
Dollar Tree Rope Pumpkins
Turn paper plates and Dollar Tree rope into cute pumpkins! You can make this easy fall decoration in about half an hour with just a few basic craft supplies.
Equipment
- Hot Glue Gun
Ingredients
- Sturdy Paper Plates like Chinet brand
- Rope from Dollar Tree I used the 11 ft lengths
- Sticks to make stems
- Ribbon, leaves, pipe cleaners, moss, etc. to decorate pumpkins
Instructions
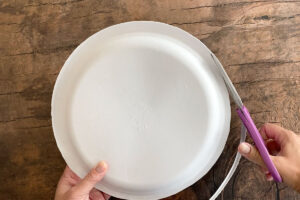
- Flip the paper plate over so the back side is up. Cut off the lip around the very edge that sticks up. Measure across the paper plate to find the center and mark it.
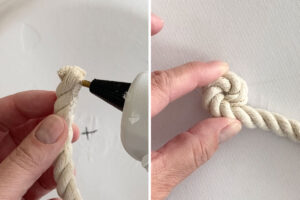
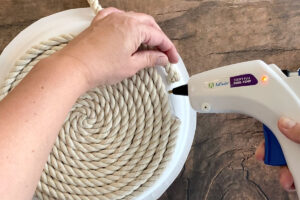
- Grab your first length of rope and cut off the taped edge. On the side of the rope, place some hot glue down down about an inch (as shown in the photo) and then roll it onto itself to create a spiral. Hold it for a minute to let the glue cool, the put some glue on the back of the spiral and place it down on the center of the plate to adhere.
- Place a line of hot glue just outside the spiral, and press the rope into it to secure.
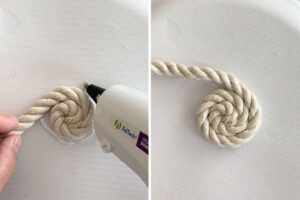
- Continue to glue the rope down on the plate in a spiral.
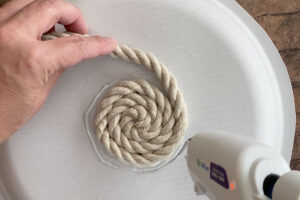
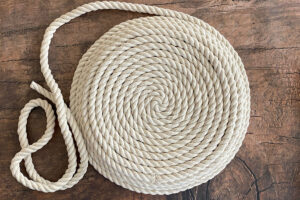
- Keep going until you have covered the entire plate or run out of rope. (One 11 ft length of rope will cover a 6-7 inch plate completely; if you are using a 10 inch plate you will need two lengths of rope.) To attach new rope, simply trim the end of the first rope and glue it to the plate, then add glue on the end and butt a new piece of rope up against it. You will be able to see where you have added new rope, although it’s not super noticeable.
- Continue until the entire plate is covered. If your spiral ended up a little off center and most of the plate is covered but some plate is visible along one edge, just use scissors to trim it.
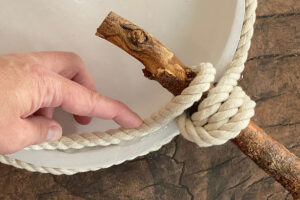
- Once the plate is covered it's time to add a stick for the stem. Place the stick behind the plate and loop the rope behind it. Use hot glue to glue the rope to the stick. Wait a moment for the glue to set.
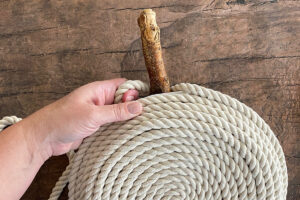
- Wrap the rope around the stick twice, hot gluing as you wrap. Wait a moment to let the glue set.
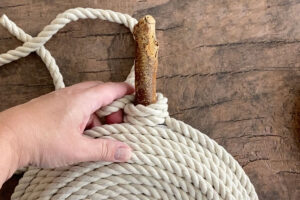
- Flip the pumpkin over and wrap the rope around the stick one more time, this time down below where it attaches to the plate. Then securely glue the end of the rope to the back of the plate. Use plenty of glue and wait a few moments to let the glue set completely.
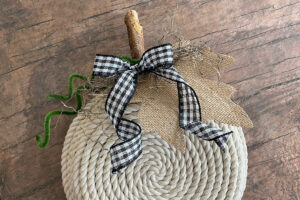
- Decorate the pumpkin as desired. I used a burlap leaf, a little spanish moss, and pipe cleaners from Dollar Tree. I also used a black and white ribbon from Hobby Lobby.
Notes
How much rope you need for each pumpkin depends on how big of a plate you start with. My larger pumpkin is made on a 10 inch Chinet dinner plate. It took two of the 11ft lengths of the rope from Dollar Tree, which are about 3/8 inch wide. The smaller pumpkins is made with a 7 inch salad plate and only took one length of rope. Please note that Dollar Tree also sells wider rope in 7 ft lengths which I have not tried using for this project.
It's best to use heavy duty, sturdy paper plates for this project. If your plates are not sturdy, you can try gluing two together and treating them as one.
If the seam where you added a new piece of rope bothers you, just make sure it is toward the top of the pumpkin when you add the stem. Then it will be covered by the finishing decorations.
If your sticks are not as wide as you'd like, you can use two per stem.
Glass pint jars work great behind the pumpkins to allow them to stand up on a shelf or mantle.