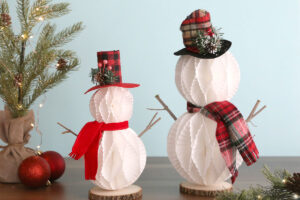
Cupcake Liner Snowmen
Learn how to turn cupcake liners into adorable paper honeycomb snowmen! This is an easy Christmas craft for adults you can complete in about half an hour.
Equipment
- Drill
- Hot Glue Gun
- Tape Runner
Ingredients
- White Cupcake Liners in two sizes
- 4 inch Wood Round
- 12 inch Bamboo Skewer
- Snowman Hat
- Fabric Strip or Ribbon
- Twigs
Instructions
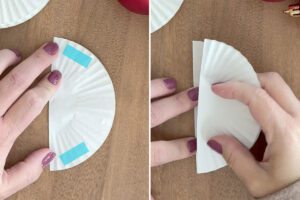
- Flatten out 12 cupcake liners. Fold each one in half. Open it back up, and add tape runner adhesive perpendicular to the fold on the crimped section only. Fold it back down and press to adhere.

- Add a short strip of adhesive near the top of the folded liner and again at the bottom, as shown by the blue rectangles in the photo (at 1 and 5 on a clock). Place a second liner directly over the first and press to adhere.
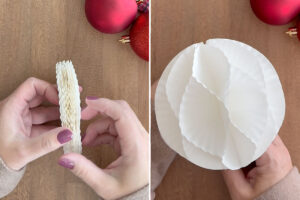
- Continue until you have a stack of all twelve liners. At this point you could open it up to create a ball. Repeat with the other size cupcake liners you are using (if you are using mini liners, you only need 10, not 12).
- Make a base by drilling a small hole in the center of the wood round and gluing the flat end of the skewer into it.
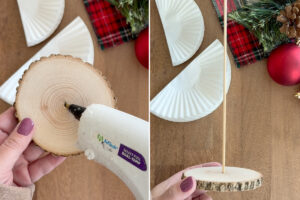
- Starting with the larger liner stack, add tape runner adhesive on the top liner at 1 and 5 like you did previously to create the stack. Then hold the stack with the folds toward you and place hot glue across all the folds, but not all the way to the top and bottom. Immediately press the folds against the skewer.
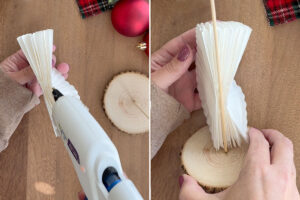
- Working quickly, grab the front and back edges of the liner stack and open it up around the skewer, allowing the folds to get glued around the skewer. Press the top and bottom liners together where the tape runner is to adhere. Fluff out the ball as needed.
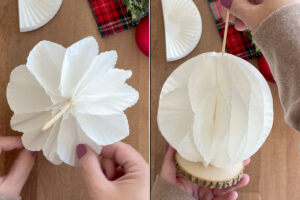
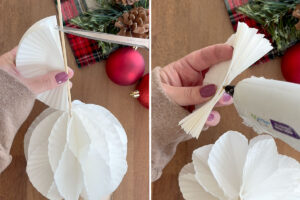
- You'll repeat this process for the top ball, but first, measure how high it will go and cut or break off the skewer just below that point. Then repeat the process: add tape runner adhesive at 1 and 5, add hot glue on the folds, press folds to skewer, open up ball around skewer and press outside liners to adhere.
- This creates the body of the snowman. At this point you can decorate it however you like. Glue a hat on top, and gently tie on a scarf made from ribbon or a strip of flannel fabric.
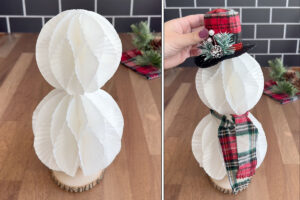
- Glue on twigs for arms and your cupcake liner snowman are complete!