DIY Floral Pumpkins using Tattoo Transfer
Ingredients
- Tattoo Paper
- Printer
- Scissors
- Damp Cloth
- Matte Poly Spray optional
Instructions
- Print the design on the glossy side of the printable tattoo sheet. Be sure your design is a mirror image before you print it (if you are using my design, it has already been mirrored). Allow the design to dry before continuing - this may only take a minute or two depending on the ink you are using.

- Remove the backing from an adhesive sheet and place the adhesive face down on your printed design. I like to pull the backing off of one corner of the adhesive sheet and line it up on my printed sheet, then continue to pull off the backing and press the adhesive sheet down. Use something like a credit card to smooth the adhesive sheet down and ensure there are no bubbles.
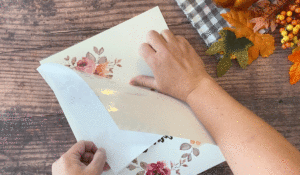
- Cut around your design. The edge of the tattoo will be less noticeable on your finished pumpkin if you cut fairly close to the design.

- Remove the clear backing. The adhesive will now be transferred onto your printed design.
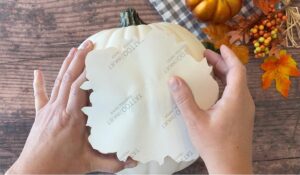
- Place the printed design sticky side down, centered on the pumpkin. At first, press only in the very middle of the design, focusing on the words. Smooth the words down, pressing the tattoo paper into the contours of the pumpkin. Then work outward from the center, pressing down the tattoo paper and following the contours of the pumpkin. You will end up with some wrinkles in the tattoo paper as you work outward because the pumpkin isn’t flat.
- Place a damp cloth over the tattoo paper. As the paper gets wet, it will get easier to press it down onto the contours of the pumpkin. Gently dab the damp cloth all over the paper. You will see the design begin to show through and the paper will loosen.
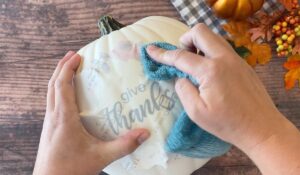
- Slowly peel away the paper. Use the damp cloth to smooth the tattoo over the pumpkin. The tattoo will wrinkly in some places; use the damp cloth to press those wrinkles down. Continue to use the damp cloth to thoroughly smooth the tattoo across the pumpkin, ensuring there are no air bubbles, and flattening down any wrinkles.

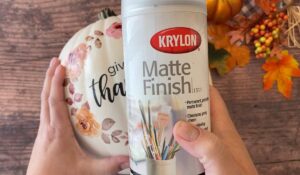
- Allow pumpkin to dry for 10 minutes, and then seal with a matte finish poly spray. This protects the tattoo transfer. Additionally, the matte finish makes it look better.
Notes
Temporary tattoo paper comes with two different sheets: a printable sheet and an adhesive sheet. Be sure to print your design on the glossy side of the printable sheet.
My download includes two different designs: a smaller floral design that fits well on a 6.5 inch craft pumpkin and a larger floral wreath with words that fits well on a 9 inch craft pumpkin.