
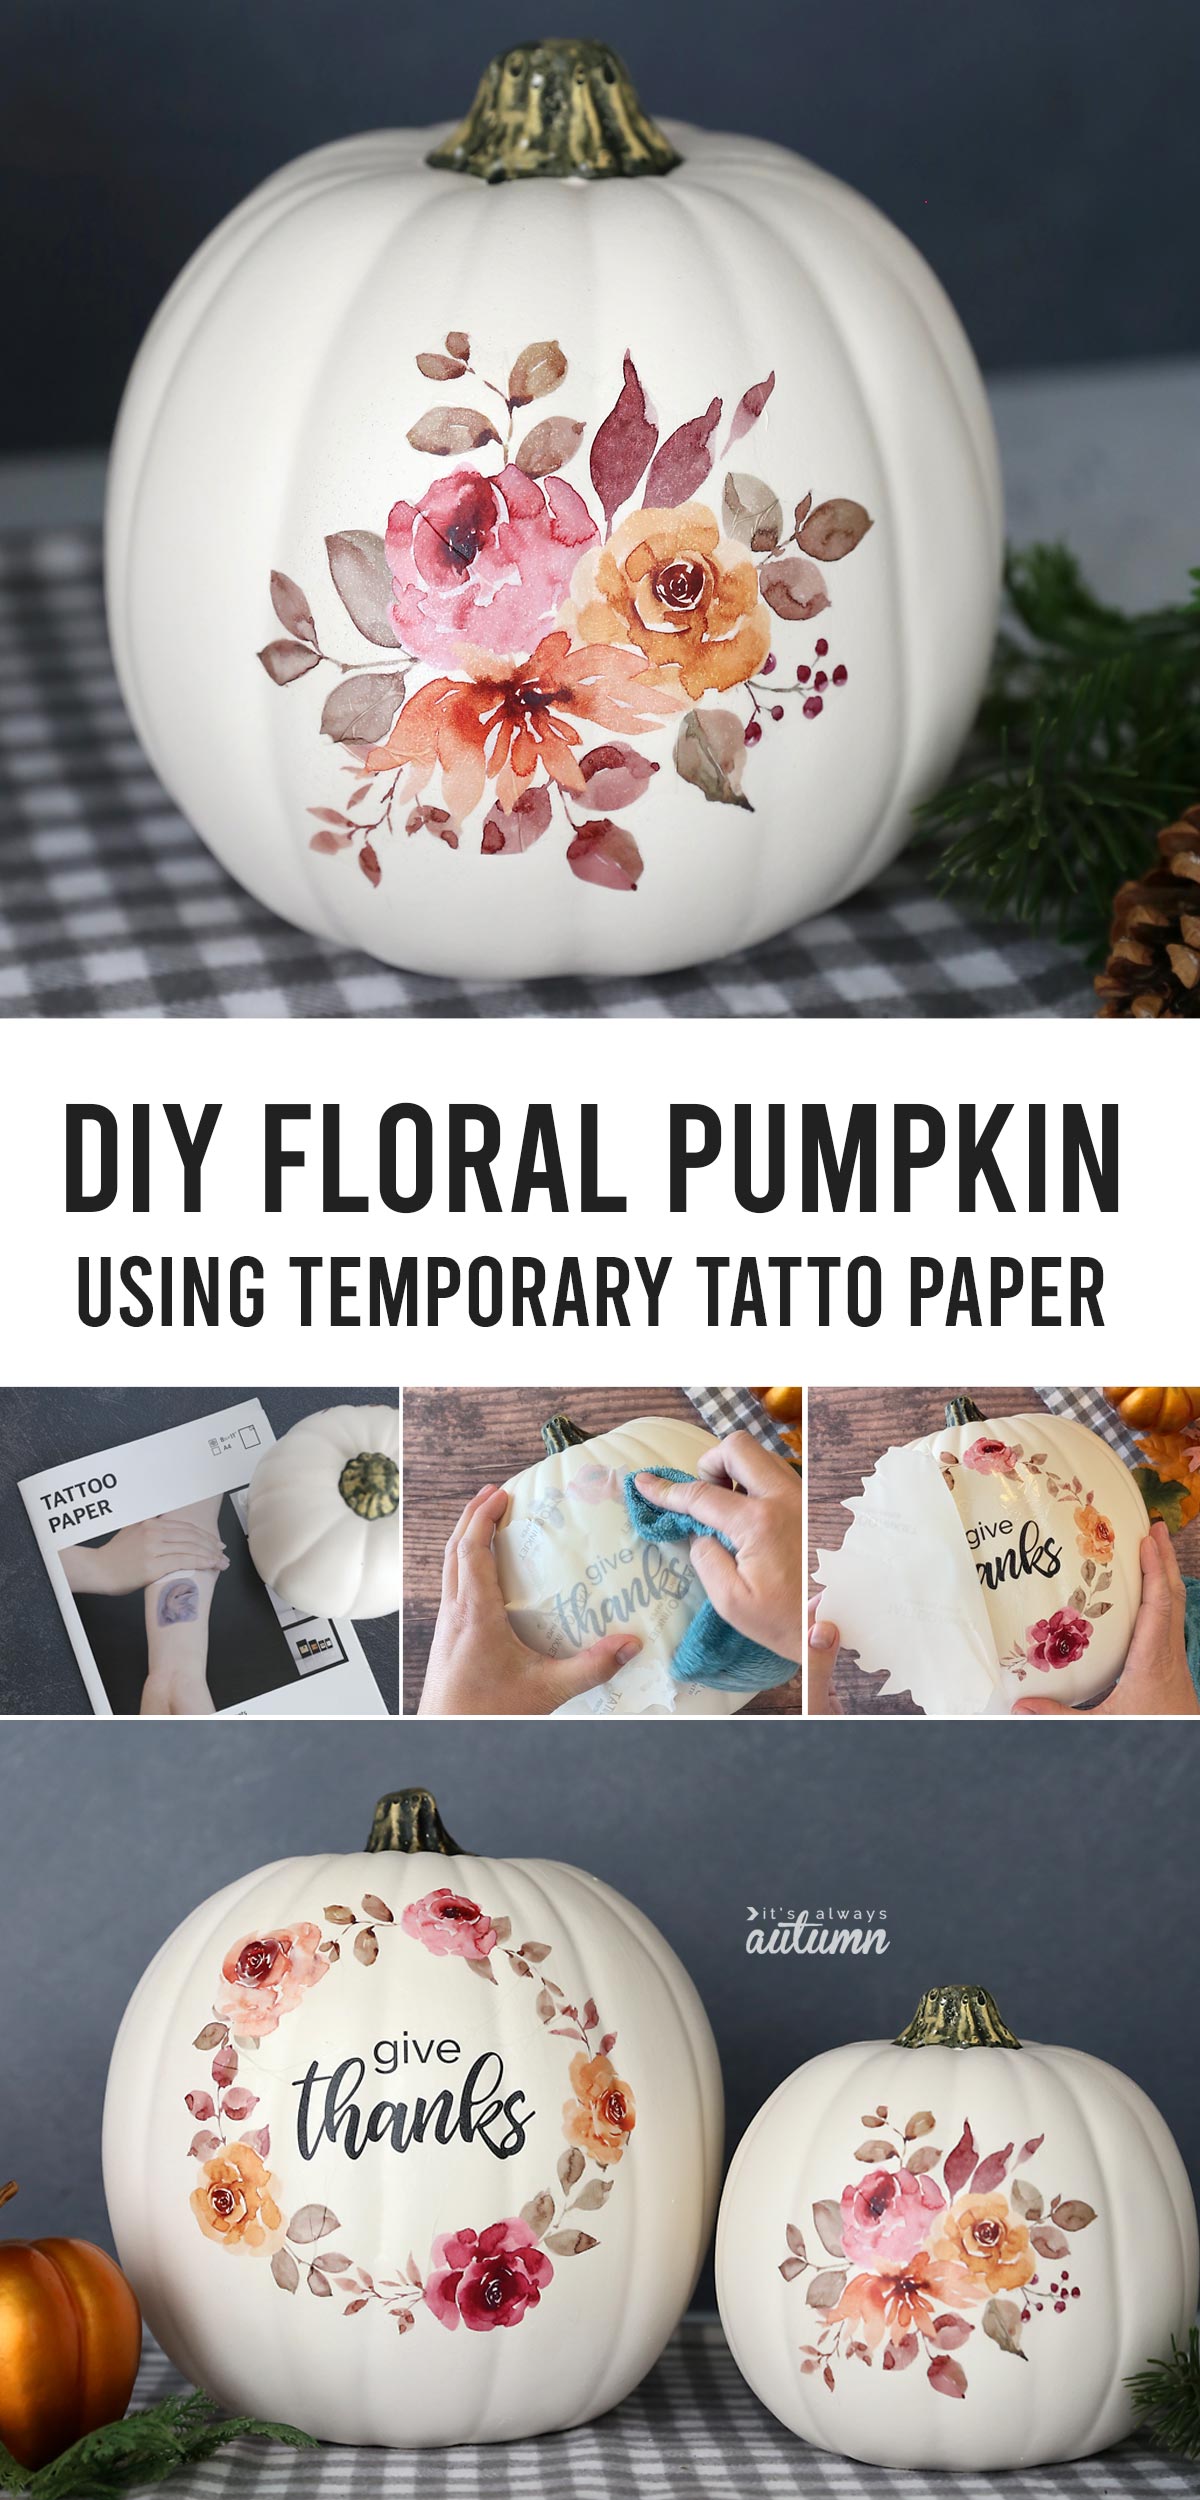
In today’s post: Learn how to use temporary tattoo paper to transfer a gorgeous floral design onto a craft pumpkin.
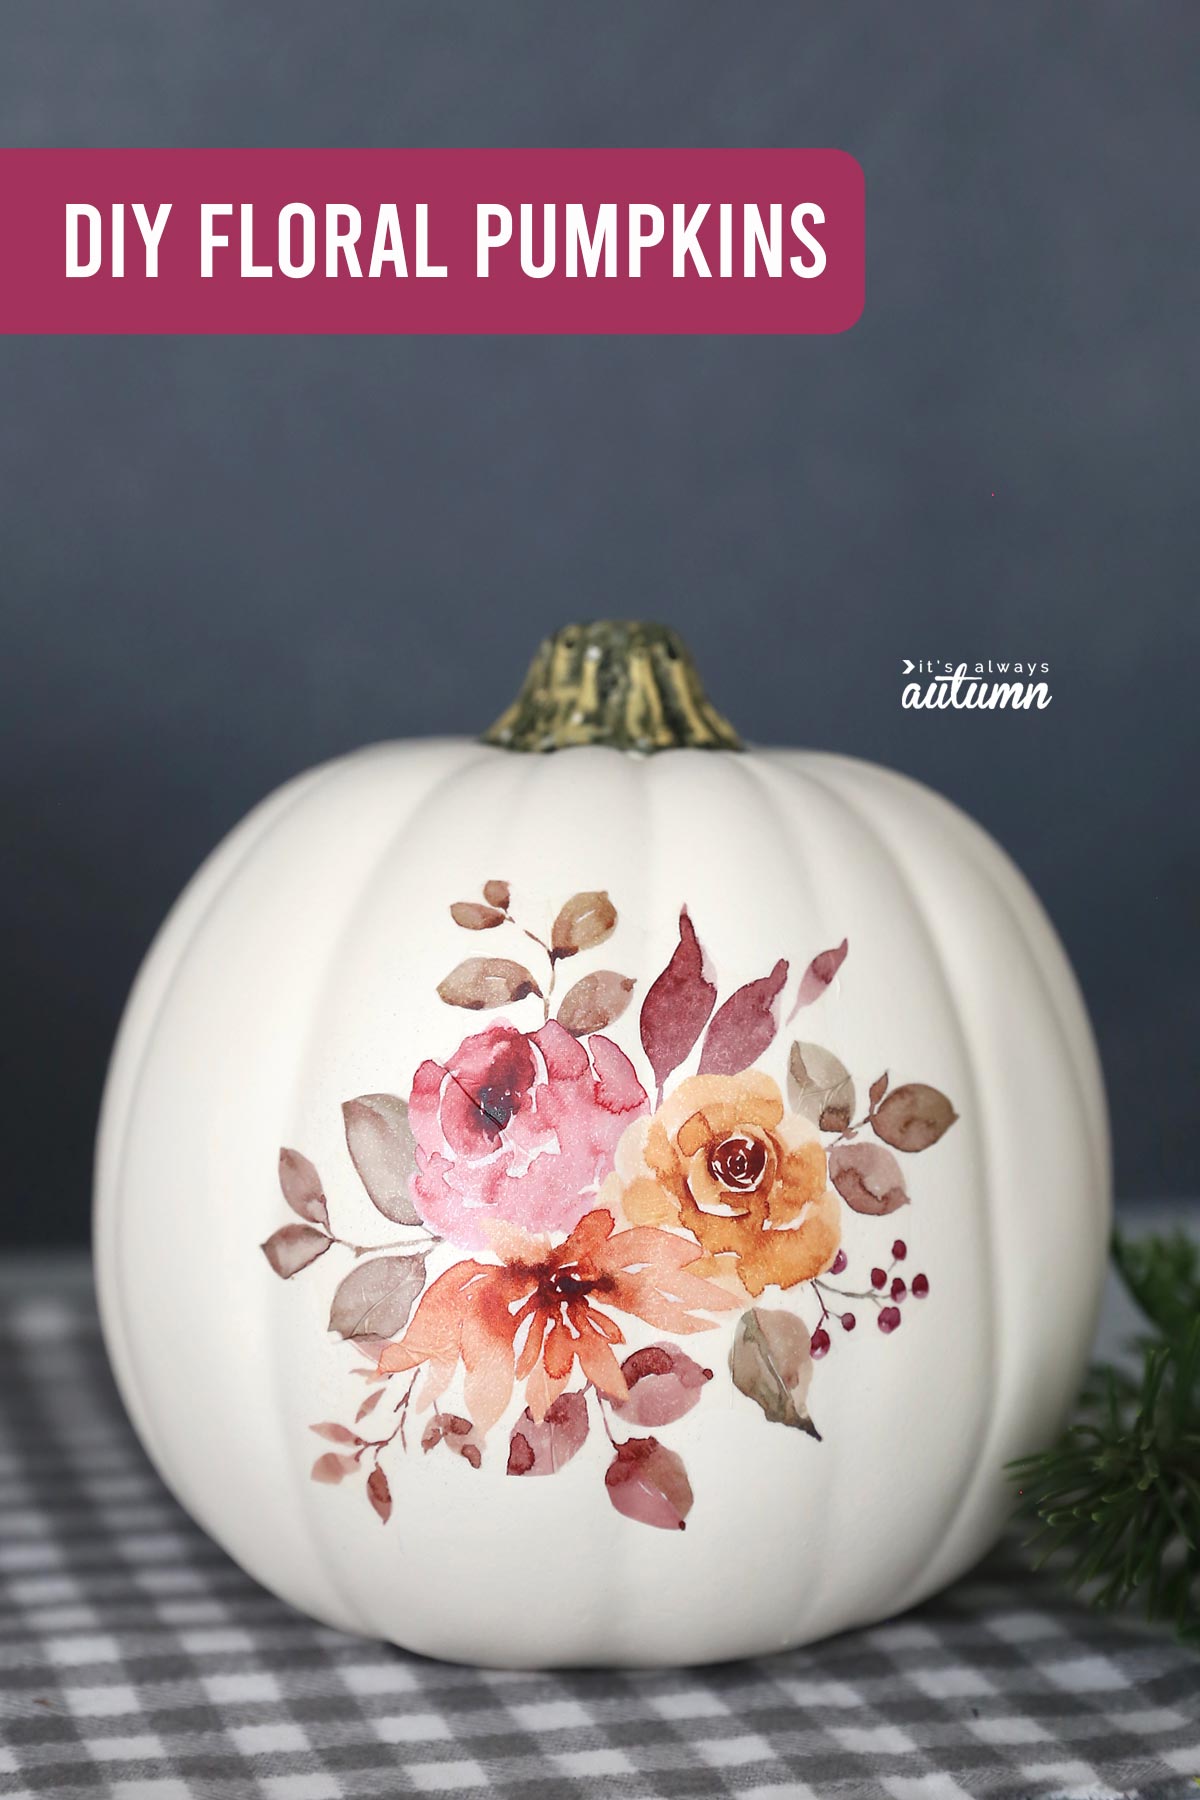
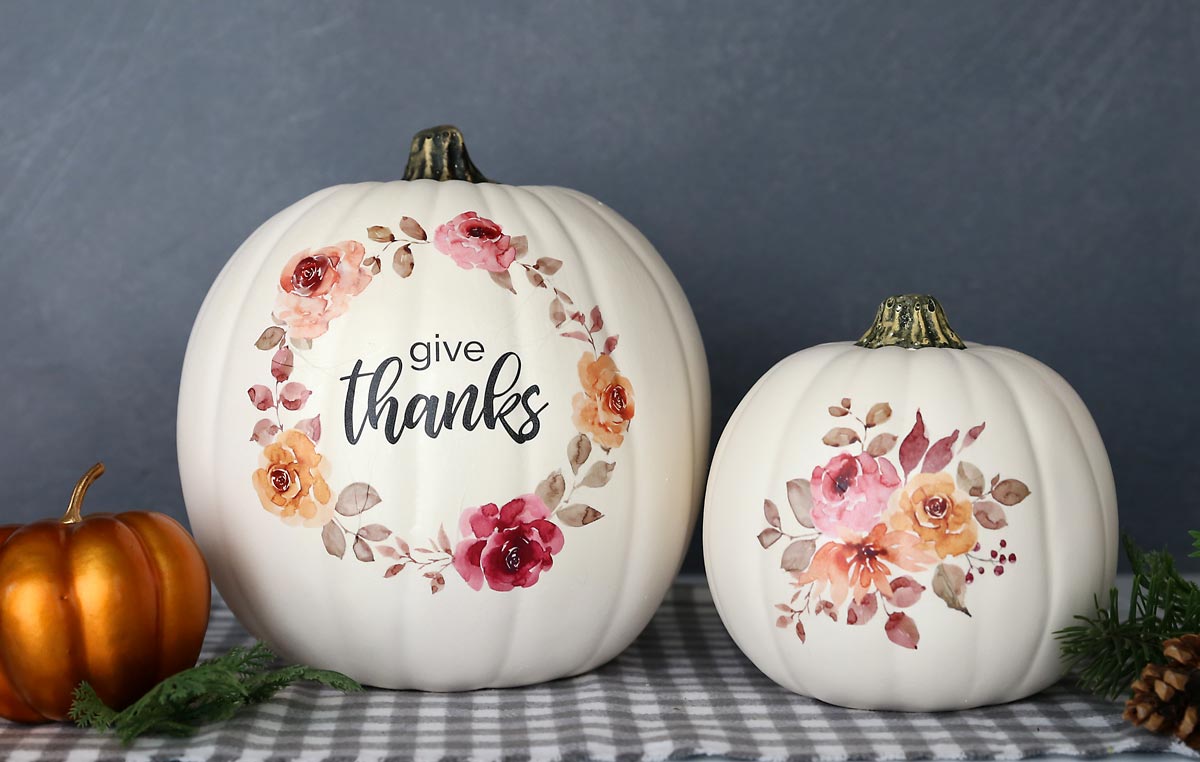
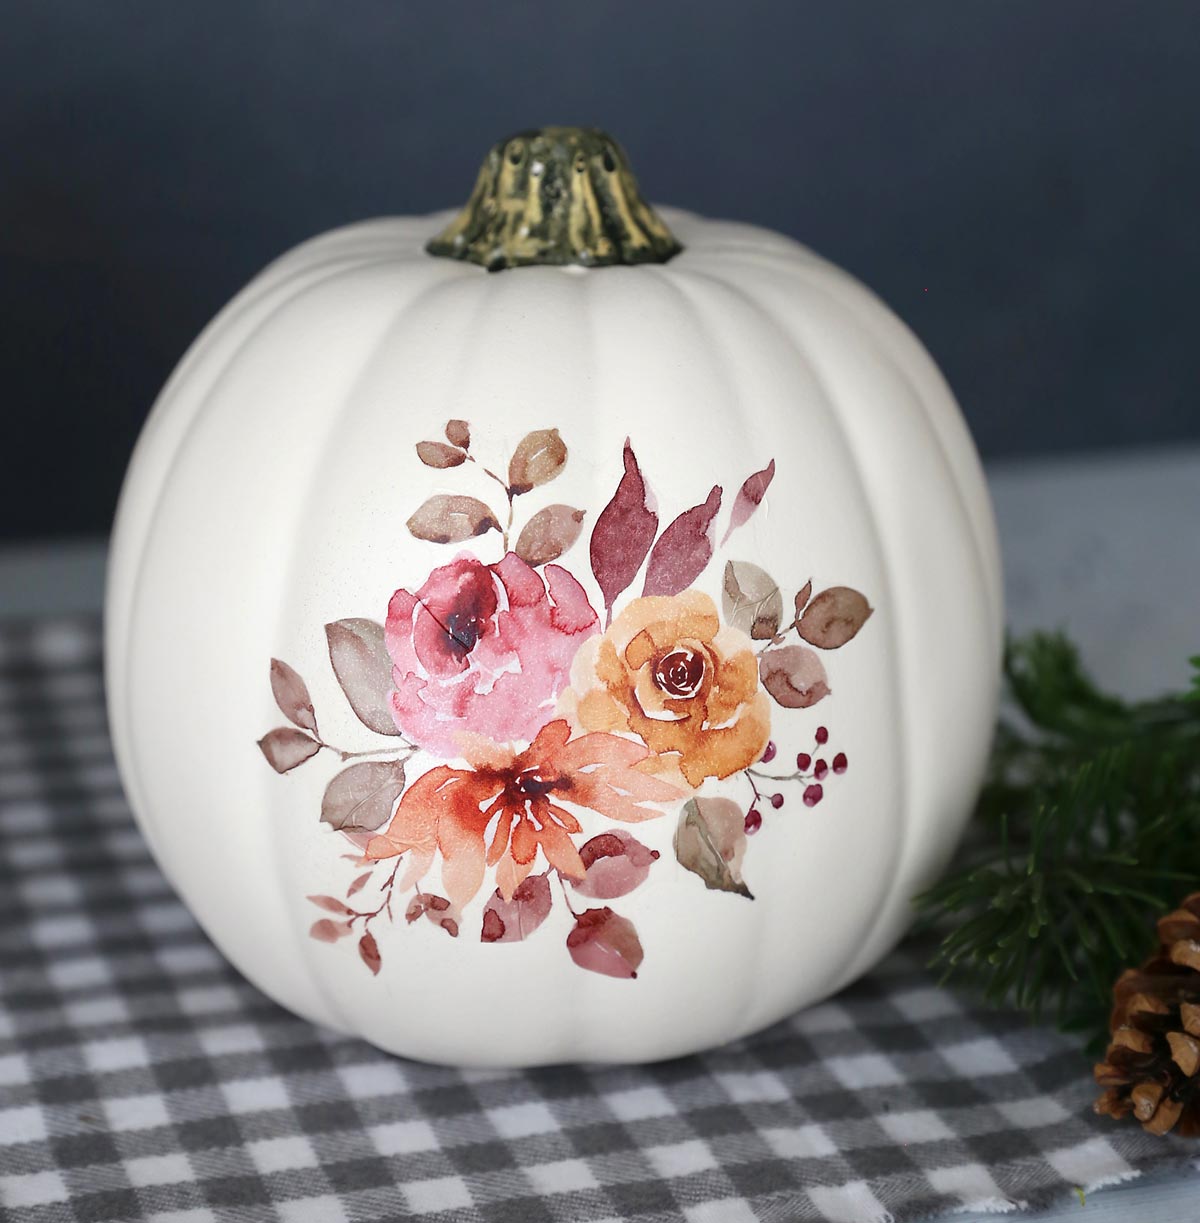
I really like easy craft projects. I especially like easy projects that look like they took way more time than they did, like today’s gorgeous floral pumpkins. They’re so pretty that they look hand painted, but you can make one in under 20 minutes!
And you can make the set of two in about half an hour. I have a free printable design for you, as well as step by step instructions and a video that will teach you exactly how to make them.
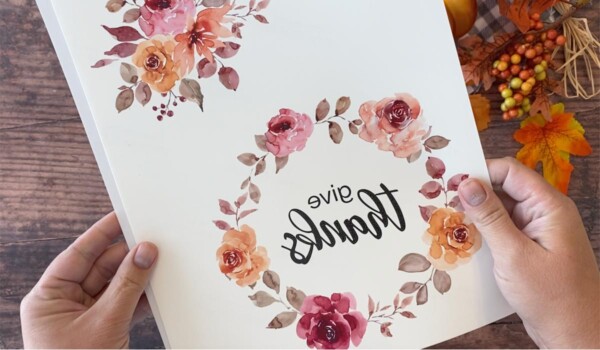
NOTE: The gorgeous watercolor florals I used on these pumpkins were created by the etsy shop Verya Studio. I am using them here (and offering a free download for you) with permission. Please visit Verya Studio for more hand painted watercolor clipart.
Floral Tattoo Pumpkins
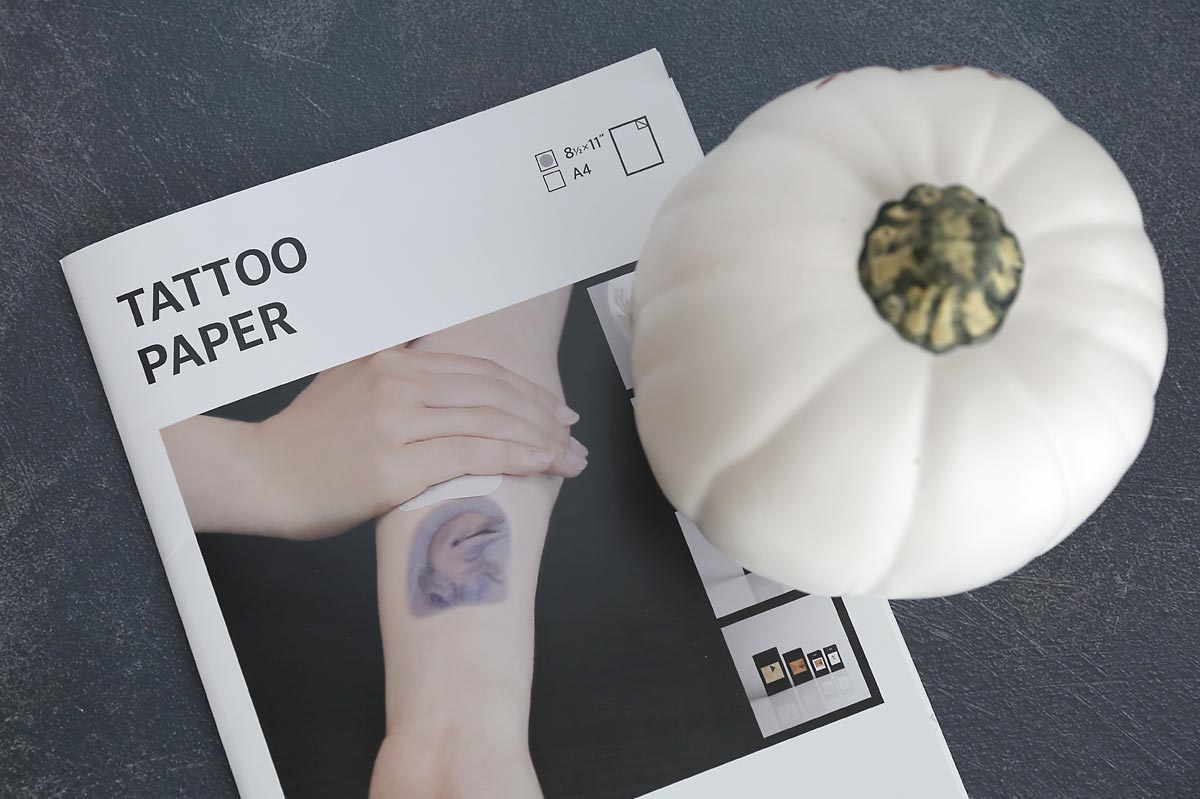
The secret weapon for today’s craft is Temporary Tattoo Paper. Remember the temporary tattoos you used to love as a kid? Well, that’s what we are using to transfer our pretty floral design onto craft pumpkins.
I’ve used tattoo paper before to transfer photos onto canvas as well as doing photo transfers to wood. I really love this method for transferring designs because it’s absolutely the easiest method I’ve ever seen (and I’ve done LOTS of photo projects!).
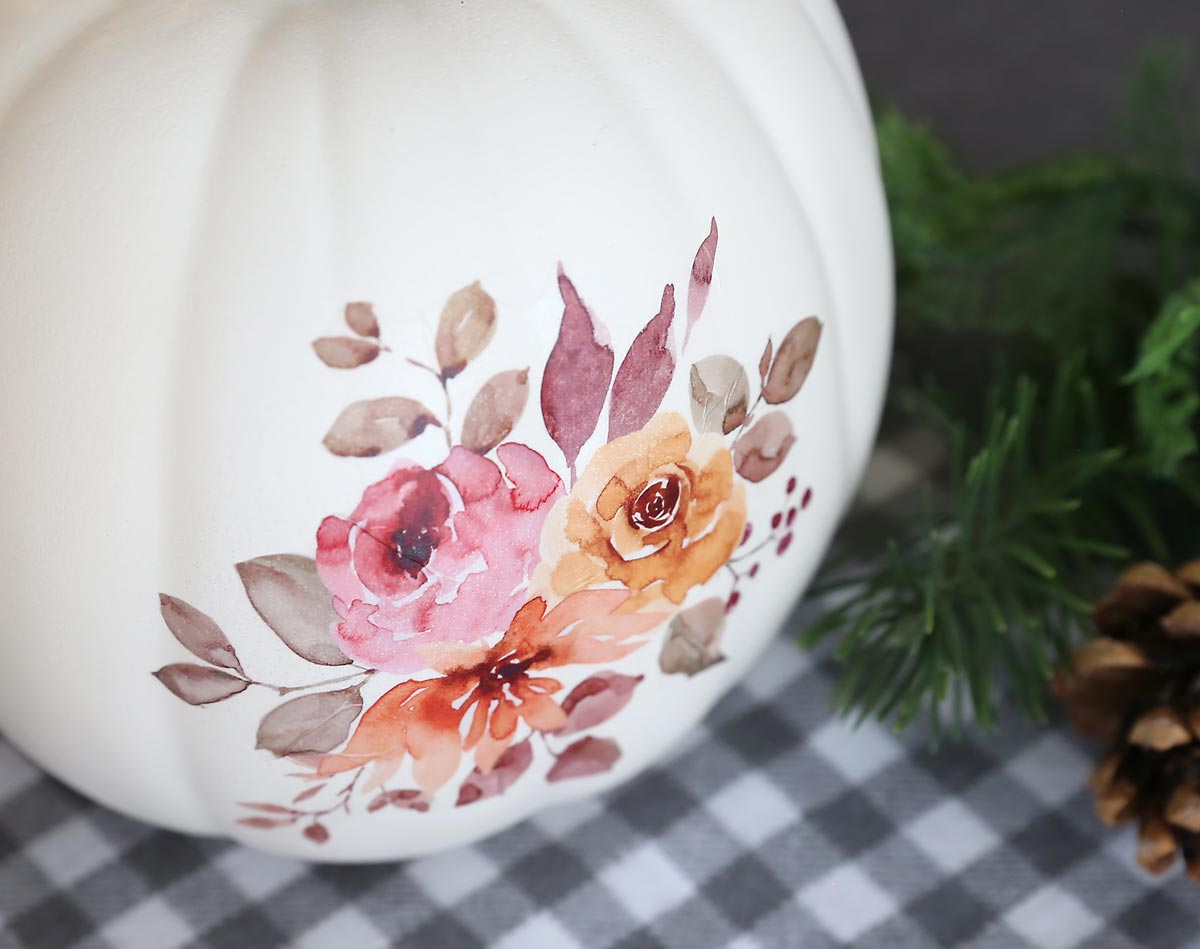
Other photo/design transfer methods require lots of time consuming steps, but tattoo transfers are super simple. And they turn out beautifully! Look at the edge of the design on this craft pumpkin – you really can’t tell it wasn’t painted.
Tattoo Transfer Supplies
To make a set of pretty floral tattoo pumpkins, you will need:
- The Printable Design: CLICK HERE to download a page that contains both floral designs
- InkJet Printer
- Temporary Tattoo Paper for inkjet printers: for today’s project I used this tattoo paper found on Amazon. I was very pleased with how it worked and if you will be making multiple projects it’s a great value. I have used this brand of tattoo paper in the past which may be cheaper if you are only doing one project, but it only comes with two sheets which can be super frustrating if you end up making a mistake.
- Craft pumpkins – I used Ashland brand cream colored craft pumpkins from Michael’s, one 9 inch and one 6.5 inch
- Popsicle stick, ruler, credit card, or something else with a straight edge for smoothing the adhesive sheet
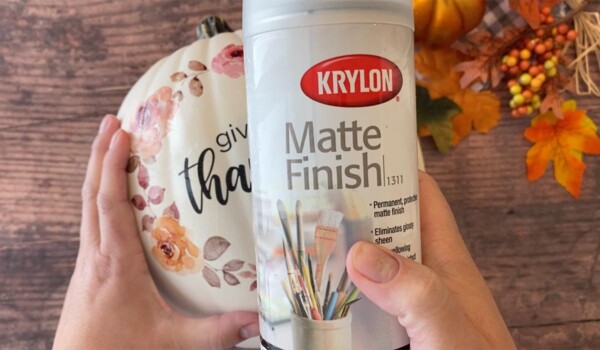
- Matte Finish spray (optional but it really improves the finished look)
Floral Tattoo Pumpkins VIDEO
Watch the video below to see how to make these pumpkins. Printable instructions with step by step photos follow the video.
DIY Floral Pumpkins using Tattoo Transfer
Supplies
- Tattoo Paper
- Printer
- Scissors
- Damp Cloth
- Matte Poly Spray optional
Want more project ideas? Sign up to get my favorite easy crafts and recipes straight to your inbox!
Instructions
- Print the design on the glossy side of the printable tattoo sheet. Be sure your design is a mirror image before you print it (if you are using my design, it has already been mirrored). Allow the design to dry before continuing - this may only take a minute or two depending on the ink you are using.

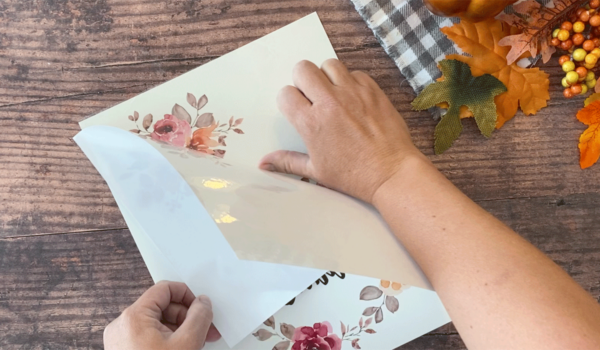
- Remove the backing from an adhesive sheet and place the adhesive face down on your printed design. I like to pull the backing off of one corner of the adhesive sheet and line it up on my printed sheet, then continue to pull off the backing and press the adhesive sheet down. Use something like a credit card to smooth the adhesive sheet down and ensure there are no bubbles.
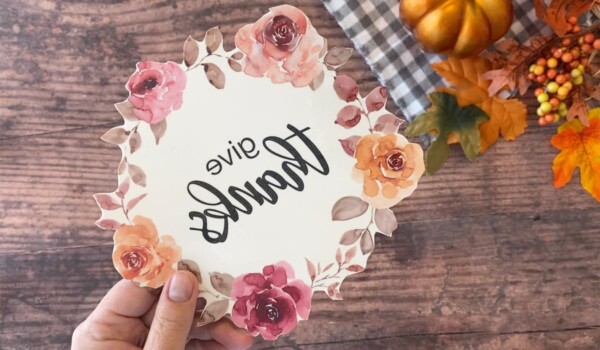
- Cut around your design. The edge of the tattoo will be less noticeable on your finished pumpkin if you cut fairly close to the design.
- Remove the clear backing. The adhesive will now be transferred onto your printed design.
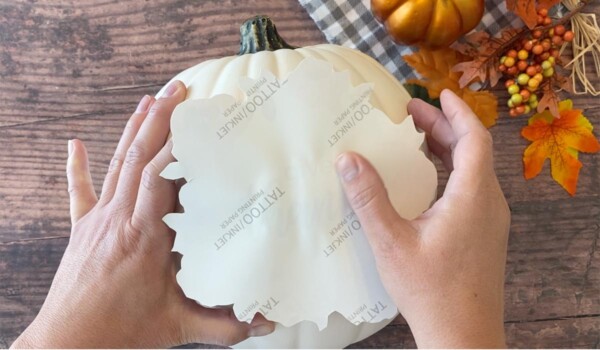
- Place the printed design sticky side down, centered on the pumpkin. At first, press only in the very middle of the design, focusing on the words. Smooth the words down, pressing the tattoo paper into the contours of the pumpkin. Then work outward from the center, pressing down the tattoo paper and following the contours of the pumpkin. You will end up with some wrinkles in the tattoo paper as you work outward because the pumpkin isn’t flat.
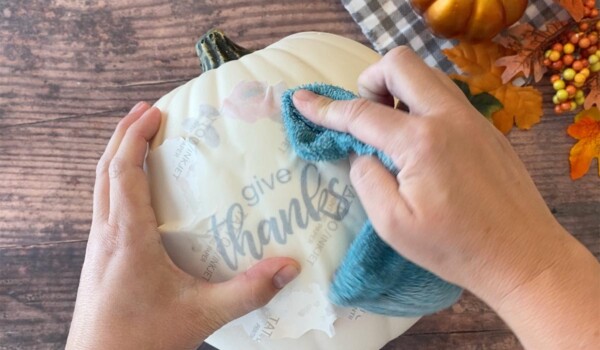
- Place a damp cloth over the tattoo paper. As the paper gets wet, it will get easier to press it down onto the contours of the pumpkin. Gently dab the damp cloth all over the paper. You will see the design begin to show through and the paper will loosen.
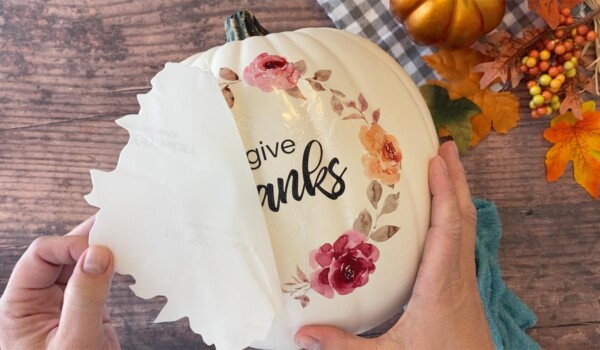
- Slowly peel away the paper. Use the damp cloth to smooth the tattoo over the pumpkin. The tattoo will wrinkly in some places; use the damp cloth to press those wrinkles down. Continue to use the damp cloth to thoroughly smooth the tattoo across the pumpkin, ensuring there are no air bubbles, and flattening down any wrinkles.
- Allow pumpkin to dry for 10 minutes, and then seal with a matte finish poly spray. This protects the tattoo transfer. Additionally, the matte finish makes it look better.
Tips
Kelly Drakey says
Would this work on real pumpkins? I guess it’s a lot of effort for something you would throw out! ha. But just curious because the cute white pumpkins at my grocery store are 2 for $5.
Autumn says
I think it probably would, but I haven’t tried it. I have used tattoo paper on a number of surfaces before and it’s always worked well!
Victoria says
Super cute!
Would love to know what printer you use?
I’ve tried to print with tattoo paper and it doesn’t make it through my printer sadly.
C kelly says
Would this work on glass candle jars with copied photographs on injet printer
Autumn Baldwin says
It should!