
Folded Book Christmas Tree
Learn how to turn an old book into a pretty folded paper Christmas tree.
Ingredients
- Paperback Book at least 3/4 inch thick
Optional Supplies
- Red Twine
- Star Decoration
- Glue Gun
- Picture Frame larger than book when opened
- White Cardstock cut to fit the frame
Instructions
- If your book is more than 1 inch thick, use an exacto or utility knife to cut it down to 1 inch (depending on the thickness of the paper this will generally be between 300-400 pages). Open the book at 1 inch and slice down the spine, discarding the excess pages or saving them for another craft project.

- Determine the halfway point of your book based on how many pages long it is now. Open the book wide at the halfway point and crease the spine. Crease the spine 3 times before the middle crease and 3 times after the middle crease at 25 page intervals. This will help the book lay open.

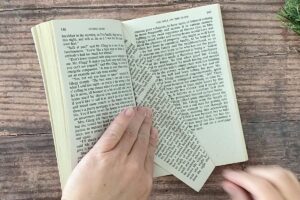
- You are going to start folding 50 numbered pages before the halfway point and finish folding 50 numbered pages after your halfway point to create the Christmas tree in the middle of your book. (That is 50 numbered pages, so 25 actual folds before and after the center point.)Starting 50 numbered pages before the halfway point, open the book up wide. Take the top right hand corner of the page and fold it down to the center of the book, as far as it will go. Make a tight, clean fold and crease it well.

- Fold the same page again, this time taking the first folded edge into the center, as far as it will go. Crease.
- A small corner of the page will now be hanging past the bottom of the book. Fold it down along the bottom edge of the book to crease. This will make a small triangle that you can tuck inside the original fold so there is a straight edge along the bottom.
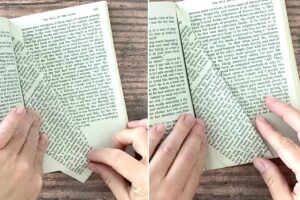
- Turn the folded page to the left, and repeat with the next page. Remember, you will be folding about 50 total pages (100 numbered pages). As you get more pages folded, it will become a little harder to make a nice fold, especially at the top. You can use your fingernail or fingernail file (or even a toothpick) to turn the paper at that top corner and get a sharp fold.

- Continue until you have about 50 folded pages and the Christmas tree looks full and the book lies flat. If your pages are a little thicker, you may only need 40 folded pages.

- If desired, decorate the Christmas tree. Hot glue rows of twine so they appear to wrap around the tree. Hot glue a star decoration on top.

- If you'd like your tree to sit in a frame, make sure the frame has a piece of white cardstock in it. Stand the frame up horizontally and set the book in it. You can hot glue the book to the white cardstock to make it more stable if desired.

Notes
You can purchase inexpensive paperback books at the dollar store or the thrift store. I prefer to use Classics from the thrift store because they are less likely to include curse words that might show in the finished project.
I used a mass market paperback book, which is nearly 7 inches tall and 4.25 inches wide, and an 8x10 picture frame.