
Skeleton Candy Bowl
Learn how to make an adorable Skeleton Candy Bowl inspired by the Pottery Barn version for a fraction of the price! This is an easy Halloween craft idea for adults.
Ingredients
- 3 ft Plastic Skeleton
- Sculpey Air Dry Clay about 1 pound
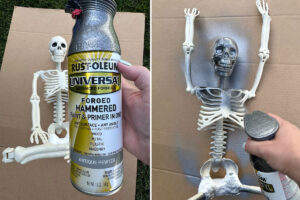
- Hammered Spray Paint
- Large Plastic Bowl
Instructions
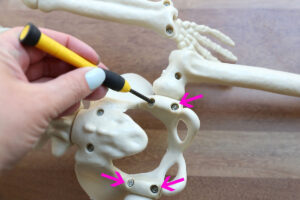
- Remove the screws in the back of the skeleton's hip joints so you can take off the legs.
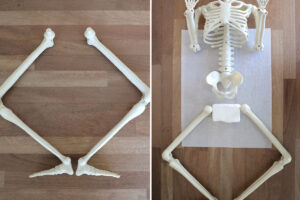
- Place the legs with the knees pointing out to create a diamond shape as shown. Place a block of air dry clay between the top of the leg bones and lay the body of the skeleton above it.
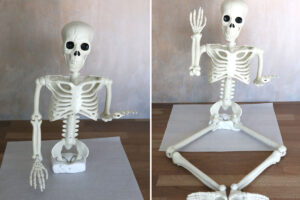
- Stand the skeleton’s body up and press it down into the clay block. You’ll want the skeleton to lean slightly forward. Take each leg and press the joint into the clay block as well, right in front of the skeleton’s hip bones. Make sure the legs are still in a diamond shape with the feet flexed and the heels touching.
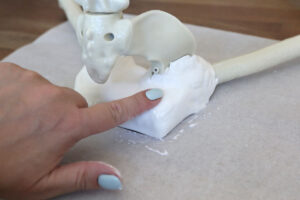
- Use more clay to cover the joints at the top of the legs and secure everything together. Use enough clay to keep the skeleton sitting up and secure the legs back to the body. Again, make sure the heels of the skeleton are together.
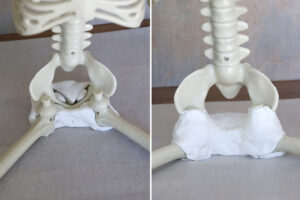
- When you are done adding clay, dip your fingers in some water and smooth out the clay. You don’t need to worry about making this look perfect; this portion of the skeleton will not be visible because the bowl of candy will sit in front of it.
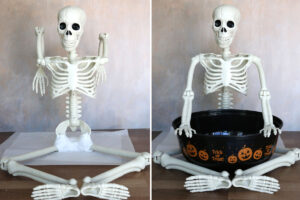
- Now you need to let the clay dry THOROUGHLY before proceeding. Depending on the humidity in your area, this could take up to three full days. If the clay feels cold when you touch it, that means it’s still wet. To make sure the skeleton doesn’t lean too far forward while drying, either pull its arms up and over its head OR place a bowl under its arms as you see in the photos below. Remember to lay the skeleton down for part of the dry time so the underside of the base dries as well. The clay may crack as it dries.
- Lay the skeleton down on some cardboard and spray paint the front and the underside. Once that is dry, sit the skeleton up and spray paint the backside and touch up the front. Spray paint whatever bowl you are using as well.
- Once the paint is fully dry, you can start using your candy bowl. Sit the skeleton up and place the bowl in right in front of the base, with the legs extending around it. Rest the skeleton hands on the edge of the bowl, then fill the bowl with wrapped candy.

Notes
Get the plastic skeleton here
The bowl is not foodsafe once it has been painted, so only place wrapped candy inside it.