It's Always Autumn

creative tutorials for everyday life

  • celebrate
    • back to school
    • birthdays
    • Christmas
    • Easter
    • Halloween
    • handmade gifts
    • July 4th
    • Mother’s Day/Father’s Day
    • Valentine’s
  • recipes
    • bread
    • dessert
    • main dish
    • side dish
  • sewing tutorials
    • gifts
    • how to sew
    • kids
    • patterns
    • refashion
    • women
  • photography
    • photo display
    • photo editing
    • photography tips
    • posing
  • printables
    • holiday
    • LDS
  • books
  • fun for kids
  • tips & tricks
  • FAQ

favorites fun for kids

tissue transfer art {easy kid art project!}

My younger kids and I have had so much fun today with a new art project: easy tissue transfer art. It’s a really simple process that even my 5-year-old could do all on her own, but you end up with a final product that looks like a beautiful art piece!

Tissue transfer art is not only gorgeous, it's totally easy enough for kids to make! Fun kid's art project - perfect indoor activity for rainy days.

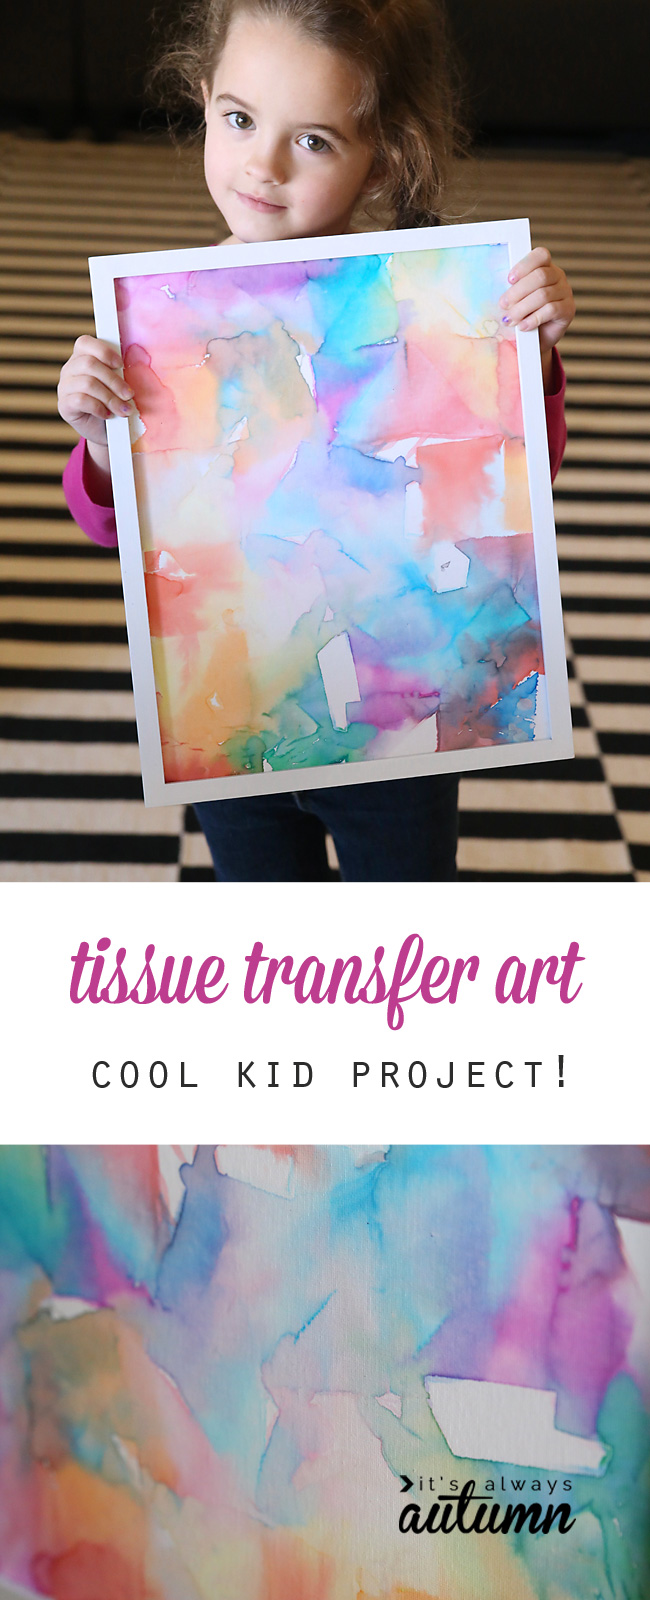
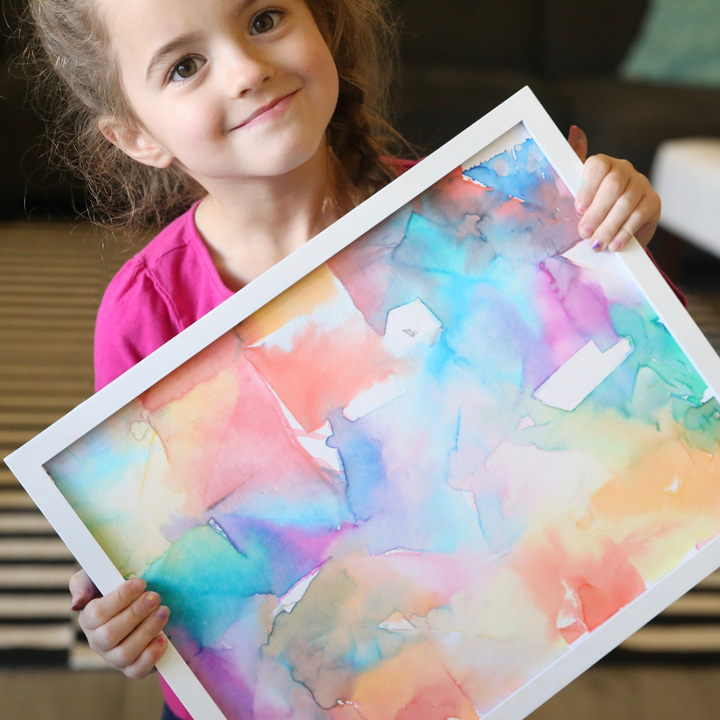
Doesn’t this look like something you could buy to decorate your home with?
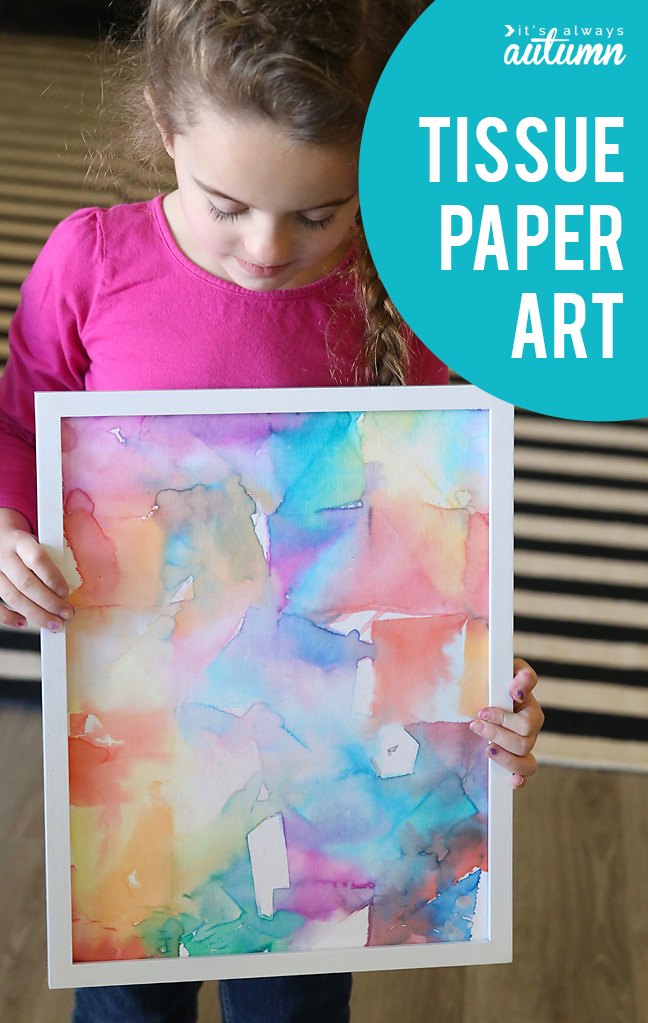
Tissue transfer art is not only gorgeous, it's totally easy enough for kids to make! Fun kid's art project - perfect indoor activity for rainy days.

MY LATEST VIDEOS
MY LATEST VIDEOS

Here’s the girl that made it (all by herself):

Easy kids art project made with tissue paper! How to make tissue paper art.


Cool, right? All you need to make tissue transfer art is tissue paper, a canvas, and a spray bottle.

Tissue transfer art is not only gorgeous, it's totally easy enough for kids to make! Fun kid's art project - perfect indoor activity for rainy days.

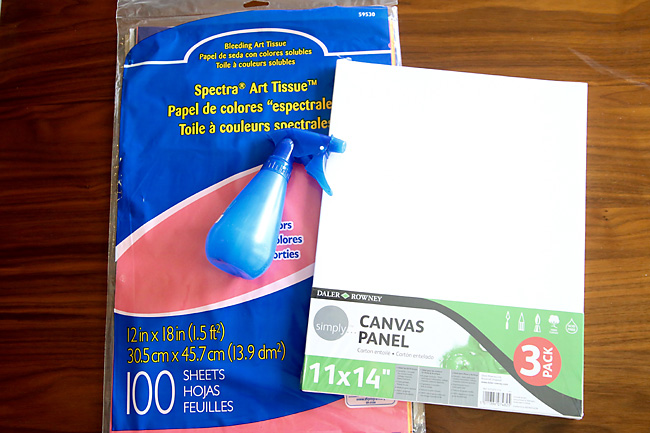
I first tried this project with tissue paper from the dollar store and it didn’t work AT ALL. So I turned to Amazon and found this Bleeding Art Tissue for about $7 (affiliate link). It bleeds through onto the canvas beautifully! We made three 11×14 canvases and have TONS of tissue paper left, so it will last us through lots of projects.

I found the flat canvas panels at Walmart for $5 for three 11×14 panels which I thought was really reasonable. The flat panels are nice because you can pop them into an inexpensive frame if you want. You can find canvas panels on Amazon – get twelve 8×10 panels for $13 here. If you want to do tissue transfer art over and over (and we will!), you can also use watercolor paper.

The process is simple: use the spray bottle to get the canvas fairly wet. Cut tissue paper into desired shapes (we used triangles) and place them on the canvas. You can put them in a single layer, or overlap them for more color mix. Spray a little more water on top of the tissue paper, then wait 20 minutes. Remove the wet tissue paper and let the canvas dry completely.

Tissue transfer art is not only gorgeous, it's totally easy enough for kids to make! Fun kid's art project - perfect indoor activity for rainy days.


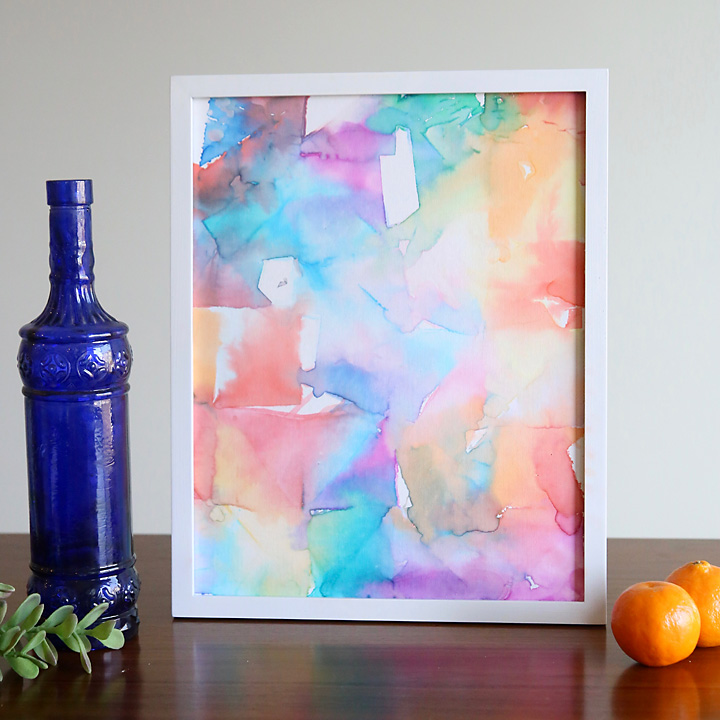
The colors will bleed from the tissue paper onto the canvas, creating a pretty watercolor effect.


We found that the colors continue to blend and seep into the canvas for a little while after the tissue paper is removed, so the final project looks even cooler when it’s completely dry. I love the texture of the canvas panel – it really makes this look like a work of art! My daughter is thrilled with her artwork.

Tissue transfer art is not only gorgeous, it's totally easy enough for kids to make! Fun kid's art project - perfect indoor activity for rainy days.

Here’s a video to show just how easy it is:

A few more tips:

  • We didn’t use the 2 or 3 darkest colors in the tissue paper pack because I found they bled too much and overtook other colors, and we didn’t use the 2 lightest colors because they didn’t transfer very well.
  • The color will bleed onto anything the wet tissue paper touches, so be sure to protect your work surface and realize you’ll end up with colored fingertips for a day or so.

Tissue transfer art is not only gorgeous, it's totally easy enough for kids to make! Fun kid's art project - perfect indoor activity for rainy days.

For more kid art, check out these posts:

20 kid art projects pretty enough to frame

Gorgeous fired alcohol ink art

Fingerprint art for kids

You may also like:

  • witch hat surprise cookies {easy Halloween treat for kids}witch hat surprise cookies {easy Halloween treat for kids}
  • DIY hallway laser maze {indoor fun for kids}DIY hallway laser maze {indoor fun for kids}
  • How to make gorgeous fired alcohol ink art {it’s so easy!!}How to make gorgeous fired alcohol ink art {it’s so easy!!}
  • 101 summer fun ideas that kids can do at home101 summer fun ideas that kids can do at home

Share this:

  • Tweet
  • Print


68 Comments

« sweater to dress upcycle {easy sewing tutorial}
easy heart shaped cinnamon rolls for Valetine’s Day »

Comments

  1. Catherine Harnisch says

    January 13, 2016 at 6:34 am

    What a great idea. I wonder how it would work if you used the fabric treated to go through a printer.

    Reply
  2. Karen Haywood says

    January 13, 2016 at 7:48 am

    This is so cool! Bravo to your little one 🙂

    Reply
  3. Chelsea @ Life With My LIttles says

    January 13, 2016 at 12:53 pm

    This is so pretty! I would love to do this with my kids as decor for our new home!! Thanks for the idea!

    Reply
  4. kathy says

    January 13, 2016 at 1:23 pm

    What a great idea, I think I will do it with my 5 four year olds on grandma day. Please tell your daughter that I think her work is beautiful.

    Reply
  5. Lorraine Reynolds says

    January 15, 2016 at 6:10 pm

    Awesome idea thanks for sharing.

    Reply
  6. Nina Londeman says

    January 15, 2016 at 8:31 pm

    Very cute, my kids would love this…not to mention I want to make one too! Thanks

    Reply
  7. Beryl says

    January 15, 2016 at 10:37 pm

    Fabulous idea, thank you.

    Reply
  8. Judy Dewalt says

    January 17, 2016 at 4:09 am

    I LOVE this. I work in a memory care community and I think my residents could do this. I am getting the supplies this week. Thank you for sharing.

    Reply
  9. Karen says

    January 17, 2016 at 11:40 am

    Thanks for sharing this wonderful project! Your daughter art is just gorgeous, and so is she! Thanks for the warning that using cheap tissue paper isn’t a good idea; I definitely would have tried Dollar Store stuff! I’m curious about watercolor paper that you mentioned. How do you use it? Again, thanks for sharing!

    Reply
  10. Diane says

    February 15, 2016 at 6:17 am

    Did this project with my 2nd graders. We used orange, yellow, green and reds and white construction paper. Then they cut out the colored paper into pumpkin shapes. They turned out super cute. Or you can draw the pumpkin outline on the paper first and then add colored tissue paper.

    Reply
  11. Larissa says

    February 16, 2016 at 10:30 pm

    Bleeding tissue seems to be something that Australia hasn’t yet embraced….but I LOVE this idea, thinking I might have a play with some crepe paper and see if that works.

    Reply
    • Anne says

      November 28, 2016 at 11:54 pm

      Crepe paper works well if you spray/paint with some vinegar mixed in the water!

      Reply
  12. Kim says

    February 22, 2016 at 3:31 pm

    We did this this afternoon and my girls all loved it. We have stained hands and fingers — a sign of a fun project! Thanks for the idea!

    Reply
    • autumn says

      February 23, 2016 at 10:42 am

      Glad you guys had fun!

      Reply
  13. Katri says

    February 26, 2016 at 7:44 am

    Really pretty wall art! I might try this with my niece. 🙂

    Reply
  14. Wendy says

    March 7, 2016 at 3:22 pm

    I found it works with regular tissue paper if you use spray rubbing alcohol. The fumes could be rough though so be sure to do it in a well ventilated area.

    Reply
    • Alicia Holman says

      August 12, 2017 at 10:35 pm

      Wendy, Did the rubbing alcohol hurt the canvas at all?

      Reply
  15. Deb says

    April 19, 2016 at 12:58 pm

    Going to try this with my Grandkids. ages 4, 6, and 8. they will create a “masterpiece” for their mom’s office for Mother’s Day.
    I just ordered the tissue from Amazon, couldn’t find any store that carried it in stock.

    Reply
    • Kathie Yancy-Sleeth says

      May 1, 2016 at 5:50 pm

      Thanks for the idea. I am a preschool teacher and we will be creating this project for our mothers for Mother’s Day. Needing to find the bleeding tissue paper quickly and on a preschool teacher’s salary, I searched the web and found our local craft chain (Michaels) said they carried it. Upon visiting the store, they in fact did not carry Bleeding Art. However, a helpful sales accociate checked the item number for that brand and the exact number came up under another name…”Celebrate It”. I bought it and it works. Have your readers request help in their local stores to check the item number. May save shipping costs.

      Reply
      • Courtney says

        June 8, 2016 at 9:58 am

        Thinking of using this as a vbs project with our three year olds in childcare.
        Thanks for sharing!

        Reply
      • Amy P says

        July 19, 2016 at 12:26 am

        Thanks for the tip about the Michaels brand working – their coupons are great too!

        Reply
    • annette says

      August 11, 2017 at 5:44 am

      Walmart carries it in stock.

      Reply
  16. karen Criner says

    June 9, 2016 at 9:49 am

    Okay, you guys! This is for all the adults out there who can only draw “stick people,” just like me. This article should be named for kids and adults who draw stick people! LOL! LOL! Really, I am so serious. Going to pin this and label it, wall art. This project is so simple but the outcome is awesome. You can pick your own colors and make the art work any size your heart desires. What a good idea and how fun!

    Reply
  17. LEANNA MORRIS says

    July 9, 2016 at 11:13 am

    This is so neat even small children could do this. I’m planning this for one of the crafts we will do on vacation with my grandkids!
    Thank you for the post!

    Reply
  18. kan naito says

    July 10, 2016 at 11:02 pm

    This is so nice.I’ll do that next holiday.Not for my kids.(^_^)

    Reply
  19. cleaning says

    July 18, 2016 at 5:39 am

    Great post, what you said is really helpful to me.

    Reply
  20. شركة تنظيف خزانات بالمدينة المنورة says

    August 28, 2016 at 1:25 pm

    Great Idea
    thank you.

    Reply
  21. شركة تنظيف شقق بالمدينة المنورة says

    September 10, 2016 at 7:57 am

    many thanks for that post

    Reply
  22. شركة رش مبيدات بالمدينة المنورة says

    October 4, 2016 at 9:16 am

    many thanks for that beautiful post

    Reply
  23. Tracey says

    November 14, 2016 at 5:40 pm

    Do you have to use the “bleed” tissue paper?

    Reply
  24. Laura says

    December 11, 2016 at 2:16 pm

    Amazing project for my wedding! My niece’s and nephews and a variety of ages all did this project with me, and I’m using it as a sign for the kids’ table! I’d love to create this same watercolor effect with the table seating signs but use a card stock of some sort. Any ideas on what paper this would work best on? I still have a ton of the bleeding tissue paper left. Thanks 🙂

    Reply
  25. Saiee pant says

    December 13, 2016 at 2:48 am

    Easy and nice idea

    Reply
  26. Kris says

    January 15, 2017 at 5:53 pm

    Love it. Looks like my 3 yr old Grandson and I will do this.

    Reply
  27. Erika Coleman says

    January 20, 2017 at 11:16 pm

    What a fantastic craft for kids! I love this idea.

    Reply
  28. Paula Beamer says

    February 12, 2017 at 9:01 am

    I am going to try this with my daughter’s 3rd grade class as a Valentine’s gift but I am going to incorporate a heart outline…I think this is a beautiful project.

    Reply
  29. SONIA says

    February 18, 2017 at 4:46 am

    AMEI ESSA TÉCNICA!

    Reply
  30. Marlene. Herrick says

    February 21, 2017 at 2:41 pm

    Read that Celebrate It tissue would work. Not as dark as I thought. I thought I read alcohol will make the tissue bleed more. Help. Doing project Friday.

    Reply
  31. Javier says

    March 14, 2017 at 11:35 am

    So beautiful! What a great idea. Thank you so much for sharing! I will try it myself as soon as I get the tissue paper you recommend. I cannot wait!
    Javier

    Reply
  32. kelly says

    April 24, 2017 at 4:46 pm

    Thanks so much for this tutorial! I bought the supplies a month ago, hadn’t done them yet, and then it was Easter – so we did Easter eggs this way (dip egg in vinegar, apply dry tissue scraps, let sit for 15 mins or so.) Worked beautifully! https://www.flickr.com/photos/weavingmajor/33880572222 I can’t wait to try it on watercolor paper!

    Reply
  33. Rebeca obando says

    May 24, 2017 at 4:59 pm

    I really like this activity
    How do I send notifications to my email?

    Reply
  34. Jan Jones says

    May 29, 2017 at 5:37 am

    Thank you for sharing your experience. I bought some of the tissue paper you’re talking about, and I am glad to know about the darkest and lightest colors. I have a couple of HUGE canvasas, like 2×3 ft, maybe, that were given to me and I wasn’t sure what to do with them. I was too intimidated to try to do a painting, but I think this will turn out beautifully.

    Reply
  35. Jennifer @ Because food is love says

    June 9, 2017 at 12:02 pm

    I’ve made these with my 3 kids too! I bought 5X7 canvas panels and had each child create their own. I framed them with simple white frames and hung them in my bathroom. I love how they turned out. I love children’s art. I only hang art in our house that we created or has a special meaning to us. It’s so much more special. Love your blog!

    Reply
  36. Spencer Oldham says

    November 12, 2017 at 3:19 am

    Wonderful idea! Can’t wait to try it with my grandkids !

    Reply
  37. Ali Donohue says

    December 4, 2017 at 1:11 pm

    Missed opportunity on your site

    Hi! It looks like you’re using Amazon Associates to facilitate some affiliate linking on your site. Is that correct?

    If so, you should consider running VigLink to supplement that affiliate revenue. Our monetization tools turn your regular commercial links into revenue generating links. We have a network of over 80k merchants so we could provide backfill for all of the merchants you don’t have relationships with yet.

    If you’re more of a visual learner, watch this short video on how VigLink works:
    https://www.youtube.com/watch?v=PK_PEnG41aU

    Let me know if you’d like to learn more about this!

    Reply
  38. home page says

    December 26, 2017 at 11:08 pm

    The article you have shared here very good. This is really interesting information for me. Thanks for sharing!

    Reply
  39. Nursery Rhymes Videos says

    December 28, 2017 at 9:50 pm

    Nice creativity we have seen in your post. The way you have described your stuff is pretty cool. I like it.

    Reply
  40. Sierra Dallas says

    February 12, 2018 at 12:20 pm

    wow!such a clever idea. This fun art project develops kids creativity and helps kids mantel growth. Thanks for sharing really nice and amazing thought.

    Reply
  41. Hospital management system says

    February 19, 2018 at 5:42 am

    Many thanks for that article amazing

    Reply
  42. treatment of anaesthesia says

    May 24, 2018 at 10:50 am

    great idea for children health .

    Reply
  43. Mahsa says

    June 10, 2018 at 11:50 pm

    It’s a great project. Do u think it’s possible that it’s done on paper or any thing els instead of canvas?

    Reply
  44. Ana Kari says

    July 31, 2018 at 3:37 pm

    I’ll be trying this out soon with my students but we only have an hour for our workshops. Do you think I could dry the work with a blow dryer to speed up the process?

    Reply
  45. Pascale says

    October 22, 2018 at 9:55 pm

    Looking do to this for our daughter’s birthday. What frame did you use?

    Reply

Trackbacks

  1. Robin's Nest Spring Garland - Heart of Deborah says:
    March 11, 2016 at 7:46 am

    […] this craft I was inspired by a tissue transfer art kid’s craft. We used the same concept to create a watercolor look without watercolor paint! This specific craft […]

    Reply
  2. Summer Boredom Busters for Kids says:
    May 17, 2016 at 5:34 am

    […] Tissue Transfer Art: […]

    Reply
  3. 22 Simple Yet Fun DIY Crafts For Kids says:
    June 14, 2016 at 1:23 am

    […] image via itsalwaysautumn […]

    Reply
  4. 53 Astonishing Art Ideas for Kids - Hobbycraft Blog says:
    August 15, 2016 at 8:03 am

    […] Tissue Transfer Art by It’s Always Autumn […]

    Reply
  5. Tissue switch artwork is just not solely beautiful, it's completely straightforward sufficient for teenagers … – XmasGive.com – DIY & Home Decor Ideas says:
    January 12, 2017 at 8:53 am

    […] Previous Previous post: 29 Intelligent Kitchen Cleansing Ideas Each Clear Freak Wants To Know Search for: […]

    Reply
  6. 20 Astonishing Art Ideas for Kids - Hobbycraft Blog says:
    February 15, 2017 at 5:53 am

    […] Tissue Transfer Art by It’s Always Autumn […]

    Reply
  7. Wedding Blog says:
    February 19, 2017 at 6:51 pm

    Watercolor Spray Holiday Photo

    […] per into pumpkin shapes. They turned out super cute. Or you can draw the pumpkin […]

    Reply
  8. indoor activities for kids | lorrin sell | photographer of wild things says:
    February 23, 2017 at 10:03 pm

    […] Tissue Transfer Art | It’s Always Autumn […]

    Reply
  9. April-The Week of the Young Child | YMCA ECLC Midway Families says:
    April 4, 2017 at 8:11 am

    […] Easy (and beautiful!) tissue paper transfer art […]

    Reply
  10. Lattes, Lilacs, & Lullabies - Ultimate Guide To Summer Fun: 80+ Activities, Crafts, Games, & Treats - Lattes, Lilacs, & Lullabies says:
    June 8, 2017 at 4:29 pm

    […] Tissue Paper Crafting (here […]

    Reply
  11. Ribbon Blog says:
    June 10, 2017 at 3:03 am

    Holiday Tissue Paper Variety Pack

    […] pumpkin shapes. They turned out super cute. Or you can draw the pumpkin outline […]

    Reply
  12. August Activity Calendar - Teaching Mama says:
    August 2, 2017 at 9:50 am

    […] Day 3- Tissue Transfer Art […]

    Reply
  13. Crepe Paper Bleeding Art - Frogs and Fairies says:
    February 12, 2018 at 3:13 am

    […] got an inspiration from It’s Always Autumn, where they used tissue paper to create transfer art. We didn’t have any tissue paper at […]

    Reply
  14. 21 Amazing Spray Bottle Activities – HAPPY TODDLER PLAYTIME says:
    May 26, 2018 at 8:41 am

    […] Tissue Transfer Art {Easy Kid Art Project!}, It’s Always Autumn […]

    Reply
  15. Ultimate Summer Activities For the Whole Family to Enjoy says:
    June 12, 2018 at 1:04 pm

    […] art projects Tissue transfer art credit: […]

    Reply
  16. 15 Indoor Kids Activities for Making Unforgettable Family Memories says:
    August 8, 2018 at 6:41 am

    […]  via itsalwaysautumn.com […]

    Reply

Leave a Reply Cancel reply

Your email address will not be published. Required fields are marked *

Hey, glad you’re here!

I'm Autumn, a mom of five who loves ice cream, Masterpiece Theatre, and clothes that hide the fact that I eat so much ice cream. When I was 18 I got a job at a craft store and told everyone (regularly) how much I hated crafts. Well, things change! Read More…

Find me here

  • Facebook
  • Instagram
  • Pinterest
  • Twitter

Get the latest

Get the latest

Popular Posts

How to make mini donuts! {baked cake mix donuts recipe}

This artisan bread recipe is so easy to make and turns out amazing! It only takes 4 ingredients and 5 minutes of hands on time for crusty, delicious bread! How to make bread.

Crazy easy homemade artisan bread {only 4 ingredients!}

Tissue transfer art is not only gorgeous, it's totally easy enough for kids to make! Fun kid's art project - perfect indoor activity for rainy days.

tissue transfer art {easy kid art project!}

20 pretty DIY paper flower tutorials

girl’s flutter sleeve dress or top sewing tutorial & free pattern in 4T

Blog policy

All posts and pictures are copyrighted by Autumn Baldwin and blog content may not be reposted elsewhere. However, linking back to my content is just fine. You may use one photo as long as you link directly back to the specific post. Thank you!

Please view our Privacy Policy here.

Also, please note that this blog is a participant in the Amazon Services LLC Associates Program, an affiliate advertising program designed to provide a means for sites to earn advertising fees by advertising and linking to Amazon.com.

Copyright © 2019 · Divine theme by Restored 316