It's Always Autumn

creative tutorials for everyday life

  • Holidays
    • back to school
    • birthdays
    • Christmas
    • Easter
    • Halloween
    • July 4th
    • Mother’s Day/Father’s Day
    • teacher appreciation
    • Valentine’s
  • Crafts
    • crafts + DIY
    • handmade gifts
    • photo crafts
    • kid crafts + activities
  • Recipes
    • bread
    • dessert
    • main dish
    • side dish
  • Sewing
    • free sewing patterns
    • sewing for women
    • sewing for kids
    • how to sew
    • gifts
  • Photography
    • beginning photography tips
    • posing tips
    • photo editing tips
  • Tips
    • parenting tips
    • travel tips
    • books I love
  • FAQ

sewing sewing for women

striped classic tee midi dress sewing tutorial

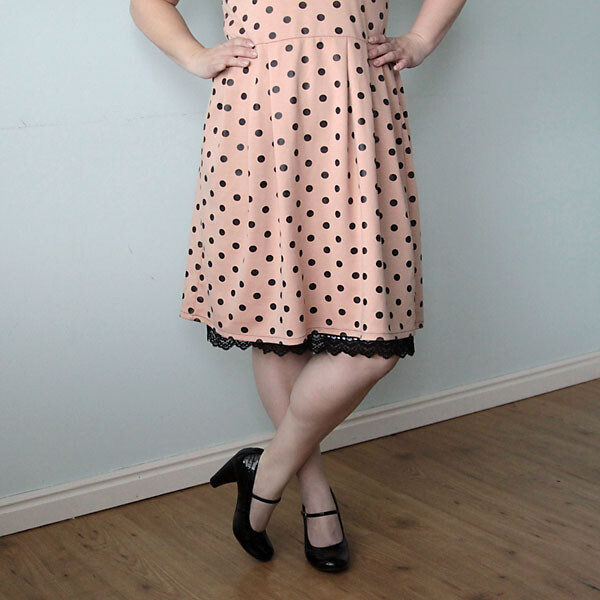
My older sister once had a roommate who used to complain to everyone about her hourglass figure, and how hard it was to find clothes that fit because her waist was just so small in comparison to her hips and bust. Well . . . I don’t have that problem. The older I get the more my waist just kind of disappears – maybe it’s gone to the same place all those missing sock matches go. Anyway, I don’t want to do anything crazy to get my waist back, like exercising or giving up ice cream (heaven forbid), so I decided to try to fake it instead by changing up the direction of the stripes on my new tee shirt dress.

How to sew a cute midi dress using a free t-shirt pattern. Easy women's dress pattern and tutorial.

You’re amazed, I know. Look at that hourglass figure!

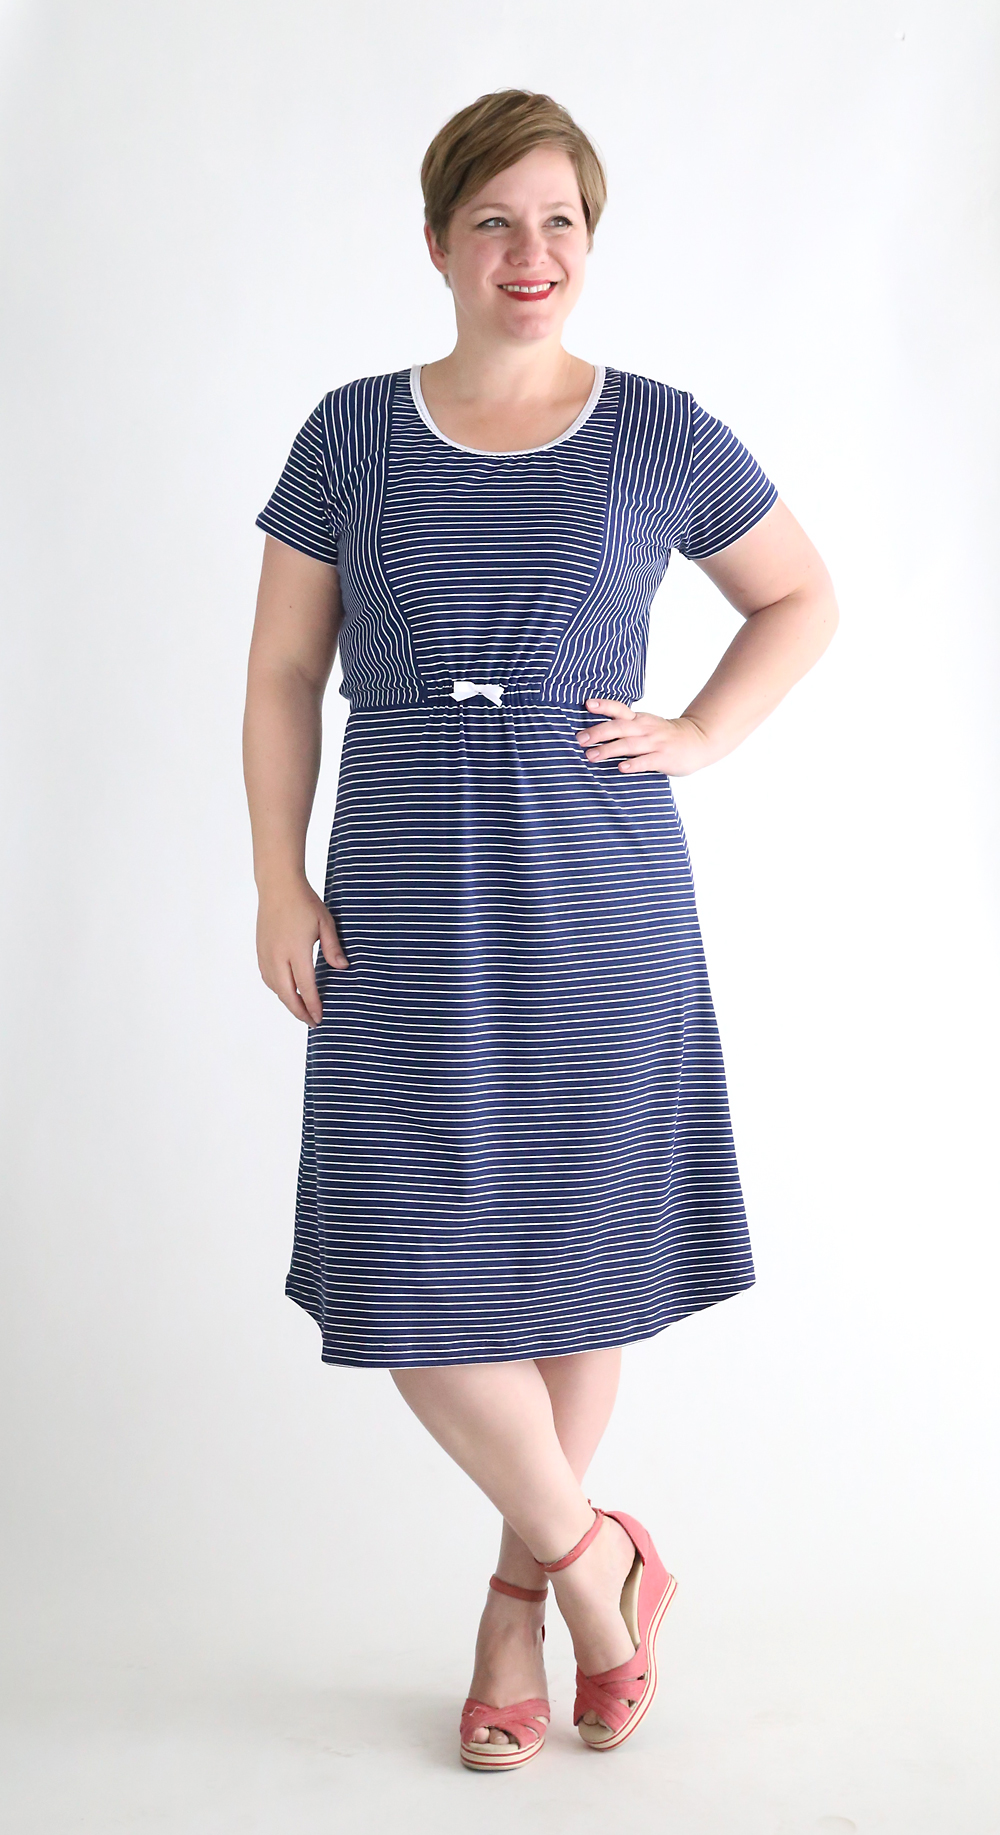
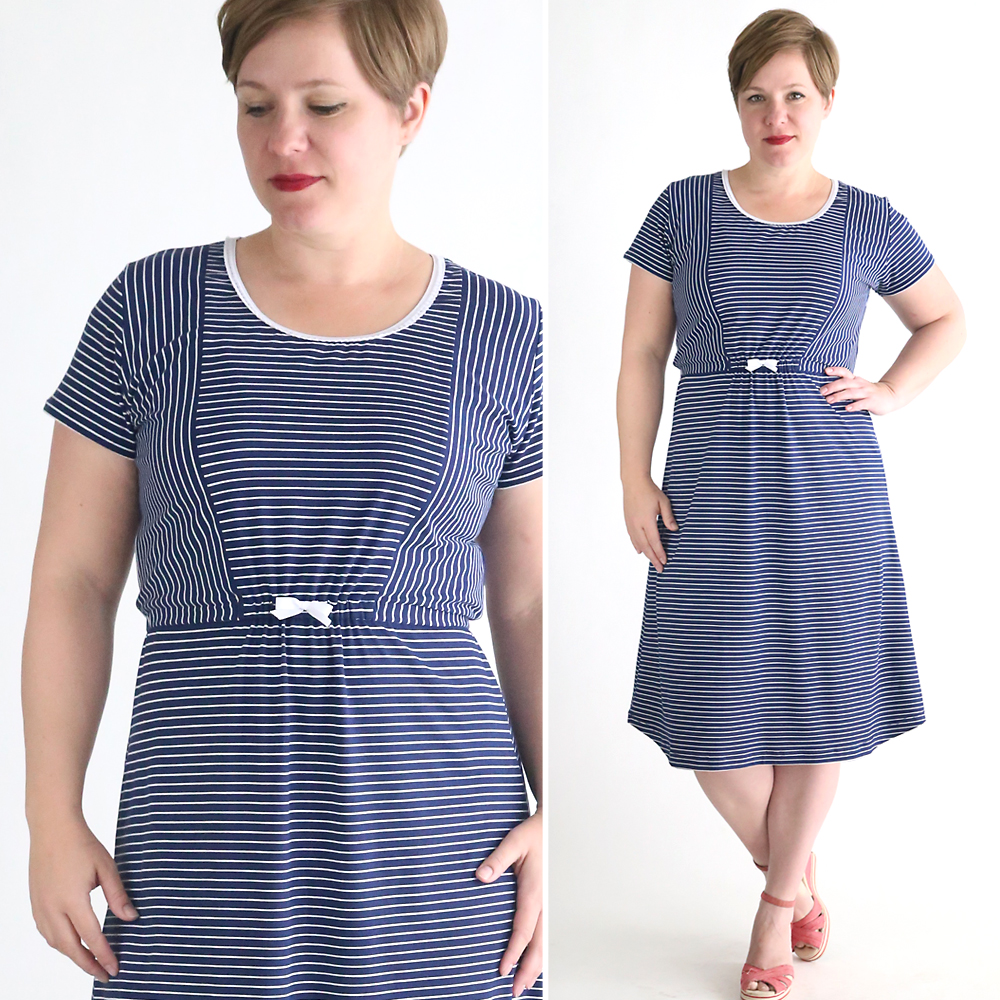
No? Ok, maybe not quite a magical transformation, but still a kinda cute dress, right? It feels a little retro to me so I wore it with the dark red lipstick that I bought and can’t decide whether I’m keeping or not. I tried to layer it on a little lighter this time because it feels so dark to me. Thoughts?

Cute dress! Click through for a free sewing pattern and tutorial in women's size large for this striped midi tee shirt dress.

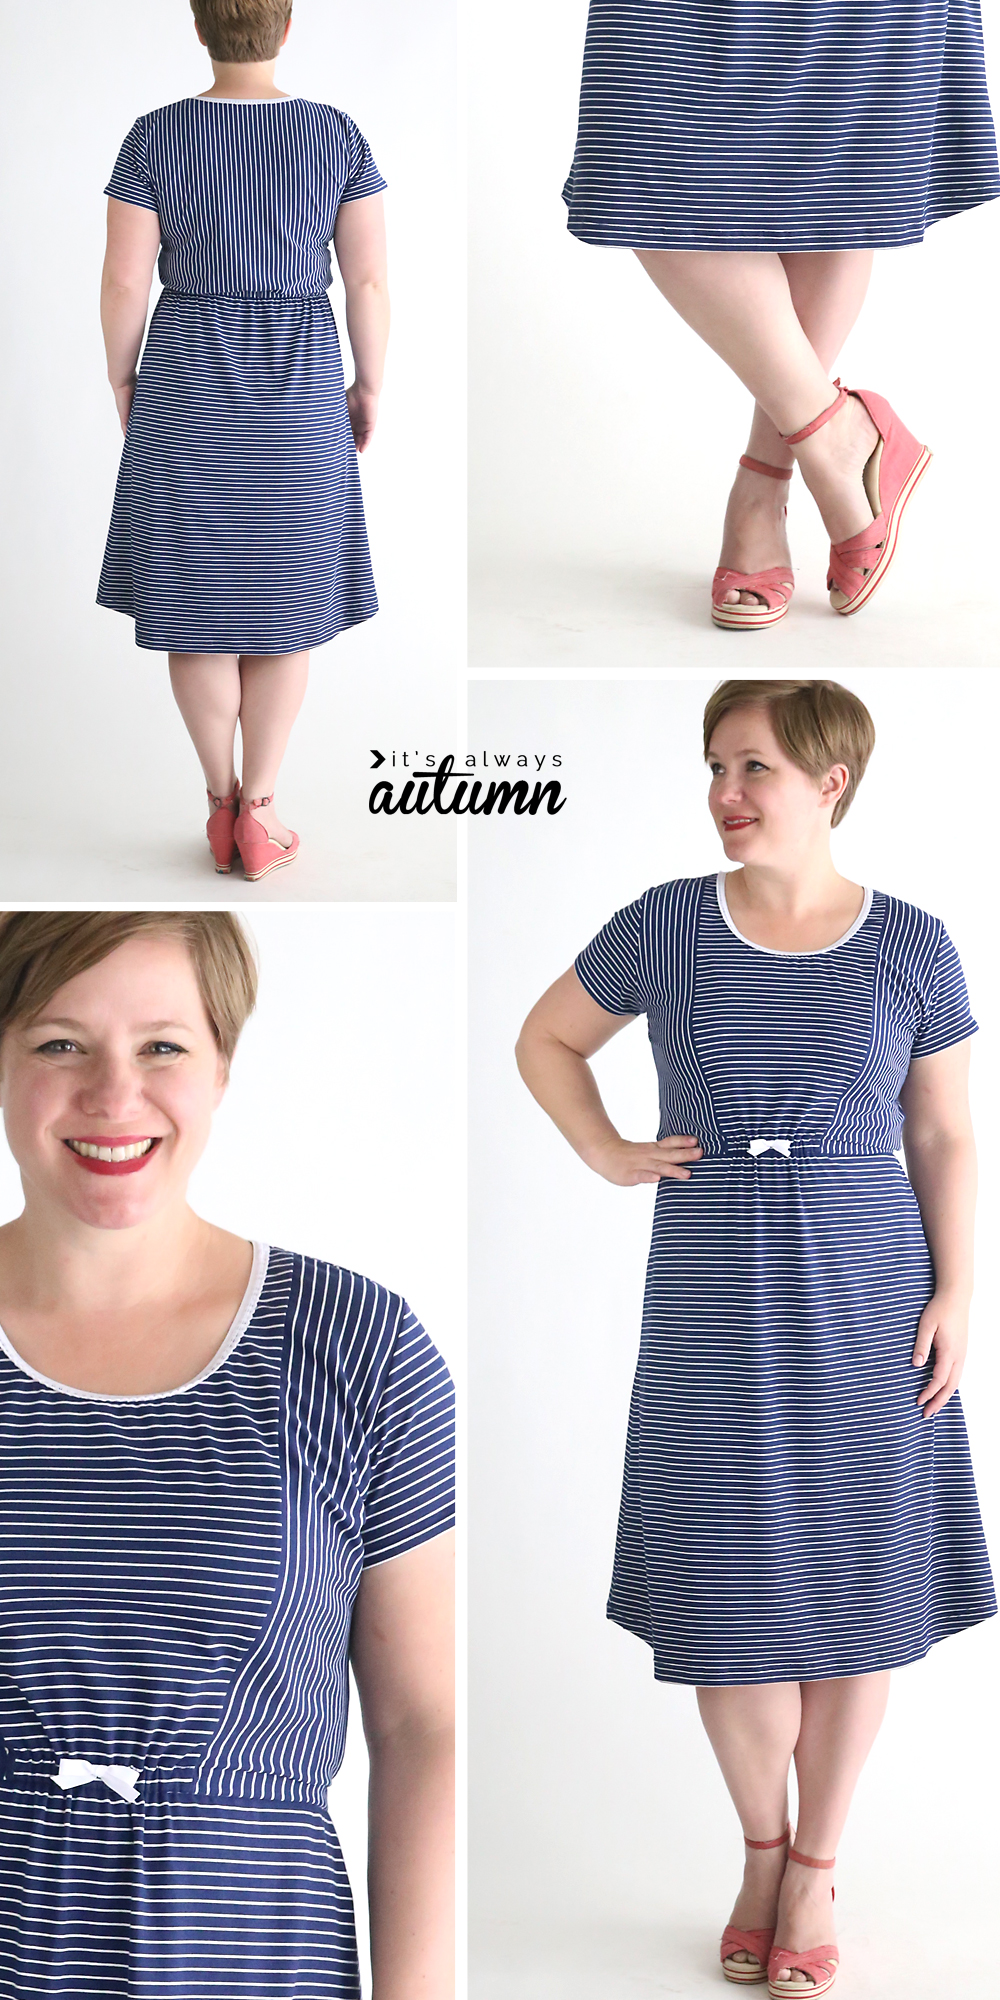
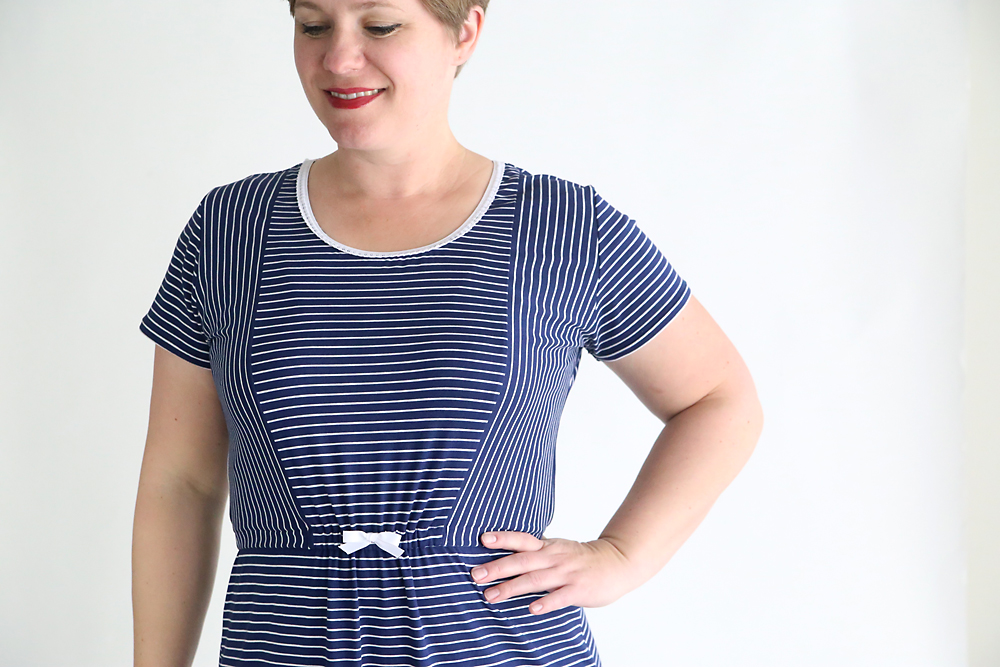
Anyhoo, about the dress. I used my Classic Tee pattern to make a midi length dress (just like I did with this one), but I sliced it up a bit so I could get stripes going different ways – side to side on the skirt, up and down on the back bodice, and both side to side AND up and down on the front bodice. That’s the part that’s supposed to make me look magically skinny, if you couldn’t tell 😉

Cute dress! Click through for a free sewing pattern and tutorial in women's size large for this striped midi tee shirt dress.

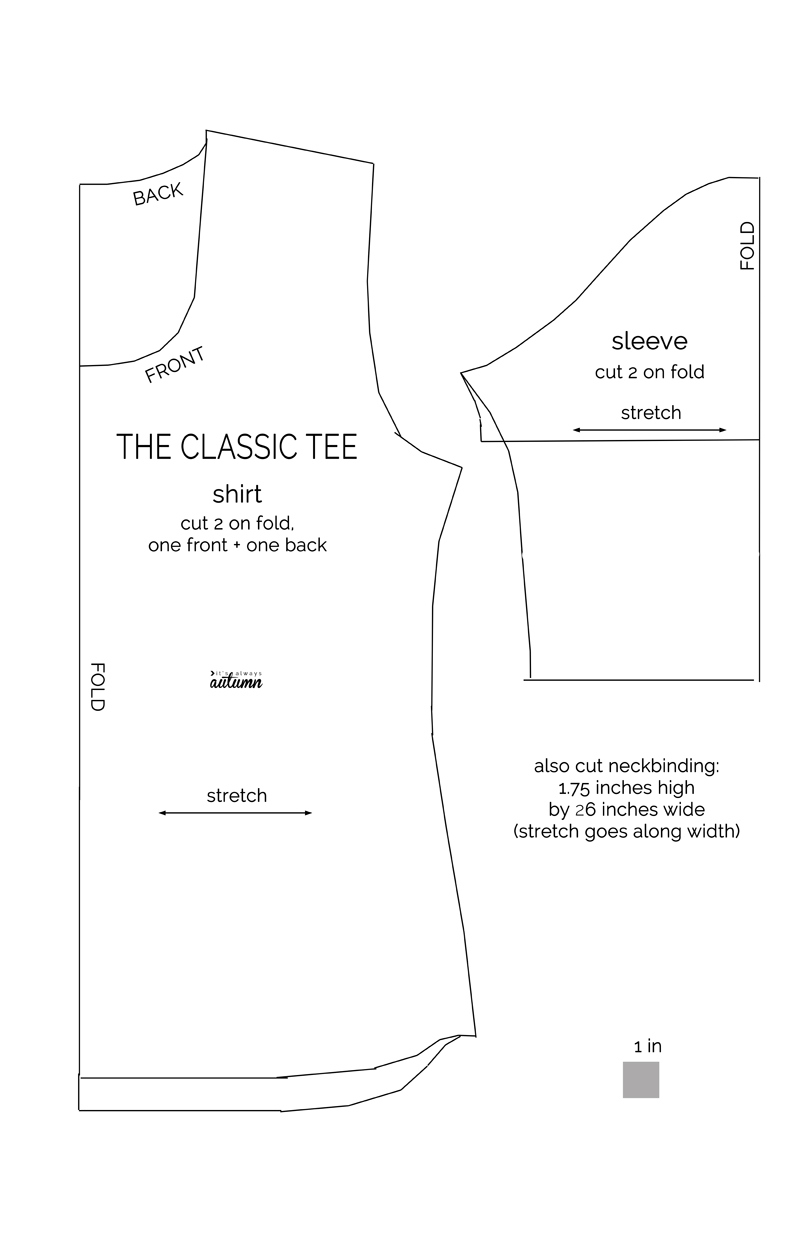
You’re going to need 2 yards of knit (stretchy) fabric for this dress, although if you’re careful you might be able to get away with 1.5 yards. You want to use fabric that has 4-way stretch for this dress. Make sure you wash and dry the fabric before you begin. You’ll also need my Classic Tee pattern, which you can download by clicking here. Print out the pattern at 100% or full size, and ensure the grey test squares measure exactly 1 inch. Butt the pages together and tape them without overlapping. It looks like this:

classic-tee-free-womens-pdf-sewing-pattern-how-to-sew-a-t-shirt-5

If you haven’t made this tee shirt before, you may want to sew one up before trying this dress. Refer to the Classic Tee post for full instructions.

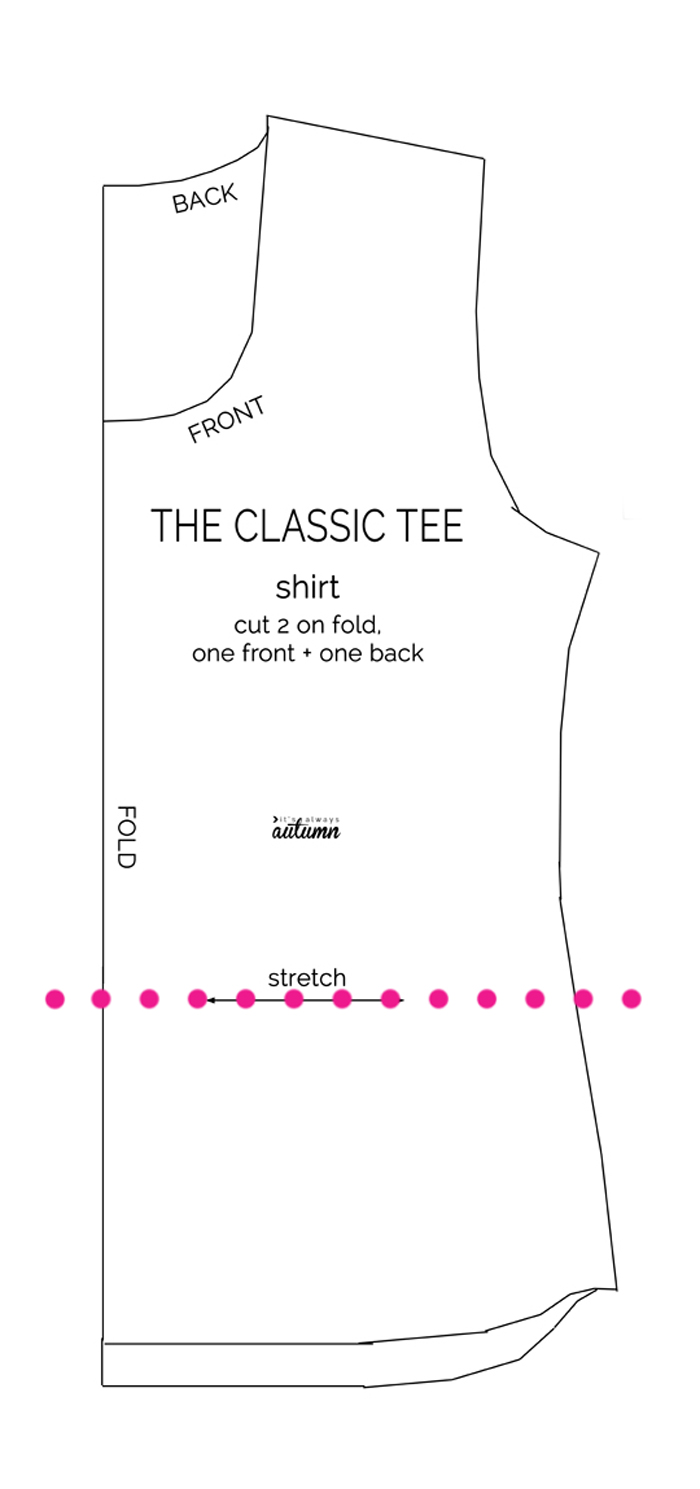
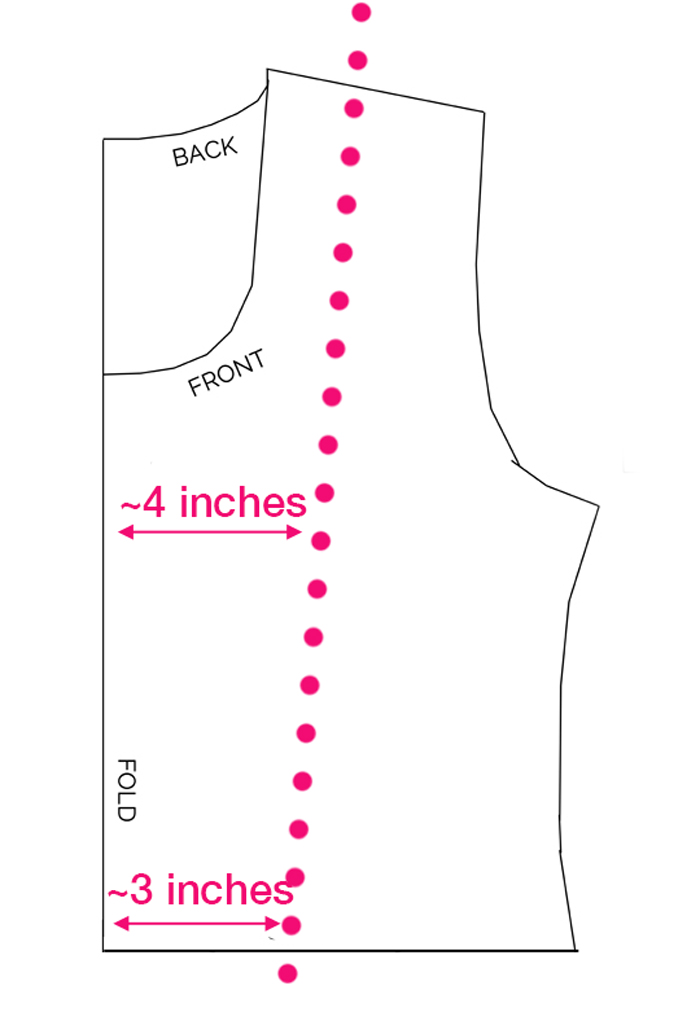
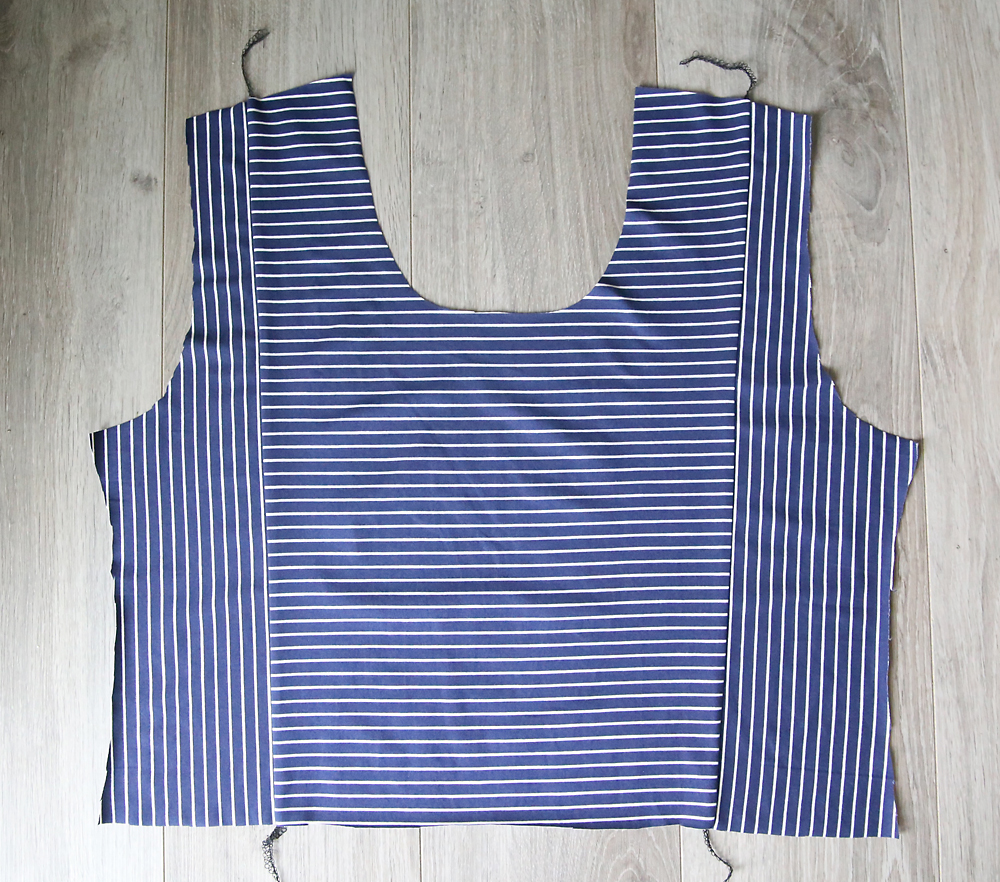
To make this dress, I sliced up the bodice pattern. First, I cut all the way across the bodice on the arrowed line under the word “stretch”. This is about at the natural waist. Then I used the top half of the pattern to cut out one bodice piece with the stripes going up and down, for the back bodice.

how-to-sew-a-tee-shirt-midi-dress-women-easy-sewing-tutorial-free-pdf-pattern-tee-15

Then I sliced the pattern up again, this time for the front bodice, as shown below.

how-to-sew-a-tee-shirt-midi-dress-women-easy-sewing-tutorial-free-pdf-pattern-tee-17


I cut the center portion of the pattern with stripes going side to side (adding 1/2 an inch seam allowance along the edge where I sliced the pattern). Then I cut the sides of the pattern with the stripes going up and down (again adding 1/2 inch seam allowance along the edge where the pattern was sliced). So the bodice pieces look like this:

how-to-sew-a-tee-shirt-midi-dress-women-easy-sewing-tutorial-free-pdf-pattern-tee-13

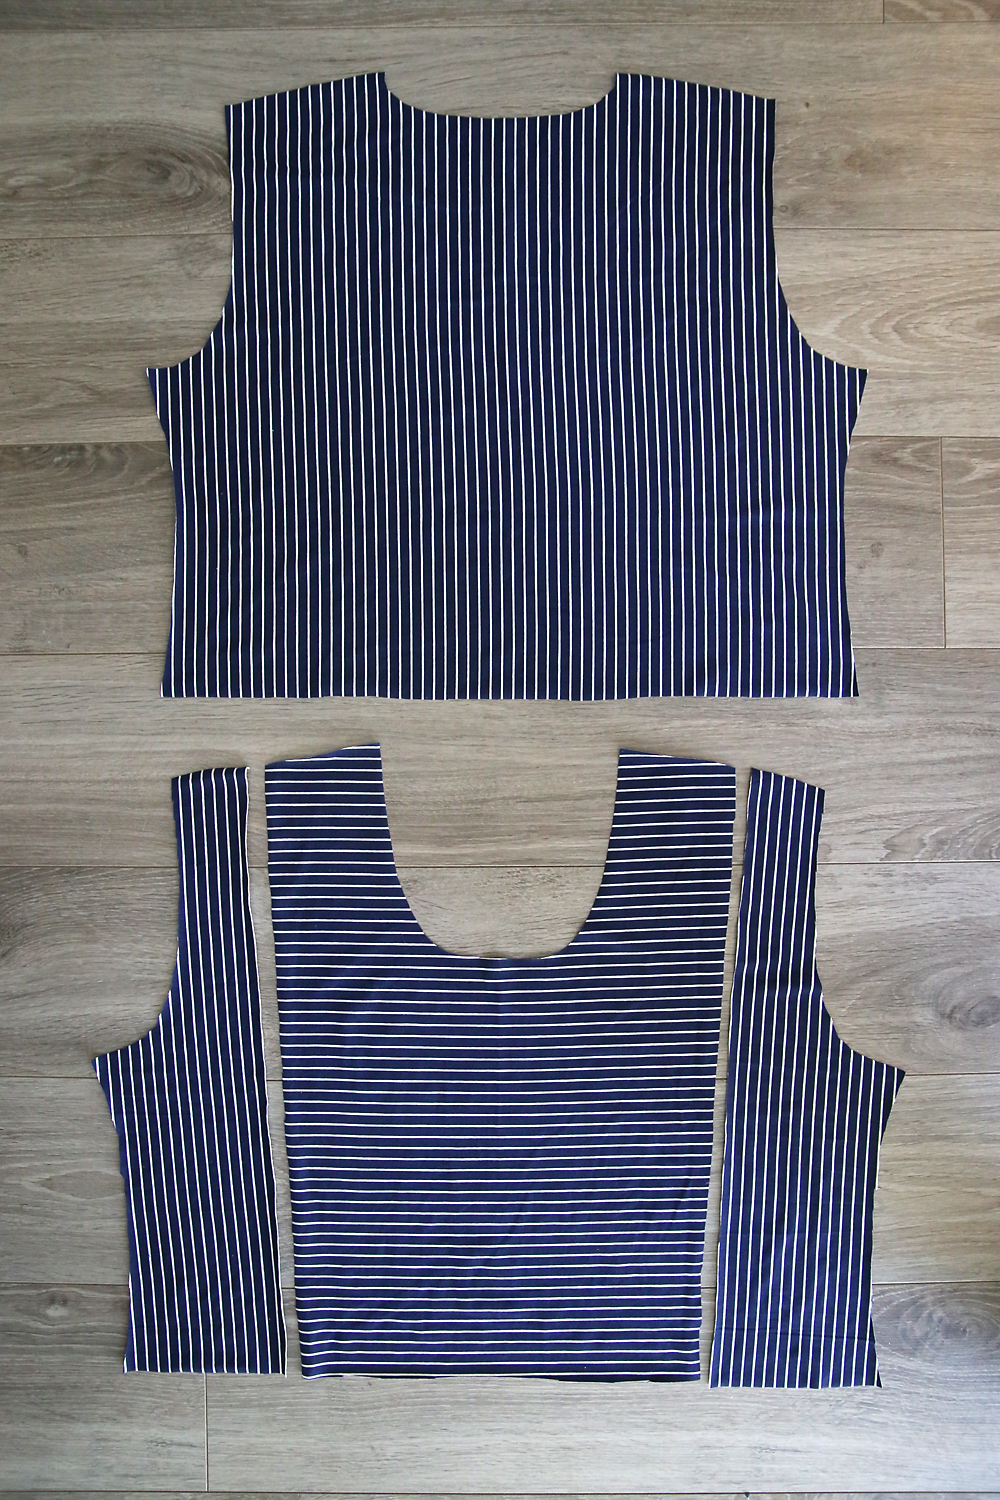
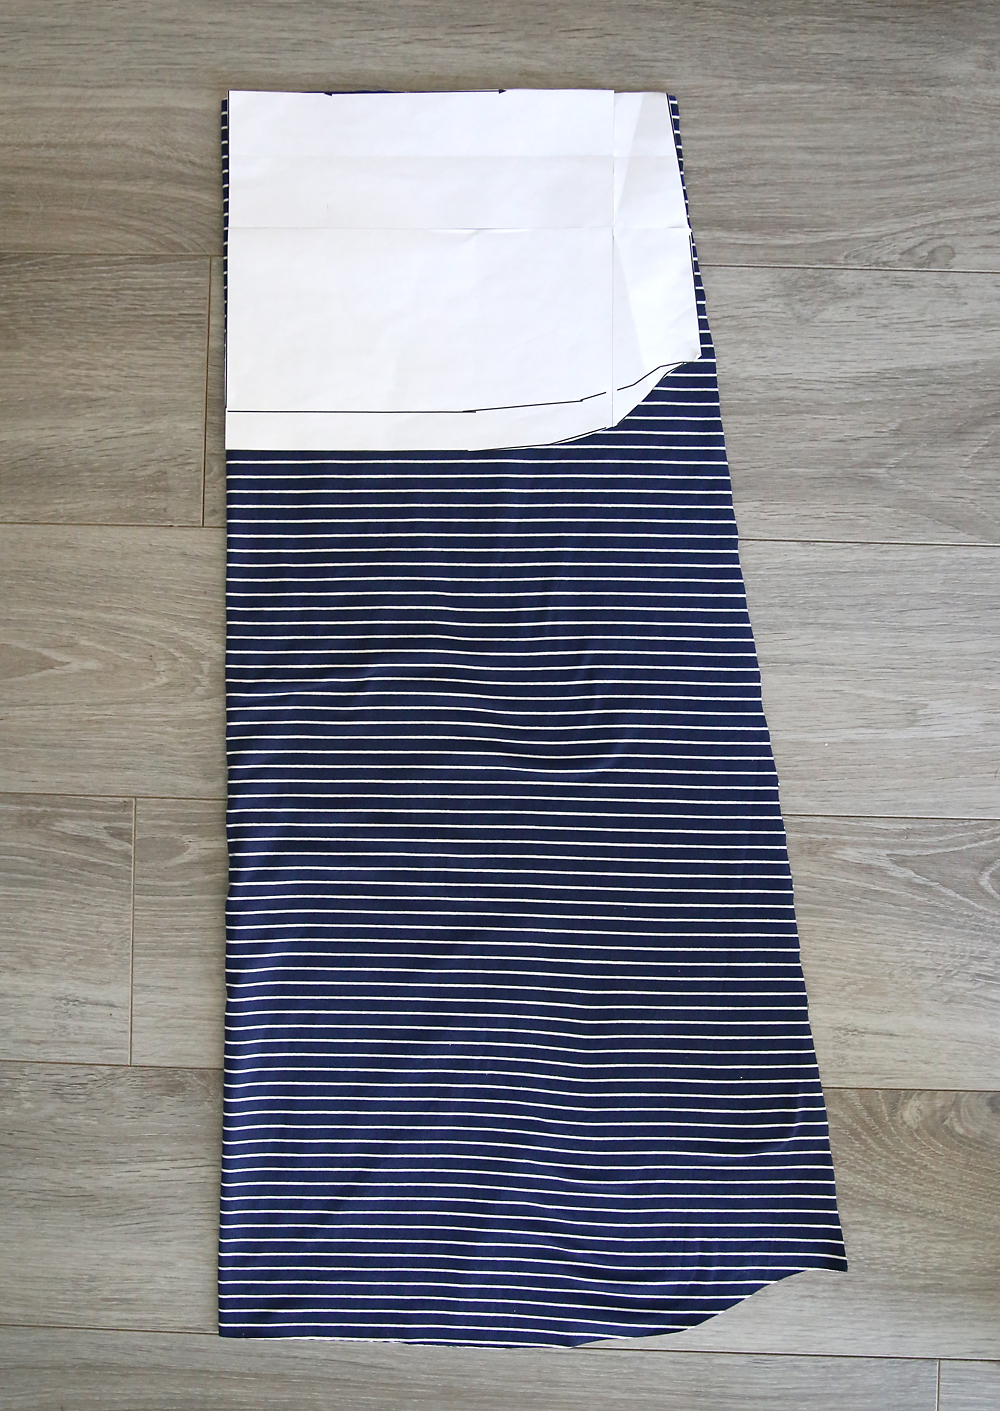
Then I used the bottom half of the bodice pattern to cut two skirt pieces, as shown below. I angled the side seam out as I cut. The skirt pieces are about 26 inches long on the sides, and 28 inches long at the fold.

Cute dress! Click through for a free sewing pattern and tutorial in women's size large for this striped midi tee shirt dress.

Finally, I cut short sleeves as shown on the pattern.

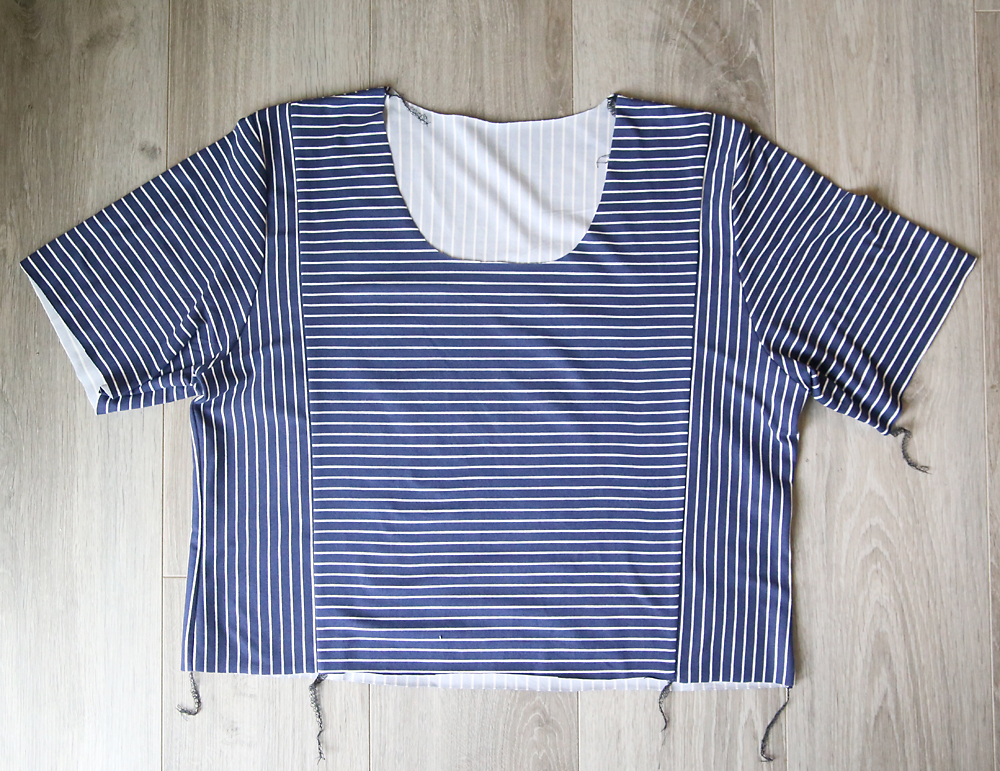
To begin, I pieced the front bodice back together, as shown below.

Cute dress! Click through for a free sewing pattern and tutorial in women's size large for this striped midi tee shirt dress.

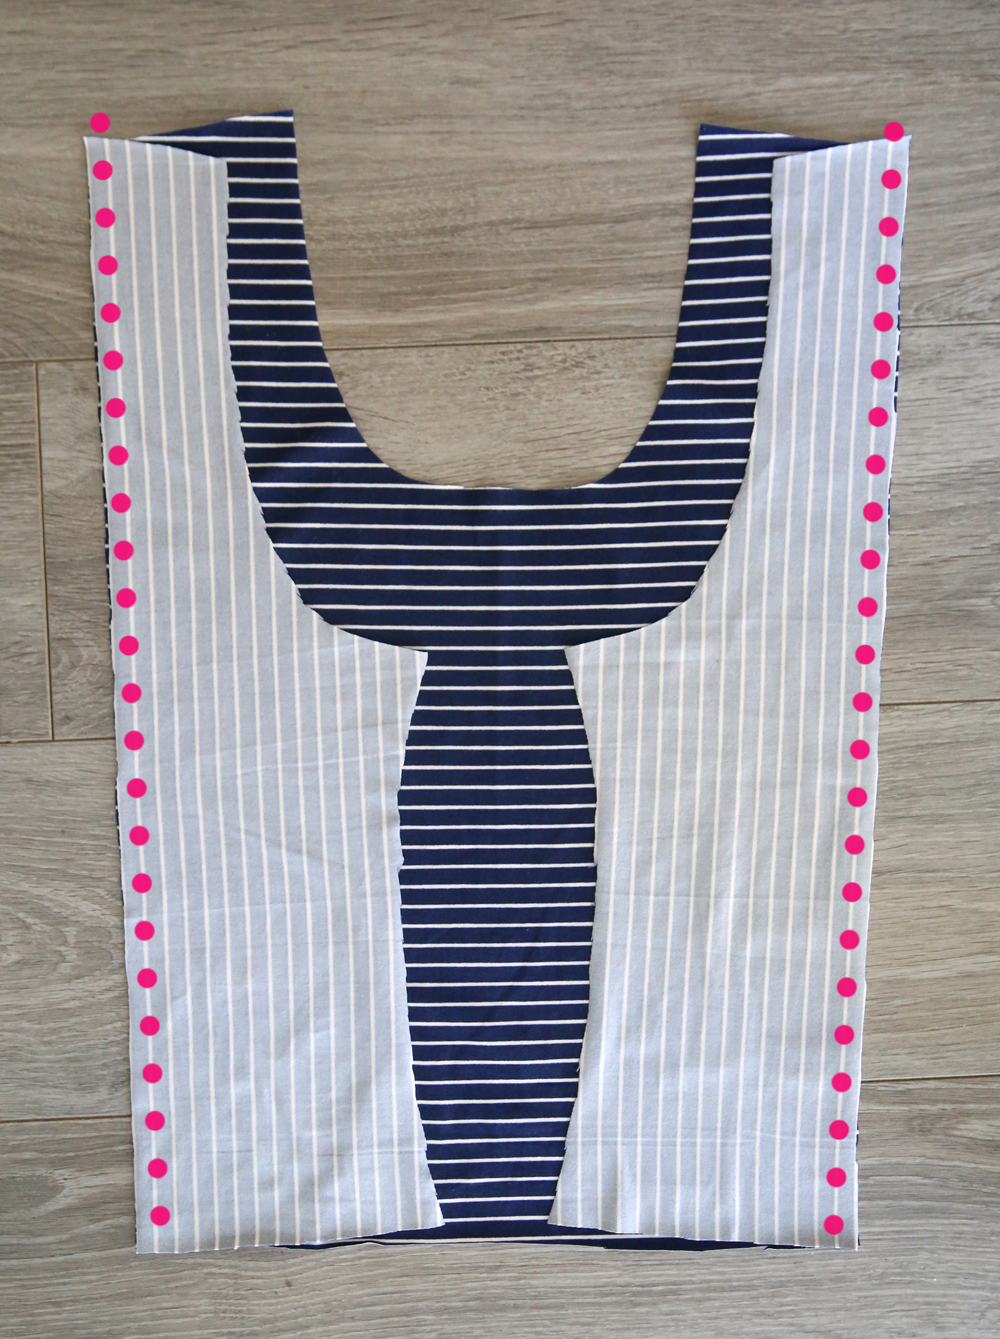
Once the front bodice is sewn together, it looks like this:

Cute dress! Click through for a free sewing pattern and tutorial in women's size large for this striped midi tee shirt dress.

Then I sewed up the top of the dress, following the instructions in the Classic Tee post. That gave me the top of my dress:

Cute dress! Click through for a free sewing pattern and tutorial in women's size large for this striped midi tee shirt dress.

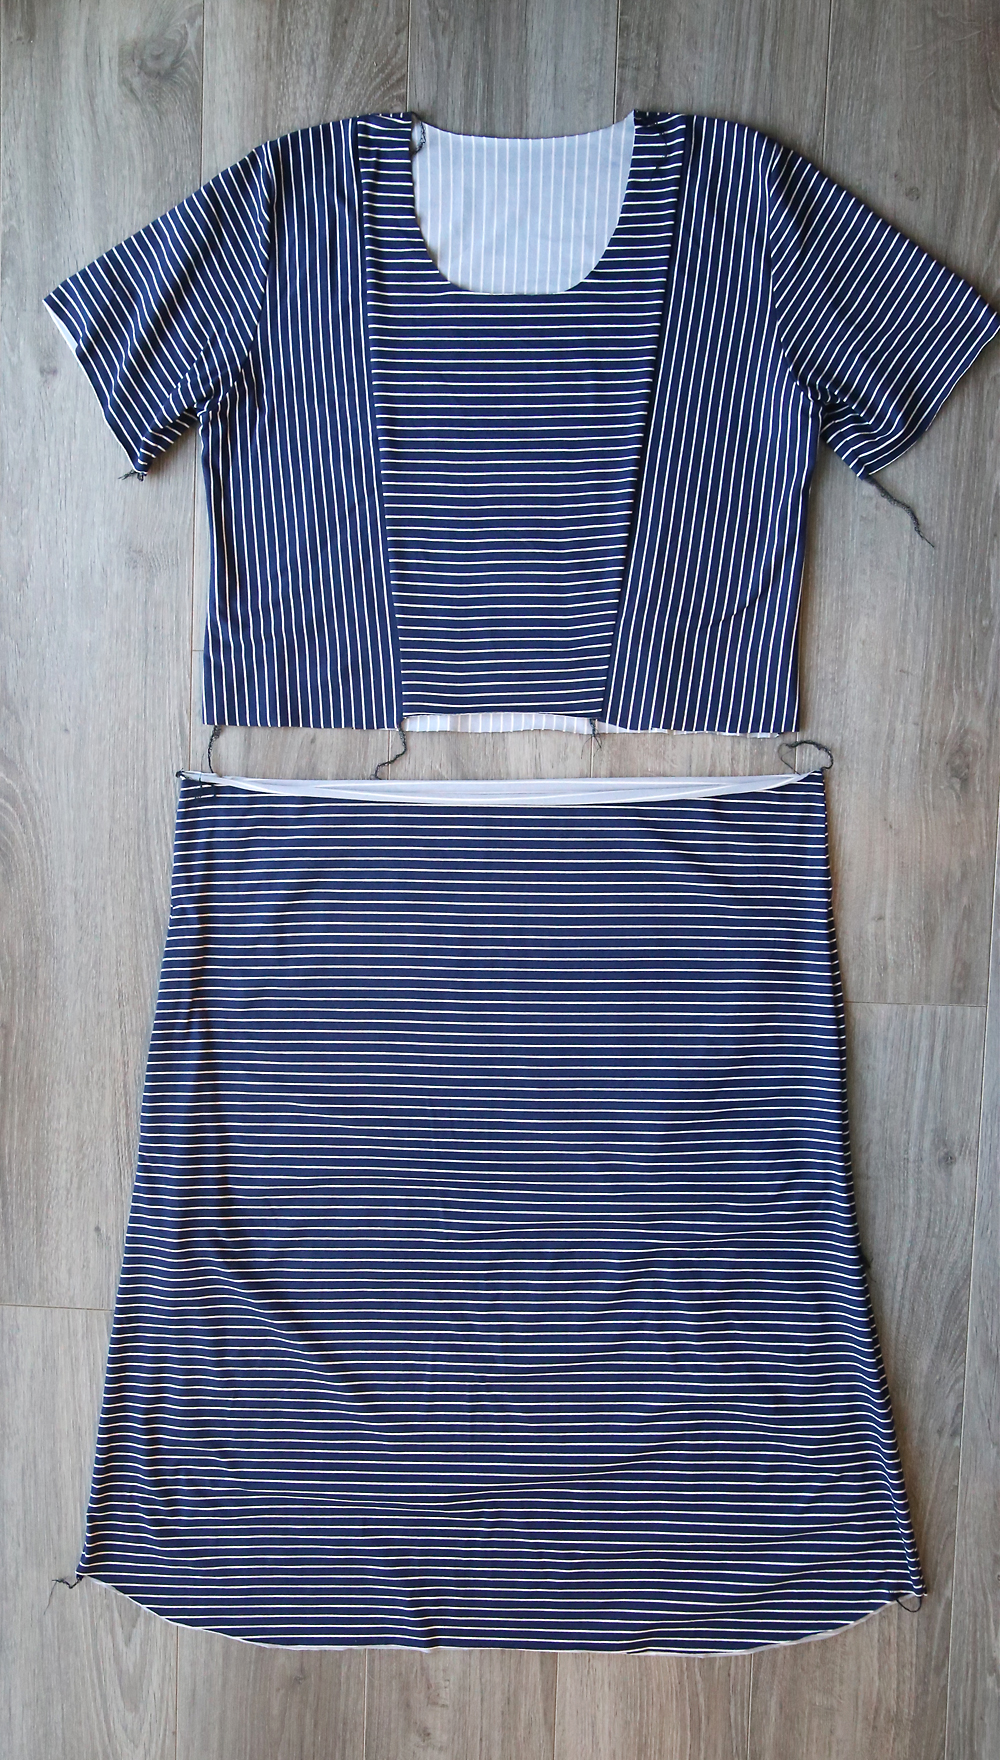
Then I sewed the two skirt pieces together along the side seams, so I had a top and a skirt:

Cute dress! Click through for a free sewing pattern and tutorial in women's size large for this striped midi tee shirt dress.

I turned the skirt inside out and slid the top inside it, matched up the waistline of both pieces, then pinned and sewed. I used a 1 inch seam allowance sewing the top and skirt together. You also need to use a stitch that will have some stretch, like a stretch stitch or a narrow zigzag. I actually used a straight stitch, but stretched the fabric a bit as I sewed.

Once the top and skirt are sewn together, turn the entire dress inside out and press the seam allowance up. Then sew the seam allowance to the top of the dress, just over 1/2 an inch from the first seam, to create a casing for elastic. Be sure to leave a 2 inch opening along this seam so you’ll be able to thread elastic through the casing.

how-to-sew-a-tee-shirt-midi-dress-women-easy-sewing-tutorial-free-pdf-pattern-tee-14

Then you can thread 1/2 inch elastic through the casing to gather in the waistline. Pull the elastic as tight as is comfortable, then sew the elastic to itself, and then sew the opening you left closed. At this point the basic construction of the dress is finished.

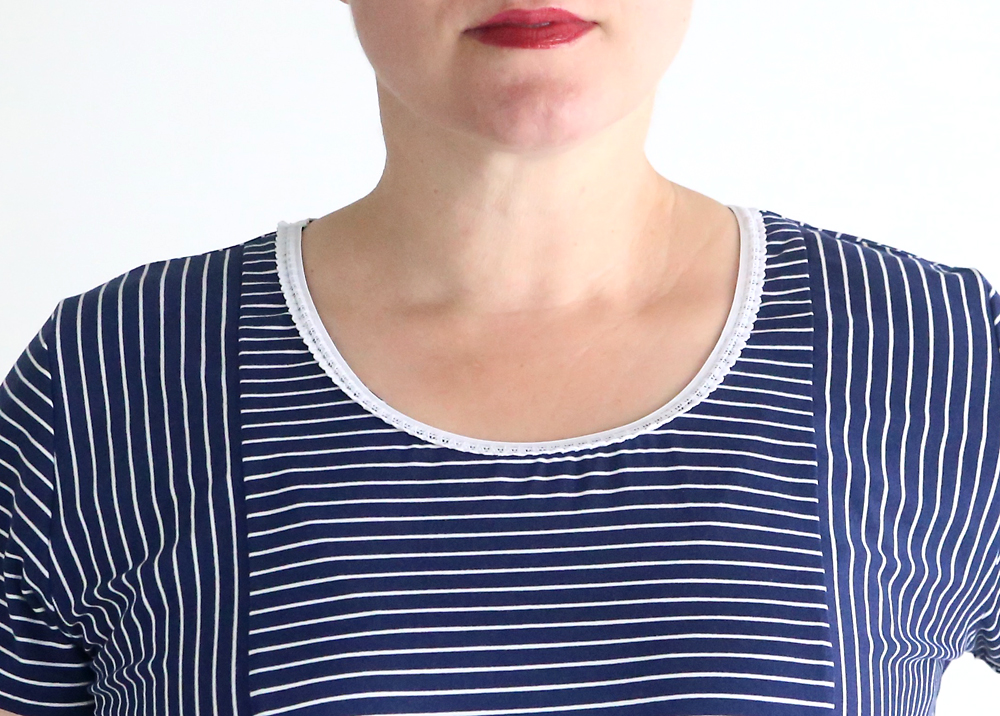
Now you just need to hem the sleeves and bottom of the dress and finish the neckline. Instead of my usual method of adding a neckbinding, I just turned the neckline under about 1/2 an inch and pressed and pinned. Then I layered some pretty elastic over the neckline and sewed it on using a double needle, gently stretching the elastic as I sewed.

Cute dress! Click through for a free sewing pattern and tutorial in women's size large for this striped midi tee shirt dress.

Finally, I made a small bow with white ribbon and sewed it at the waist.

Cute dress! Click through for a free sewing pattern and tutorial in women's size large for this striped midi tee shirt dress.

And done! This dress took a little more work than most things I sew, but hey, it’s good to not be such a lazy sewist now and again, right?

Cute dress! Click through for a free sewing pattern and tutorial in women's size large for this striped midi tee shirt dress.

Share this:

  • Tweet
  • Print


21 Comments

free email series

4 FOOLPROOF HOLIDAY PROJECTS

Easy craft & recipe ideas to help you enjoy the season

« DIY modern wood + magnet photo frame
20 gorgeous printable quotes | free inspirational quote prints »

Comments

  1. Mary Jean Gross says

    May 16, 2017 at 7:24 am

    I really like this dress. Will sew it soon. Glad to be receiving e-mails again.

    Reply
  2. Dara says

    May 16, 2017 at 9:11 am

    Autumn. YOU are “SEW” SMART! This is SO cute! Thank You!

    Reply
  3. Mary Brady says

    May 16, 2017 at 9:34 am

    This is great! I love it! Thanks so much for sharing!!!

    Reply
  4. Regina Roza says

    May 16, 2017 at 1:15 pm

    You look amazing! I love this dress; I also have a new serger that I’m terrified of so I think I’ll have to bust it out (finally had it for a while)and make one of these dresses for myself!

    Reply
  5. Leigh says

    May 17, 2017 at 8:23 am

    Love the dress and the lip stick looks wonderful. You can definitely pull off that color!! Haven’t tried any of your patterns yet but will very soon, I love them all!!! Thanks so much for posting them.

    Reply
  6. Dora says

    May 17, 2017 at 8:56 pm

    The dress looks darling on you. Do you have “red”shoes? Redder than in the pic?

    Reply
  7. Mary says

    May 20, 2017 at 9:22 am

    Very cute! I need to try this one!

    Reply
  8. MPaula says

    May 25, 2017 at 5:33 am

    I need this dress although I may not make it with stripes. Have you heard that stripes in clothing may affect some people with seizures? I don’t know much more than that myself. I wish I could say that sympathize with the woman with the houses figure … I don’t.

    Reply
    • MPaula says

      May 25, 2017 at 5:35 am

      Laughing!! Housr figure vs hourglass figure –> NOT the same! Obviously.

      Reply
      • autumn says

        May 25, 2017 at 7:26 am

        lol!

        Reply
    • autumn says

      May 25, 2017 at 7:25 am

      I didn’t know that about stripes! And yes, very tough to sympathize with that gal, right?

      Reply
  9. Donna Lynn Campbell says

    June 9, 2017 at 9:39 am

    Great idea and simple!

    Reply
  10. Diane says

    July 23, 2017 at 9:15 am

    This dress is sooo cute, and it seems easy enough for even me to make. Thanks for all your wonderful tutorials.

    Reply
  11. Mel says

    July 31, 2017 at 2:33 pm

    I just wants to say thank you for all the free patterns! I love yours! They’re cute, modest and flattering!

    Reply
  12. Shelby says

    August 3, 2017 at 2:50 pm

    Wow! I love this! I just found your site and have been looking through everything! Anyways, I love this dress and am going to attempt to make a couple dresses for myself soon..

    Reply
  13. Meg says

    August 5, 2017 at 2:15 pm

    Hi There! Adorable dress… thanks. If you or someone else would like to avoid the drape beneath the back waist, put in a curve at the center fold top. The body is not straight and has curves, (ooh lala) and therefore a curve will “bring up” the center back waist. Love it!

    Reply
    • Meg says

      August 5, 2017 at 2:17 pm

      Oops, the center fold of the bottom piece needs the curve. I’d say about 1/2 inch will do.

      Reply
  14. L Diane Johnson says

    October 2, 2017 at 3:06 am

    Lovely and well-planned striping design!

    It doesn’t look like forced-thinness as some dresses — looks understated and does a great job of cinching just right. Drapes so nicely!

    And the lipstick? Just right! Brings the eye to your face and nice balance with the dark striping. Love it!

    Thx for taking the time to share this with others.

    Reply
  15. Gwen says

    October 6, 2017 at 5:55 pm

    What size is this?

    Reply
    • autumn says

      October 9, 2017 at 8:06 am

      All my patterns are a women’s size large, sized to fit a 38 inch bust and roomy in the hips.

      Reply

Trackbacks

  1. Tutorial and pattern: Striped midi t-shirt dress – Sewing says:
    May 24, 2017 at 11:37 am

    […] Striped Classic Tee Midi Dress Sewing Tutorial, by It’s Always Autumn […]

    Reply

Leave a Reply Cancel reply

Your email address will not be published. Required fields are marked *

Hey, glad you’re here!

I'm Autumn, a mom of five who loves ice cream, Masterpiece Theatre, and clothes that hide the fact that I eat so much ice cream. When I was 18 I got a job at a craft store and told everyone (regularly) how much I hated crafts. Well, things change! Read More…

Find me here

  • Facebook
  • Instagram
  • Pinterest
  • Twitter

free email series

4 FOOLPROOF HOLIDAY PROJECTS

Easy craft + recipe ideas to help you enjoy the season

Popular Posts

How to make GORGEOUS paper flowers

How to make mini donuts! {baked cake mix donuts recipe}

Tissue transfer art is not only gorgeous, it's totally easy enough for kids to make! Fun kid's art project - perfect indoor activity for rainy days.

Easy + gorgeous tissue paper art {perfect for kids!}

This artisan bread recipe is so easy to make and turns out amazing! It only takes 4 ingredients and 5 minutes of hands on time for crusty, delicious bread! How to make bread.

Crazy easy homemade artisan bread {only 4 ingredients!}

girl’s flutter sleeve dress or top sewing tutorial & free pattern in 4T

Blog policy

All posts and pictures are copyrighted by Autumn Baldwin and blog content may not be reposted elsewhere. However, linking back to my content is just fine. You may use one photo as long as you link directly back to the specific post. Thank you!

Please view our Privacy Policy here.

Also, please note that this blog is a participant in the Amazon Services LLC Associates Program, an affiliate advertising program designed to provide a means for sites to earn advertising fees by advertising and linking to Amazon.com.

Copyright © 2019 · Divine theme by Restored 316192.168.1.1 router login