
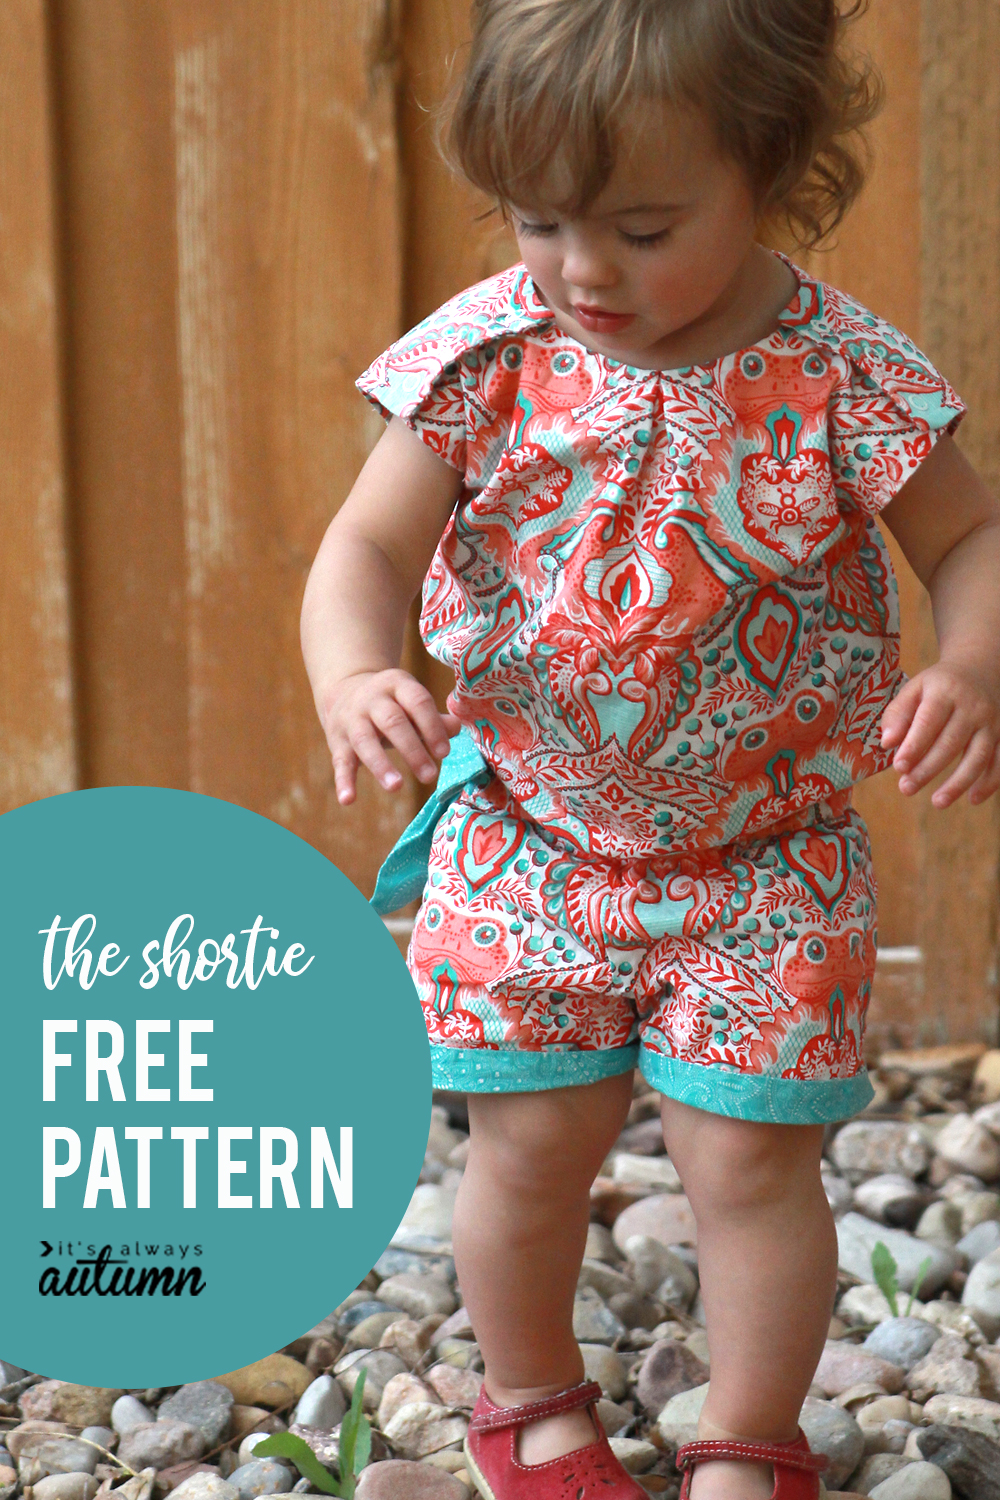
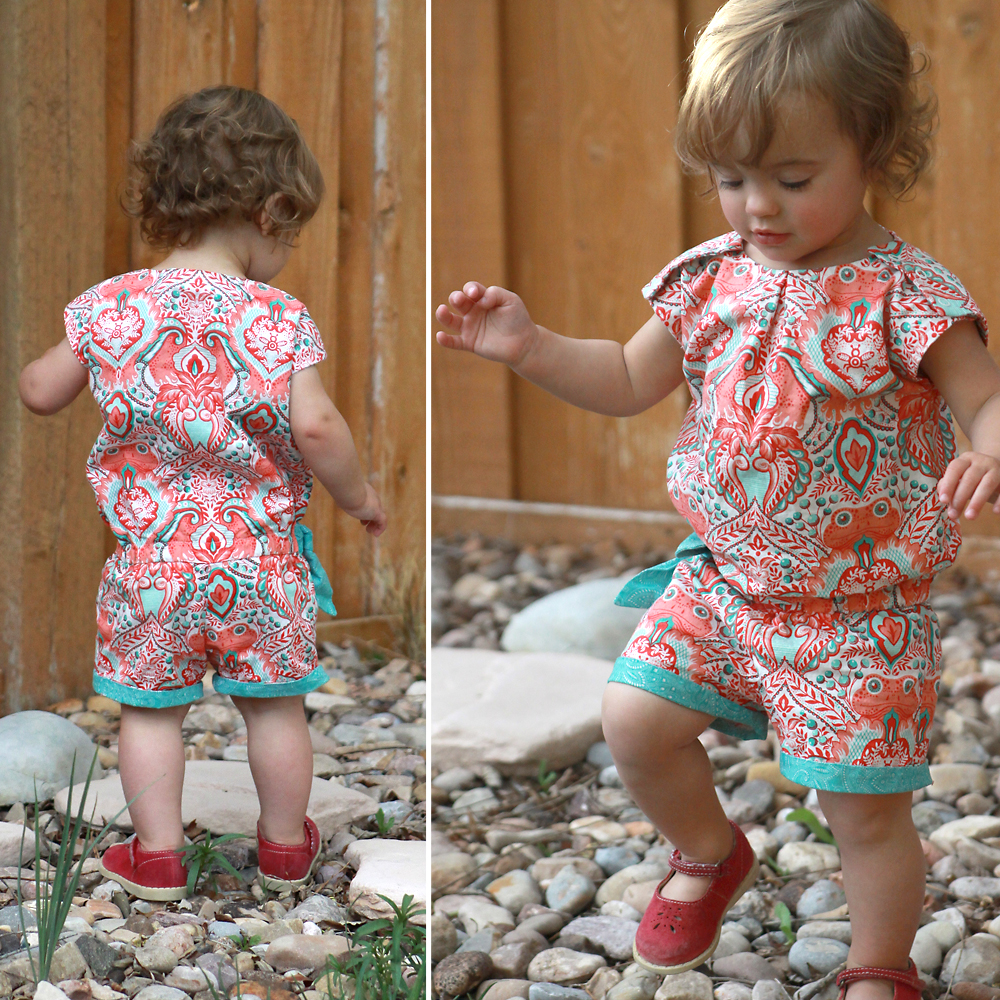
I love the look of jumpers/rompers/shorties that I keep seeing on the runway, but there is no way I could ever pull one off, even if I wanted to. You know who can? My baby girl. She can pull off just about anything, so I decided to create a Runway Shortie just for her. It has the cuteness of a dress with the versatility of shorts, so she can run and play to her heart’s content.
Do you like it? If you do – get ready to make one for your own little girl! I’ll show you how to make your own pattern below, but I’m also offering a FREE pattern download. It’s sized at 12-18 months, and fits my little girl (who is a small/average 16 month old) perfectly, so it would probably be best for a baby right around a year old. If your little girl is a different size, just use the instructions below to make your own pattern!
Gather your supplies:
1 yard of fabric (I used Coral Frog Prince by Free Spirit)
fat quarter of coordinating fabric (I used Aqua Paisley by Moda)
scraps of lightweight fusible interfacing
1/2 inch elastic
snaps and setter (or buttons)
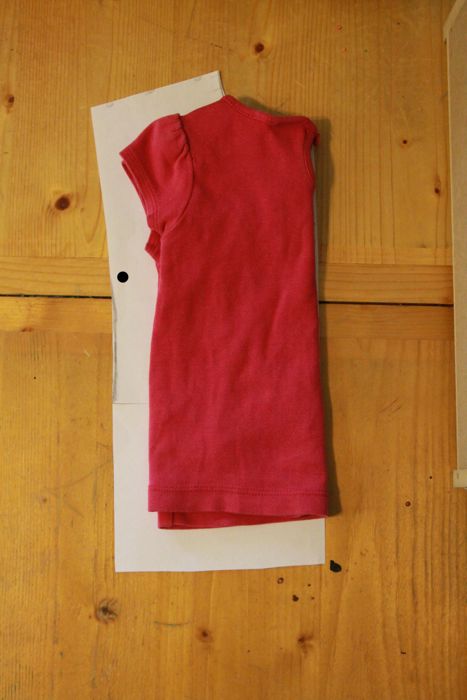
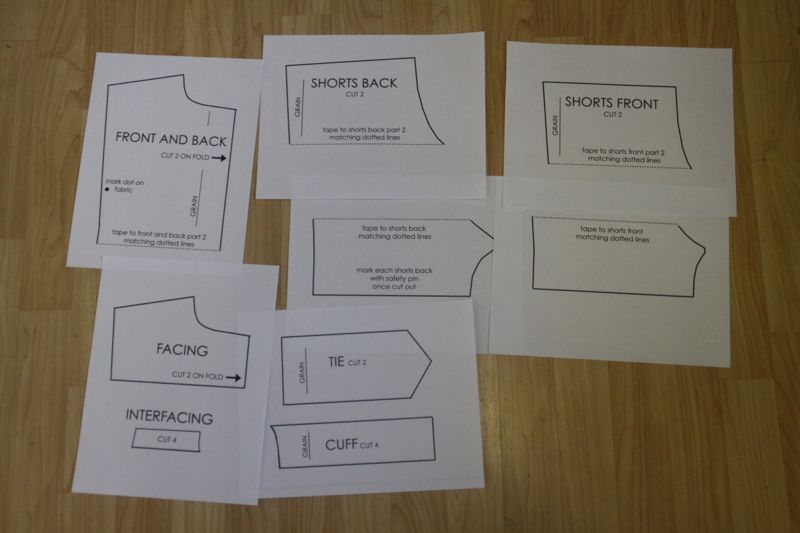
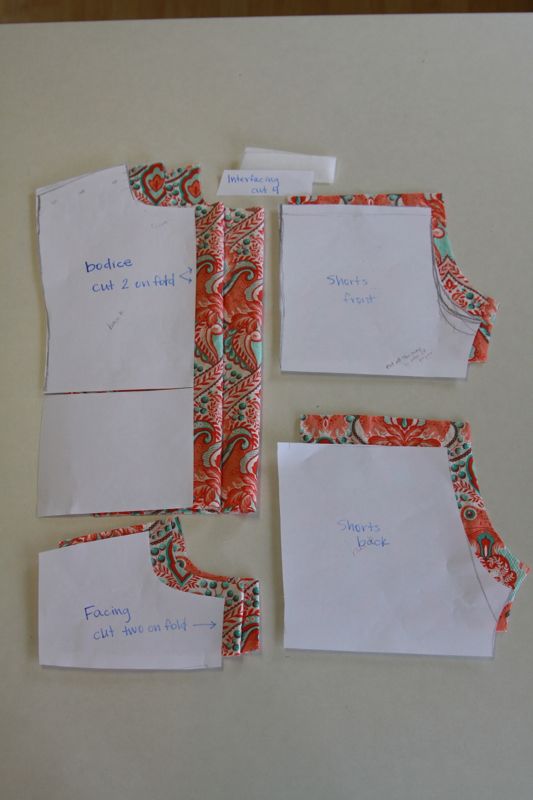
Start by creating a pattern, using a pair of shorts and a shirt that fit your girl well. Don’t use anything tight, and make sure the shirt you use comes down below her waist to cover the tops of her shorts. We’re going to make these pieces: bodice, facing, shorts front, shorts back, cuff, and tie. (Happen to have a girl who wears 12-18 month clothes? Click here to download my pattern free!)
Fold the shirt in half and use it to trace a bodice pattern. Follow the neckline, then extend it up 1 1/2 inches to allow enough room for overlapping shoulders. Extend the pattern down 1 1/2 inches to create a dropped waist. Extend it out about an inch to give it a roomy feel, then connect the bottom edge and the shoulder edge with a mostly straight line, as seen in the picture below. Mark a dot on the outside edge just below the bottom of your shirt’s sleeve.
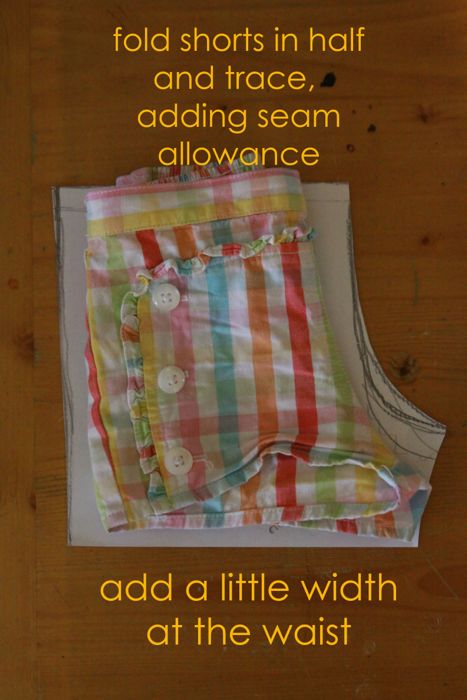
Next, fold your paid of shorts in half and use them to trace your shorts front. Make sure to add room for a seam allowance around all the edges except the top (because we’ve added extra length to the bodice already). The top of your shorts should be 1/2 inch wider than the bottom of your bodice, so add a little room at the waist if needed to make sure these match up.
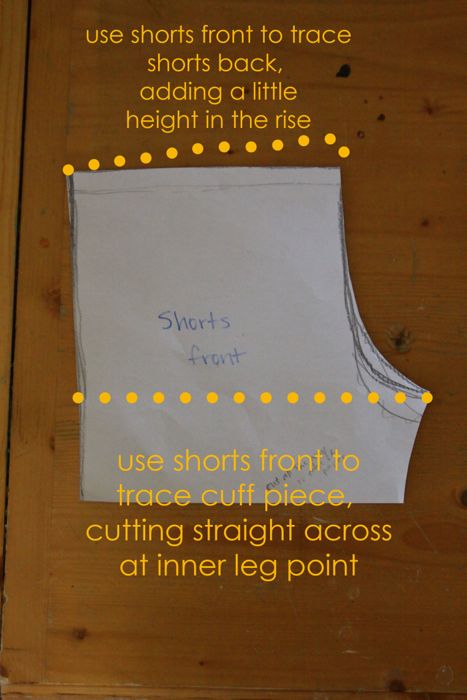
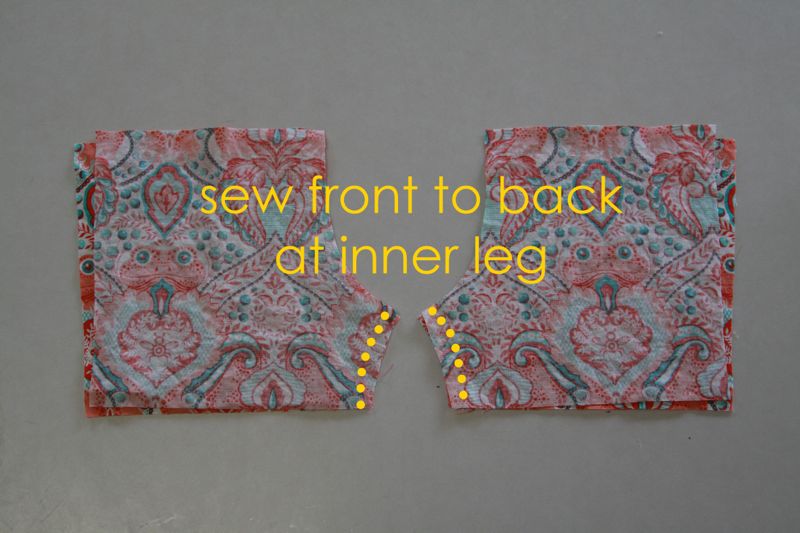
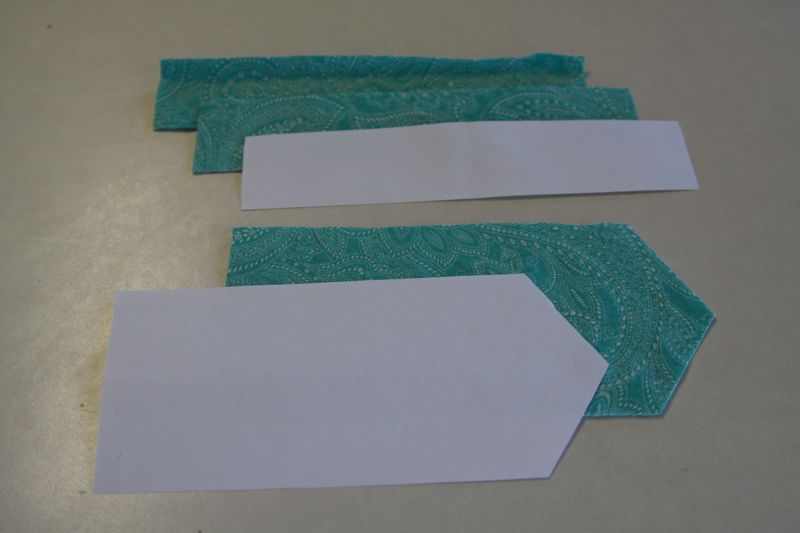
Next, use your shorts front pattern to trace a shorts back pattern, just adding a little extra height in the rise, as shown w/yellow dots below. Also use your shorts front pattern to trace a cuff pattern, cutting straight across at the inner leg point as shown below.
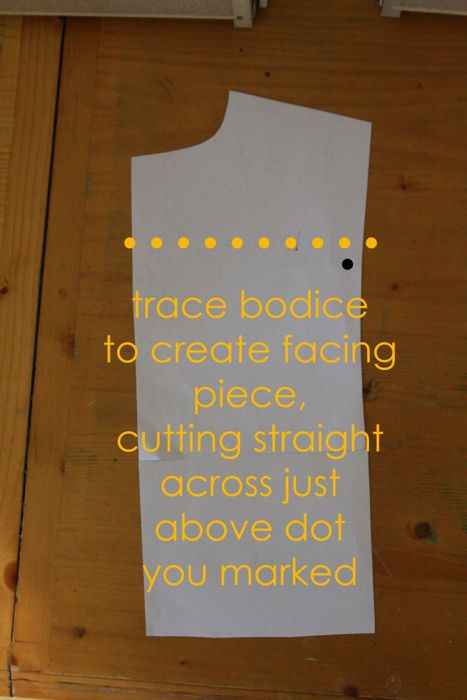
Now use your bodice pattern to trace a facing pattern, as shown below (it’s just the portion above the dotted line).
Finally, cut out a tie pattern – it should be 7.5 inches long and 3.5 inches tall.
Gather all your pattern pieces. If your girl wears 12-18 month size, visit my blog for the free pattern downloand, print the pattern pieces, cut them out, and tape together where noted. Be sure that the cuff piece measures just barely less than 8 inches wide on top and 7 5/8 inches wide on the bottom – if it doesn’t it’s not printing at 100%. (There are actually 8 pieces to print – I forgot one in my photo.)
Be sure you have washed and dried all your fabric (don’t skip this step! or you might end up with a garment that fits until the first wash, and then is too small).
Cut the pieces from your main fabric as shown below (save the cuff and tie for your coordinating fabric). I recommend getting a full yard of fabric – you could probably get by with 3/4 yard if you’re careful with placement – but if your fabric has a pattern on it you’ll want enough to be sure you can center the front/back pieces on the fabric’s pattern. (BTW, a few of your pattern pieces will look slightly different than the ones below – I made just a few adjustments as I went along.)
You might want to consider cutting out your pieces using pinking shears to prevent fraying on all edges. If you choose not to do this, you’ll likely need to finish each seam allowance as you go along (either by serging, pinking, or zigzagging each raw edge). Please plan on a 1/2 inch seam allowance on every seam unless otherwise noted, and backstitch at the beginning and end of each seam. Also plan to press open each seam as you go along.
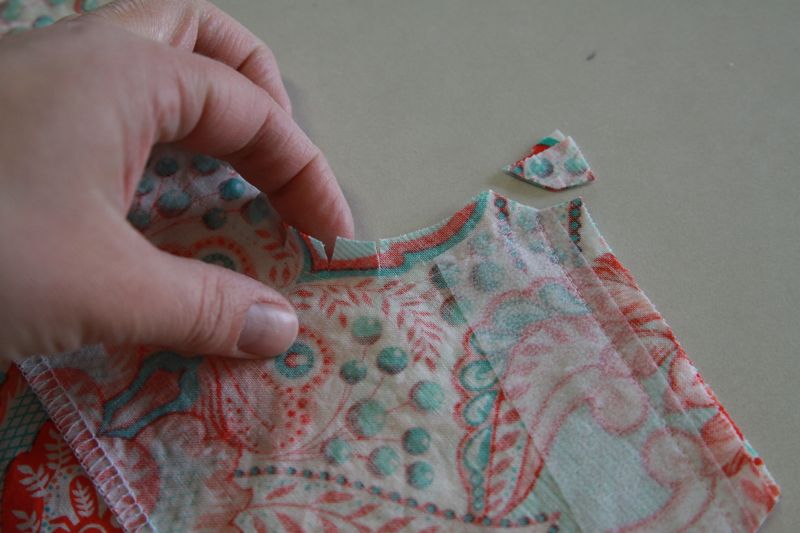
Begin by ironing your rectangles of fusible interfacing to the shoulder areas of your facing pieces, as shown below (remember to iron with the bumpy side of the interfacing touching the wrong side of the facing pieces). Then lay one facing on top of one bodice (front/back) piece, right sides together, and stitch up the left side, across the left shoulder, around the neck, across the right shoulder, and down the right side (as shown below). Backstitch at the beginning and end.

Clip your curves and corners as shown below, then turn bodice right side out and press. Repeat with the other bodice and facing.
Topstitch about 1/4 inch from the edge around your facing, as shown in the photo below. Then lay the two bodice pieces right sides together and sew up each side until you hit the dot marked on the pattern. Backstitch and forward stitch a few times right at the dot to secure the end of this seam well. This will become the bottom of the armhole.
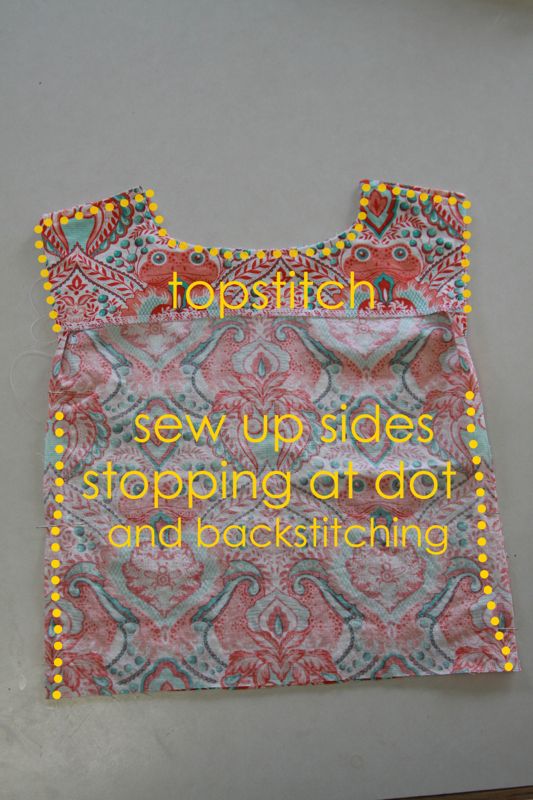
When you press the side seams open, you’ll see that the side seam ends an inch or two below the bottom edge of the facing. This creates the bottom of the sleeve (or arm hole since we aren’t technically putting in a sleeve).
Now that the bodice is all put together it’s time to start on the shorts. As noted on the pattern piece, it’s a good idea to mark each back piece of the shorts – I just put a safety pin through each back piece so I remember which is which. If you’ve gotten them mixed up, just compare to the pattern pieces – the back pieces have a little longer rise on the curved edge.
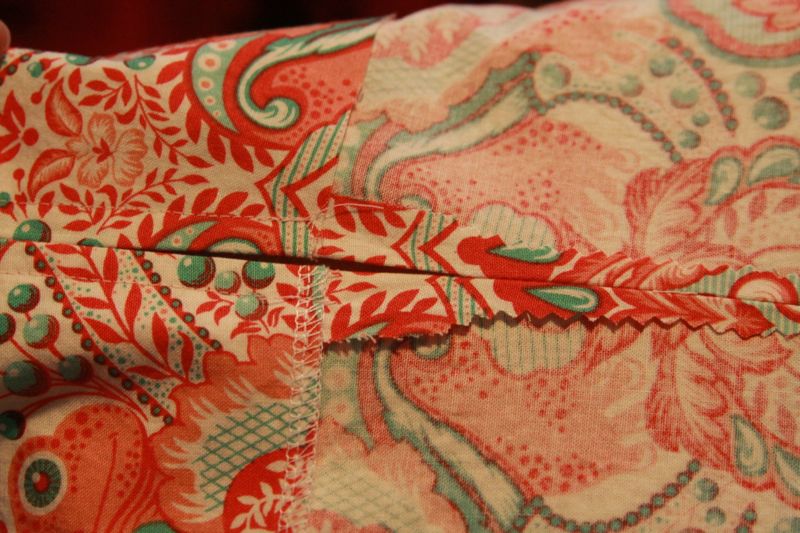
Place one front shorts piece on top of on back shorts piece, RST, matching up the shortest seams. Sew. Press open and finish edges.
Now open up each front/back pair, and place them RST. Sew along the long curved area (which my mom always referred to as the rainbow).
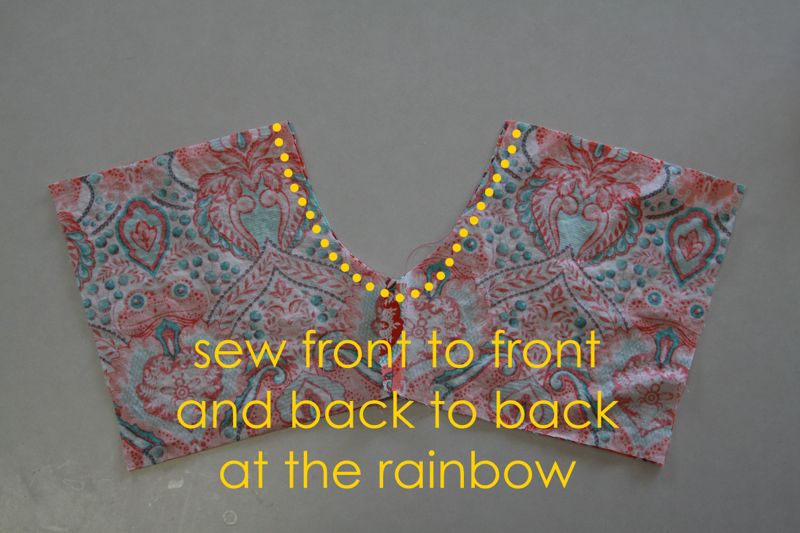
Press that seam open as well as you can (it gets a little tricky through the curve), then open up the shorts as you see below.
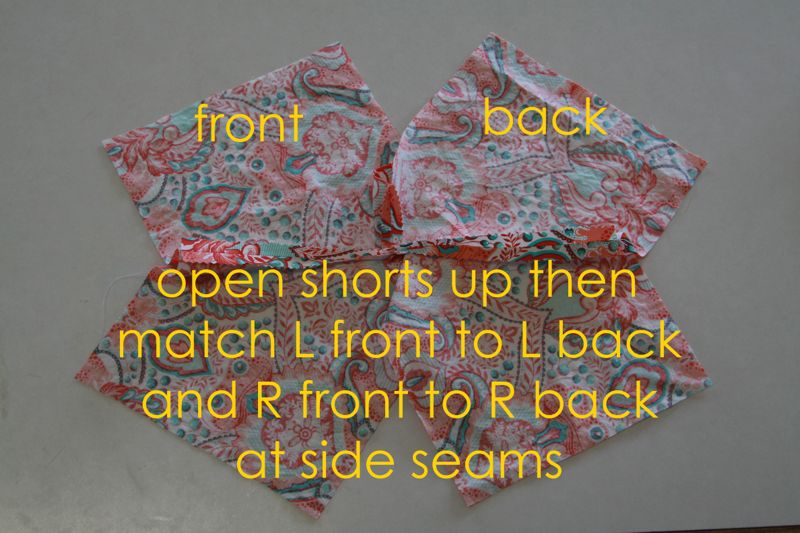
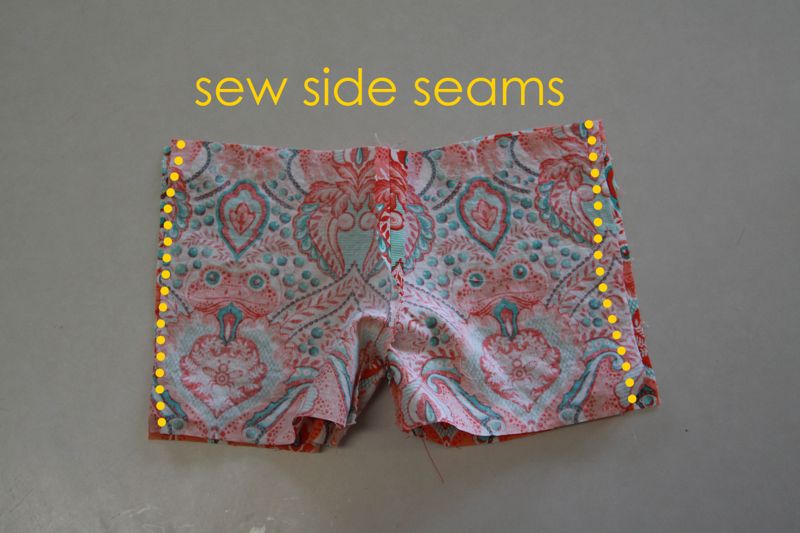
Match the L front to the L back of the shorts and the same for the right, then sew down the sides, and press the seams open.
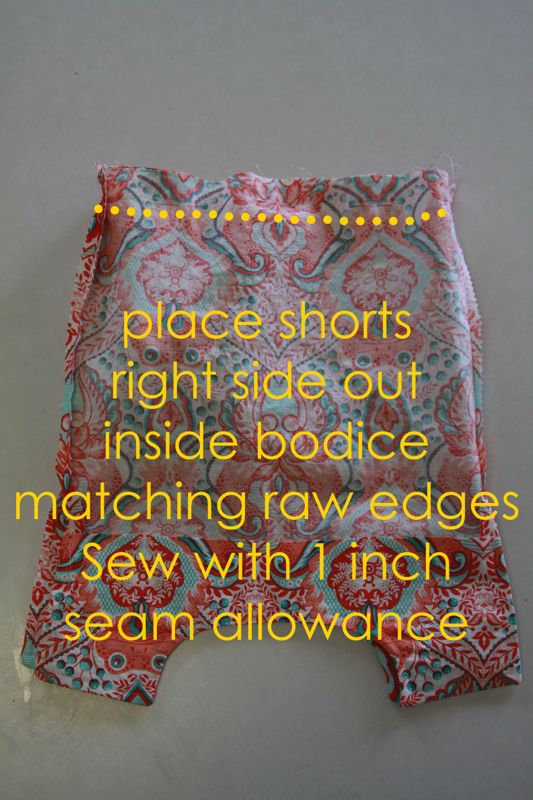
At this point the top of the shorts and the bottom of the bodice should be exactly the same width. If it’s not, adjust whichever one is wider by taking in a little on each side. Then turn the bodice inside out. Keeping the shorts right side out, slide them inside the bodice, matching up the raw edges. Sew all the way around, using a FULL INCH seam allowance. We need a larger seam allowance here because we’ll use it to make a casing for the elastic.
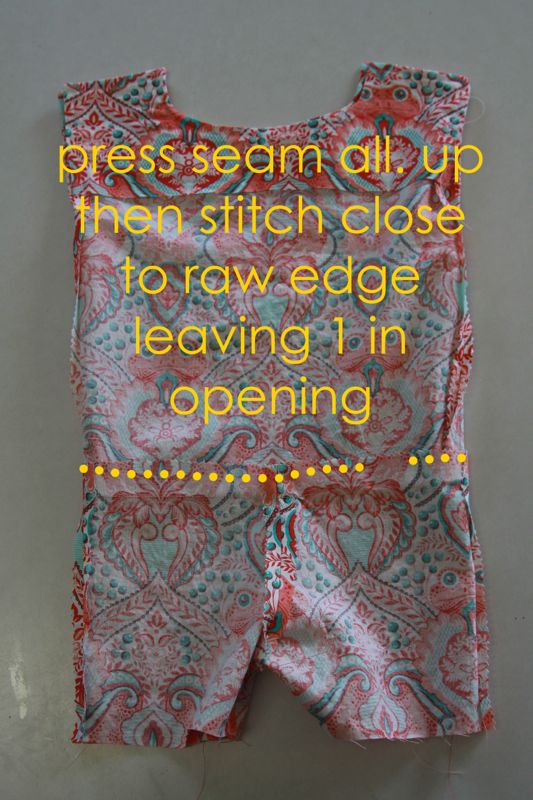
Turn the entire thing inside out, and press the seam allowance to the top. Stitch around it, close to the raw edge, leaving a one inch opening (remember to backstitch at the begining and end of each seam).
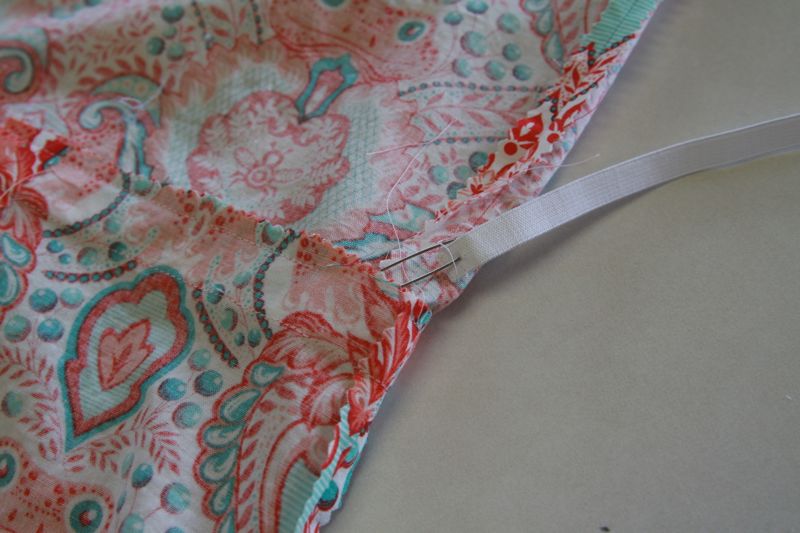
Cut an 18 in length of 1/2 in elastic (measure around your child’s hips to make sure this will be enough). Use a safety pin to thread the elastic through the casing. Once the elastic is all the way around, sew the ends together using a zig zag. At this point you can close up the opening you left above.
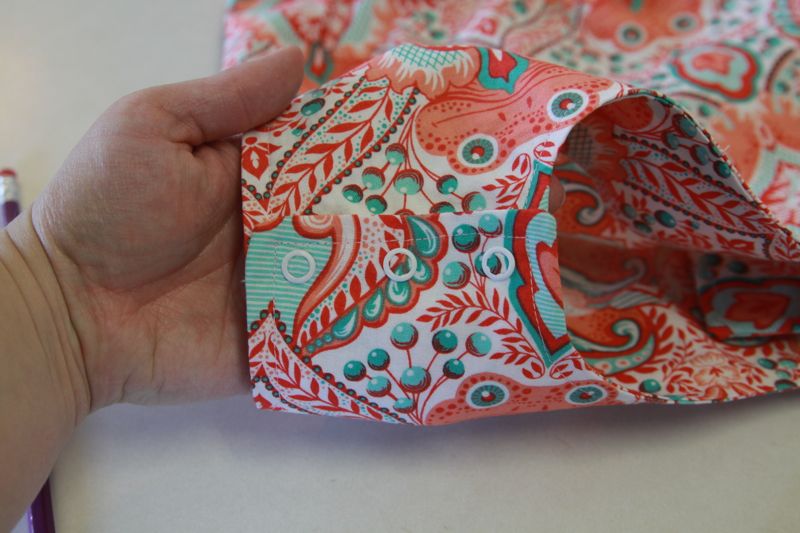
Now it’s time to add snaps to the shoulders of the bodice. Snaps seem intimidating, but they really aren’t that hard. I have a snapsetter – you can get one fairly cheap from Joanns or Walmart. Add three snaps to each shoulder.
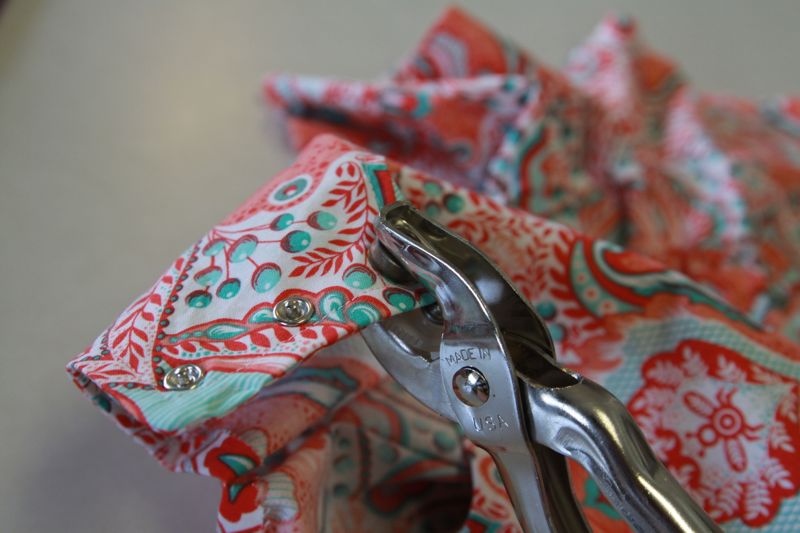
Need help on adding snaps? Check out this tutorial from make it and love it. Be sure that on the front shoulders the white/silver prong pieces are on the inside, while on the back shoulders the prong pieces are on the outside. This will allow the back shoulders to overlap the front shoulders and snap on top of them. If you really don’t want to mess with straps, add buttons or even sew-on velcro at each shoulder.
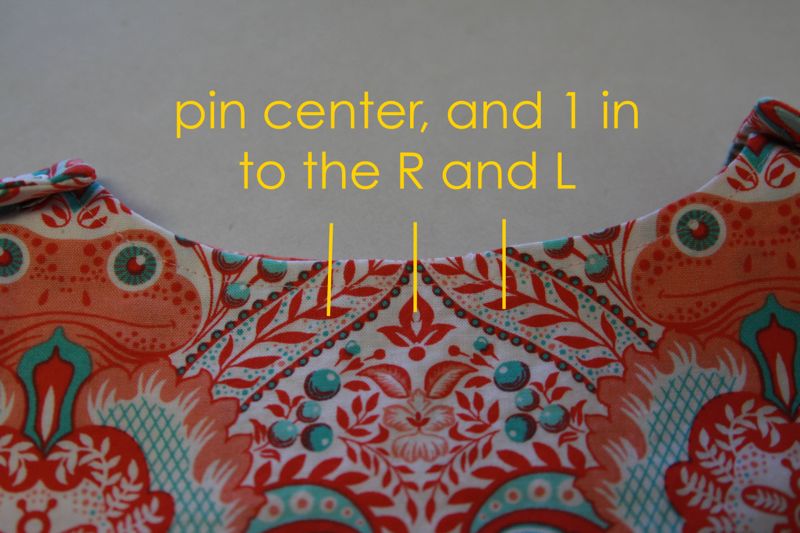
This next step is optional – I added a little inverted pleat in the front because my baby girl has kind of slim shoulders and the boatneck seemed a little too wide for her. So you can try the shortie on your model and decide if you need a little pleat as well. I like how it looks, but again, it’s totally optional. Just find the middle of your front neck and mark it with a pin. Then put another pin one inch to the left, and another one inch to the right.
Bring all the pins together, creating an inverted pleat. Stitch across the pleat (right on top of your original topstitching so it doesn’t show) four or five times to secure it.
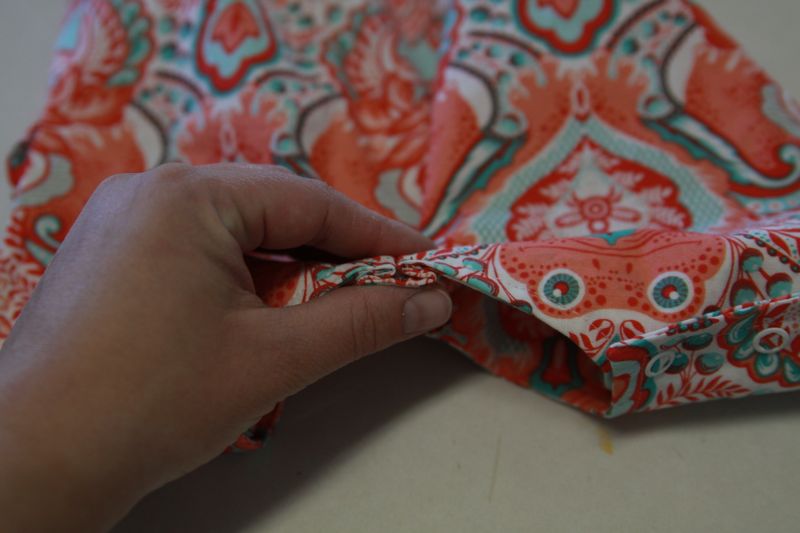
This picture shows it will the pins still in, but you get an idea of how it should look.
Now that the main construction is done, it’s time to grab your accent fabric and cut out the pattern pieces for the cuffs and ties. (Your cuff is a little taller than mine to make the next few steps a bit easier.)
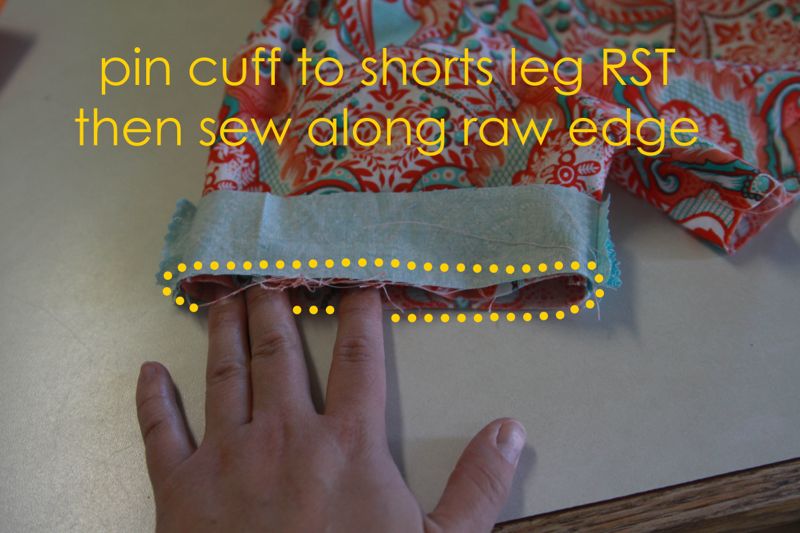
Lay two cuff pieces right sides together, and sew along the short edges to create a circle of fabric. Place it over one leg of the shorts (matching up the curved short end of the cuff to the inner leg), RST, then sew along the raw edges.
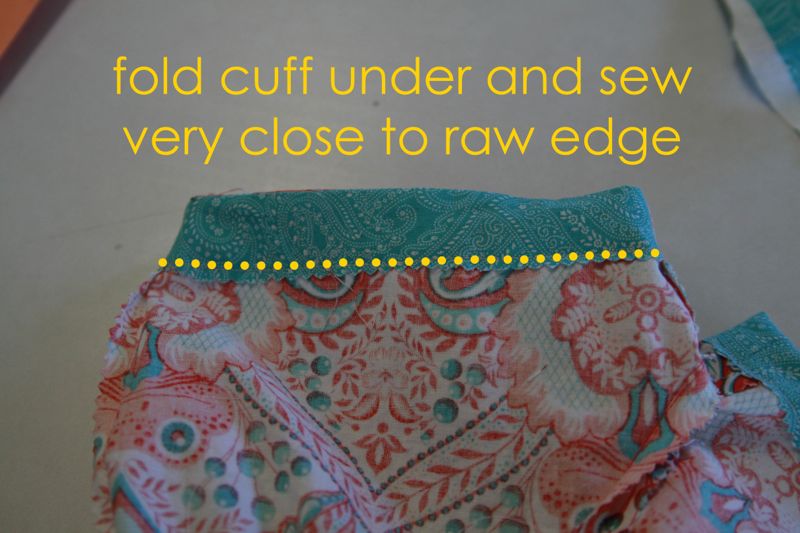
Fold the cuff so it’s completely inside the shorts leg and press. Then sew again, this time very close to the remaining raw edge of the cuff, as shown below.
Now turn the shortie right side out, then fold up each cuff and press. Hand tack in a few places if you wish to make sure the cuff remains turned up.
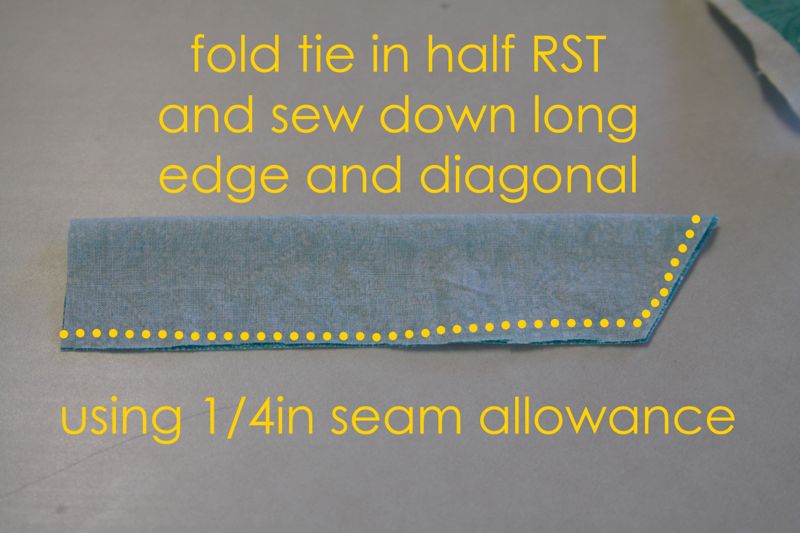
Grab your tie pieces and fold them in half longways. Sew up the long side and diagonal edges. Clip the corners, turn right side out, and press.
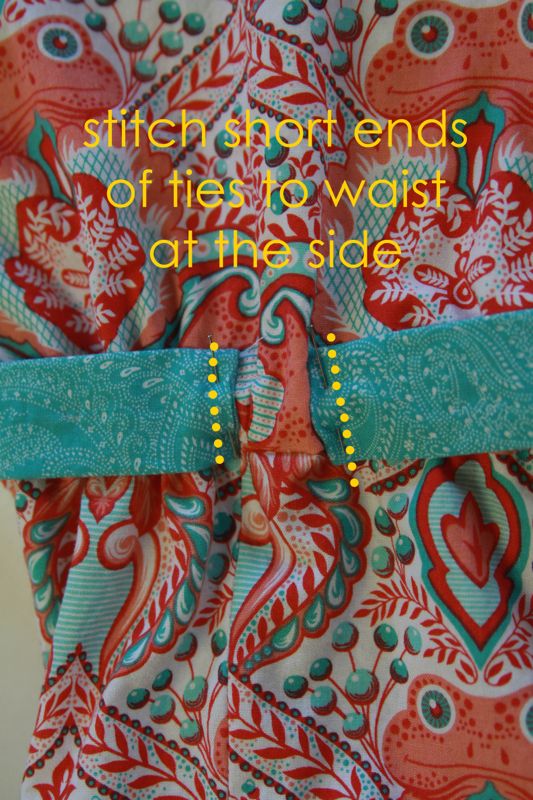
Tuck in the raw edges at the open end of each tie and press. Place the short side of one tie right over the elastic waist casing at one side seam and sew. Sew the short side of the other tie an inch or two away on the front of the shortie. Again, you’ll be sewing right over and through your elastic. The ties will be pointing away from each other. Once they are sewn on, tie them together.
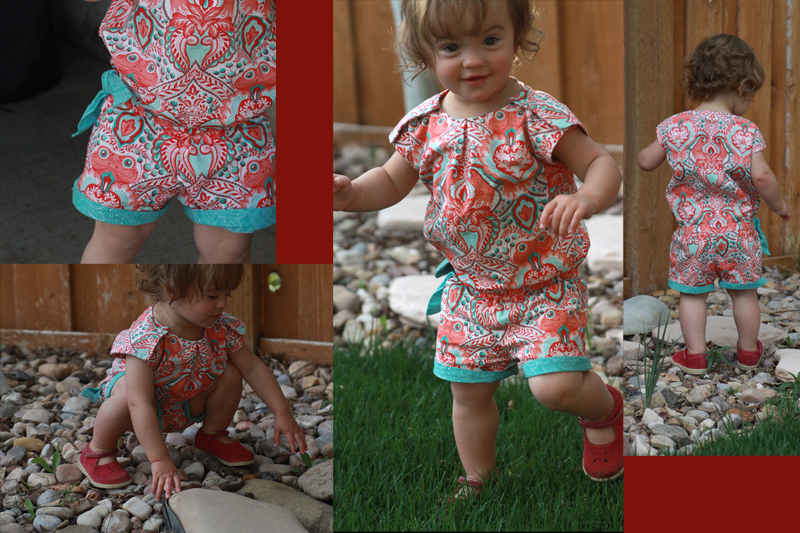
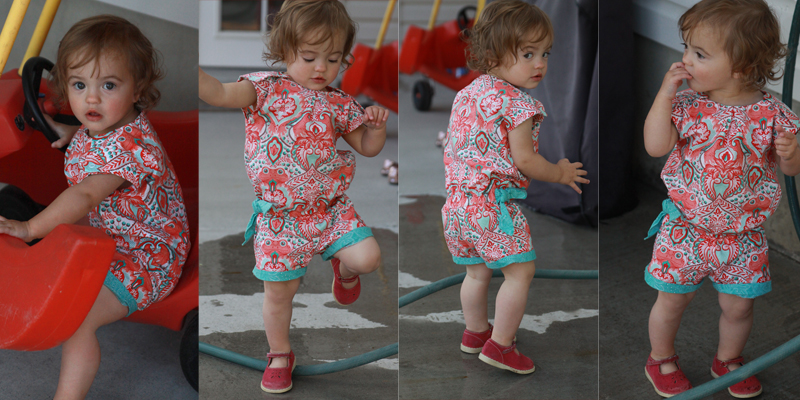
And here’s your finished shortie!
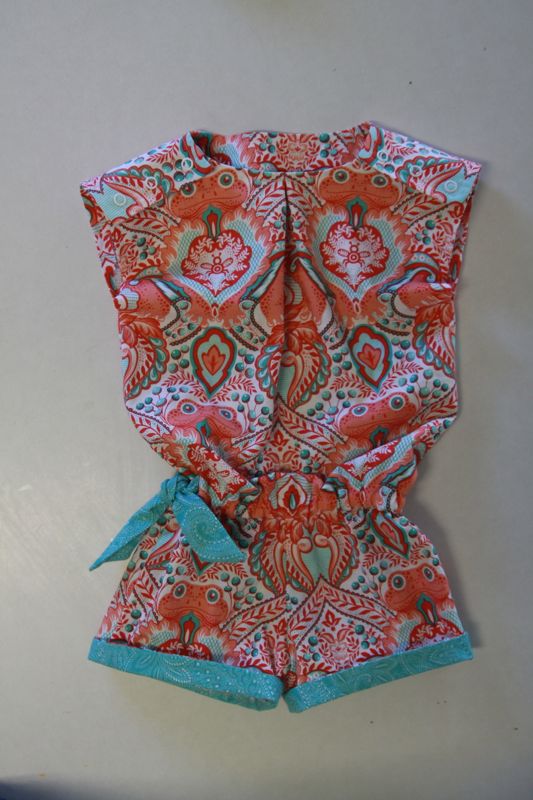
It looks really long in the torso and short in the shorts because it is! The elastic should sit on your baby’s hips, not her waist, so it looks just like the dropped-waist versions we’ve all seen on the runway. On my version the shoulder snaps are a little bit forward on the shoulders, but on the version you make using my pattern the snaps will sit right on top of the shoulders (which will help the shoulders sit better).

Sharolyn says
This is seriously the cutest romper pattern I’ve found on Pinterest, including those that you have to pay for. I just made one for my daughter for the 4th of July. The instructions were so easy to follow that I’ll probably make her one a week for the rest of summer. Thank you so much for posting your hard work for others to share!
sArah says
This is such a cute pattern! I´m about to tape the pieces and want to cut some fabric but I´m confused about the seam allowances. You said we should plan to sew with 1/2″ sa – so it´s NOT included in the pattern pieces? I just want to make sure 🙂
Thanks for the freebie
Sarah says
Hi there, I love this little shortie and can’t wait to make it.
I am however, having trouble (as a novice) understanding how I am meant to see the shorts together when the inner leg curves are on completely different angles and lengths…
Please help!