
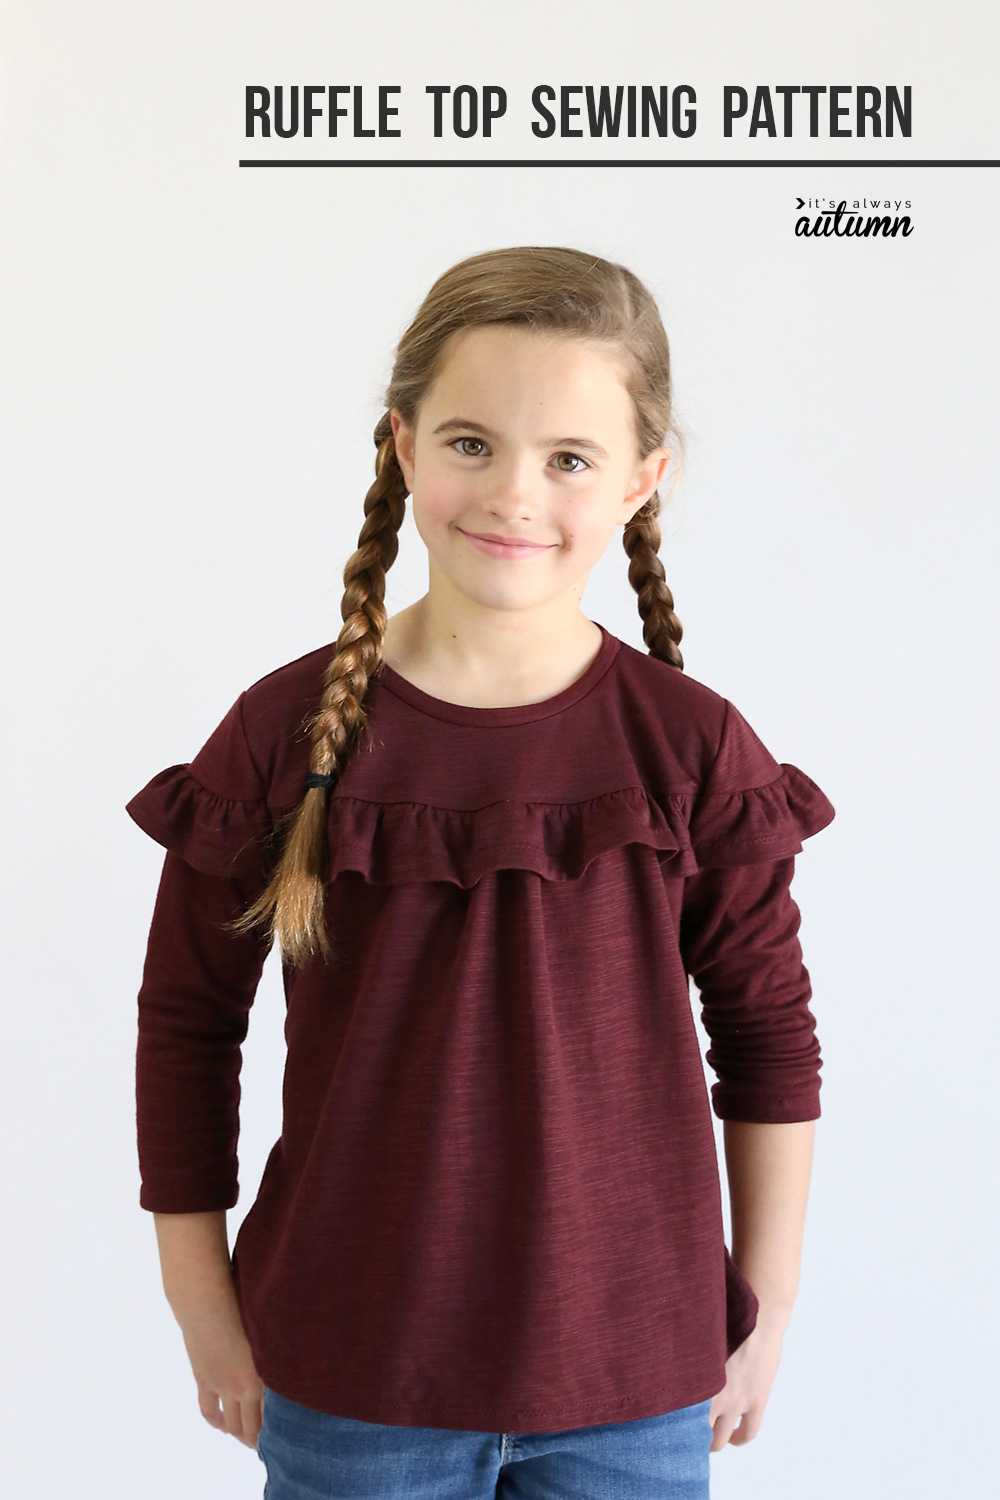
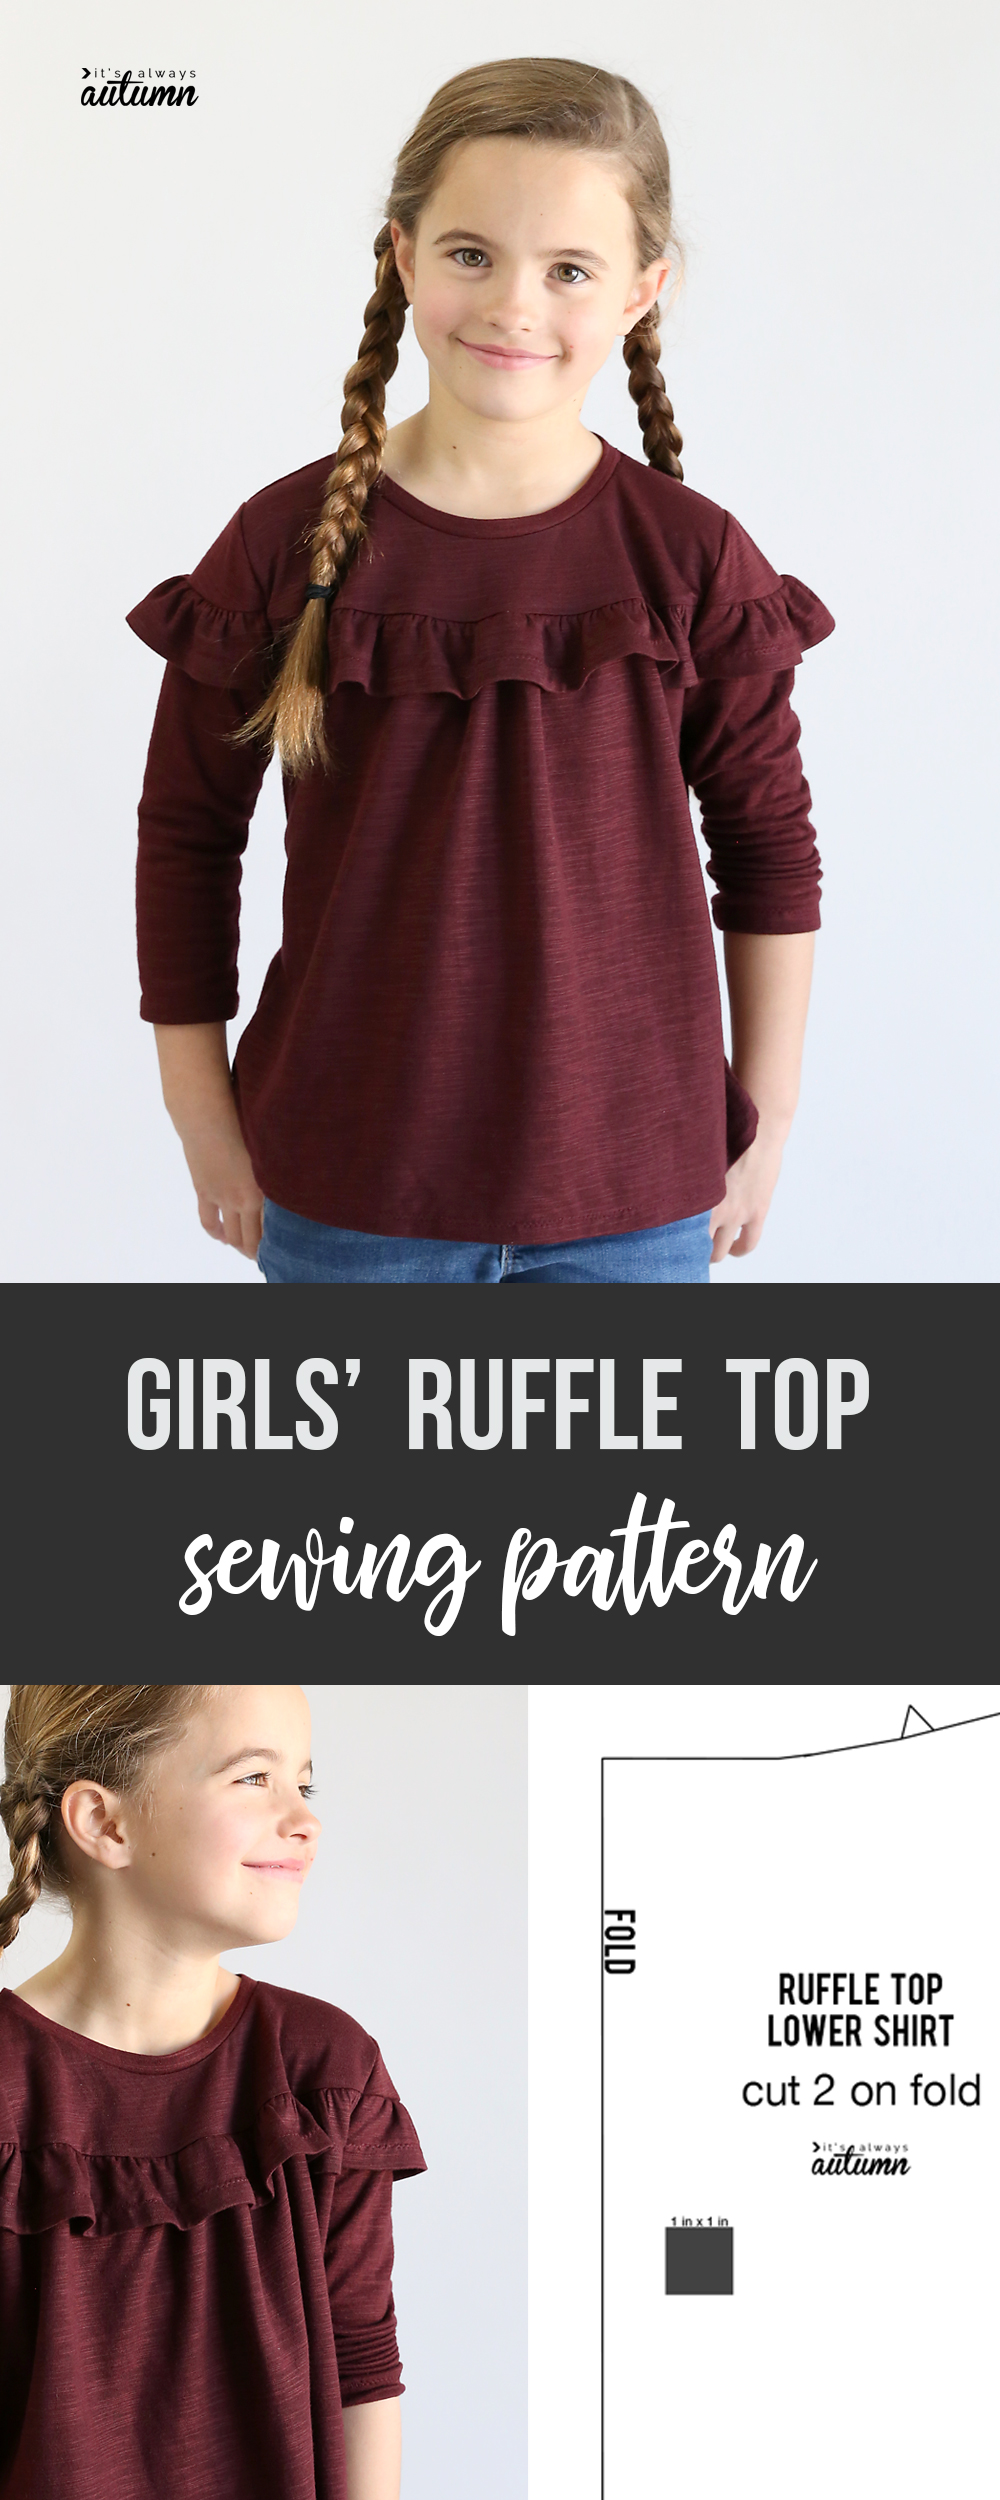
In today’s post: Download the free girls’ ruffle top sewing pattern in size 7/8.
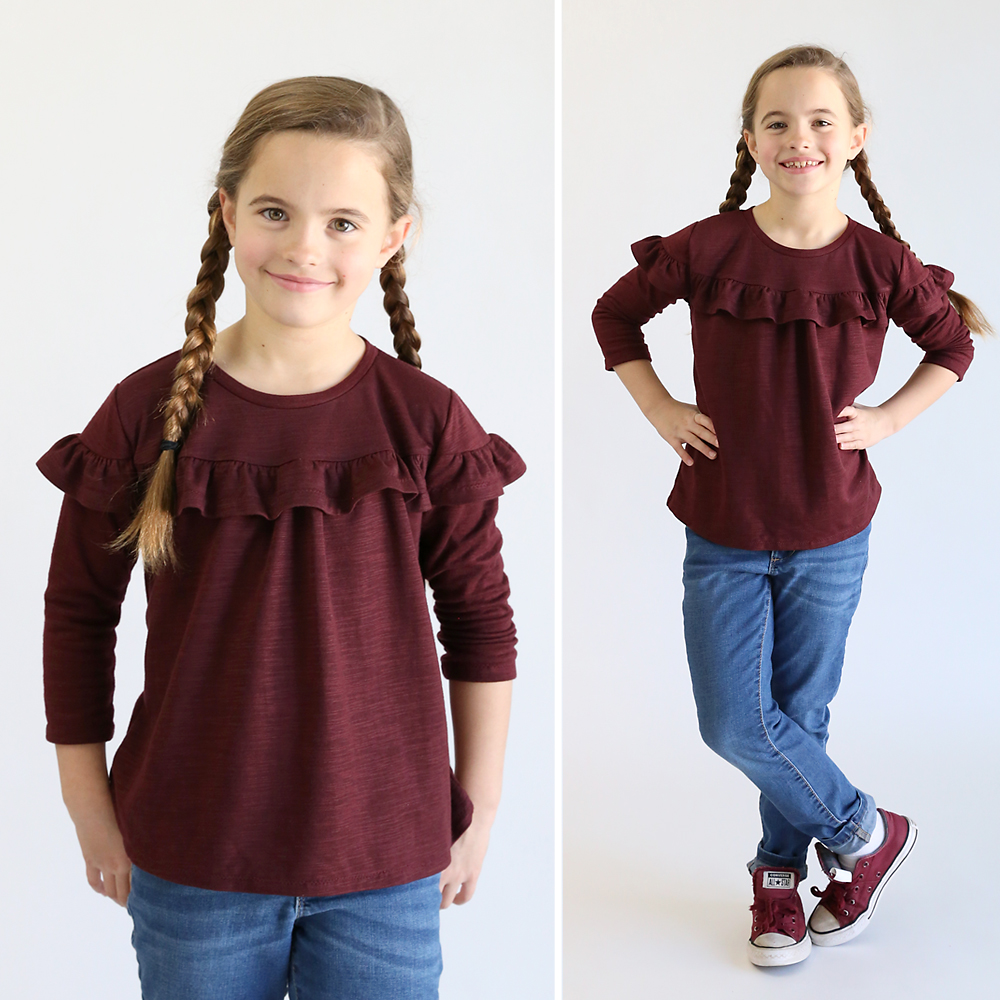
Ok people, I need to know: are we all tired of ruffles yet? It seems like ruffles have been a big thing on tops for girls and women for the past ten years and I keep thinking the trend must be over. But every time I think “ok, ruffles are finally out” I see another adorable top covered with – you guessed it – ruffles. Far be it from me to fight one of the most consistent trends of the past decade, so I’m sharing a new sewing pattern for you today for this cute little girls’ ruffle top. (And hey, you can use this pattern to make a dress too! Check back next week for more info.)
Fun fact: After I started having kids, I took a sewing hiatus that lasted a looooong time. It wasn’t until I found out our fifth child was a girl and I decided to make her blessing dress that I started sewing again. This was 2010 and sewing blogs were fairly new – anyone remember what was taking the sewing world by storm at that time?
Fifty bonus points to anyone who said embellished tees! They were all the rage and the clever ladies with sewing blogs were busy teaching us how to cut up old t-shirts to turn them into cuter t-shirts complete with ruffles and flowers. How fun! In fact, one of the first things I made when I started sewing again was this Embellished Tee from Make It & Love It. Another one was the famous Ruffle Shirt from Tea Rose Home. Anyone else been around the sewing blog world long enough to remember these?
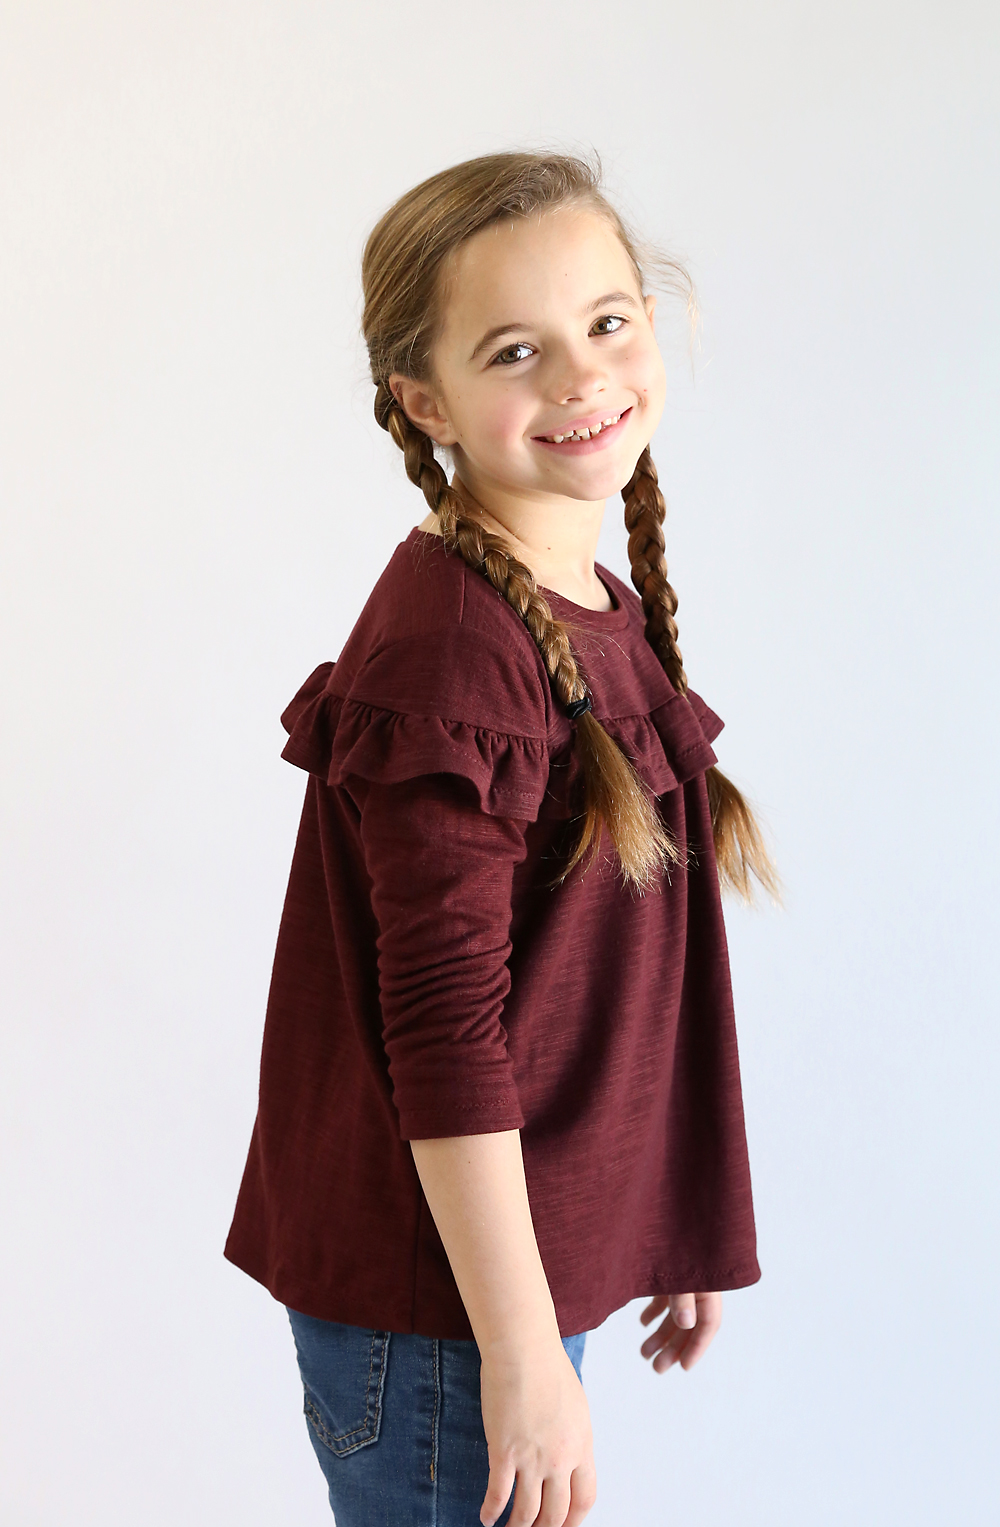
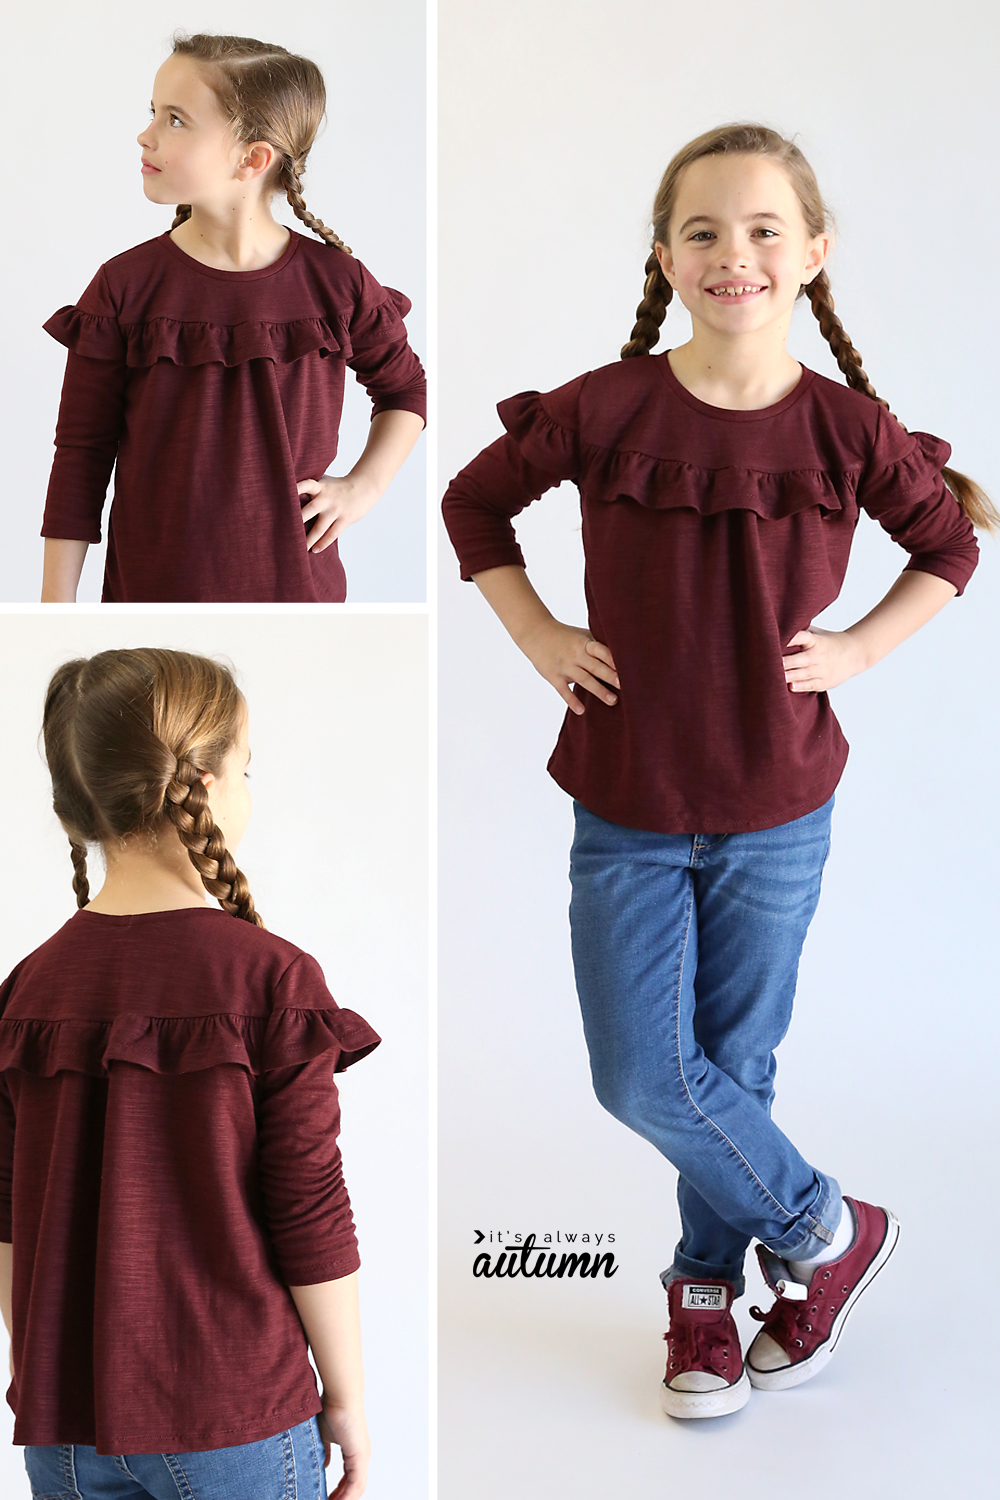
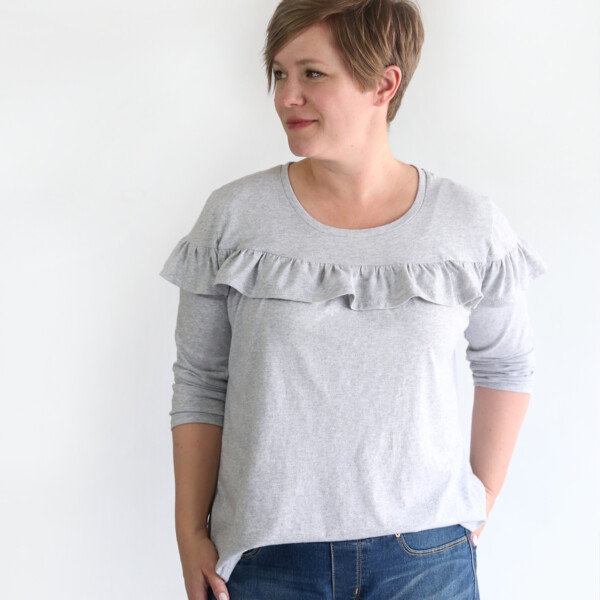
So here we are nine years later and I’m still chopping up t-shirts to make cuter t-shirts, lol. I made this ruffle shirt for my daughter from a men’s 3XL long sleeve tee from Walmart. I struggle to find knit fabrics I love in my local fabric stores (seems like they are always too thick or too thin!), and ordering fabric can be a bit of a gamble since you can’t see and feel it first, plus you have to wait for it to arrive. But I find that men’s t-shirts can be a great source of medium weight knit in a variety of colors that are often prettier than what you find at the fabric store!
For this pattern, you really want a knit that has a bit of substance – a light or tissue weight knit weight will probably get stretched out and not be able to hold in the ruffles. You also want a knit that has good recovery – so when you stretch it you want it to snap back nicely to its original shape.
Girls’ Ruffle Top Pattern in size 7/8
This pattern is in girl’s size 7/8 only. Sorry about that 😉
Download the pattern by clicking here.
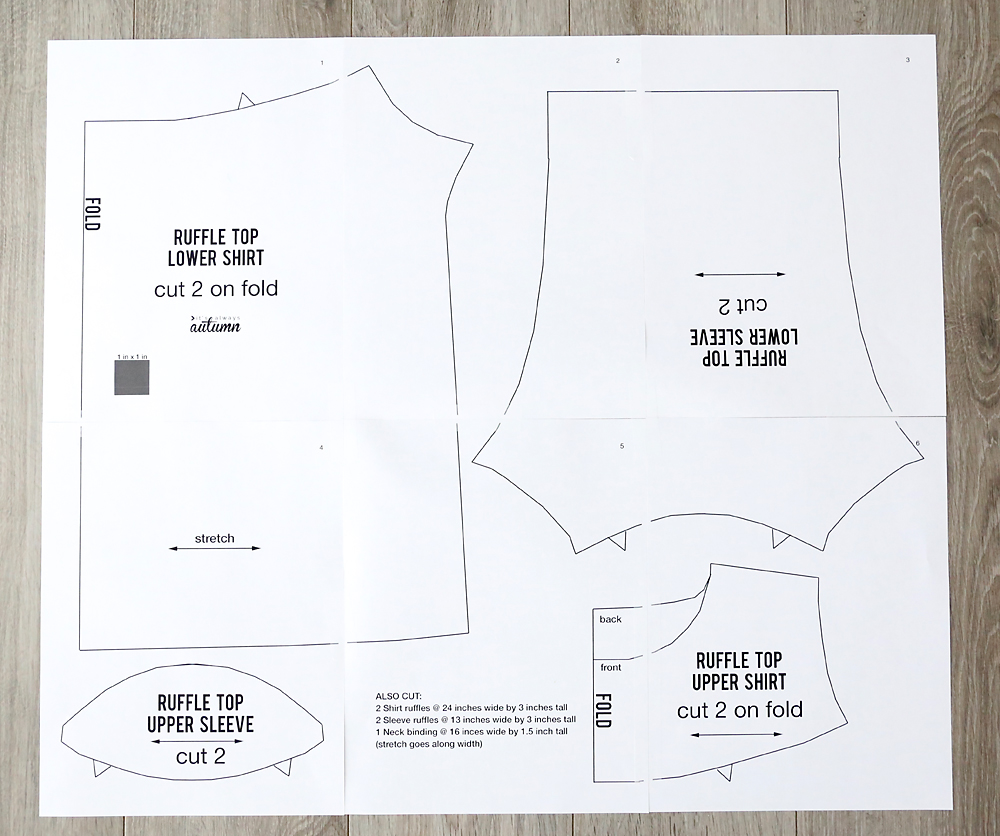
Print out the pattern on 6 sheets of 8.5×11 paper. Be sure to print it at 100% or full size, and print page 1 first so you can measure the test square – it should be exactly 1 inch square. Butt the printed pages up next to each other without trimming or overlapping and tape together. The pattern will look like this:
You’ll need about a yard and a quarter of 56-60 inch wide knit (stretchy) fabric for this top. Look for a knit that feels like a t-shirt (I actually used a 3X men’s shirt from Walmart because I don’t love the knits I can find locally).
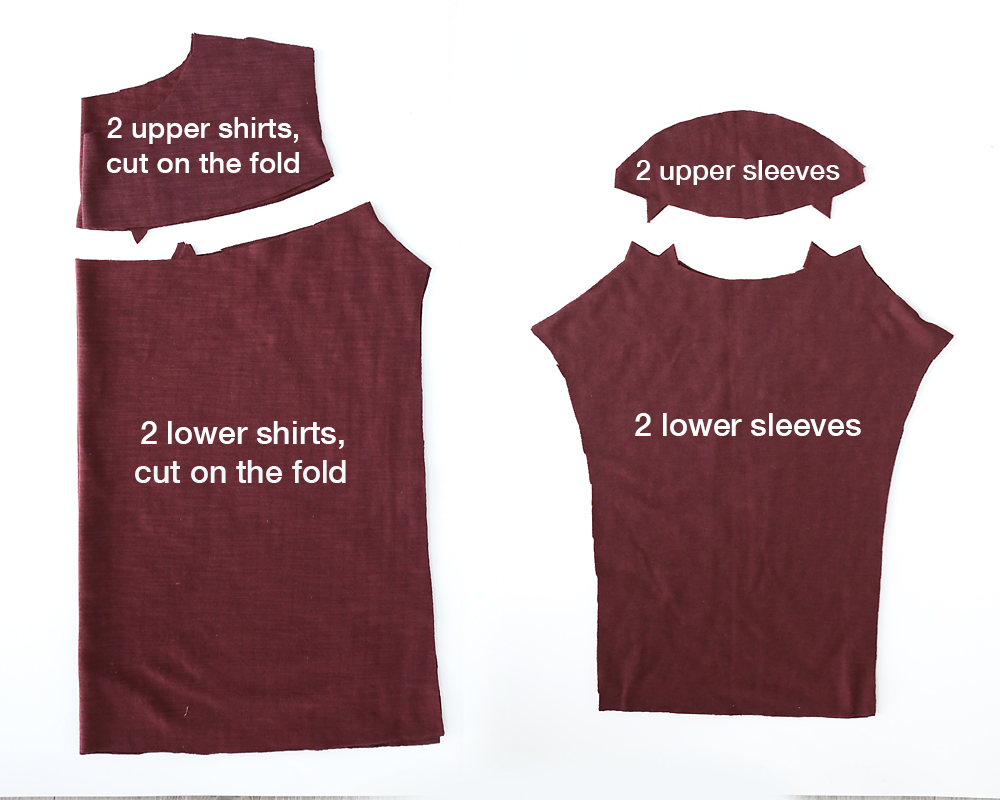
Step 1: Cut out the pieces. There are four pattern pieces to cut out PLUS 3 additional pieces you will cut from measurements. This is what the pattern pieces look like. Note that the upper shirt and lower shirt pieces are cut on the fold, but the sleeve pieces are not. Also, be sure to cut one upper shirt with the front neckline and one with the back neckline. **The pattern includes 3/4 length sleeves. If you would like long sleeves, add 3-4 inches of length to the lower sleeve pattern.
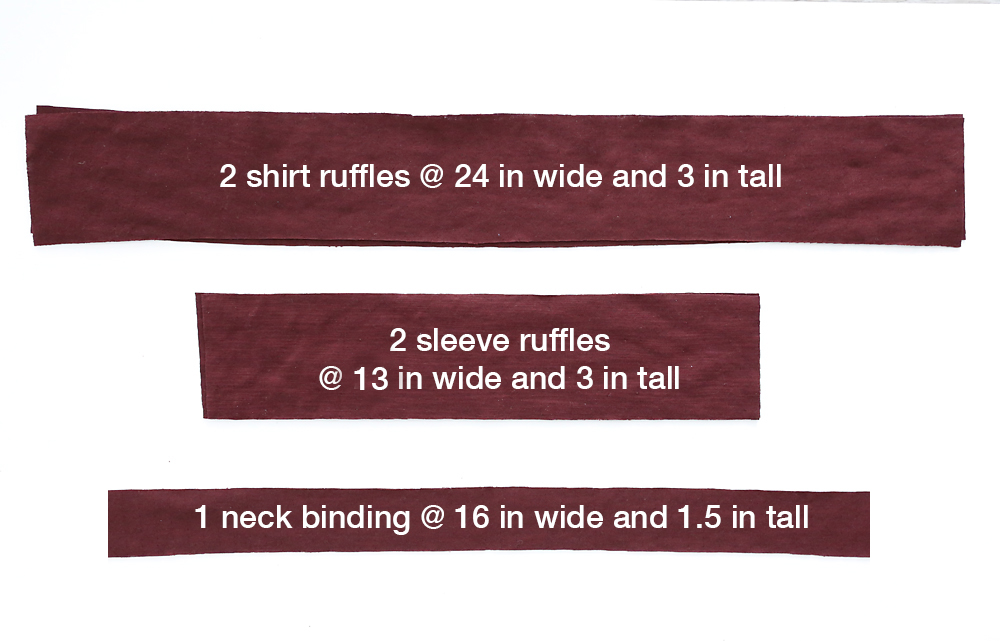
These are the three additional pieces. Measurements for them are noted on the pattern. BE SURE that the stretch goes along the width of all these pieces.
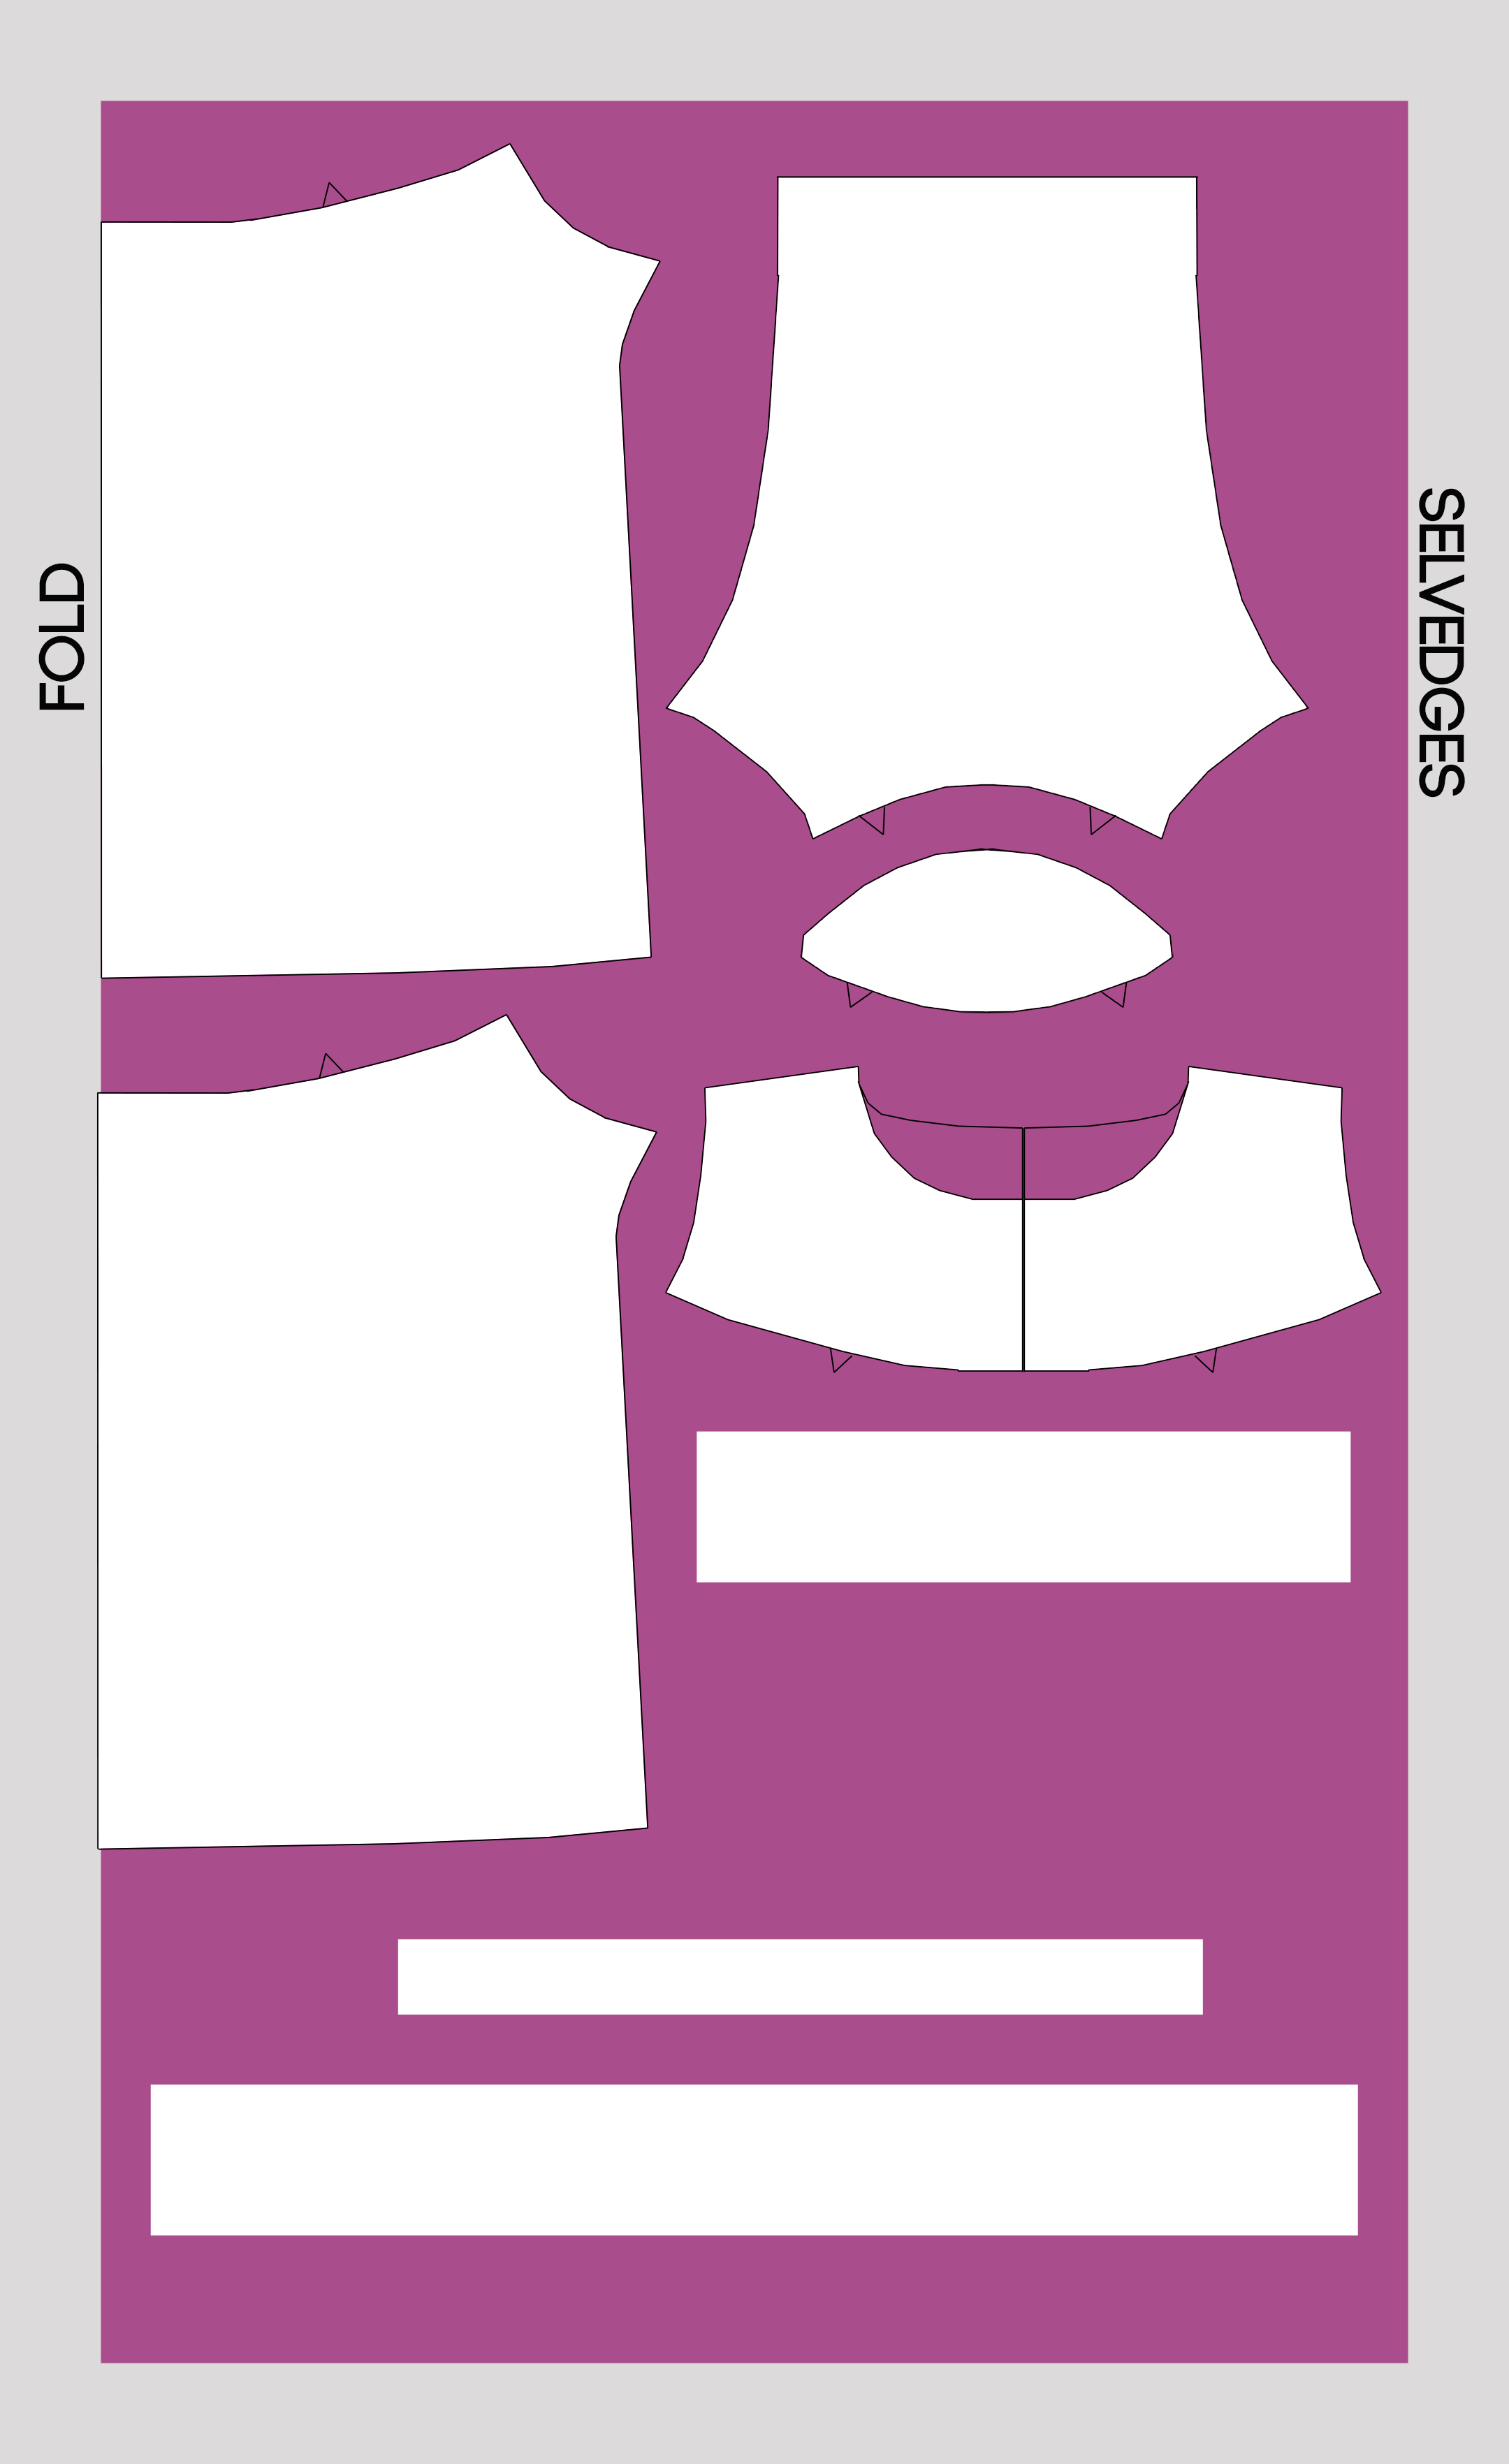
*Half an inch seam allowance is included in this pattern. Here’s a diagram to help with pattern placement on your fabric:
Step 2: Hem + gather ruffle pieces. On one long side of each ruffle, turn up 1/2 and inch and press. Sew (I used a zigzag).
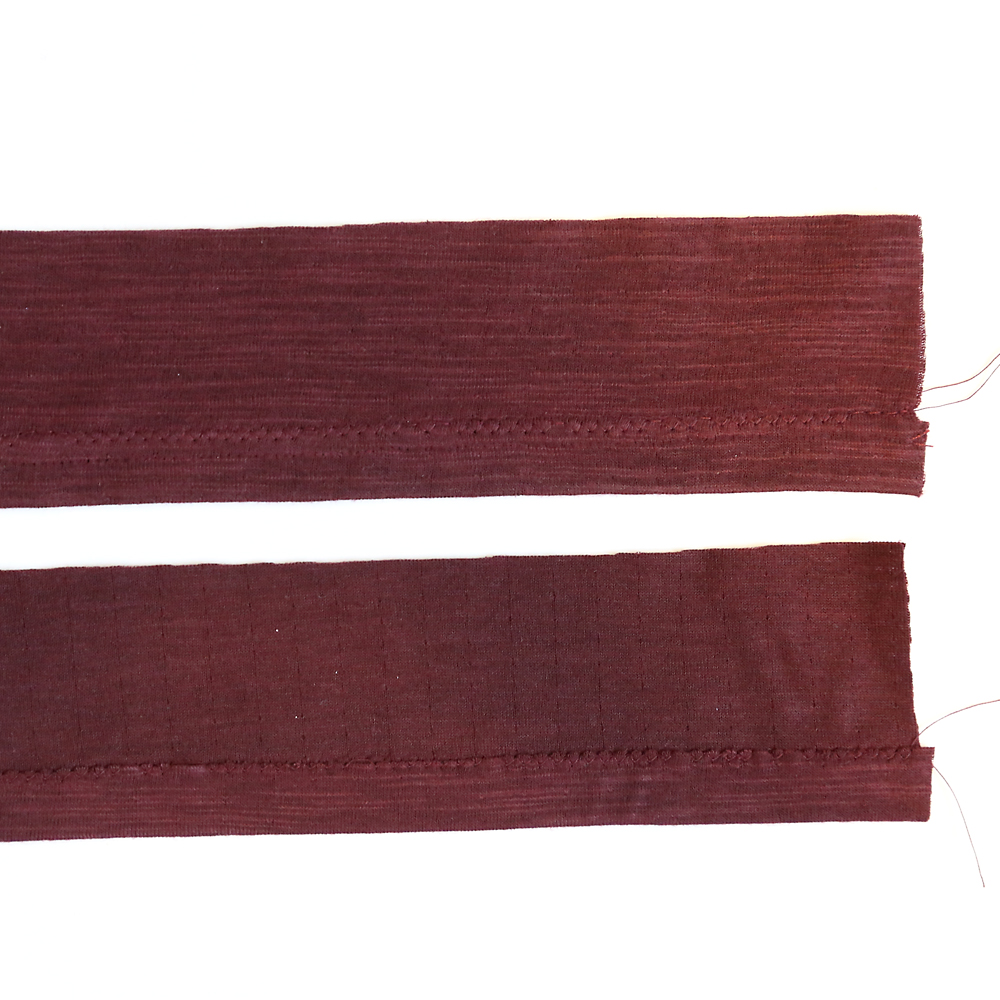
Then, sew two rows of gathering stitches along the other long side of each ruffle. A gathering stitch is a long straight stitch with a low tension. Pull on the bobbin threads to gather the ruffles. The shirt ruffles should be gathered to 16 inches long and the sleeve ruffles gathered to 8 inches long. Be sure to evenly distribute the gathers.
Step 3: Sew in sleeve ruffles. For each sleeve, you now have three pieces: an upper sleeve, a ruffle, and a lower sleeve. Lay those three pieces out with right sides facing up, as shown in the photo on the left below. Pick up the ruffle and lay it on top of the lower sleeve, as shown in the photo on the right (both pieces are still right side up).
Next, you will flip the upper sleeve down so that the right side is facing down. Match up the notches and pin the upper sleeve to the lower sleeve with the ruffle sandwiched in between them. Sew the three pieces together with a 1/2 inch seam allowance. Either serge or use a stretch stitch or narrow zig zag so the seam will have some stretch. This is what the completed sleeve looks like:
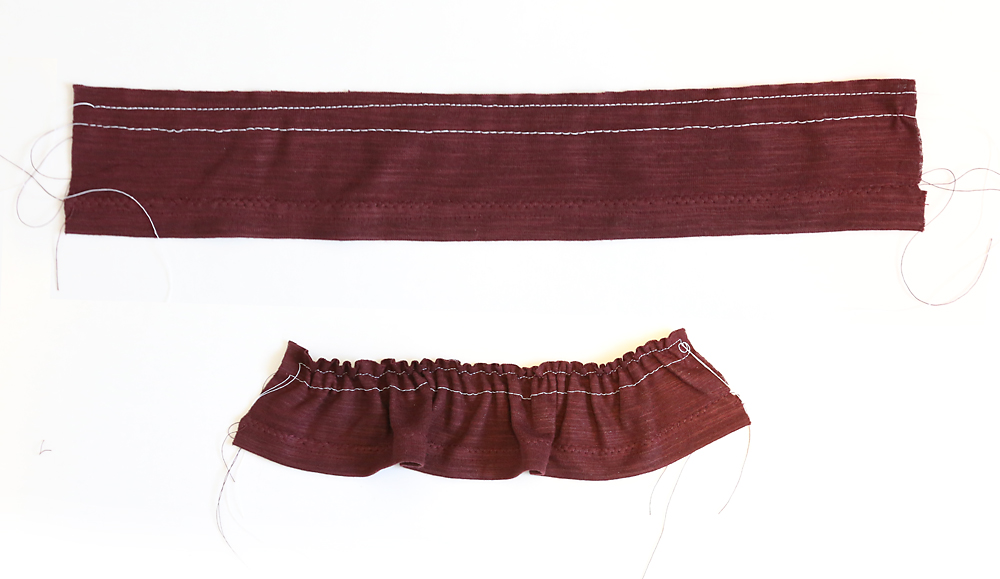
Step 4: Sew in shirt ruffles. You also have three pieces for the shirt front and the shirt back. You’ll notice that the lower shirt is wider than the upper shirt. Sew two rows of gathering stitches in between the notches on the lower shirt, and pull the bobbin threads to gather it up until it is the same width as the upper shirt, as shown below.
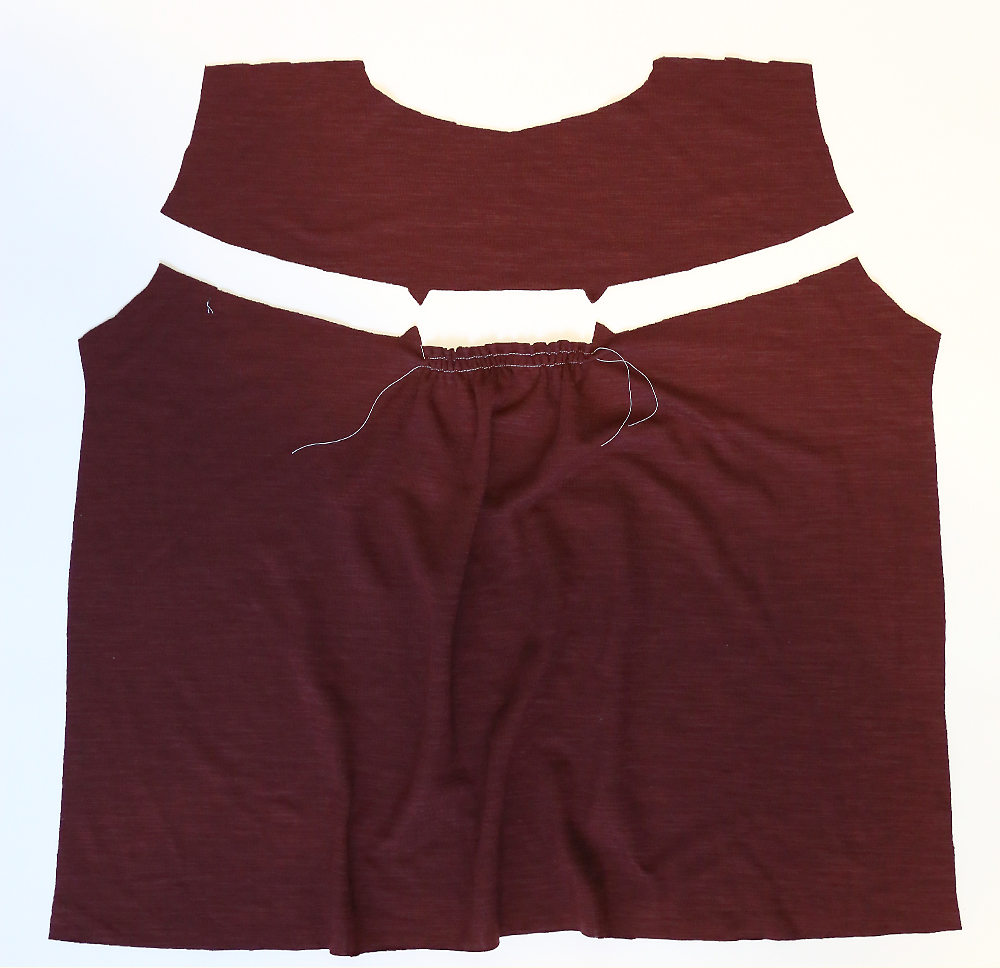
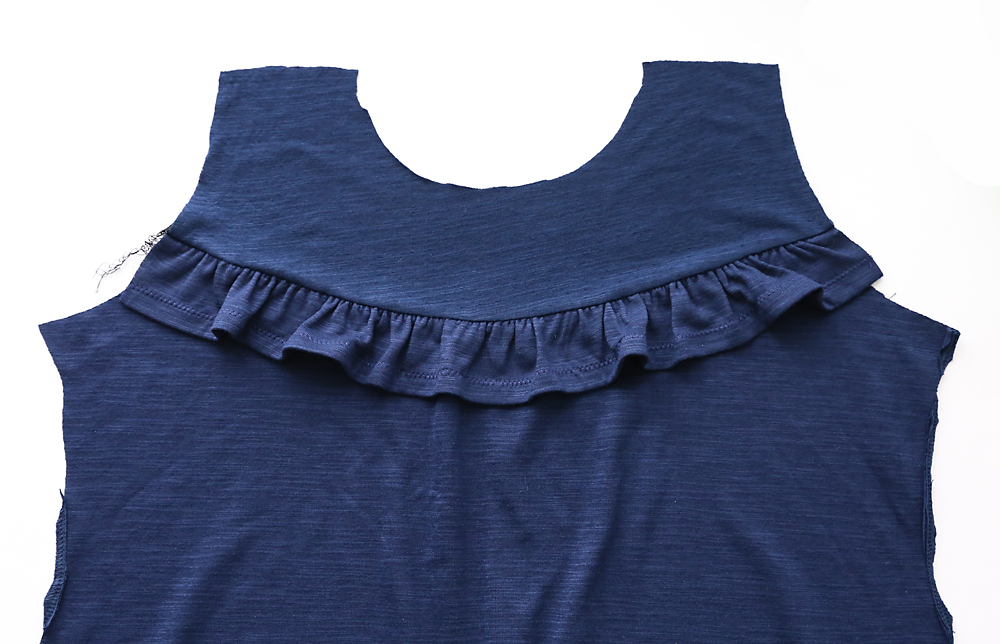
Sandwich the ruffle between the lower shirt and upper shirt in the same way you did the sleeves, matching up the notches. Sew with a 1/2 inch seam allowance using a stitch that will stretch. This is what the completed shirt piece looks like:
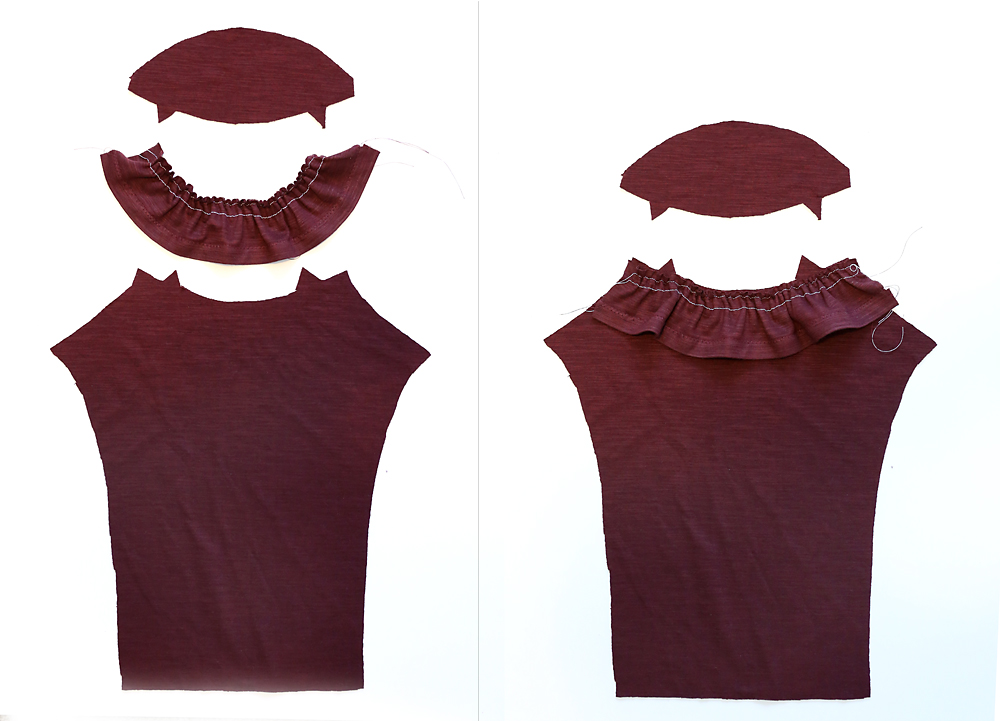
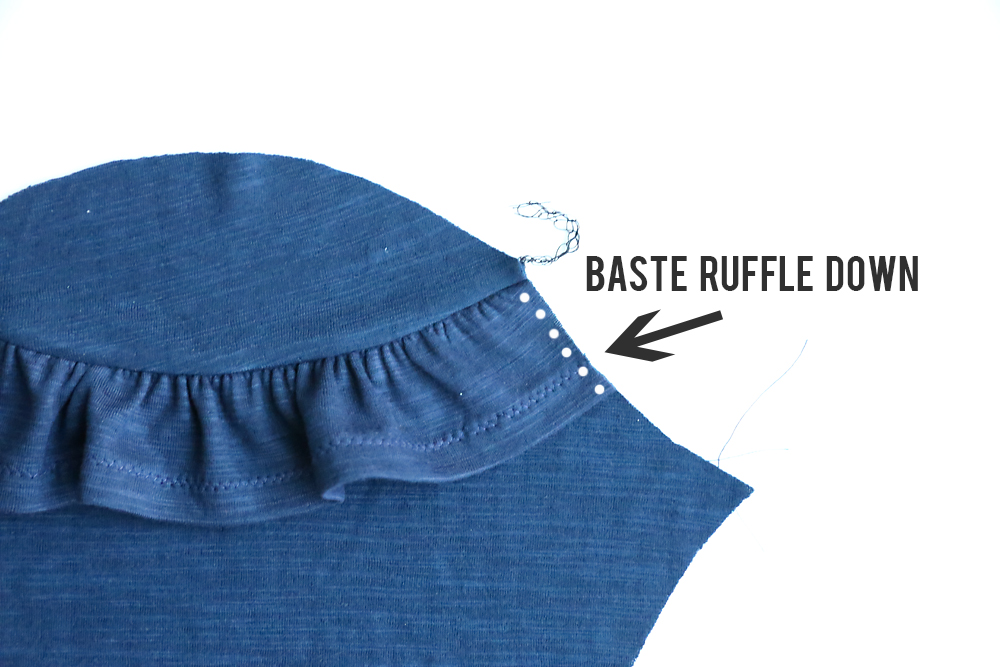
Step 5: Baste ruffles down. Where the ruffles end at the edge of the sleeve, trim the ruffle so it matches the curve of the sleeve piece, and baste the ruffle down to the sleeve (as shown). Do the same thing with the shirt pieces.
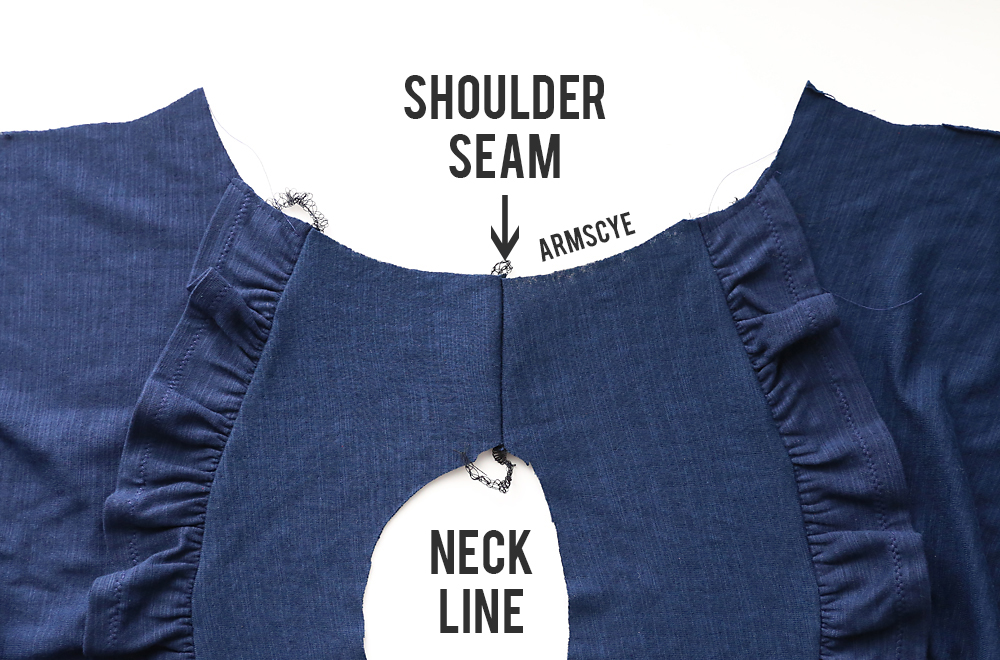
Step 6: Sew shirt pieces together. Lay the front shirt piece on the back shirt piece, right sides together. Sew across the shoulder seams as shown.

Step 7: Attach the sleeves. First, open up the shirt and lay it down on a flat surface, right side up, as shown below.
Grab one sleeve and match the center top of the sleeve curve with the shoulder seam on the shirt and pin, right sides together (top photo below).
Continue to pin the sleeve to the shirt, being sure to match up the ruffle seams. Because the sleeve curves out while the shirt curves in, either the sleeve or the body of the shirt will get bunched up as you pin (bottom photo below).
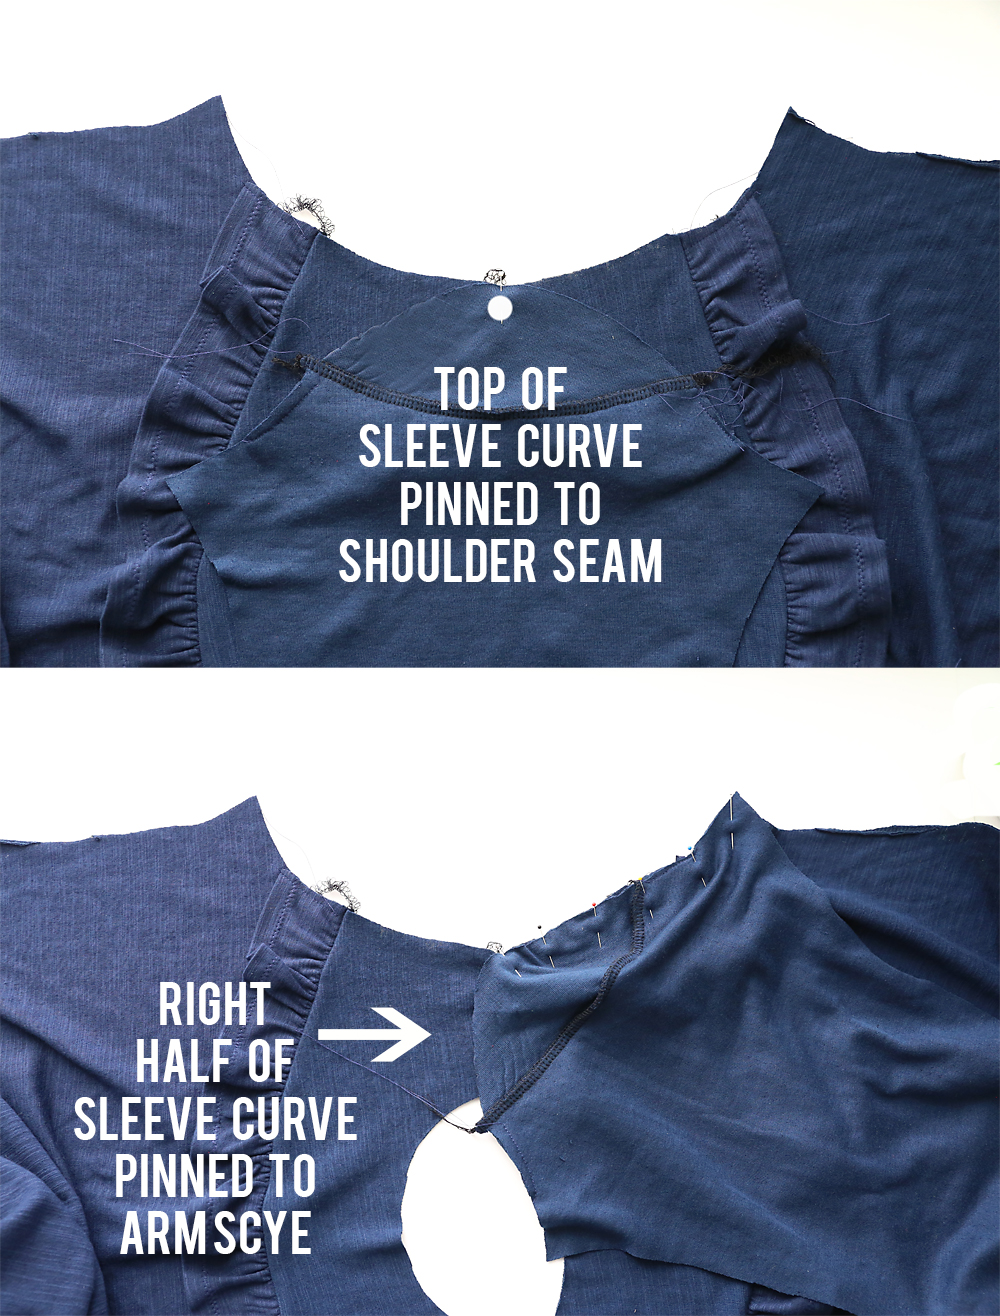
Sew both sleeves into the armscye (armhole) with a 1/2 inch seam allowance.
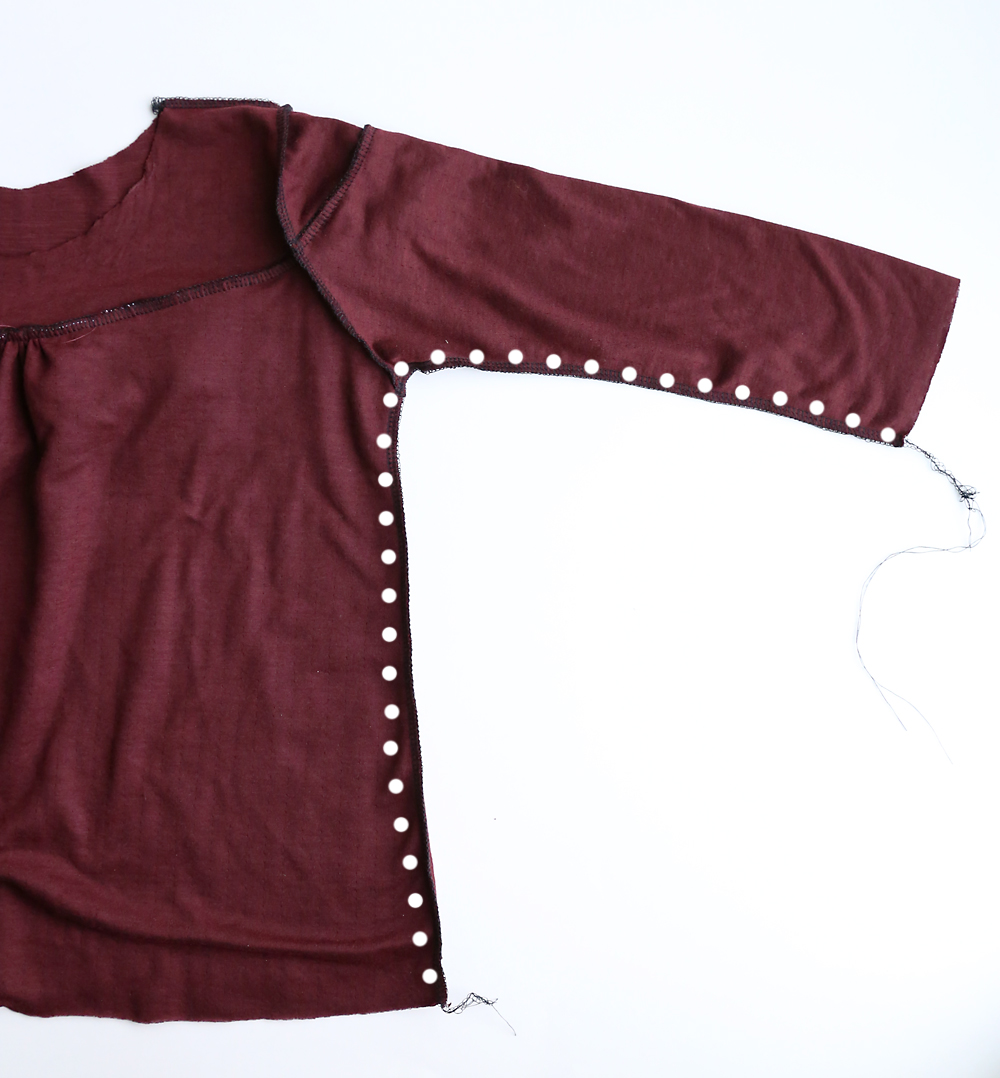
Step 8: Sew the side seams. Place the shirt with front and back right sides together. Sew up the sleeve and down the side of the shirt as shown below.
Step 9: Add the neck binding. Grab the neck binding piece and match the two short ends, right sides together. Sew.
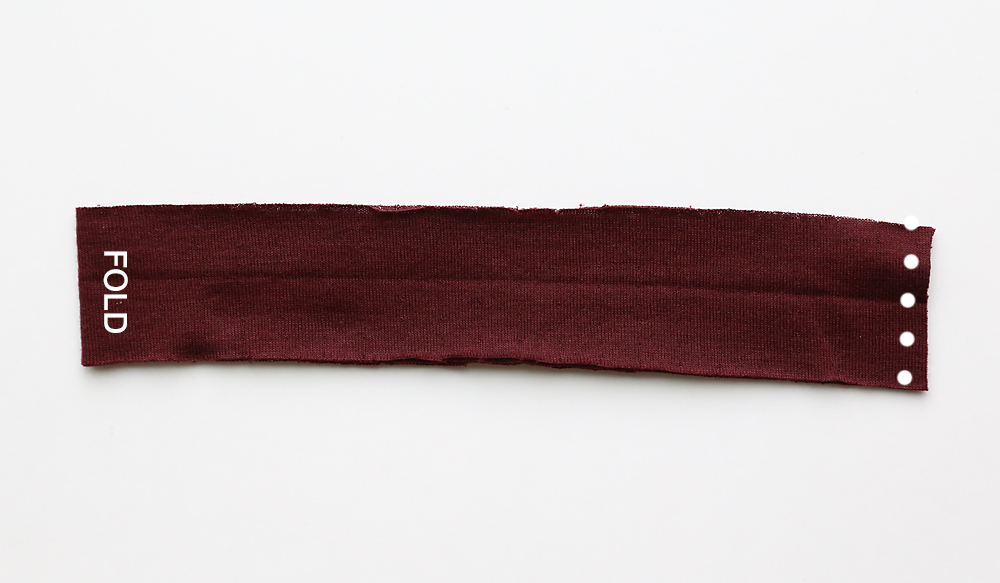
You have created a loop of fabric. Fold the loop in half with the right side out and press.

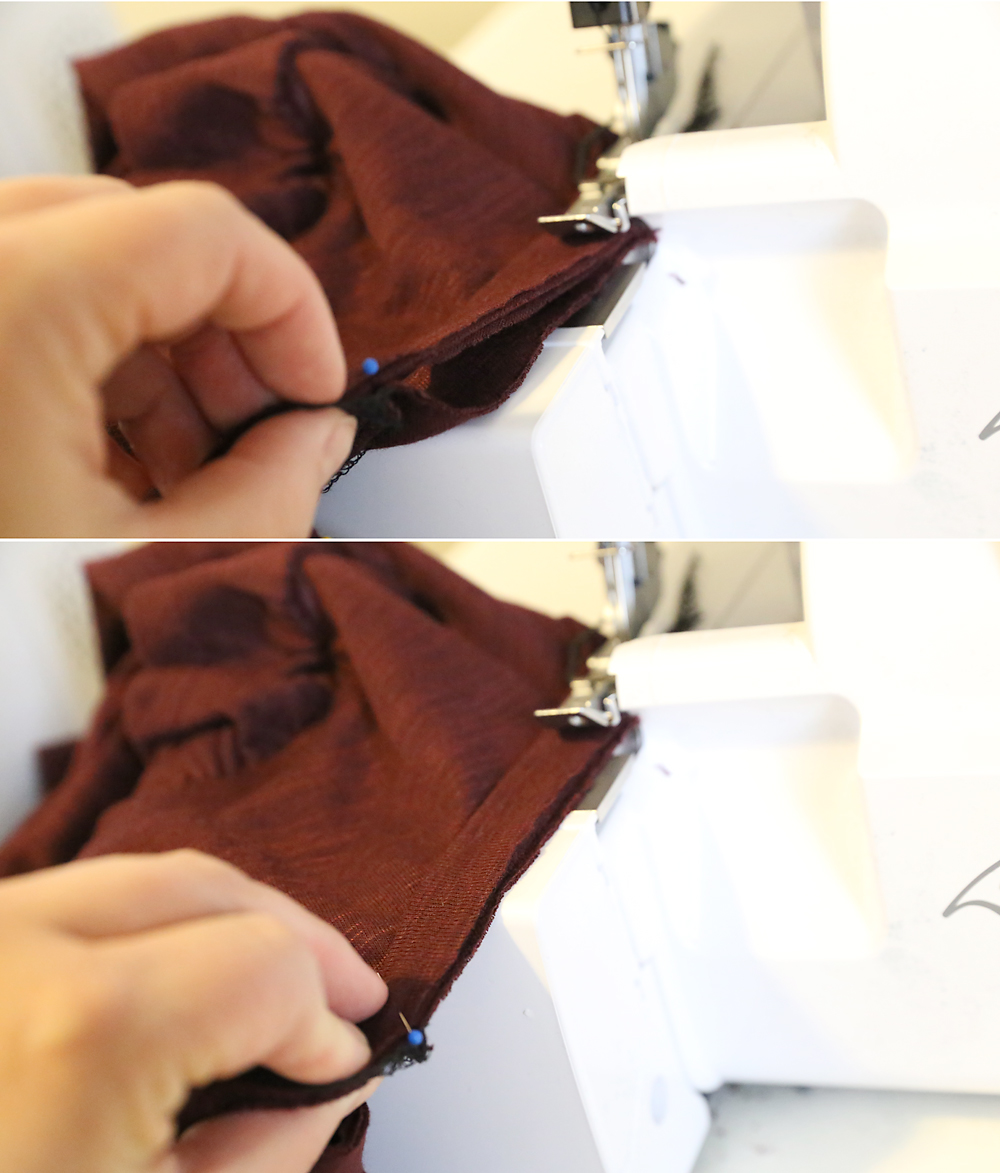
Now you need to pin the neckbinding loop onto the neck of the shirt, matching the raw edges. The neckline will be a bit larger than the neckbinding, so you will need to gently stretch the neckbinding to fit.
Once the binding is pinned in, the neckline will be bunched up slightly. When you start sewing, gently stretch the material until it lays flat (second photo below).
Sew the binding into the neckline using a stitch that will stretch: serger stitch, stretch stitch, or narrow zigzag.
Step 10: Hem the sleeve and shirt. Fold hems under 1/2 and inch and sew with a stitch that will stretch. I used a zigzag.
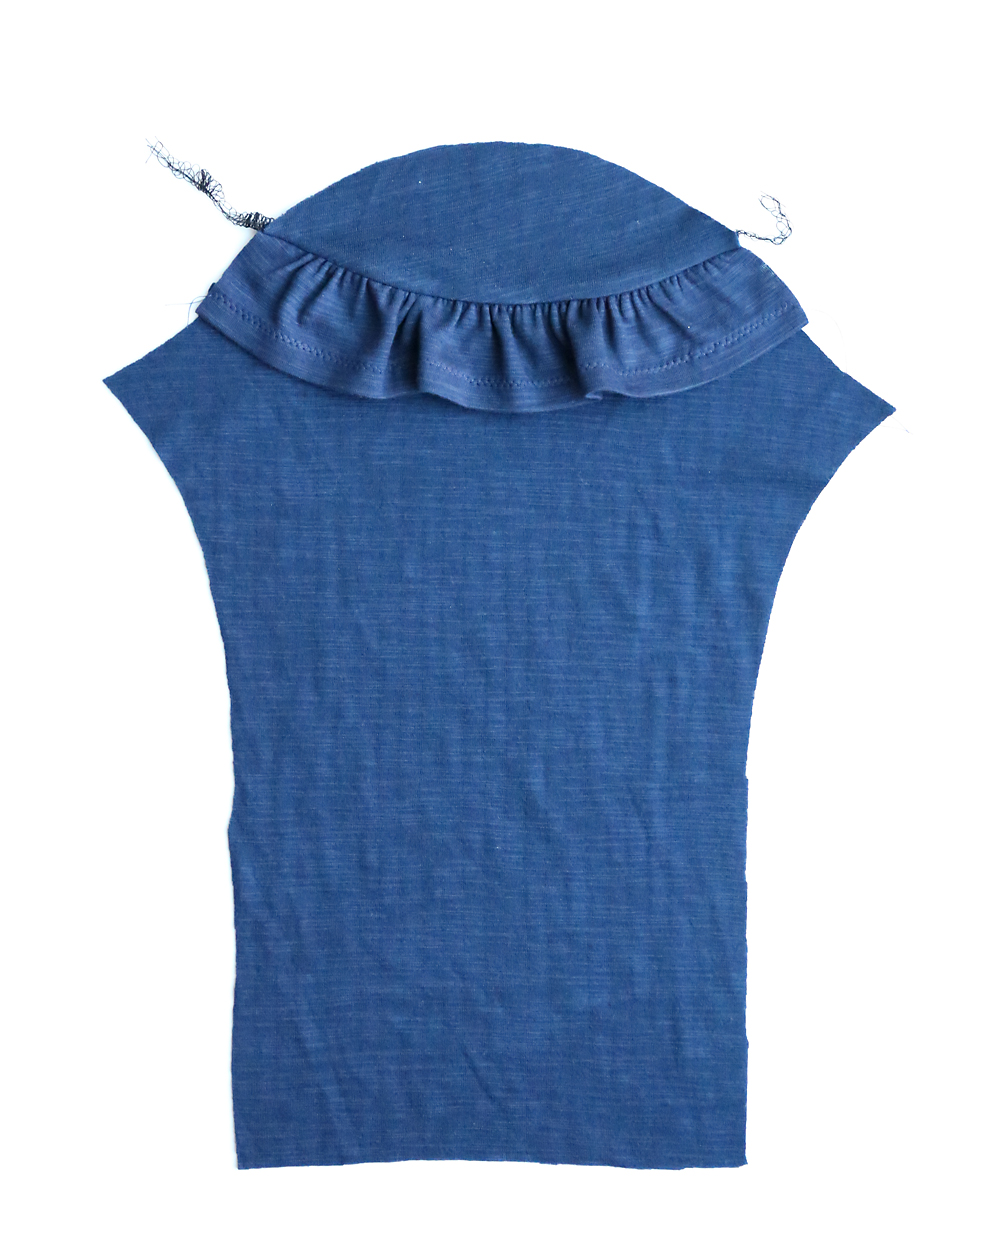
Note: Some of the photos above show pieces using navy blue fabric – that’s because I made a dress using the pattern as well! Check back next week to see how to modify the pattern to make a dress.


DIANE TREMBLAIS says
Très joli rendu
Shantel Jones says
I’ve been in blogging land long enough to know what you’re referencing without even looking at the link, lol! I love the shirt it is so cute and well done!
mirari says
thank you! my kid’s a little 8 year old girl so it’ll fit her 🙂