
In today’s post: Turn inexpensive Christmas trees from the dollar store into adorable gnomes! This is an easy Christmas craft you can complete in under half an hour.
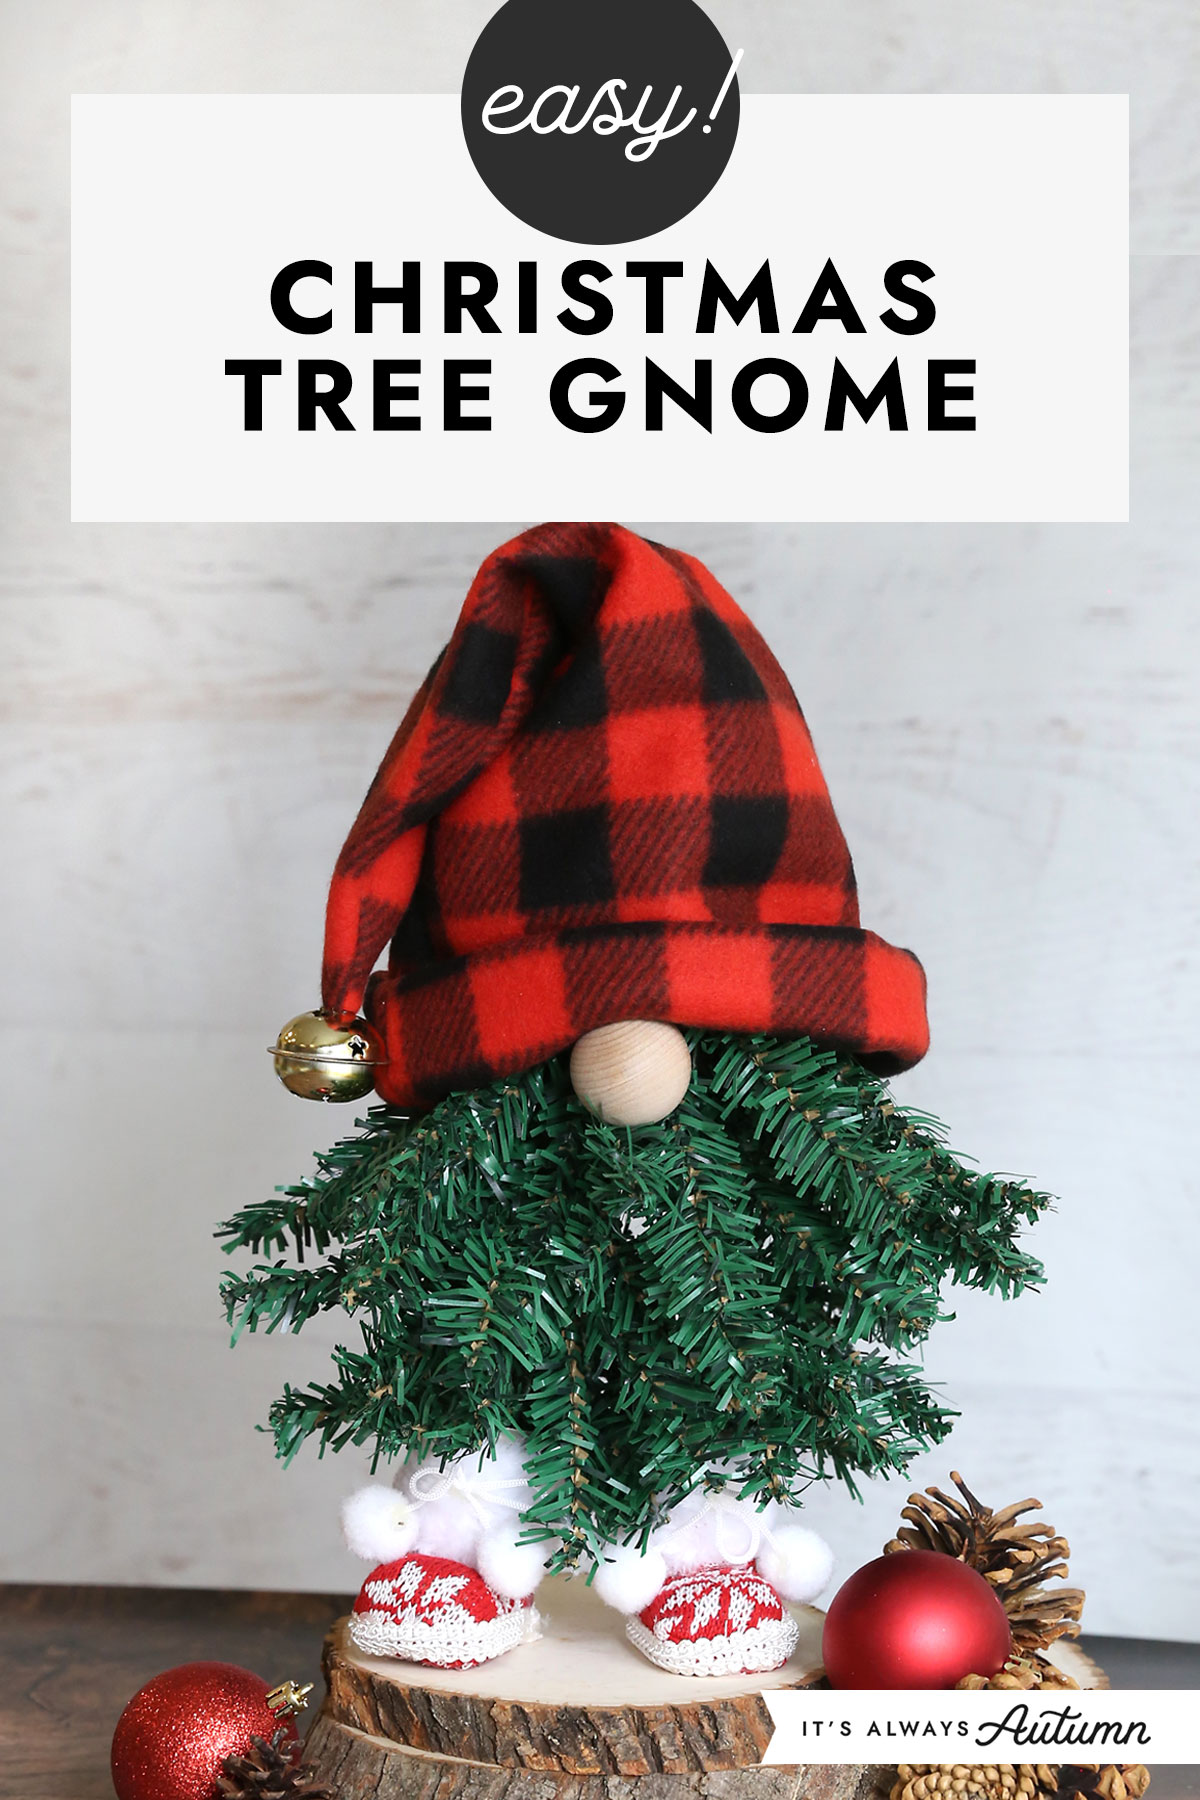
I might be a little crazy about gnomes. So far I’ve made gnomes out of socks, gnomes made from pinecones, and even brownie bite gnomes…and today we have gnomes made from Christmas trees. That’s right, these little guys are made from two small artificial Christmas trees from Dollar Tree. The hats are made from fleece scarves, and the feet are made from cute little boot Christmas ornaments. They stand up on their own and spend their days looking adorable.

Supplies
Almost all of the supplies you need to make these gnomes can be found at Dollar Tree! The wood knobs are the only supply that doesn’t come from the dollar store; I found them at Hobby Lobby. Here’s what you need for each gnome:
- Two artificial Christmas trees: look for small trees in narrow red boxes sold at Dollar Tree
- Fleece Scarf: you’ll use this to make the gnome’s hat. The red and black hat in these photos was made from a Dollar Tree scarf. You can also use purchased fleece (like I did for the grey and white hate). You will need 1/4 yard.
- Boot Ornaments: again, I found these at Dollar Tree and they are so cute! If you cannot find boot ornaments, you can still make a Christmas tree gnome – check out the box below the supply photo for more info.
- Pipe Cleaner
- Jingle Bell
- Round Floral foam piece: these are found in the floral section and look like the bottom of a foam cone, so if you can’t find the exact piece you could cut the bottom off a foam cone.
- 1.5 inch Wood Ball Knob: I purchased this at Hobby Lobby. It’s a ball of wood that’s flat on one side and has a small hole in it.

What if I can’t find the boots?
The boot ornaments from Dollar Tree are a really adorable addition to these little gnomes. However, if you cannot find them, you can still make a Christmas tree gnome. Instead of fitting the bottom branches inside the boots, you’ll want to spread them out and glue them onto something flat instead, like a wood slice, to act as a base. The gnomes will still be cute, they just won’t have visible feet.
Alternately, you can cover a foam disc with leftover fleece and use that as a base, which you can see in the photo below.
How to Make Christmas Tree Gnomes
This is a simple project that you’ll be able to complete in about half an hour. The hat requires a few lines of sewing; however if you don’t have a sewing machine you could glue it instead. Here’s what you’ll do:
Build the Body of the Gnome
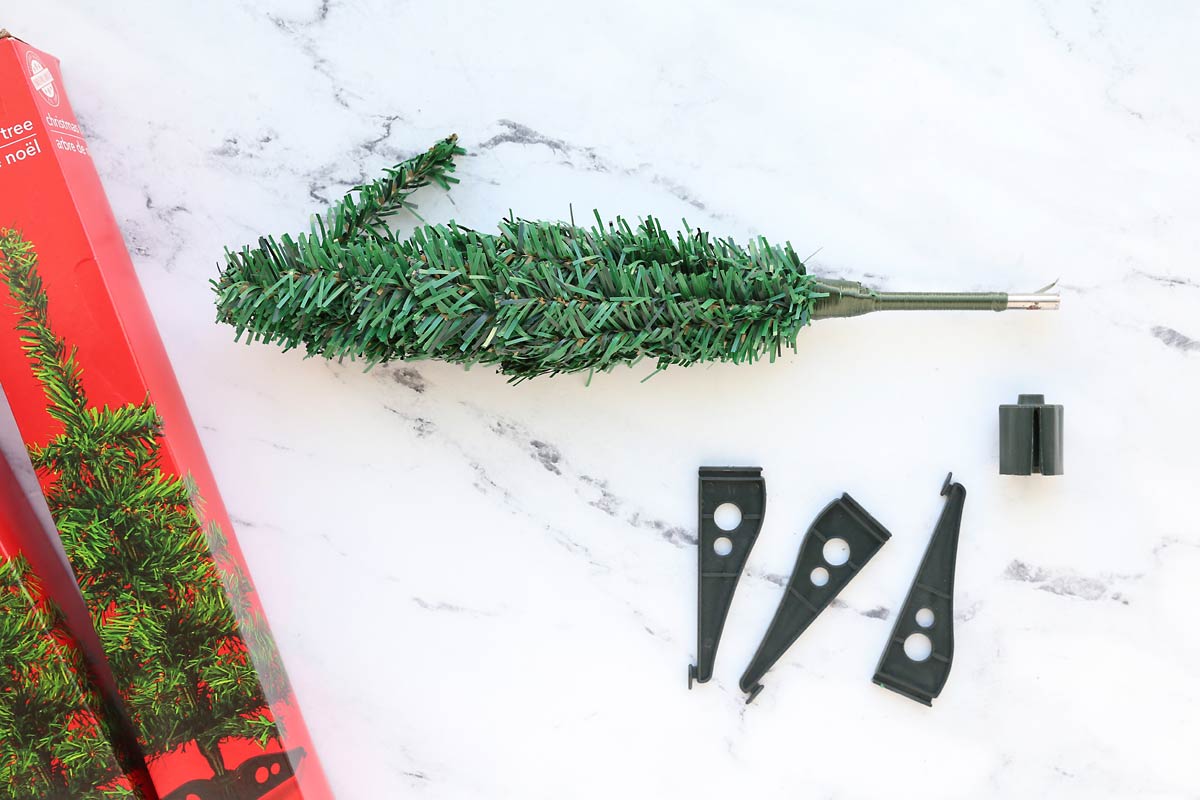
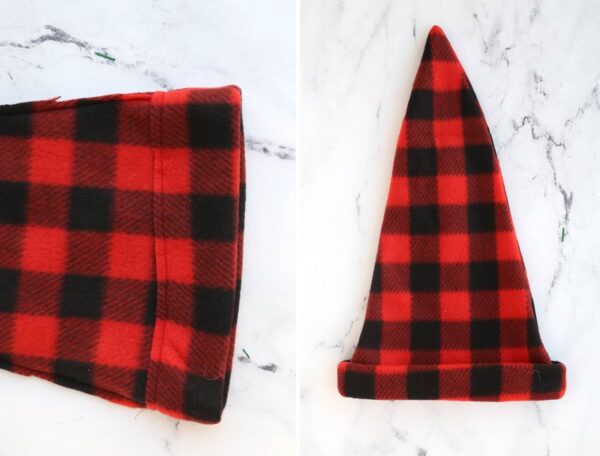
The body of each gnome is made using two Dollar tree Christmas trees. Remove the trees from the box. Pull the plastic cylinder off the bottom of the tree and discard it, along with the three legs that snap into the cylinder.
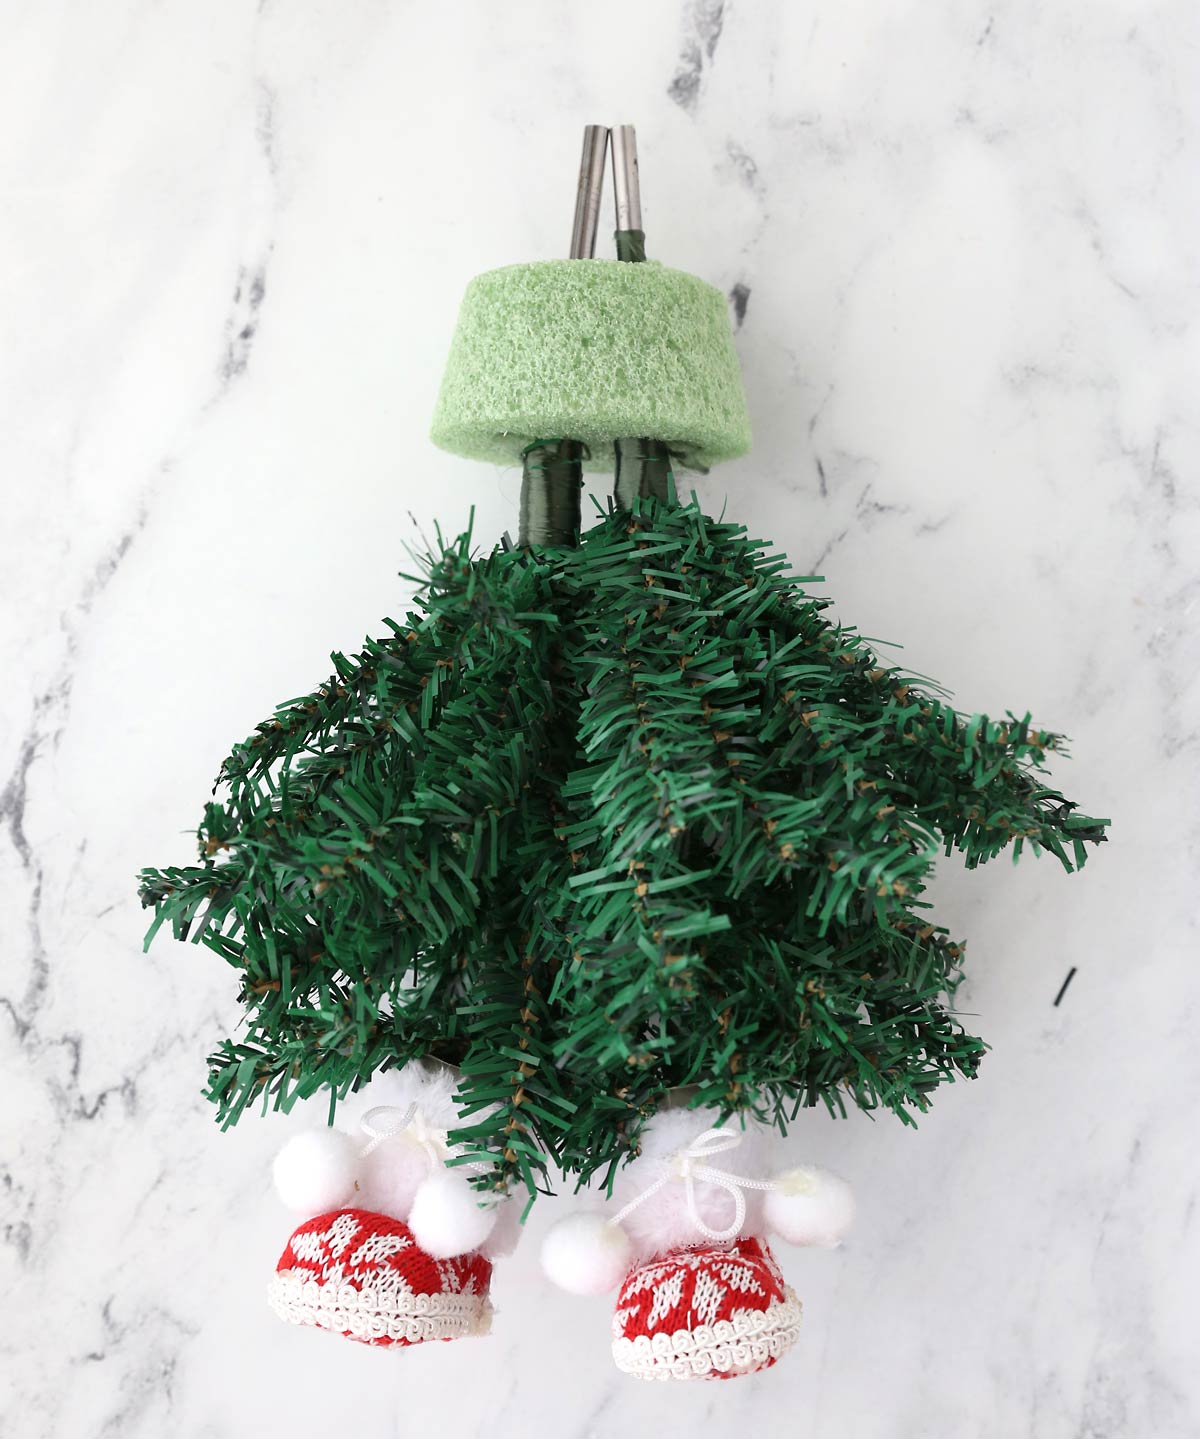
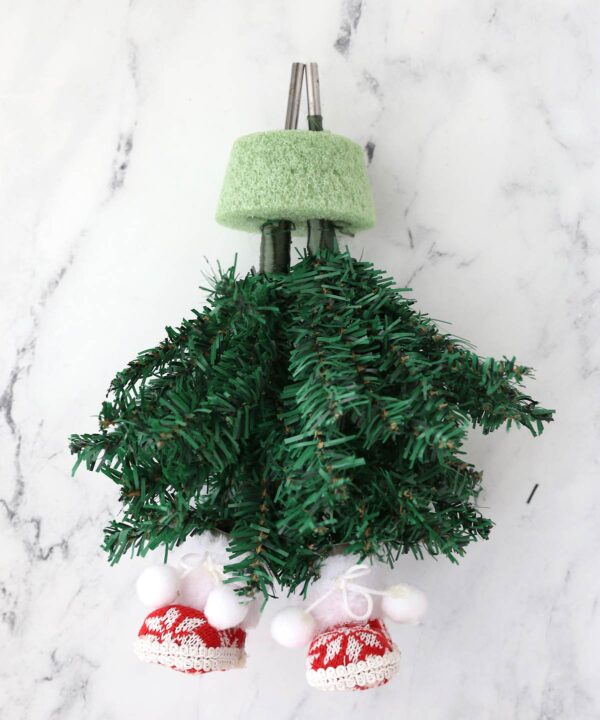
Turn the Christmas tree upside down, so the top of the tree is now the bottom. Begin spreading out the branches on the Christmas tree. As you look at each tree, you’ll see there are layers of branches interspersed with an area of tree trunk. Take the very bottom layer of branches (all the branches below the first area of trunk) and push them all together, folding the longest branch so all the bottom branches are in one bunch. Fold the bunch of branches 90 degrees to one side to create a foot shape. Slide that foot into one of the boot ornaments.

Repeat with the other tree and other boot. Stand the two trees up next to each other. Each one will have a metal piece (trunk) at the top. Poke both metal pieces through the floral foam, fairly close to one another, as shown below. This attaches to two tree together.
At this point you can stand the body of the gnome up on a flat surface and fluff all the branches. If the gnome doesn’t stand up, make sure the bottom branches are fully pushed into the boots, and bend the gnome body forward or backward a bit until it stands on its own.
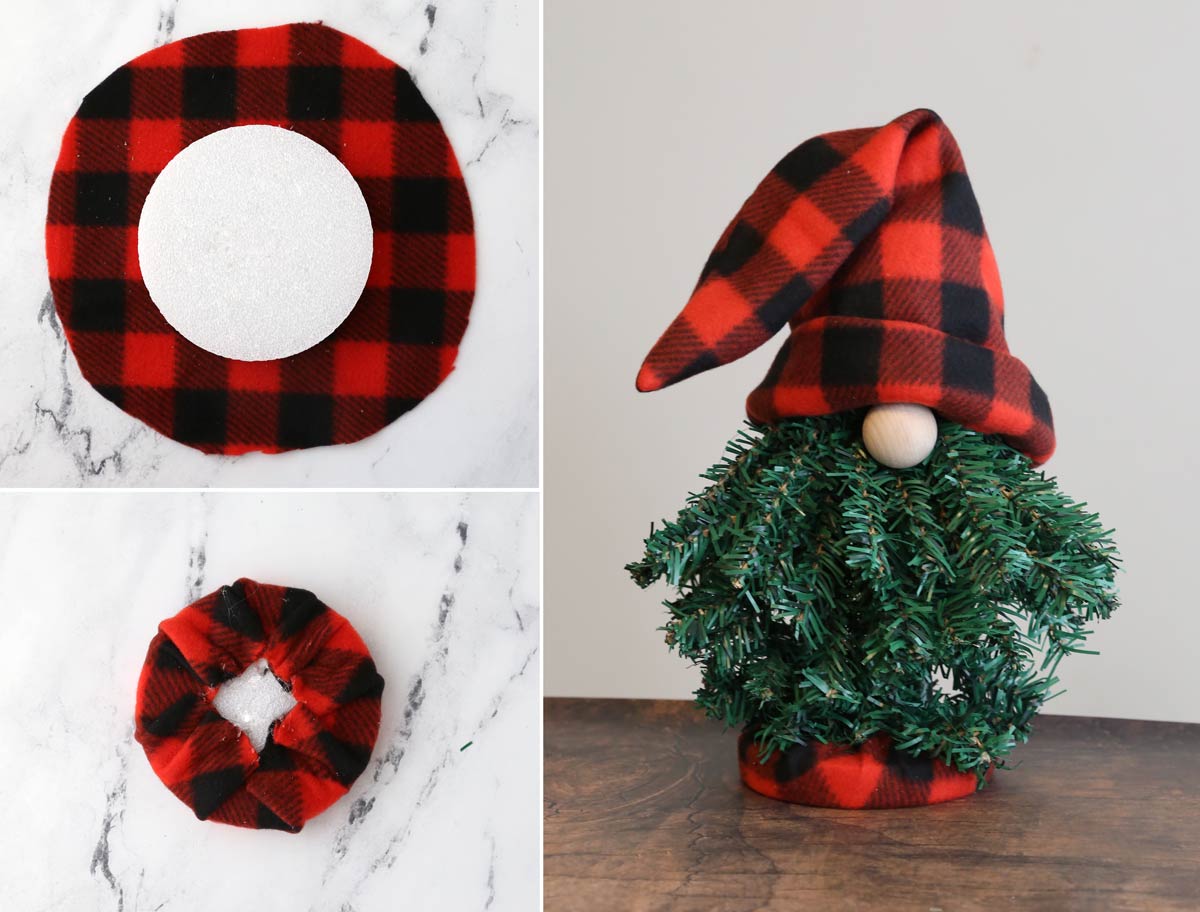
Make the hat
From the scarf, cut two pieces of fleece that are each 9 inches wide and 20 inches tall. Place them right sides together. Measure up from the bottom about 5 inches and mark on both sides. Mark the center point along the top of the fleece. Cut diagonally from the five inch mark up to the center point and then back down to the five inch mark on the other side to create a pointed hat. Sew or glue to secure.
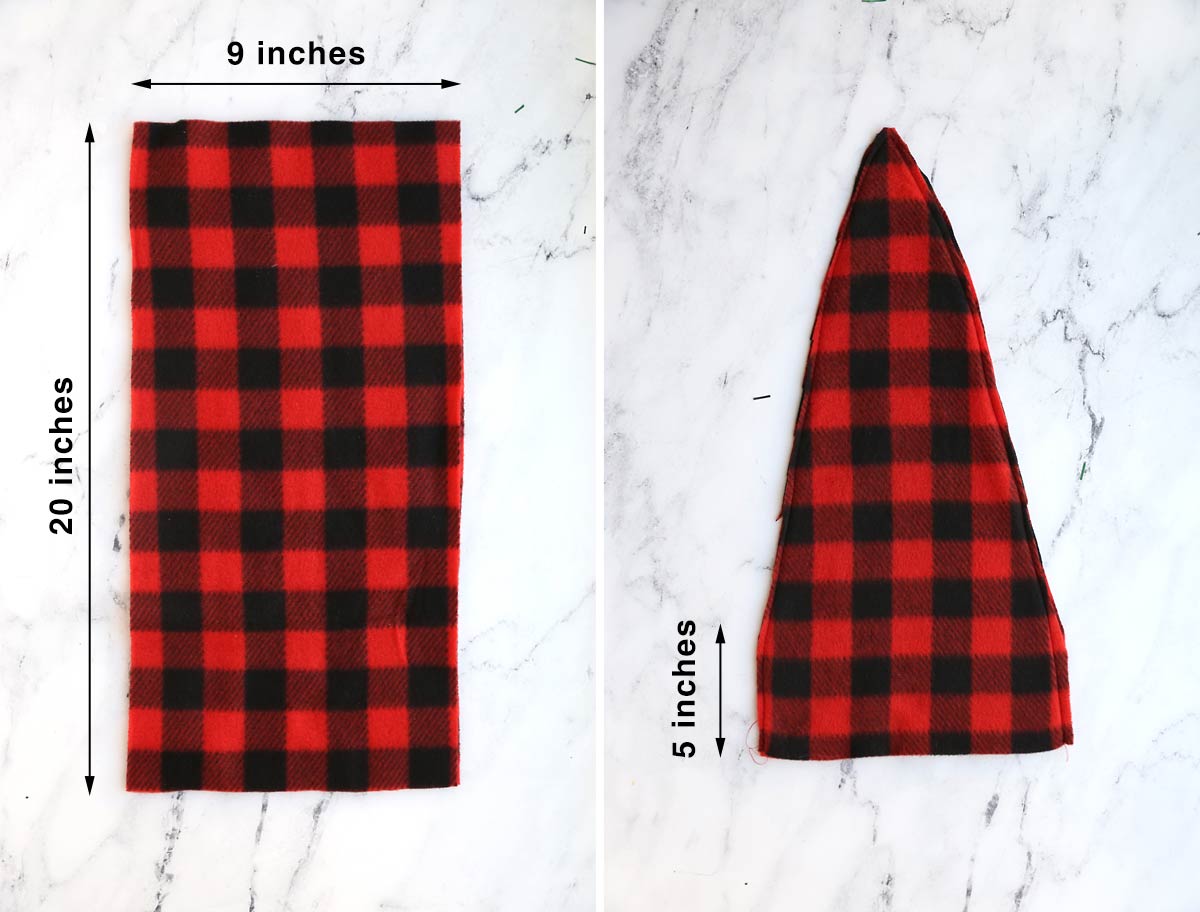
To create a cuff, keep the hat inside out. Fold the bottom up 2.5 inches and sew to secure. Then turn the hat right side out, and fold up a two inch cuff.

Assemble the Gnome
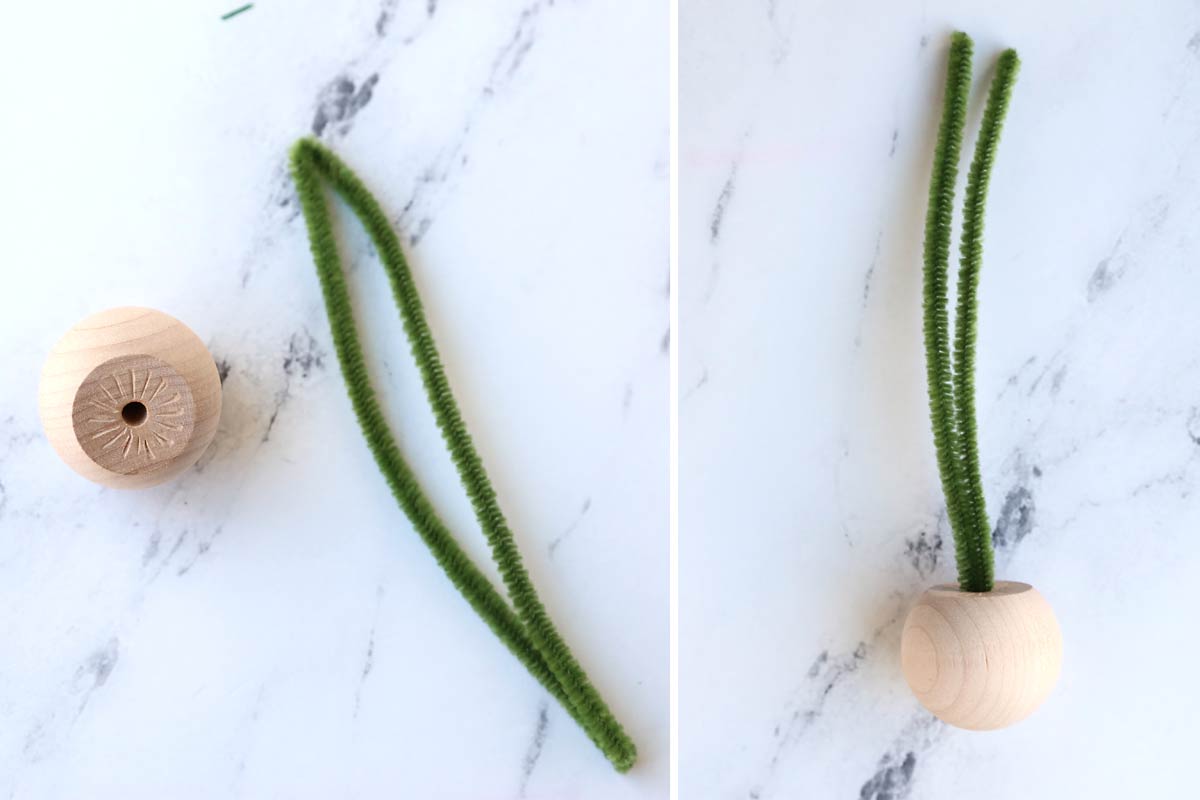
Place the hat on the gnome, making sure it completely covers the foam round. Let the top of the hat fold over to one side. The wood ball knob will be the gnome’s nose. Fold a pipe cleaner in half, then place hot glue in the hole in the knob and place the folded part of the pipe cleaner in the hole. Give it a minute for the glue to cool.
Then secure the nose to the trees by threading the pipe cleaners through the branches and twisting together in the back. Make sure the pipe cleaners in the back are hidden under the hat. The hat should come all the way down to the nose in front. Hot glue a bell to the end of the hat to complete your gnome.


Christmas Tree Gnomes
Supplies
- 2 Small Artificial Christmas Trees from Dollar Tree
- 1 Fleece Scarf from Dollar Tree, or 1/4 yard fleece
- 1 Pair of Boots Ornament from Dollar Tree
- 1 Pipe Cleaner
- 1 1.5 inch Wood Ball Knob
- 1 Floral Foam Round
- 1 Jingle Bell
Want more project ideas? Sign up to get my favorite easy crafts and recipes straight to your inbox!
Instructions
- Open each Christmas tree and pull off the cylinder at the bottom. Turn the trees upside down. Separate out the bottom layer of branches and push them into a single bunch. Fold the bunch 90 degrees and push it into a boot ornament.

- Connect the two trees together by pushing the metal trunks through a floral foam round.

- Cut two 9×20 inch pieces of fleece from the scarf. Cut as shown to make a hat shape. Sew pieces together along each long side.
- Keeping the hat inside out, fold the bottom up 2.5 inches and sew around to secure. Turn the hat right side out and fold up the bottom 2 inches to create a cuff.
- Fold a pipe cleaner in half and glue the folded edge inside the wood ball knob. Use the pipe cleaner to attach the knob to the trees for a nose.

- Place the hat on the gnome, making sure it comes down to the nose. Hot glue a jingle bell onto the pointed end of the hat. Fluff the branches and stand the gnome up.


Tips
T


chistka_nvmn says
Регулярная [url=https://waterservice24.ru/]очистка скважин Московская область[/url] помогает поддерживать водоснабжение в оптимальном состоянии и предотвращать возможные поломки.
Процедура очистки скважин необходима для обеспечения чистой воды
annette paulson says
dols
Ali says
Do the branches not move anymore or did you use something to push them down? Mine won’t budge!
Jacqueline A Metzger says
Where did you get the boots
Autumn says
Dollar Tree.
Joyce Smith says
I made them for family members friends and myself and with animals Also for daycare parents 💖
More than 20 years plus years ago I still have mine in