
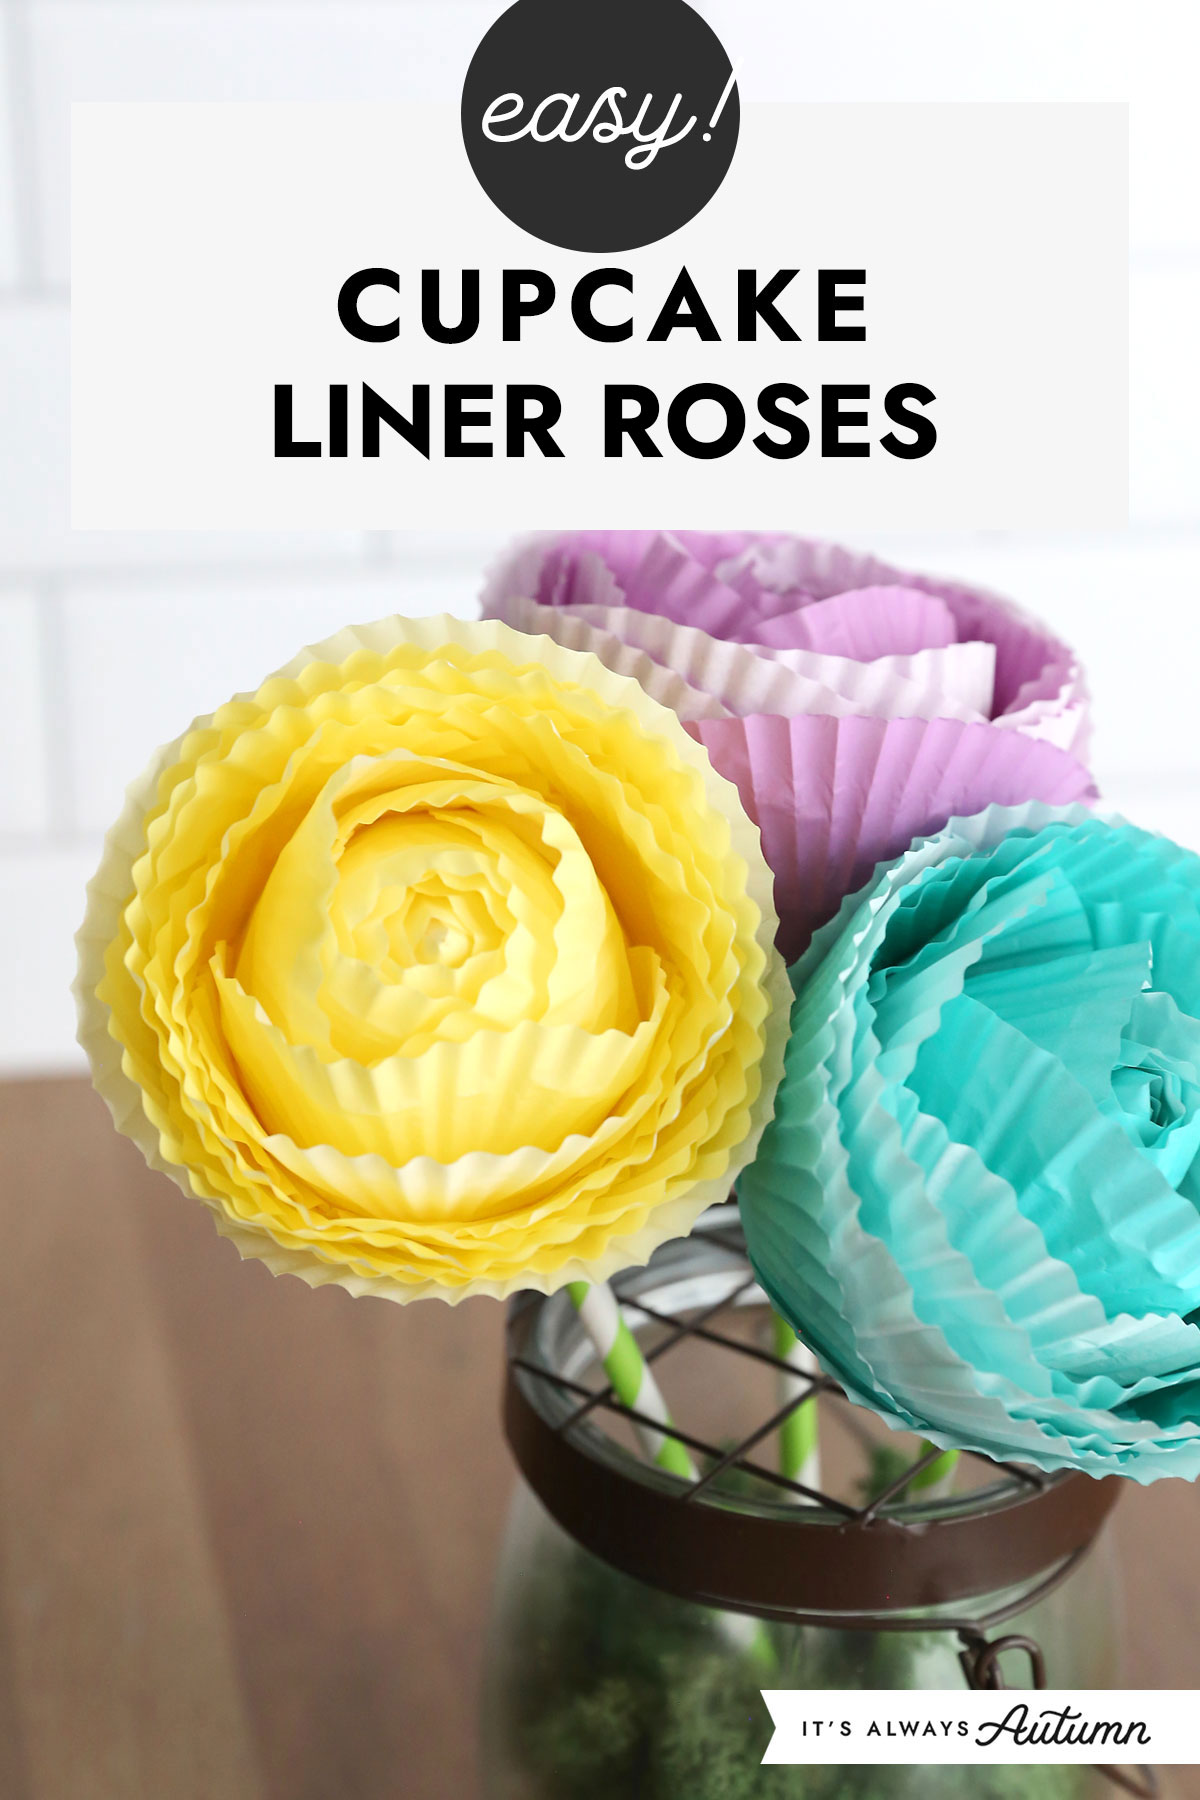
In today’s post: You can make these beautiful paper roses out of cupcake liners! This easy craft is simple enough for kids and fun enough for teens and adults.
Easy Summer Craft Tutorial
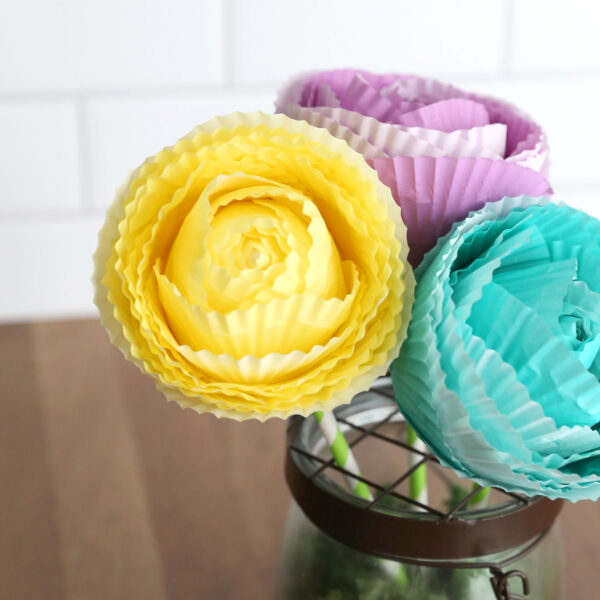
Today’s craft is fun because it feels like magic: you layer flattened cupcake liners around the rim of a cup, then turn it out and you have a rose! Many paper flowers are quite complicated to make, but not these. You can add stems to create a bouquet, or strew them across a table as part of a pretty centerpiece – they’d be especially cute decorations at a bridal shower. They are quick and calming to put together – each rose will take less than ten minutes to create – and the process is easy enough for older kids to do on their own and younger kids to do do with help. A bouquet of cupcake liner flowers could make a cute gift for Mother’s Day!
Supplies
Here’s what you need to make cupcake liner roses:
- Cupcake Liners: You’ll need 16 standard size cupcake liners for each rose. Check stores like Hobby Lobby or Walmart to find colorful cupcake liners in a variety of colors. Don’t worry if the liner is colored on the outside and white on the inside – that ends up looking really pretty!
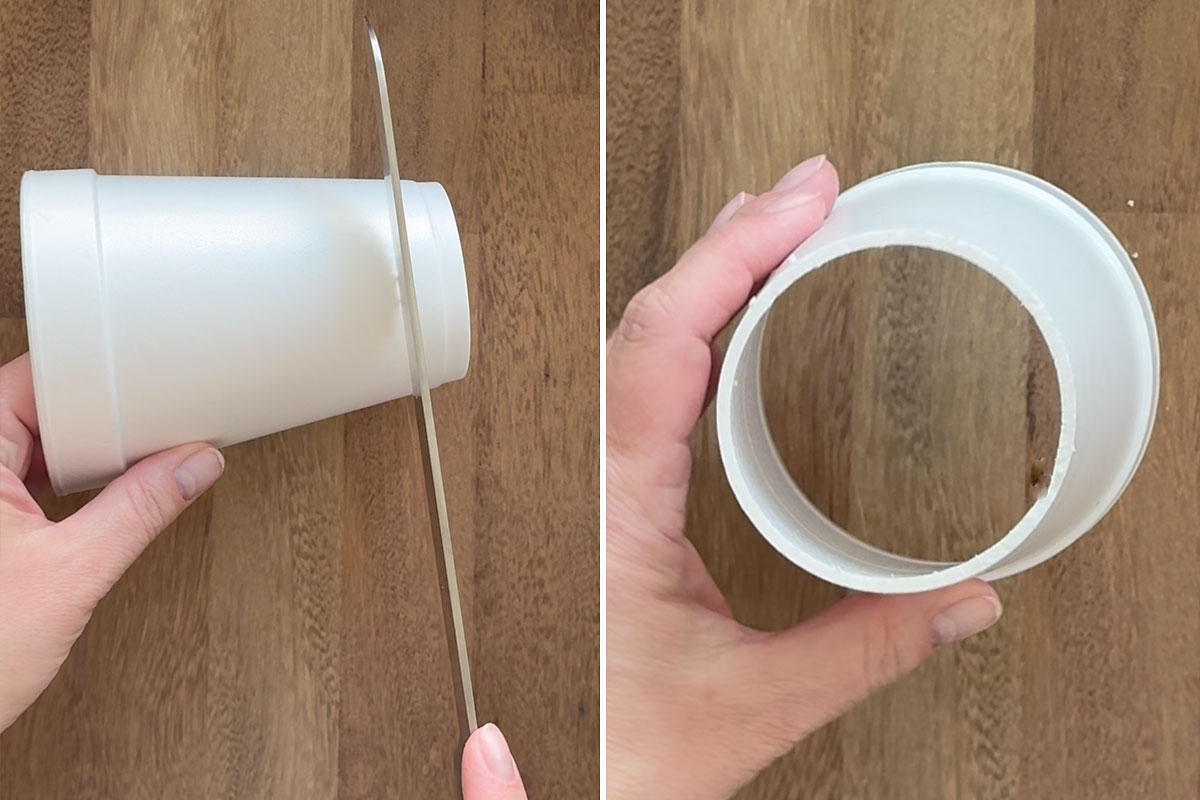
- Styrofoam Cup: You’ll use a cup to create the roses on, but you need to cut the bottom of the cup off first. I used a 16 oz styrofoam cup and it was easy to slice the bottom off. You could also use a paper cup; you just need to find a cup where the bottom is close to 2.5 inches in diameter.
- Glue Stick: To keep this craft simple and kid accessible, I used a glue stick to adhere the rose together, and it works great. But you can use a different type of adhesive, such as hot glue, if you prefer.
Note: If you’d like to make bigger flowers, you could use large cupcake liners, but you will need to use a larger cup as well.

How to Make Cupcake Liner Roses
Prep the Cup
Use a sharp knife (a serrated one works best) to slice the bottom off the styrofoam cup to make an open circle or rim on which you’ll build the rose. You want the rim to be about 2.5 inches in diameter, so cut off enough to get a circle this size. Place the cup upside-down.
Start Layering Cupcake Liners
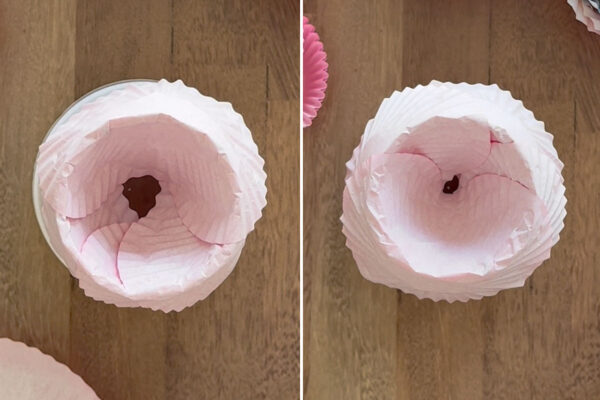
Count out 16 cupcake liners. Flatten out the first cupcake liner, placing the colored side down. Pick up the liner and gently fold it over the rim of the cup (remember this is the bottom rim of the cup), pressing half of the liner down inside the cup and pressing the other half down outside the cup. Make sure to press the liners down in the center so they follow the curve of the cup.
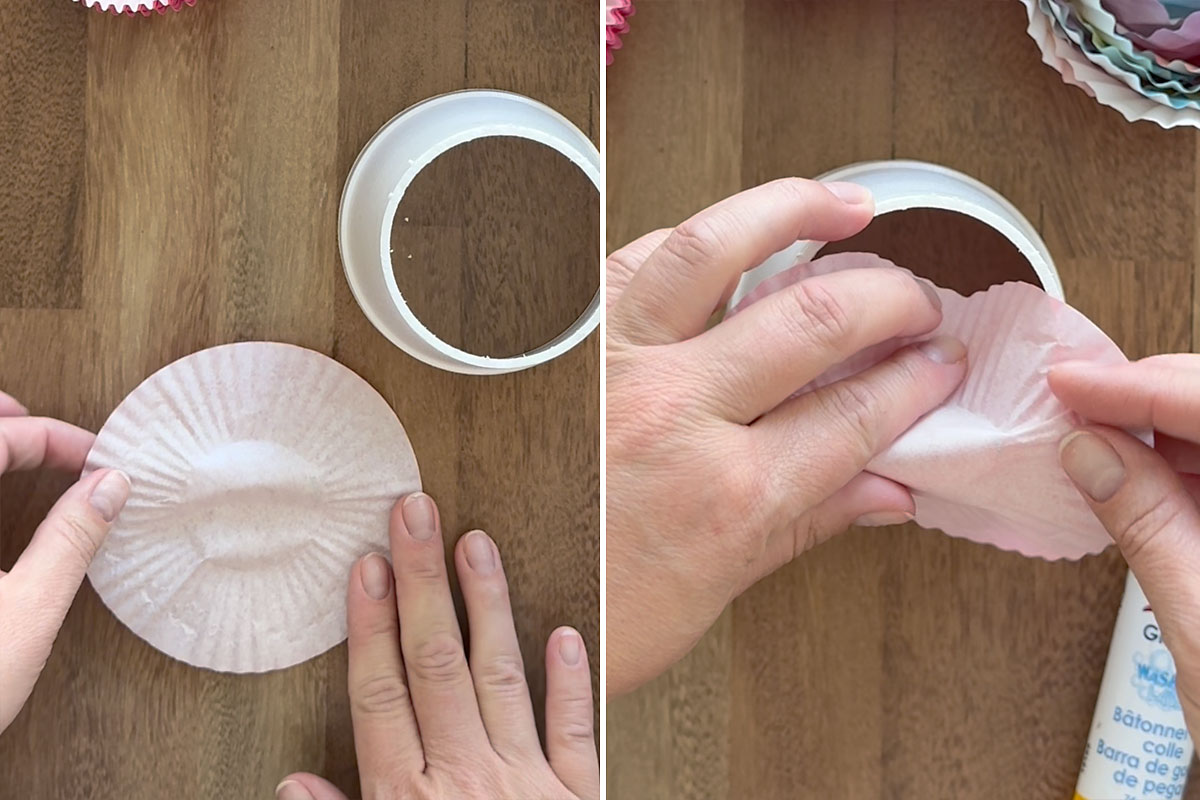
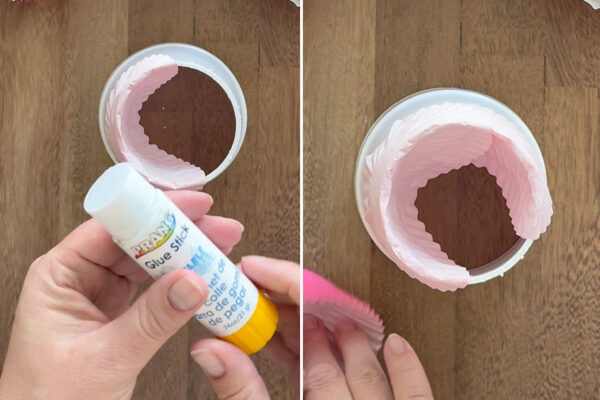
Next, layer another cupcake liner over the first one, overlapping about half of the first liner. Before you do that, apply glue stick to the area that will be overlapped, then press the second liner down.
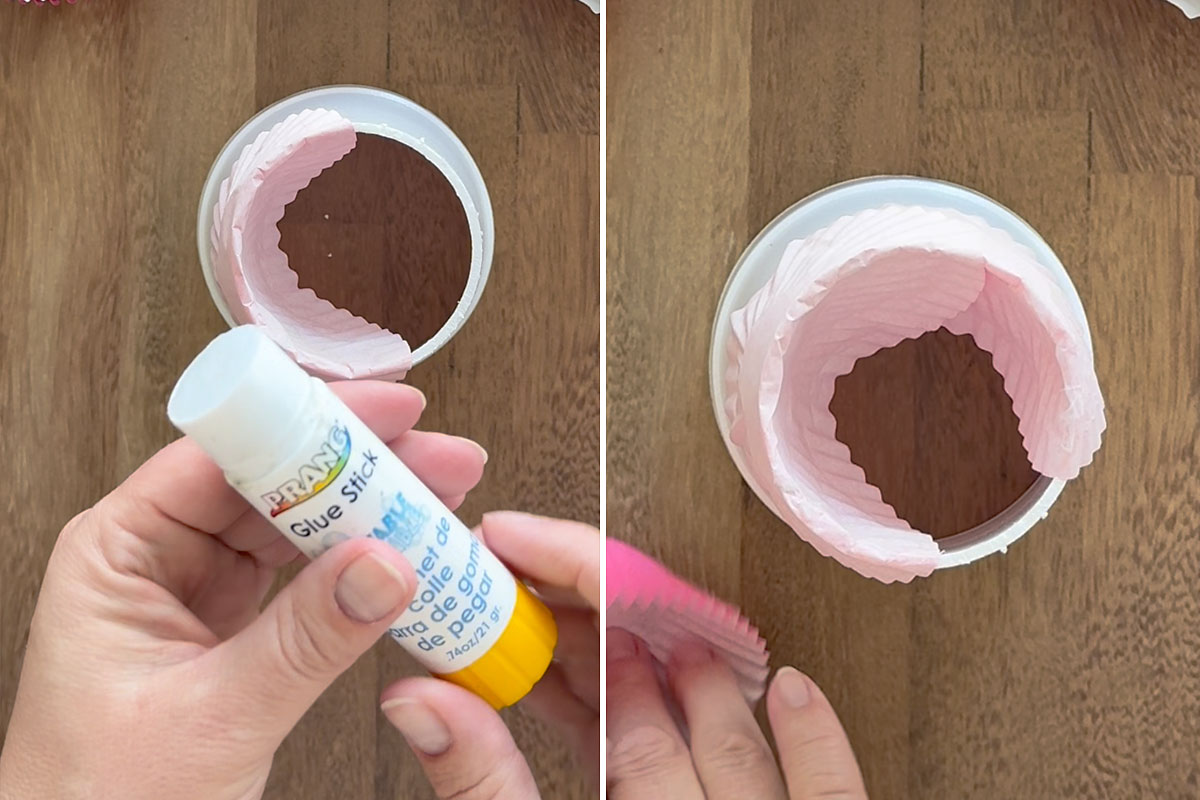
Use glue stick to adhere a third cupcake liner where it will overlap both of the first two liners (make sure you only place glue on the other liners, not on the cup). At this point the bottom of the cup should be covered.
Continue adding Liners
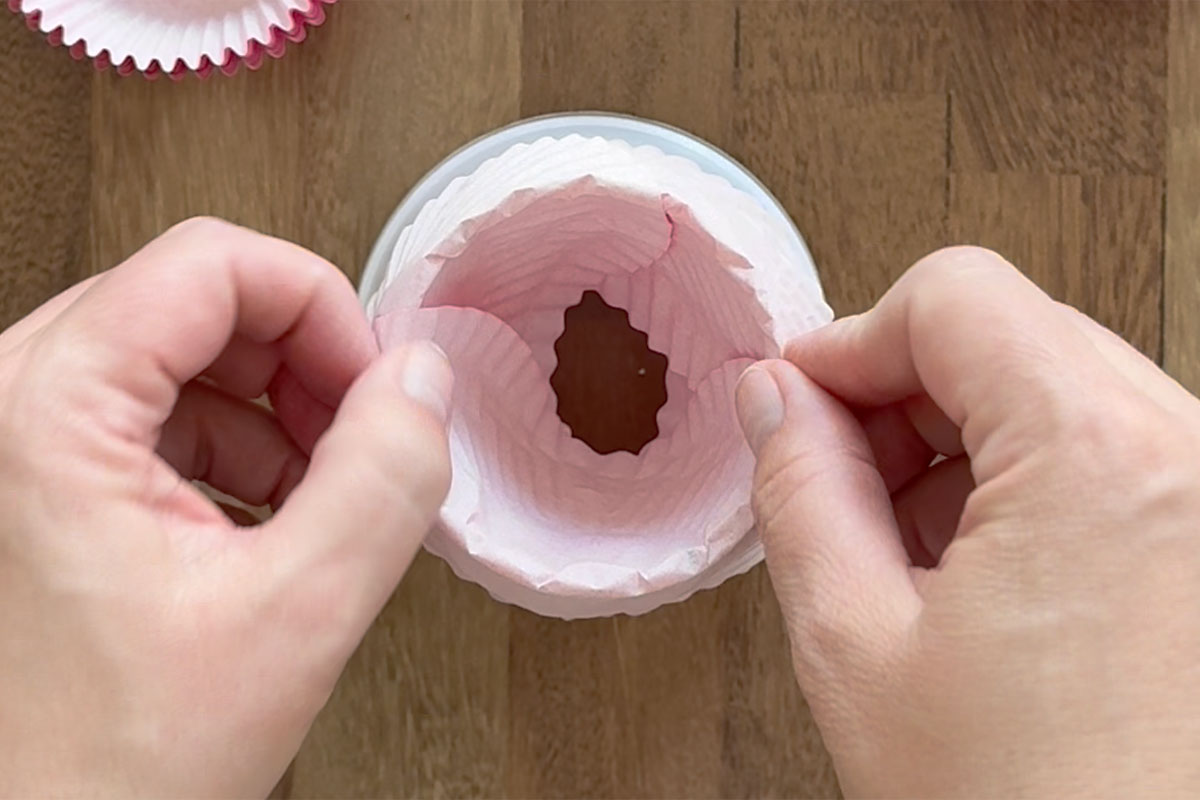
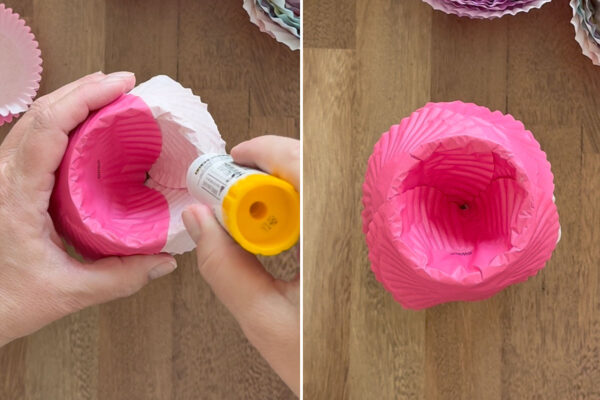
You’ll continue to add more cupcake liners to build your rose. Offset the liners a bit each time. It helps to look at the cup from the side to see where to add the next petal. I like to work in one direction for a few liners then go the other direction. The goal is to make it look a little bit random and organic.
Continue adding cupcake liners, being sure to apply glue stick before each liner. As you work you’ll see that the hole in the middle of the cup is growing smaller. This is creating the center of the rose.

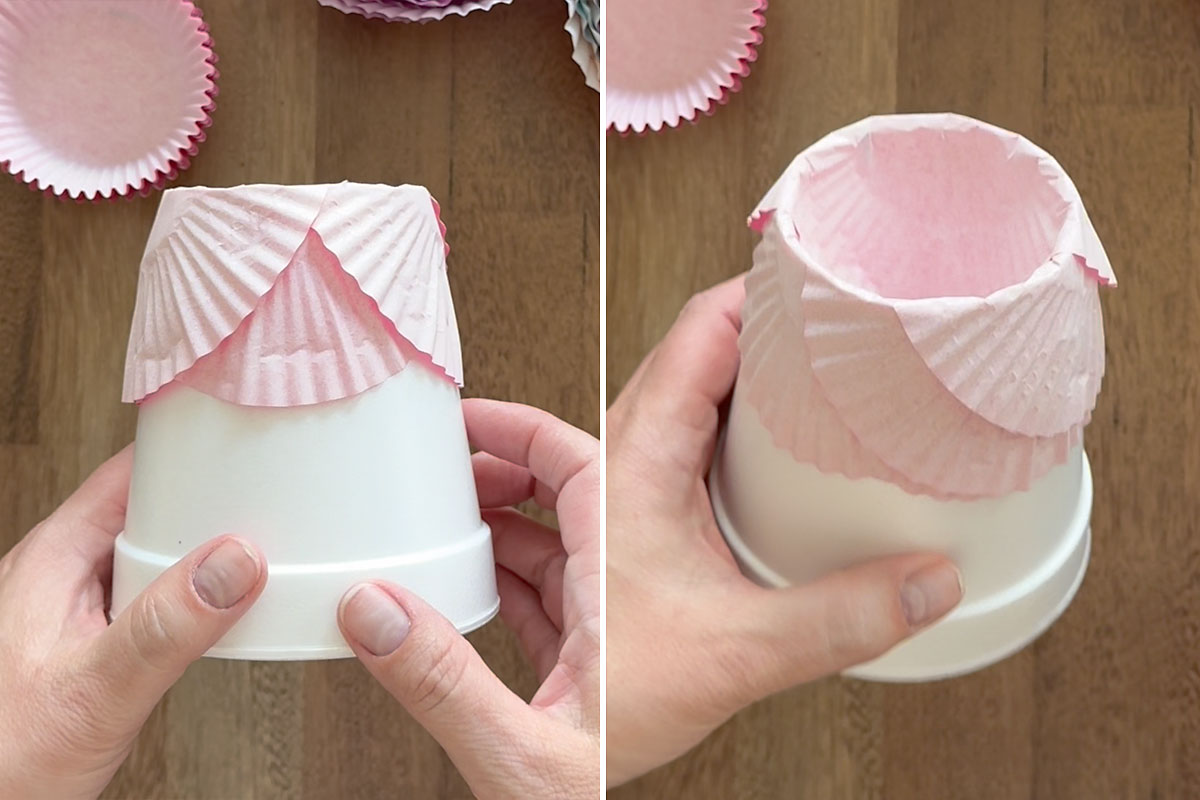
When you get to the last three liners (meaning you have used 13 already), you will flip the liners and add them with the colored side up, or facing you. Make sure to space the last three liners so they cover the entire flower.

Finish the Rose
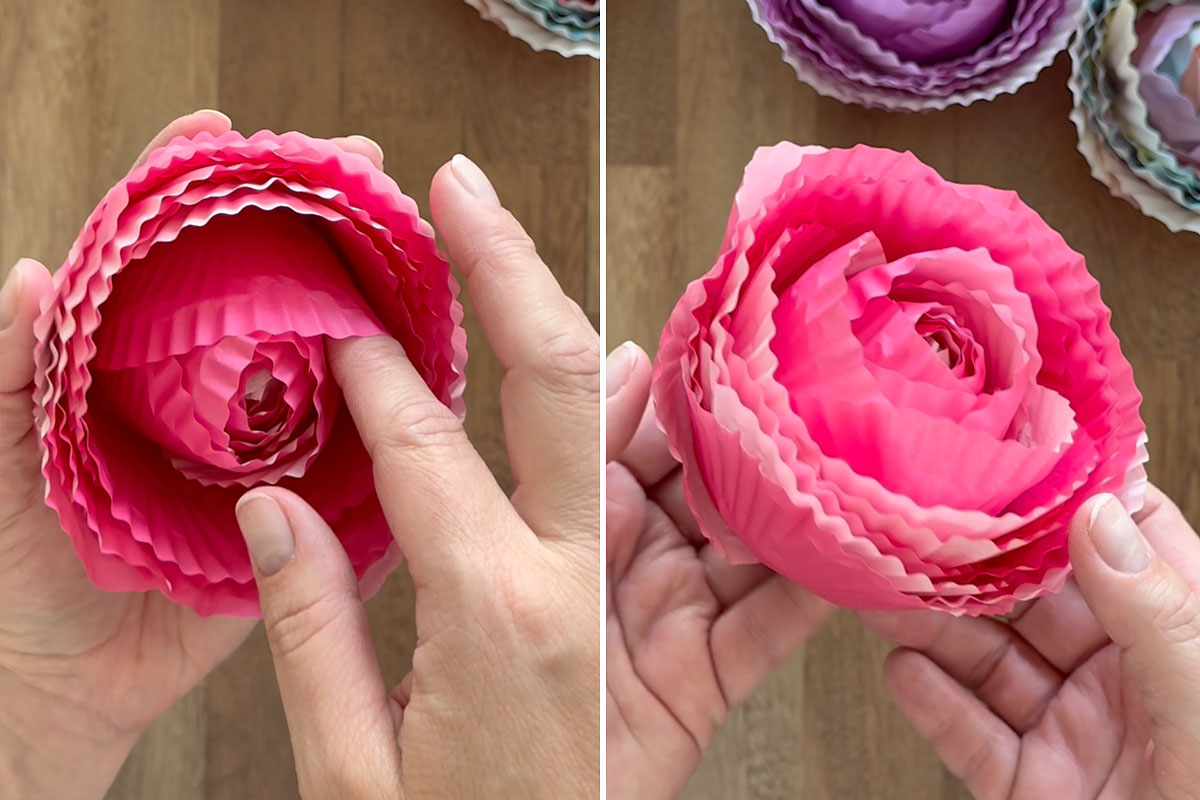
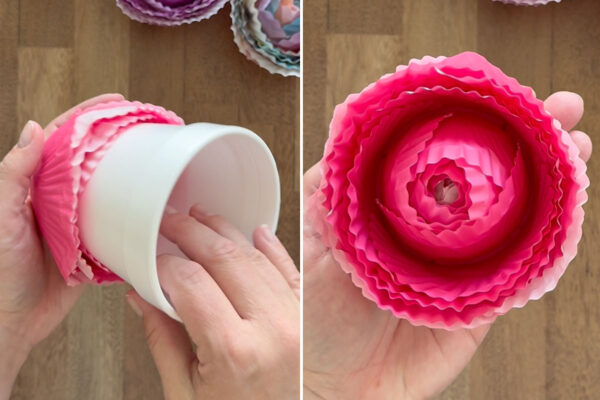
Now you can tip the cup right side up and gently press the rose from the inside to slide it off the cup. You’ll see that the layers of cupcake liners create lovely petal shapes.
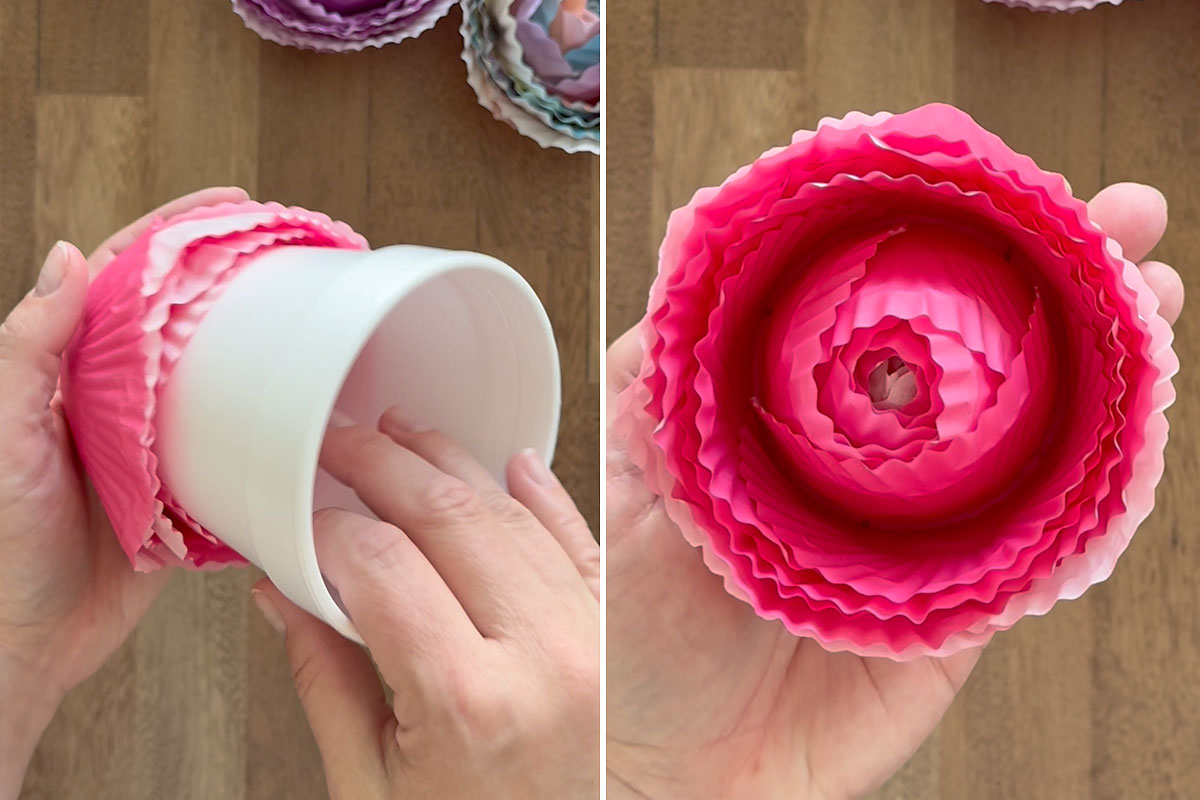
Optional: if desired, use your finger or a pencil to gently loosen the first few petals that make up the center of your flower. Don’t pull too hard; you’ll need to handle the rose gently for 10-15 minutes until the glue stick sets.
Add a Stem
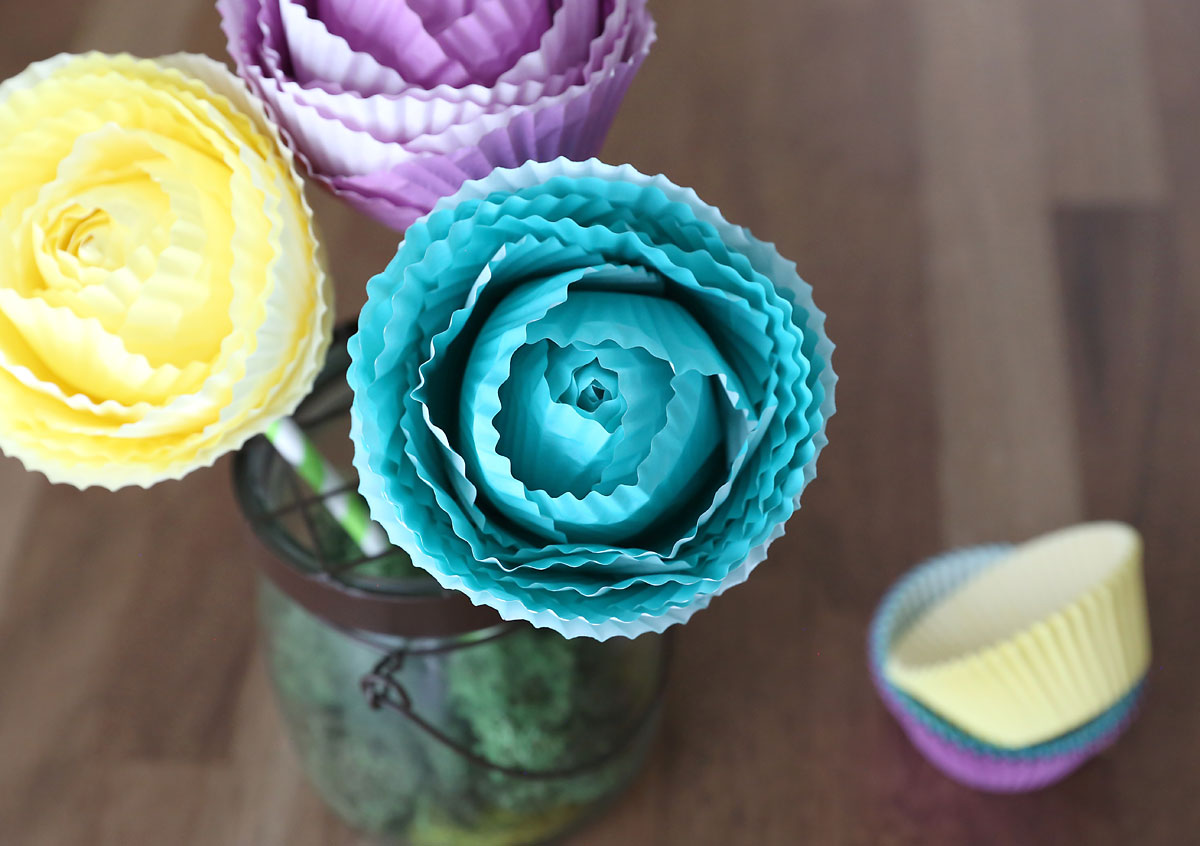
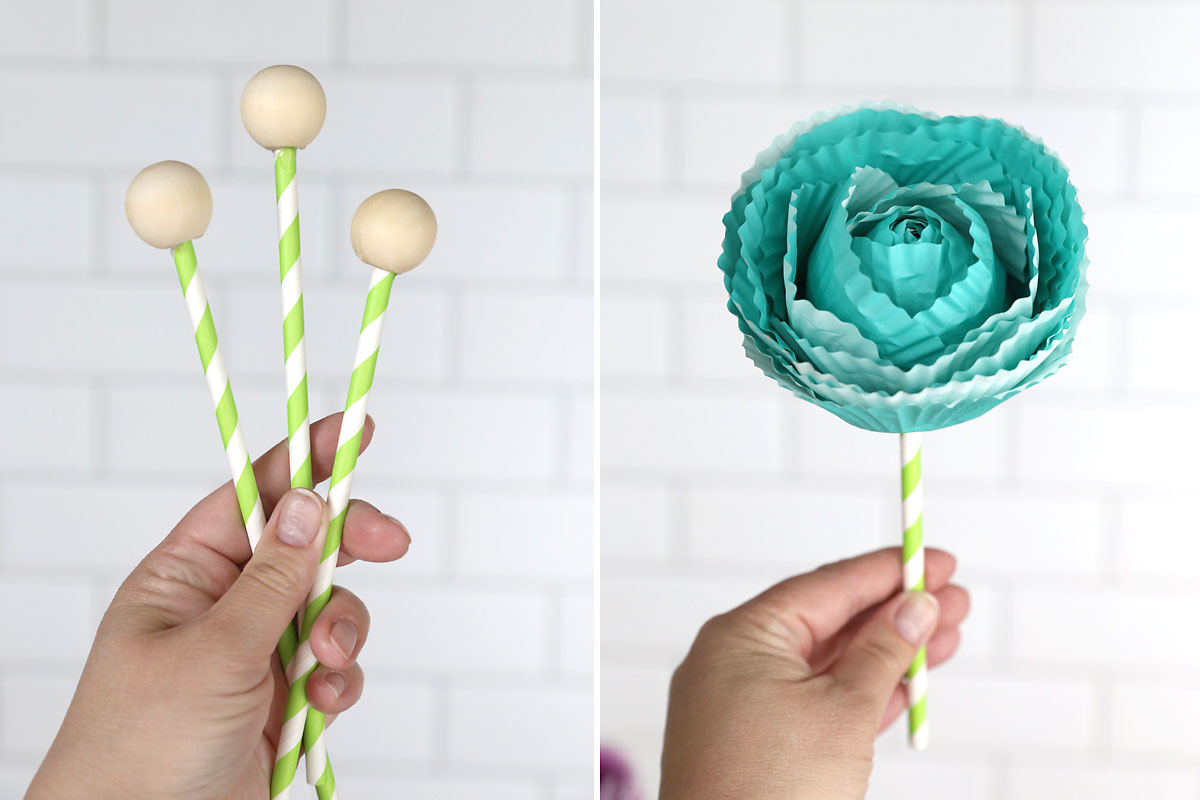
If you’d like to display these roses in a vase, you can give them a stem. Glue 1 inch wood ball caps (wood beads that only have a hole on one end) to the ends of paper straws. Alternatively you could use small styrofoam balls and bamboo skewers. Then you can glue the flowers over the balls and position them in a vase. These roses would also look cute glued onto a canvas and displayed on the wall, or strewn loose across a tablescape.
Cupcake Liner Roses
Supplies
- 16 Cupcake Liners standard size
- Styrofoam Cup 16 oz
- Glue Stick
Want more project ideas? Sign up to get my favorite easy crafts and recipes straight to your inbox!
Instructions
- Cut the bottom off the styrofoam cup to create a rim that is about 2.5 inches in diameter. Place if top down in front of you.

- Flatten out the first cupcake liner, and fold it over the cup rim, pressing half of the liner down inside the cup and half down outside the cup. The colored side of the liner will face the cup.
- Next you will layer another cupcake liner over the first one, overlapping about half of the first liner. Before you do that, apply glue stick to the area that will be overlapped, then press the second liner down.
- Use glue stick to adhere a third cupcake liner where it will overlap both of the first two liners (make sure you only place glue on the other liners, not on the cup). At this point the bottom of the cup should be covered.
- Continue to add more cupcake liners to build your rose. Offset the liners a bit each time, working on way for a bit then skipping an area and working the other way. It helps to look at the cup from the side to see where to add the next petal.
- Continue adding cupcake liners, being sure to apply glue stick before each liner. As you work you’ll see that the hole in the middle of the cup is growing smaller.
- When you get to the last three liners (meaning you have used 13 already), you will flip the liners and add them with the color up, or facing you. Make sure to space the last three liners so they cover the entire flower.
- Now you can tip the cup right side up and gently press the rose from the inside to slide it off the cup. Gently loosen the first few petals that make up the center of the flower if desired.


Leave a Comment