
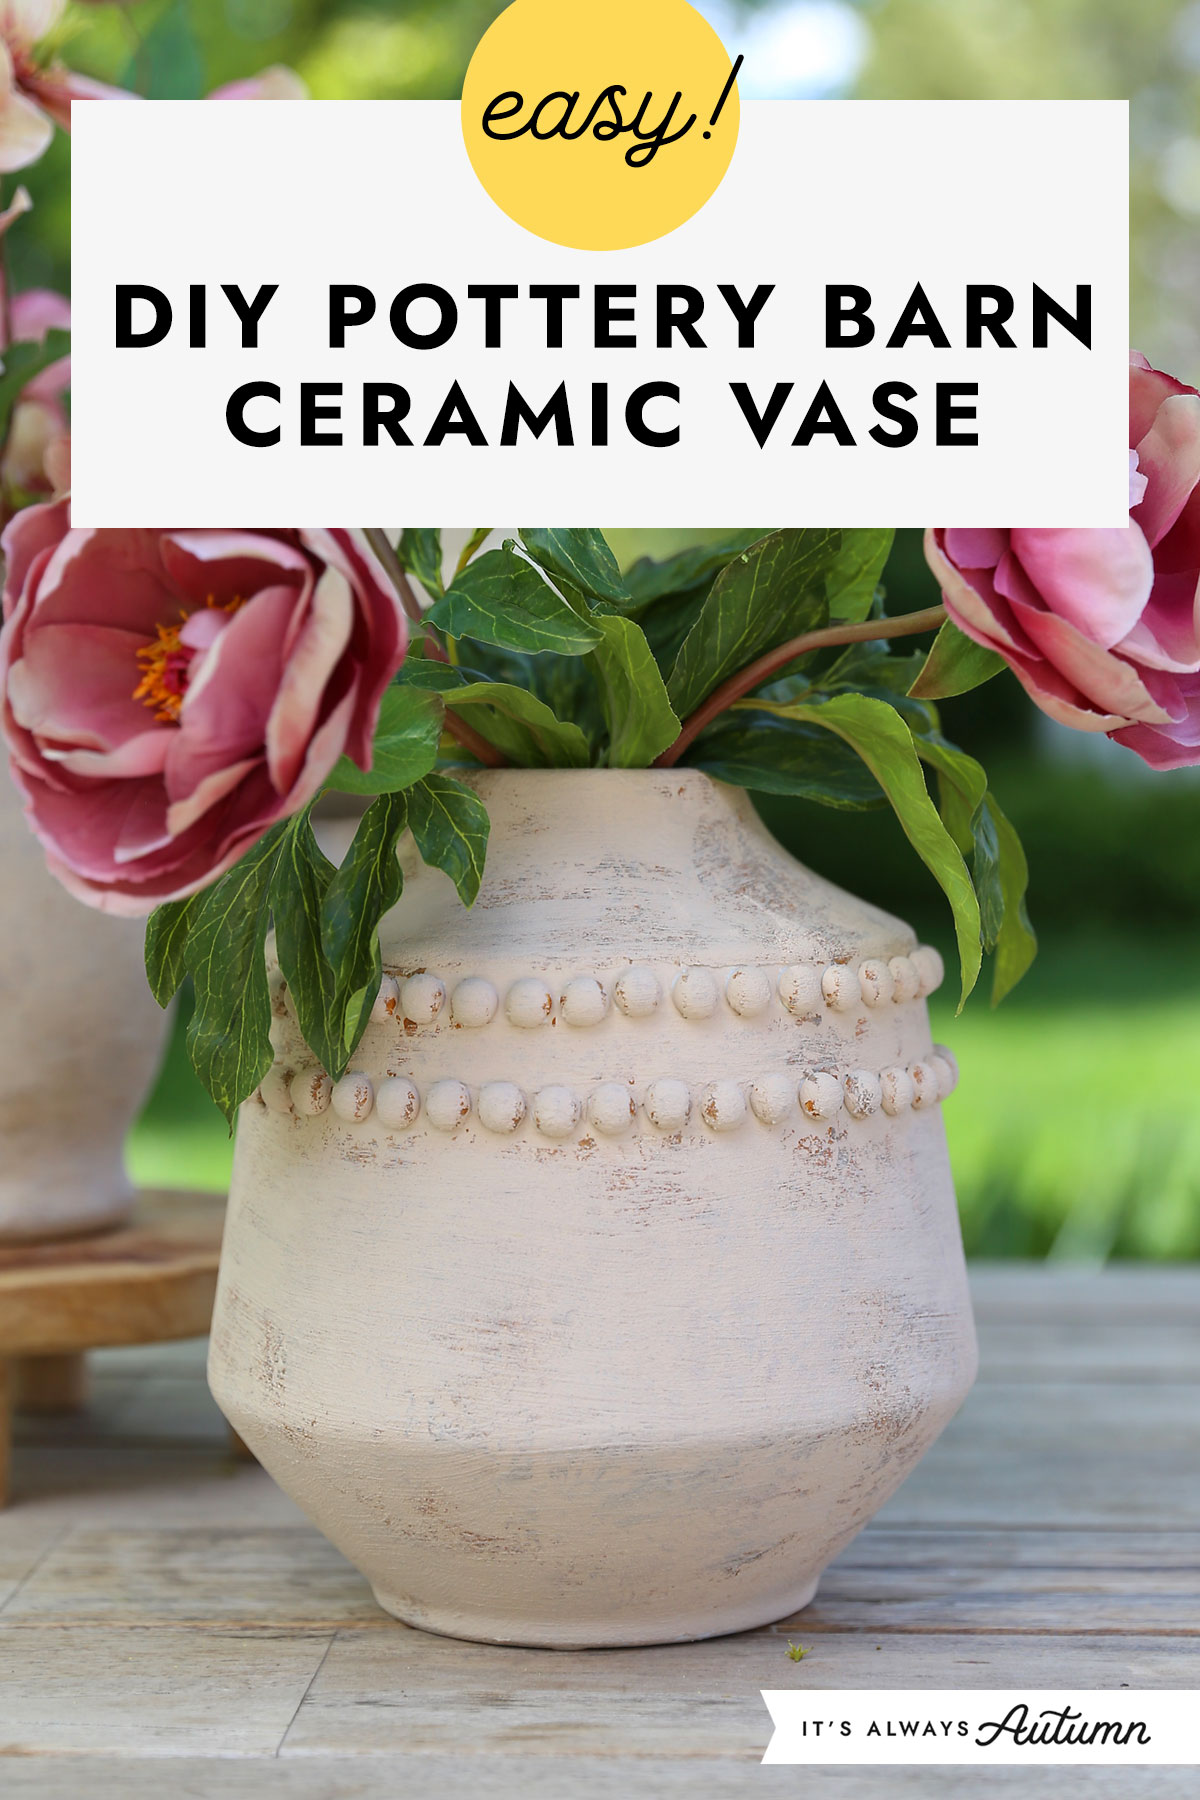
In today’s post: Learn how to turn cheap thrifted vases into beautiful aged ceramic vases that look like they came from Pottery Barn! This easy DIY for adults only takes a couple of supplies and can be completed in an afternoon.
Easy Pottery Barn Dupe
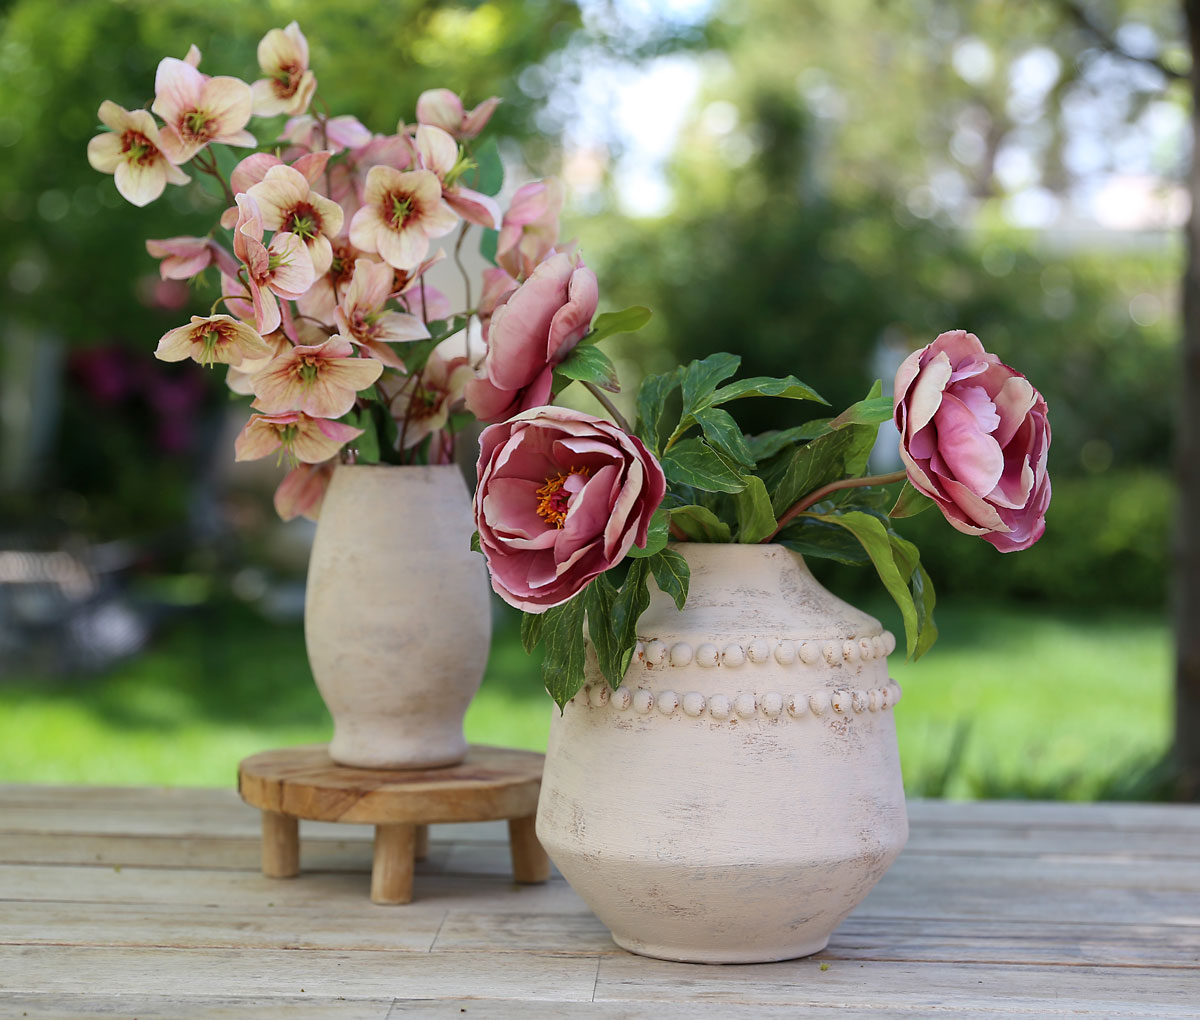
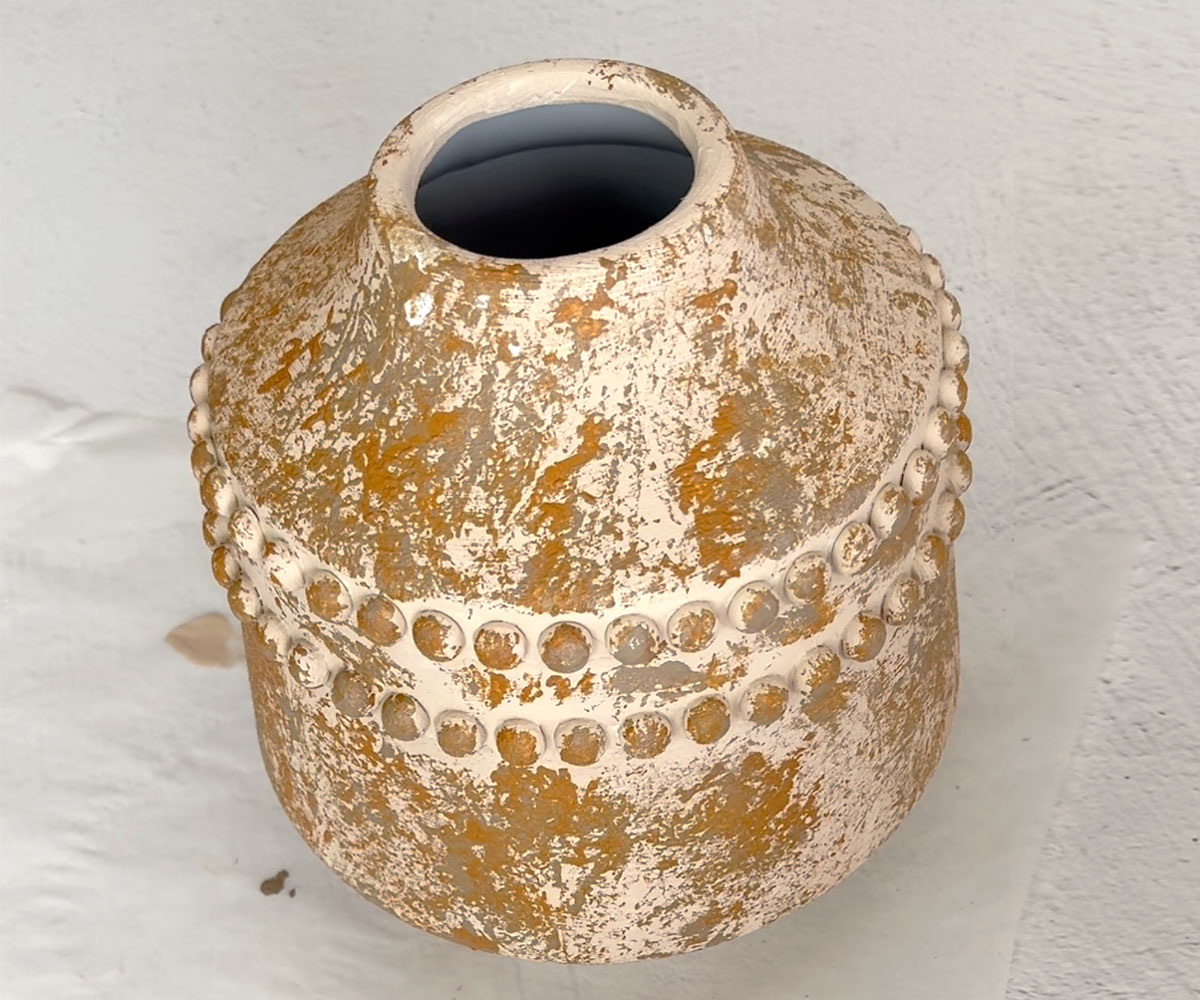
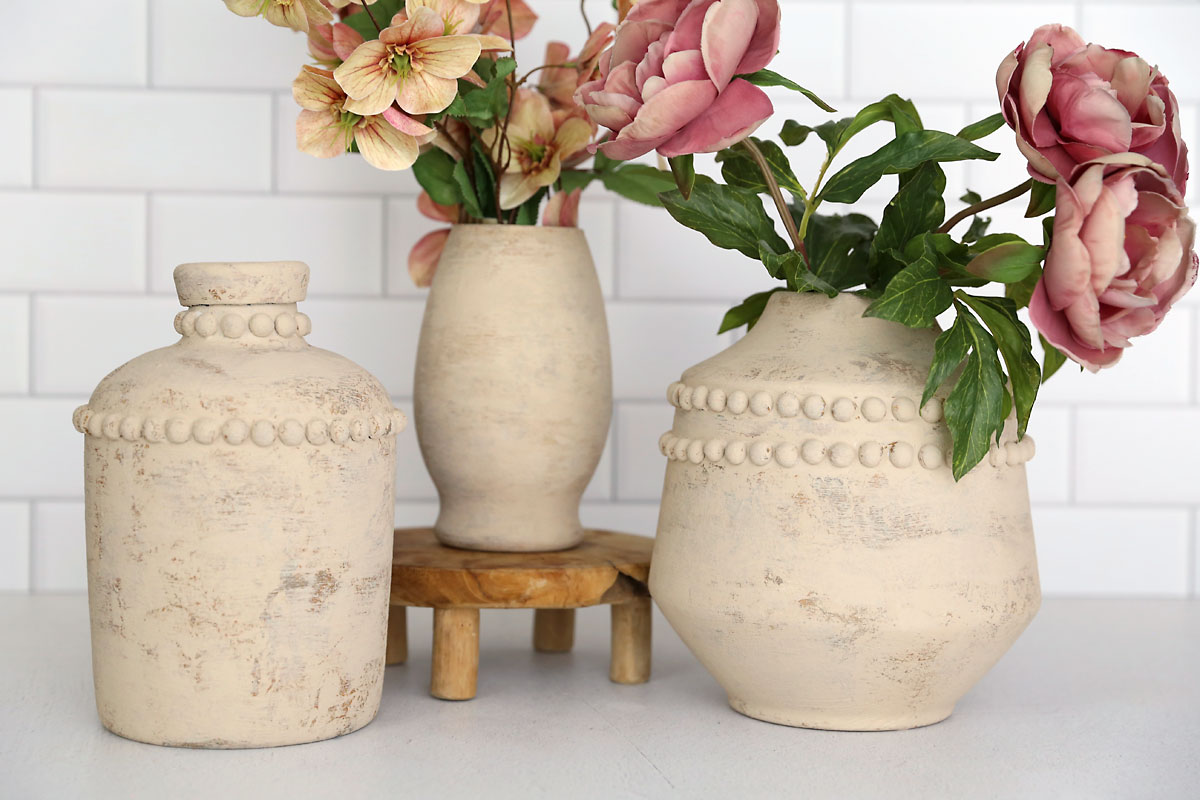
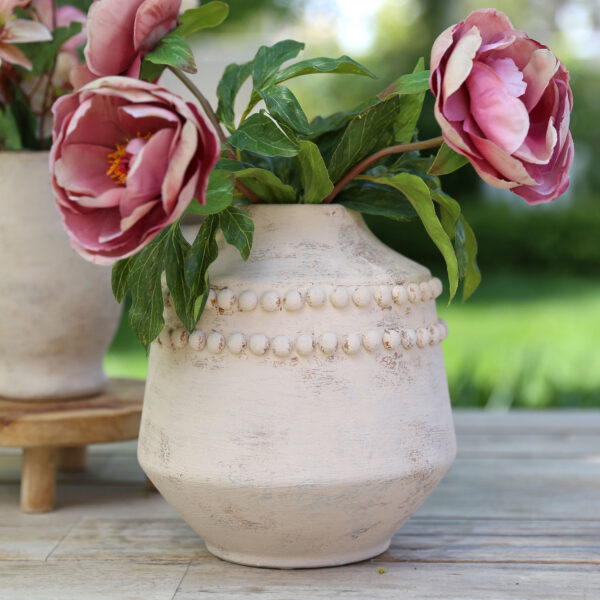
You know we all want a Pottery Barn look for thrift store prices, right? When I saw the beautiful Emilia Ceramic Collection of vases on Pottery Barn’s website I wondered if I could make a reasonable dupe – and I think I have! I started with cheap vases from the thrift store and ended up with this:
Baking Soda + Paint
A little internet research (including a post from Tulips and Twill) taught me that the key to giving thrifted vases a ceramic look is using acrylic craft paint mixed with baking soda. This results in a beautiful handmade ceramic texture. To make my vases look more like the Pottery Barn version I also added rows of split wood balls and some additional color.
Supplies
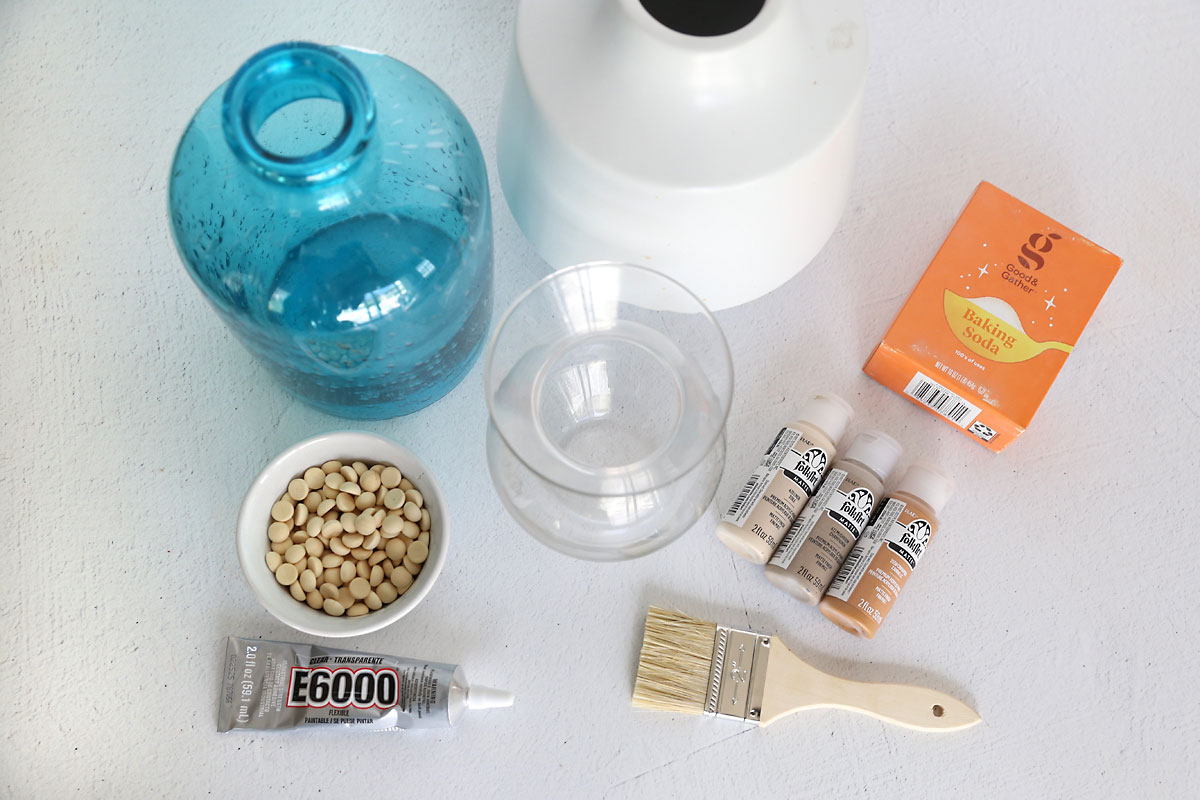
Here’s what you need to make your own DIY Pottery Barn ceramic vases:
- Vases: I got three vases from the thrift store, but you could also check the dollar store and garage sales. Two of the vases I used were glass and one was a smooth ceramic, and both surfaces worked great for this technique.
- Split Wood Balls: I used these 12 mm split wood balls (aka half wooden beads) from Amazon.
- E6000: for adhering the wood balls
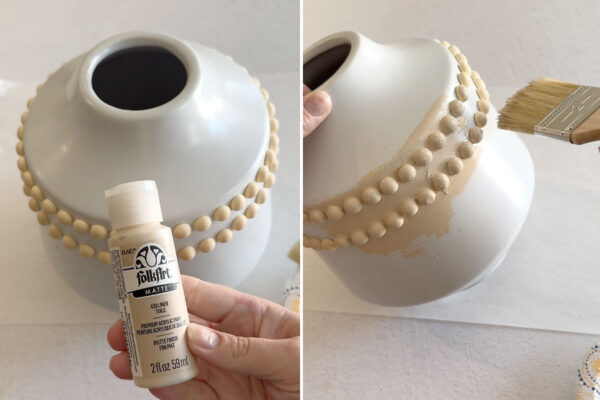
- Acrylic Craft Paint: I used three different colors of craft paint. Choose a light color for the main color (I used linen) and two darker accent colors (I used cinnamon and mushroom). You will probably need a full 2 oz bottle of the lighter color for each vase and just a little of the darker colors.
- Chip Paint Brush: I used a cheap brush from Hobby Lobby
- Baking Soda: this gives the paint texture.
- Paper towels, paper plate and/or bowl
How to Make DIY Ceramic Vases
Adhere Split Wood Balls
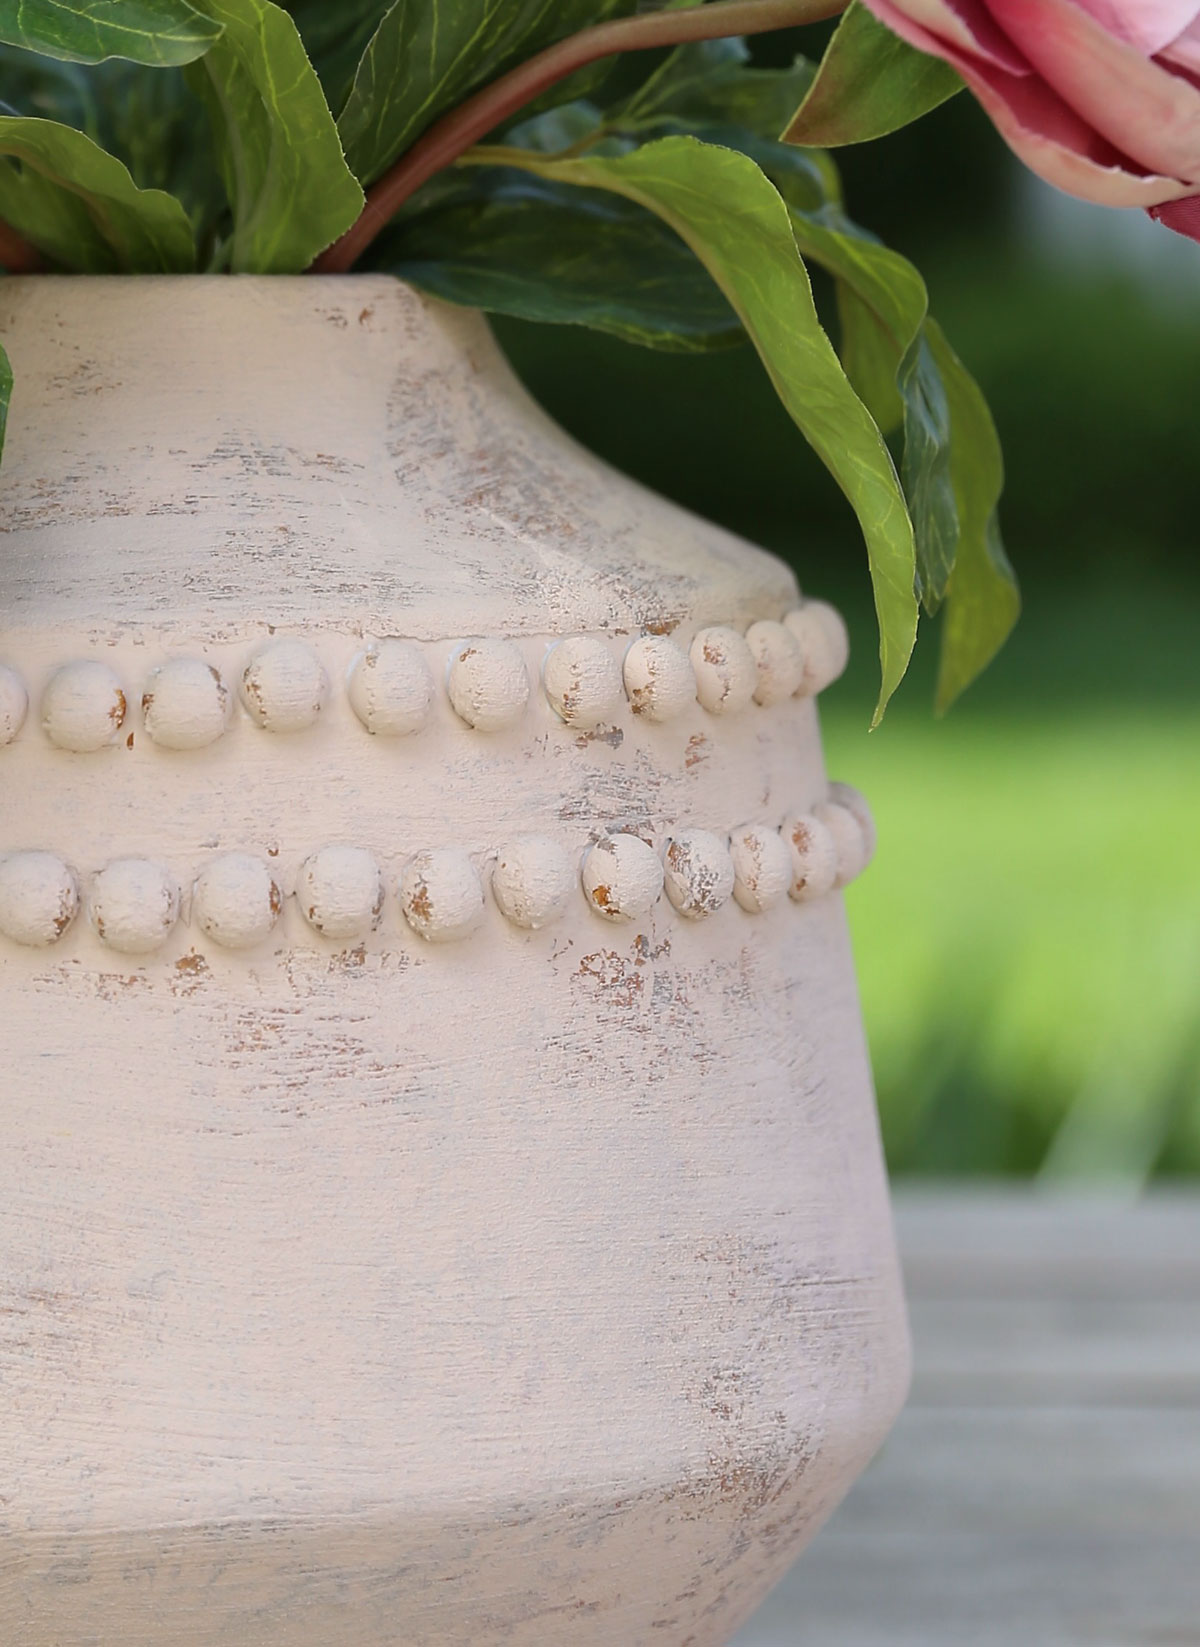
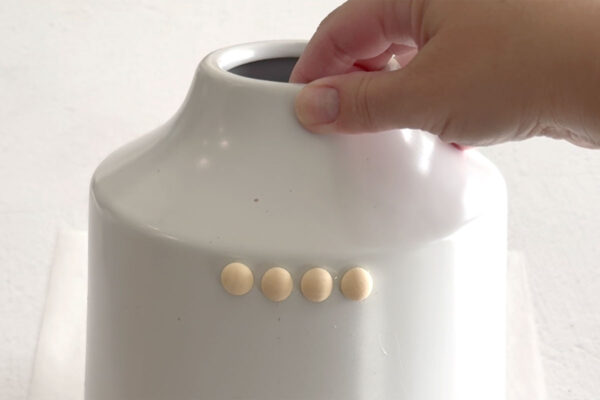
To make our DIY ceramic vases look more like the Pottery Barn version, we’ll start by adding rows of split wood balls (aka half wooden beads). This step is optional but adds a lot of character to the finished pieces. I used E6000 to adhere the split balls to the vases because it creates a very strong bond. Place just a small dab of E6000 on the back of a split wood ball and then press it to the vase where you’d like to start your row. (You can measure and mark where the row should go on the vase; I just estimated). Press the ball and hold for a second or two. If the ball starts to slide down when you let go, that means you can use less glue on the next one. Don’t worry if a few balls do slide down; just push them back into place and hold for another second or two, then they should stay put. Continue gluing split wood balls onto the vase in a row, leaving a small amount of room in between each ball. If you place the balls too close together it’s hard to paint, so leave a small space as shown below.
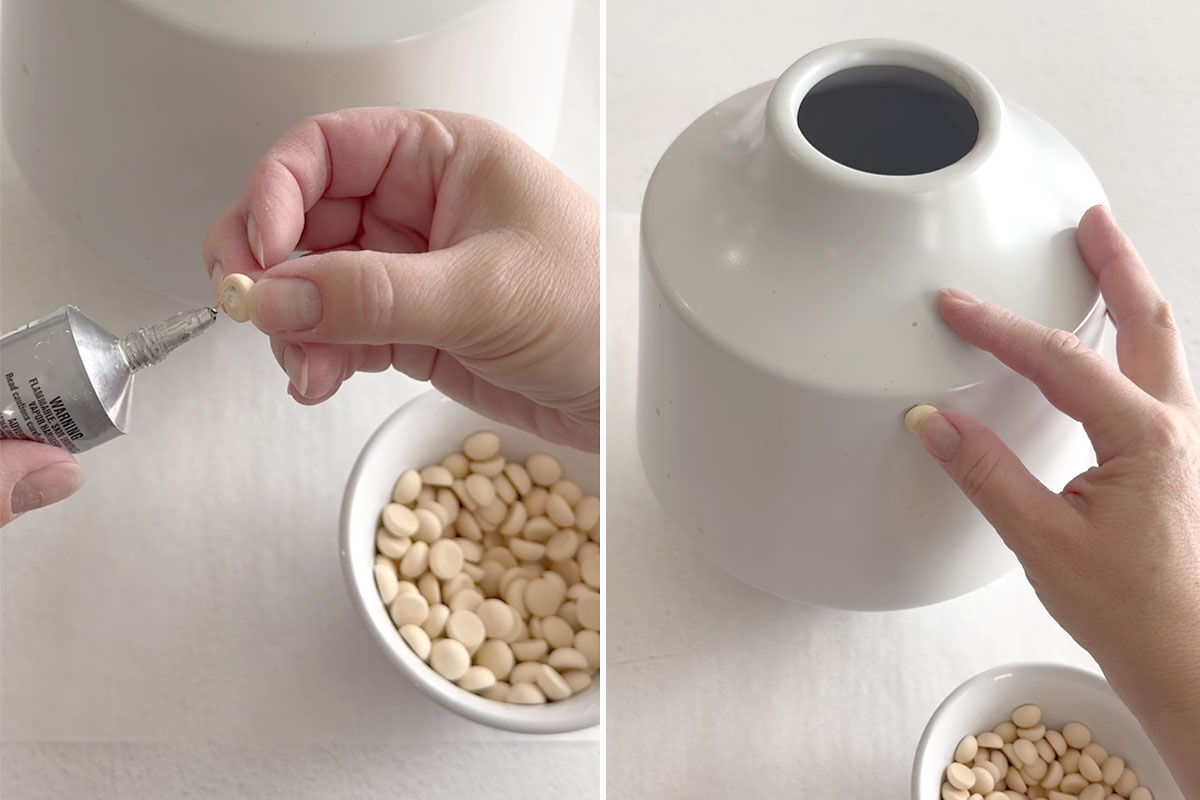

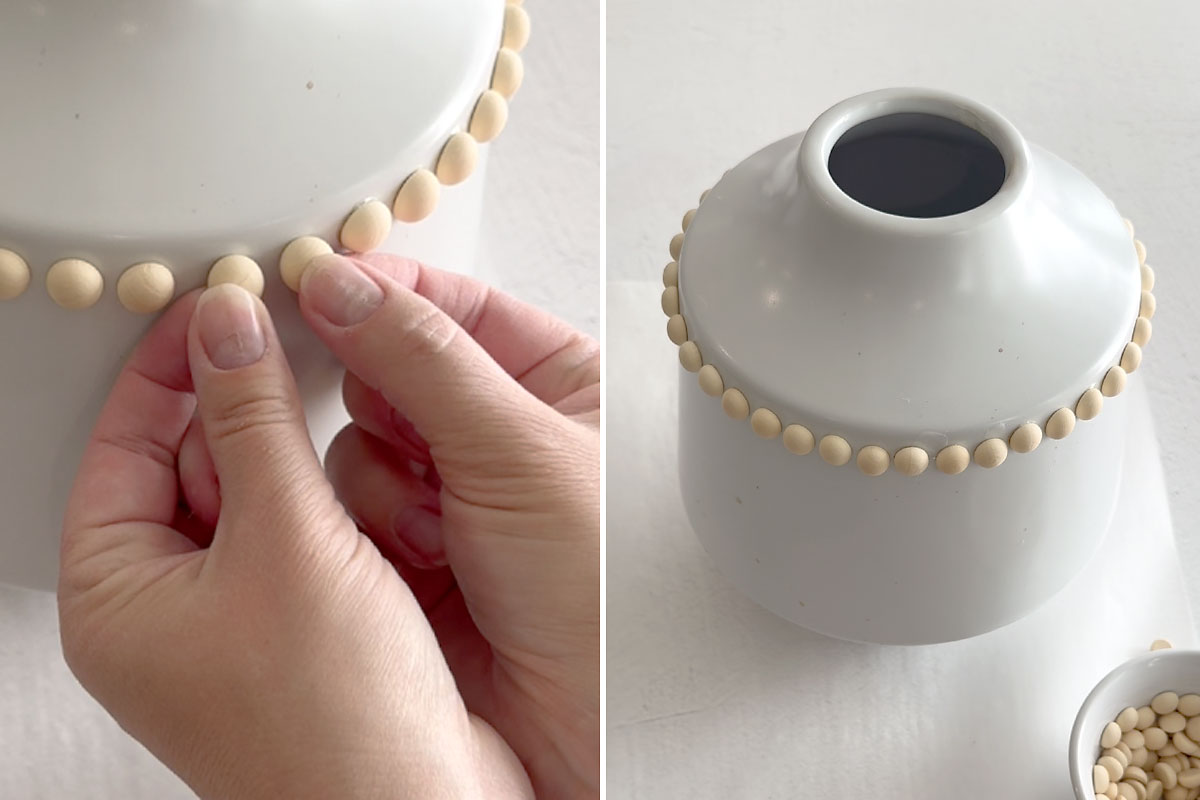
Continue gluing on the row of split balls until you get close to where you started. Decide how many balls will fit in the space that is left. The nice thing about E6000 is that it probably won’t have completely set yet, so you may be able to shift some of the balls you’ve just added one way or another if needed. Finish off the row, then complete a second row if desired. Allow the glue to dry completely, at least two hours, before painting the vases.
Paint the Wood Balls
Once the glue is completely dry and the wood balls will not move at all, it’s time to start painting! I used acrylic craft paint in Linen and a cheap chip brush. Start by painting the rows of beads. Make sure to get in between each bead as well as above and below each one. You don’t have to let the paint dry before continuing to the rest of the base coat.

Finish the Base Coat
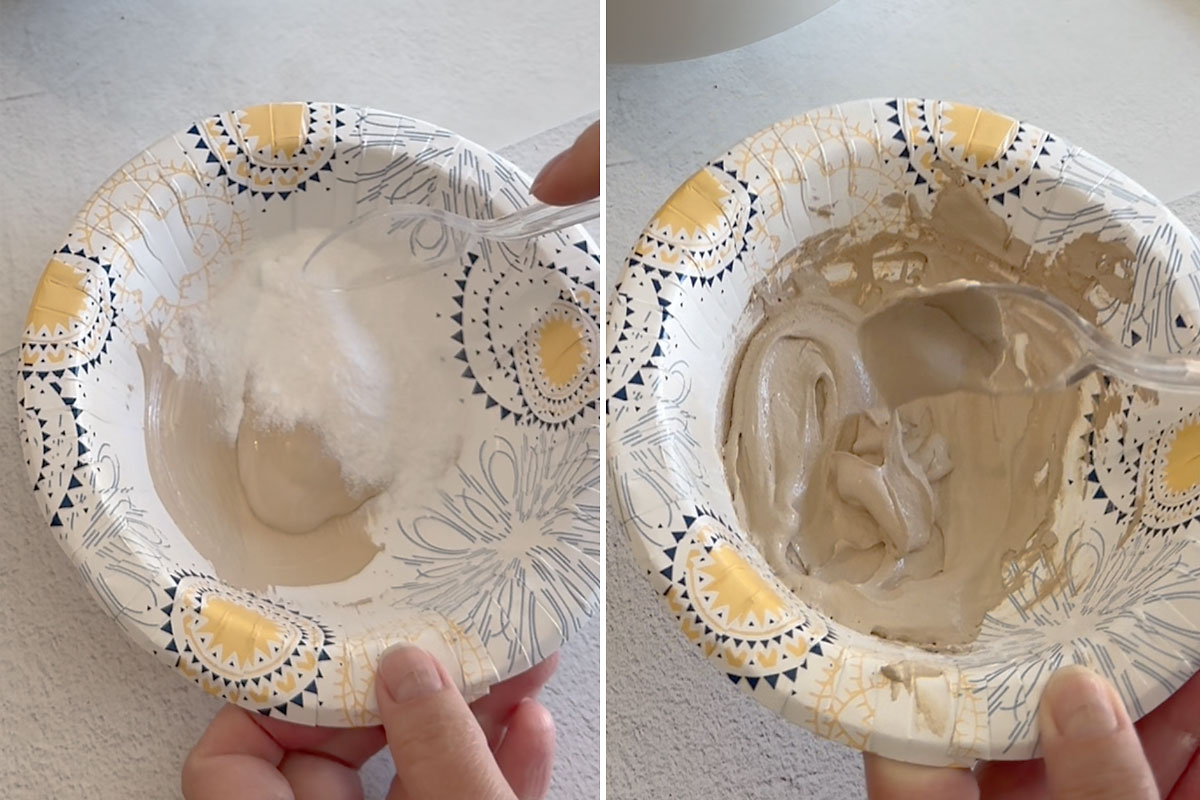
Once the beads are covered with paint, you will paint the entire vase with a thick, texture paint made by mixing baking soda into your paint. The amount of baking soda to paint you use does not need to be exact and it will vary depending on how thick the paint starts out. I poured some paint into a paper bowl then dumped in a similar amount of baking soda then mixed it up well with a plastic spoon. You are looking for a thick pudding like consistency.
Start brushing the thickened paint onto the vase. You’ll immediately see that the brush is leaving streaks in the paint – that’s good! You should see a lot of texture as you paint. However, if the paint gathers up in little balls that drop off the vase, that means you’ve mixed it too thick and you need to add more paint. Continue applying paint using side to side brush strokes until you’ve covered the entire vase. Depending on the shape of your vase, you’ll also want to paint the inside of the top of the vase if it is visible. You do not need to go over the balls with this coat of paint (since we painted them already).
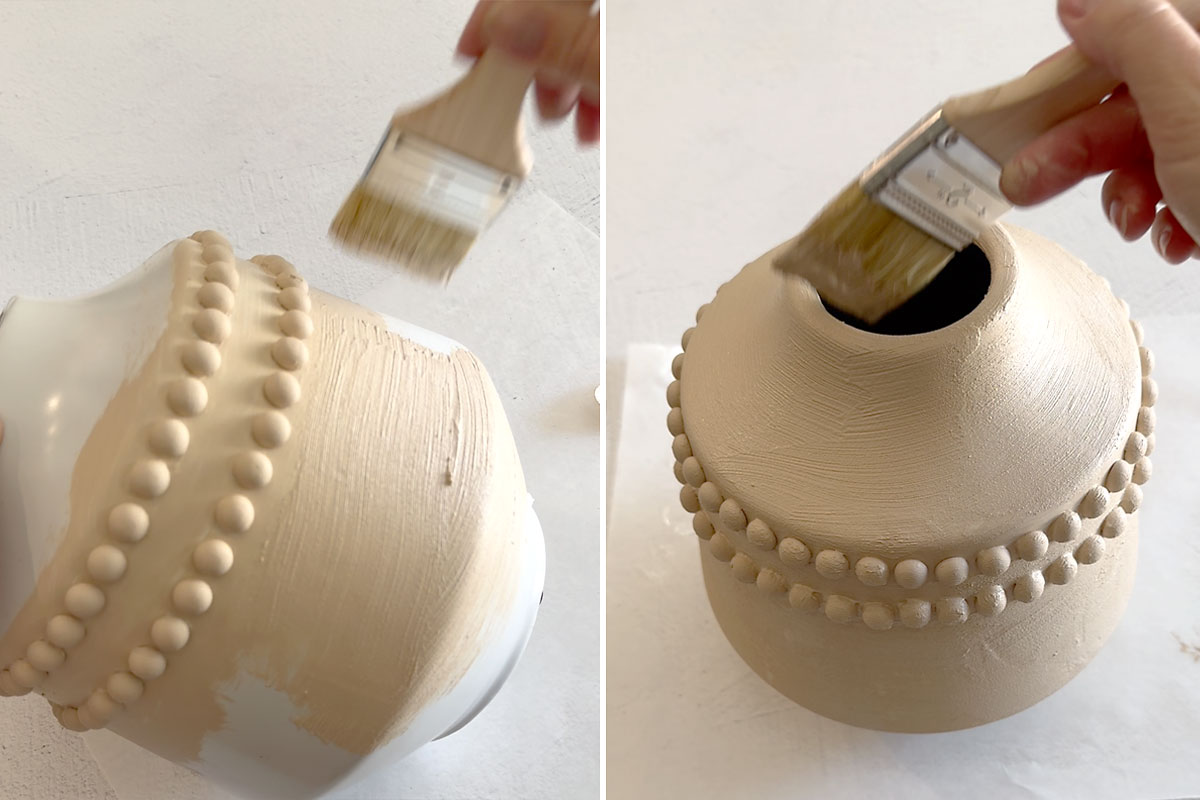
Allow the paint to dry completely before continuing. You can use a hair dryer to dry it fairly quickly. Just be sure it’s completely dry before applying more paint – if it’s still damp the baking soda may cause the paint to clump up and fall off. If you are using a clear glass vase you will likely need two coats of this base color to get good coverage. I was using a white vase and one coat was sufficient.
Add the Other Colors
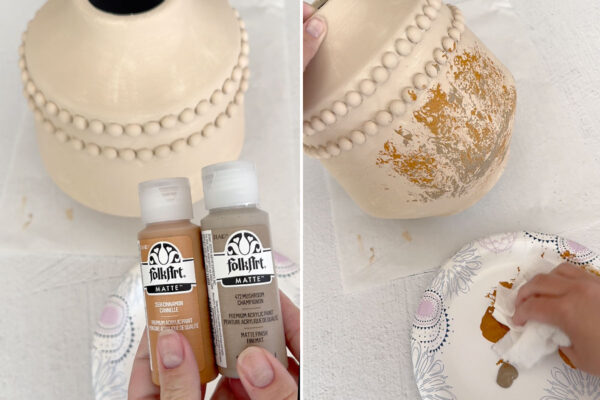
The vases look quite pretty painted in just one color, so if you like that look you could stop here. However since I was trying to get a more aged look like the Pottery Barn version, I added two darker colors: Cinnamon and Mushroom. Put dots of each of the darker colors on a paper plate, then bunch up a paper towel and bounce it in the paint, then on the paper plate a few times. Then bounce the paper towel over the vase to transfer splotches of color. Continue until there are splotches of the darker color on the entire vase, including on some of the balls. Let the vase dry completely, or dry it with a hair dryer, before continuing.

Add the Final Coat
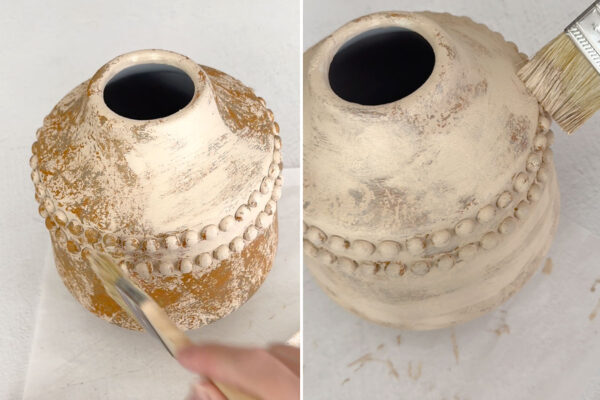
Just one more step! Mix up a little more of the base coat and baking soda, and this time you can add a few drops of water to get a thinner consistency. Your goal is to brush on a very light top coat that will let some of the darker colors show through. Get just a little bit of paint on your brush at a time, then tap the brush against the vase in a few places (so you don’t transfer all the paint in the same place) and then brush the paint on using long side to side strokes. It’s best to build up this coat gradually, adding a little paint at a time, to make sure you don’t completely cover the darker colors. The finished look is up to you: keep painting until you like the look!

Finished Project
Once this last coat is done, allow the vase to dry over night before using. NOTE: These vases are intended for use with faux flowers only. Water could damage the ceramic look finish on the outside of the vases.
DIY Ceramic Vases
Supplies
- Thrifted Vases Glass or Ceramic
- Split Wood Balls 12 mm
- E6000 Glue
- Acrylic Craft Paint in a light linen color and two darker colors
- Chip Paint Brush
- Baking Soda
Want more project ideas? Sign up to get my favorite easy crafts and recipes straight to your inbox!
Equipment
- Paper Towel, Paper Plate
Instructions
- Use a small amount of E6000 to glue split wood balls in a row around the vase.

- Leave a little space in between each ball. If the balls start to slide down, just press them back up into place.
- Continue adding balls until the row goes all the way around the vase. Add a second row if desired. Allow the glue to dry completely, at least two hours.
- Paint over the wood balls using the lighter color, making sure to cover where the balls meet the vase.
- Mix approximately equal parts of baking soda and the lighter color paint together in a paper bowl on or a paper plate. The consistency should be like grainy pudding.
- Brush the baking soda paint onto the vase using side to side strokes (you do not need to go over the balls). Cover the entire outside of the vase, and any inner portion that would be visible at the top. Allow to dry thoroughly before continuing (you can use a hair dryer to speed the drying). If needed, paint on a second coat.
- Put dabs of the darker two paint colors on a paper plate. Bunch up a paper towel and tap it in the paint, then tap it on the paper plate. Then use a bouncing motion on the vase to start transferring splotches of darker paint.
- Continue until the entire vase is covered. Allow it to dry or use a hair dryer to dry it.

- Finally, apply one more very light coat of the lighter color mixed with baking soda. You can add a bit of water to make the mixture a bit thinner. Get just a little paint on the brush at once and dab it in a few places on the vase, then brush from side to side to spread the paint. The goal is to allow the darker colors to show through, giving the vase an aged ceramic look.
- Allow the vase to dry thoroughly before displaying. Use with faux flowers only; water may damage the finish on the vase.


Amy Hunter says
I love how they turned out!!