
In today’s post: Learn how to make a DIY hanging plant stand – it’s an easy beginner project that looks great on your patio or front porch. I’m sharing the simplest way to put together one of these wooden plant stands along with step by step instructions and photos.

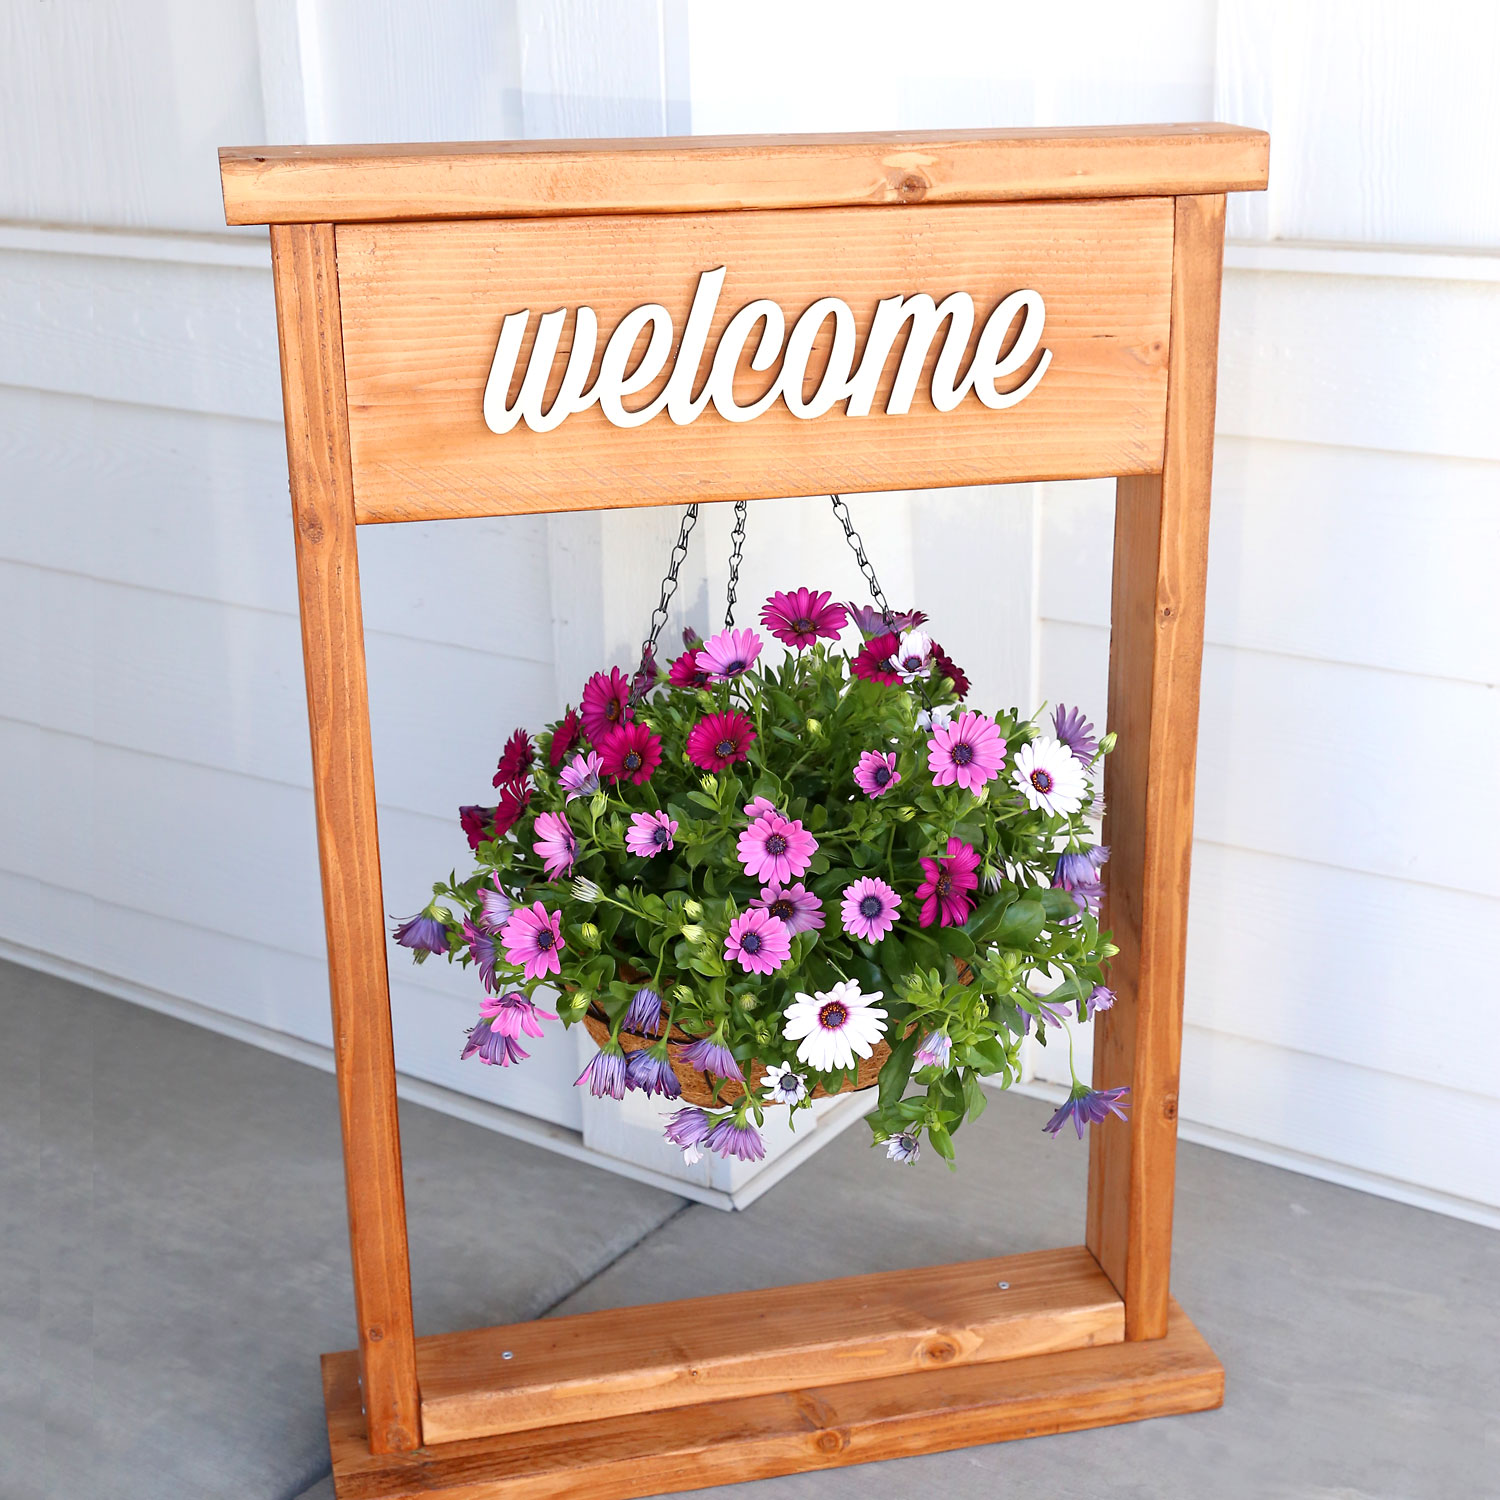
DIY Hanging Plant Stand
This wooden hanging planter is a fun way to spruce up your front porch without a lot of work. We’ve figured out the simplest way to make this DIY plant stand using easy to find supplies for today’s tutorial. This project is an easy one to tackle, even if you don’t have much experience building things, and it would make a lovely gift to give Mom for Mother’s Day! Total hands on time to make this DIY project is about two hours; however, that time will be split up over two days because you will need to paint or stain the wood and allow it to dry.
Supplies: Wood
This DIY planter stand is made from wood you can find in the lumber section at Lowe’s or Home Depot. You will need:
- a 2×4 that is 10 feet long
- a 2×8 that is 8 feet long (you actually only need about 4 feet of this board but most home stores don’t sell shorter 2×8 boards)
If you plan to stain to wood, it’s a good idea to buy boards made from the same material. At my local Lowe’s, it was cheapest to get Douglas Fir boards. When you go to purchase your wood, be picky! Look closely at the stack of boards and pick out the nicest ones. Look for boards that are smooth and don’t have dents or cracks. Ask for help if needed; a store employee should be available to help you pick the best pieces. Additionally, ask a store employee to cut your wood to the size you’ll need at the store (see “Cutting the Wood” below for measurements). This makes it much easier to transport home and will save you time even if you have a saw you could use at home.
Other Supplies
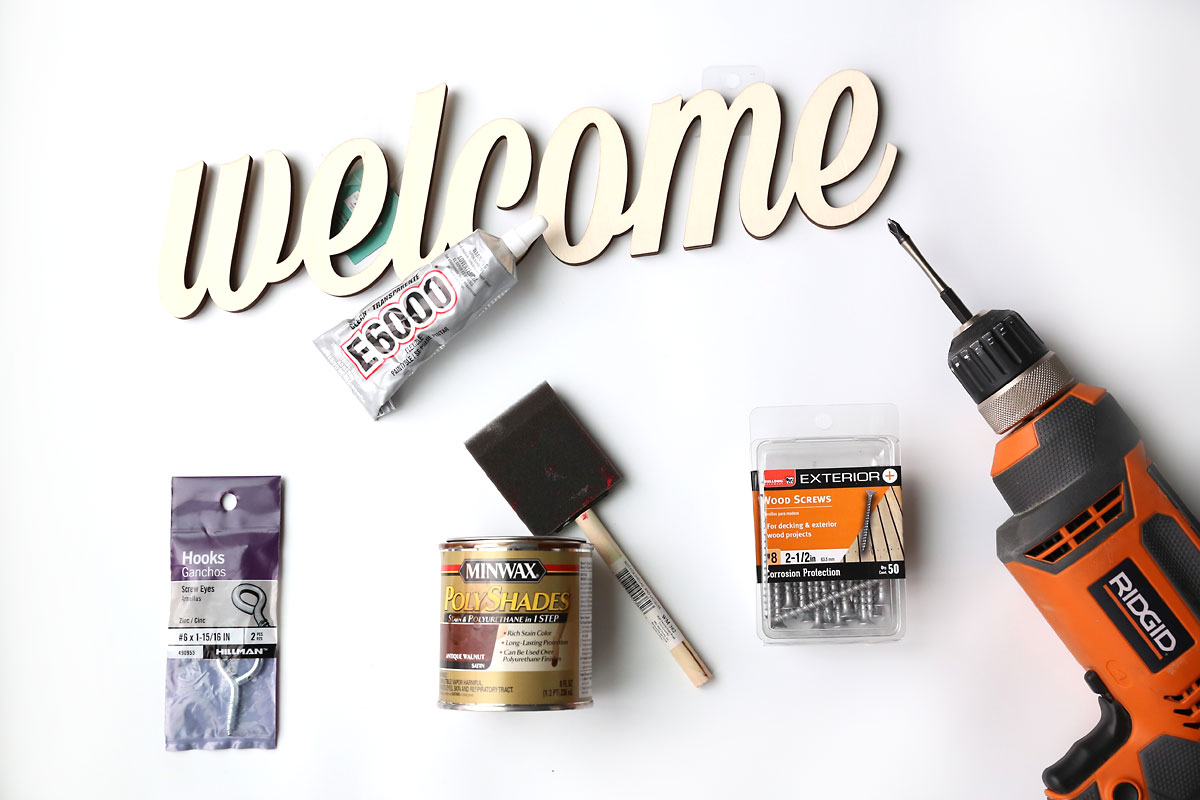
This is what you’ll need in addition to the wood:
- Sandpaper, sanding block, or electric sander: I recommend an electric sander because it will save you quite a bit of time
- 2.5 inch long screws: I used #6 exterior wood screws
- Power drill with a screwdriver bit that matches your screws + a drill bit that’s slightly smaller than your screws
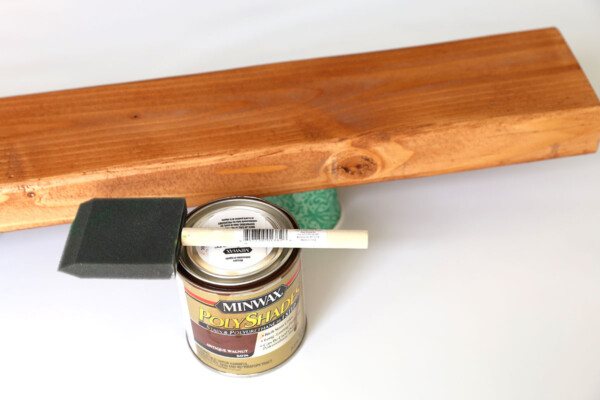
- Paint or stain + paintbrush: I used a half pint of Minwax PolyShades Stain + Polyurethane in 1 Step and a foam paintbrush
- Screw Eye Hook: I used a #4 x 2-3/16 inch hook (about an inch wide total)
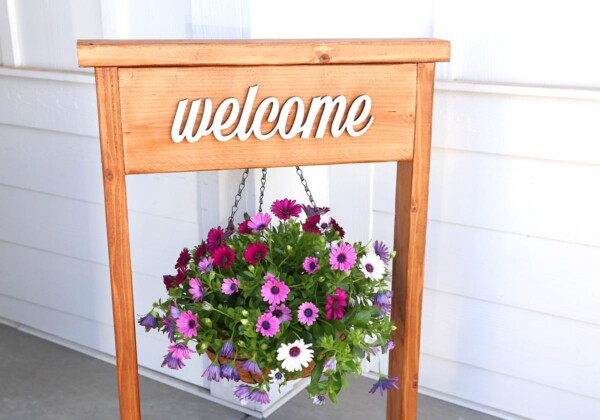
- Welcome wood cutout: I used this one from Hobby Lobby; you could also use a vinyl word or a stencil and paint
- Glue or nails to attach the wood cutout
- 14 inch Metal Hanging Basket with Coco liner: I used this one from Walmart
Cut and Sand the Wood
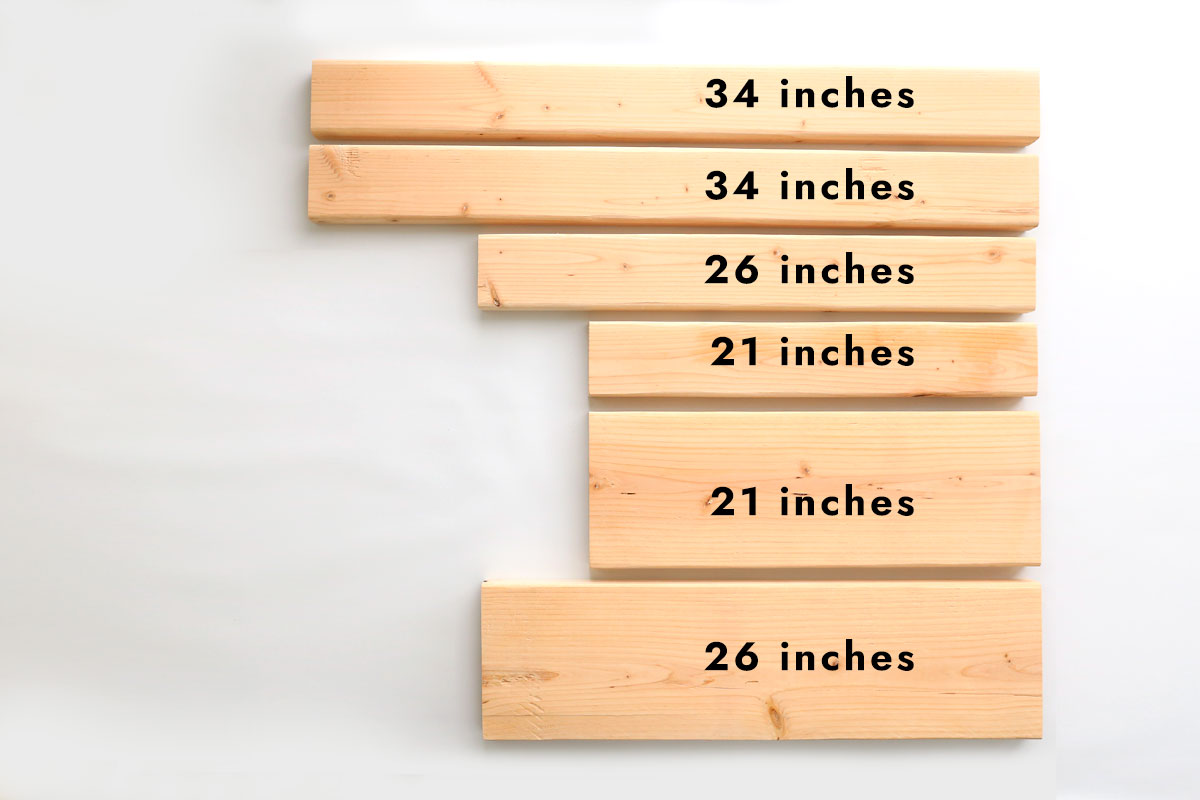
You’ll begin by cutting the wood into 6 pieces (there will be some scraps). It’s easiest to have a store employee cut the wood for you at the store after you purchase it, so be sure to ask about that. These are the pieces you need:
- (2) pieces of 34 inch long 2×4
- (1) piece of 21 inch long 2×4
- (1) piece of 26 inch long 2×4
- (1) piece of 21 inch long 2×8
- (1) piece of 26 inch long 2×8
Once your wood pieces are cut to size, you’ll need to sand them. I used a small ortibal sander to do this. You can use a sanding block if you don’t have a power sander; it will just take longer. Sand all sides of the wood. This took about half an hour.
Paint or Stain the Wood
Next, you’ll paint or stain your wood pieces. I placed a disposable plastic tablecloth on top of my table and used small disposable cups to prop up the wood pieces. I used a foam paintbrush to apply stain to the tops and sides of the wood, then allowed that to dry for 6 hours. Then I flipped the wood over and stained the bottom of the wood pieces. If you’d like a lighter color, you can wipe some of the stain back off before it dries. If you’d like a darker color, you could add a second coat. I was happy with the look using one coat of Antique Walnut stain + polyurethane in 1 step.

Note: I chose to stain the wood before building the plant stand. However, if you are painting your stand (especially if you decide to use a nice spray paint) you could probably wait and do this after it’s built, which may save you some time. Additionally, you may want to add a final coat of poly if you don’t use a stain that already includes it.
Build the Base Frame
Begin by creating a U-shape with the 21 inch piece of 2×4 and the (2) 34 inch pieces of 2×4, and shown below. You’ll use two screws to attach each longer piece to the shorter piece, as shown by the blue arrows.
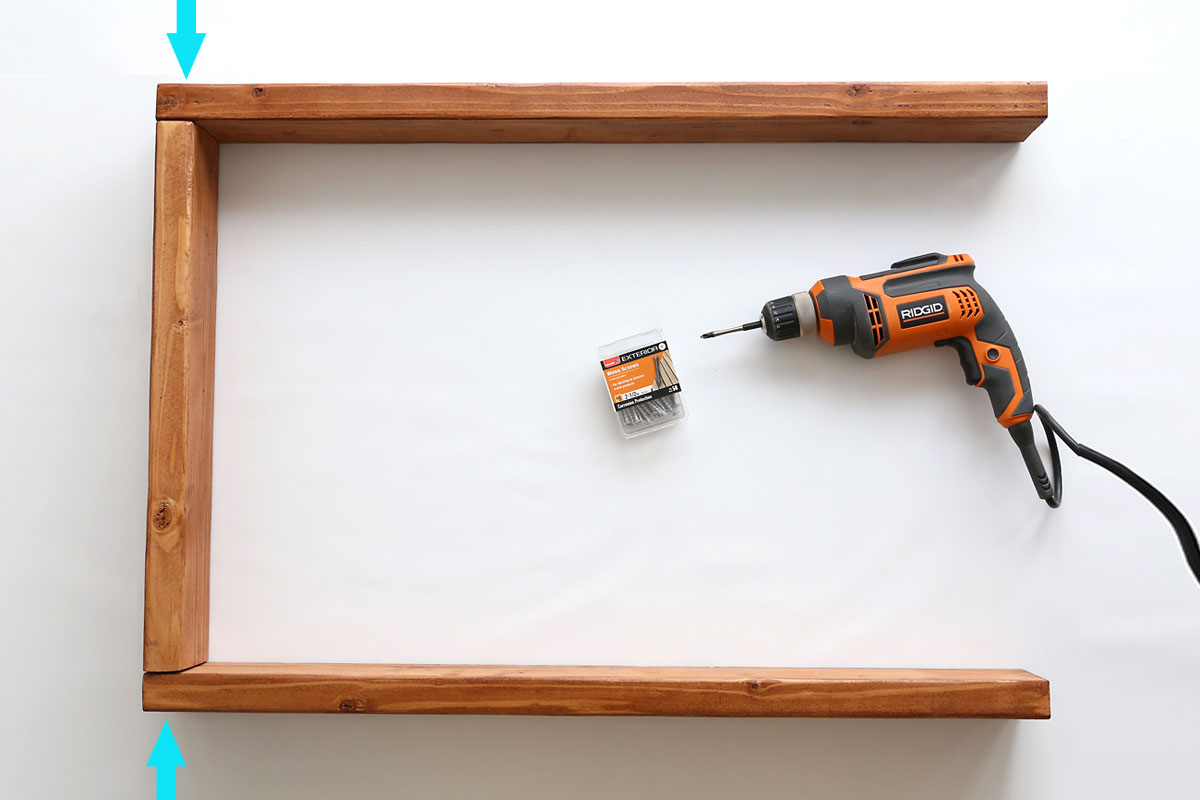
To make sure you can easily drive in the screws, set up the wood and drill holes first, using a drill bit that’s a little smaller than the screws you are using. If you have two drills, you can keep the drill bit on one and the screwdriver bit on one. If you only have one drill, you’ll need to swap back and forth for each step.
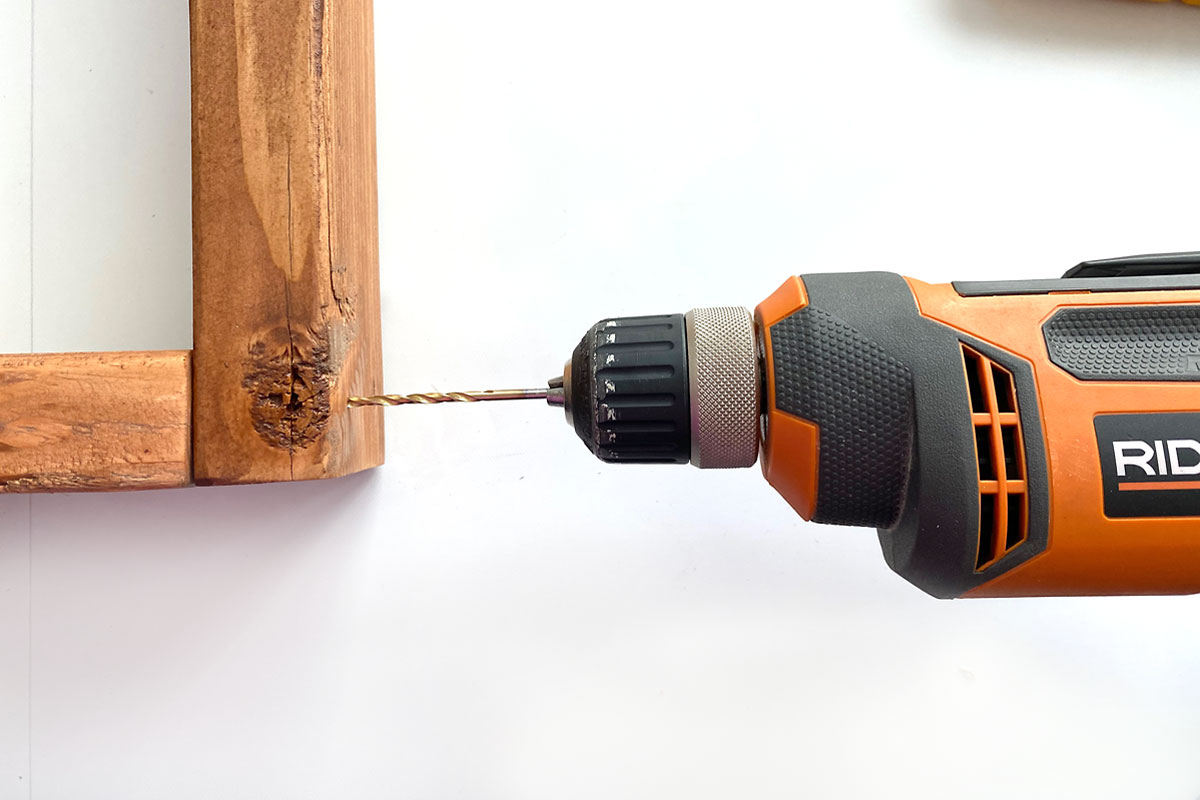
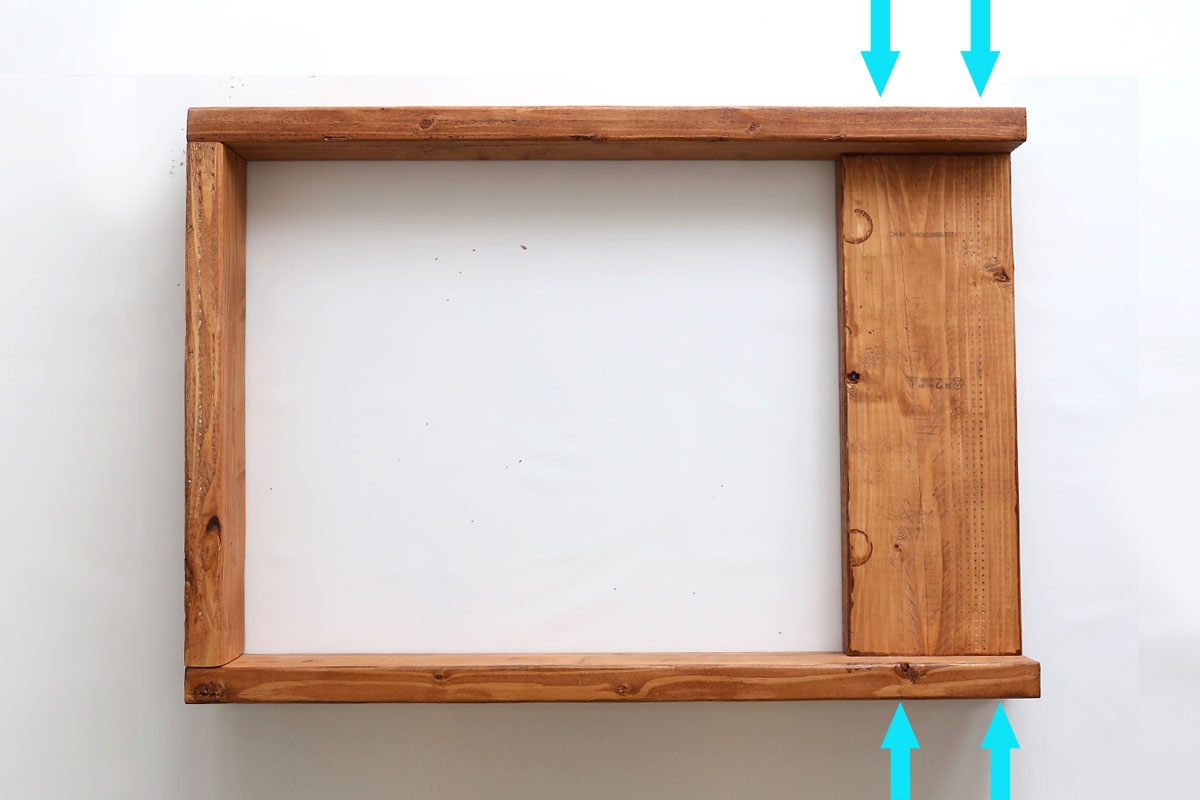
If one side of the “U” looks nicer than the other, place that side down. That will be the front of your plant hanger. Now, place the 21 inch piece of 2×8 in between the top edges of the “U”, nicer side down, as shown below. Send 2 screws through each 34 inch piece of 2×4 into the 2×8, as shown by the blue arrows. (Drill holes first.) This completes the basic frame for the hanging plant holder.
Attach the Box to the Base
Place the 26 inch piece of 2×8 flat on the ground, and stand up the frame on top of it. Center* the bottom of the frame on the base. (*Because the hook will be slightly to the back of the hanger, you can place the frame slightly forward on the base.) Attach the box to the base by sending two screws down through it, as shown in the photo below. Then flip the entire thing over and send two screws through the base into the side pieces of the frame.

Add the Top
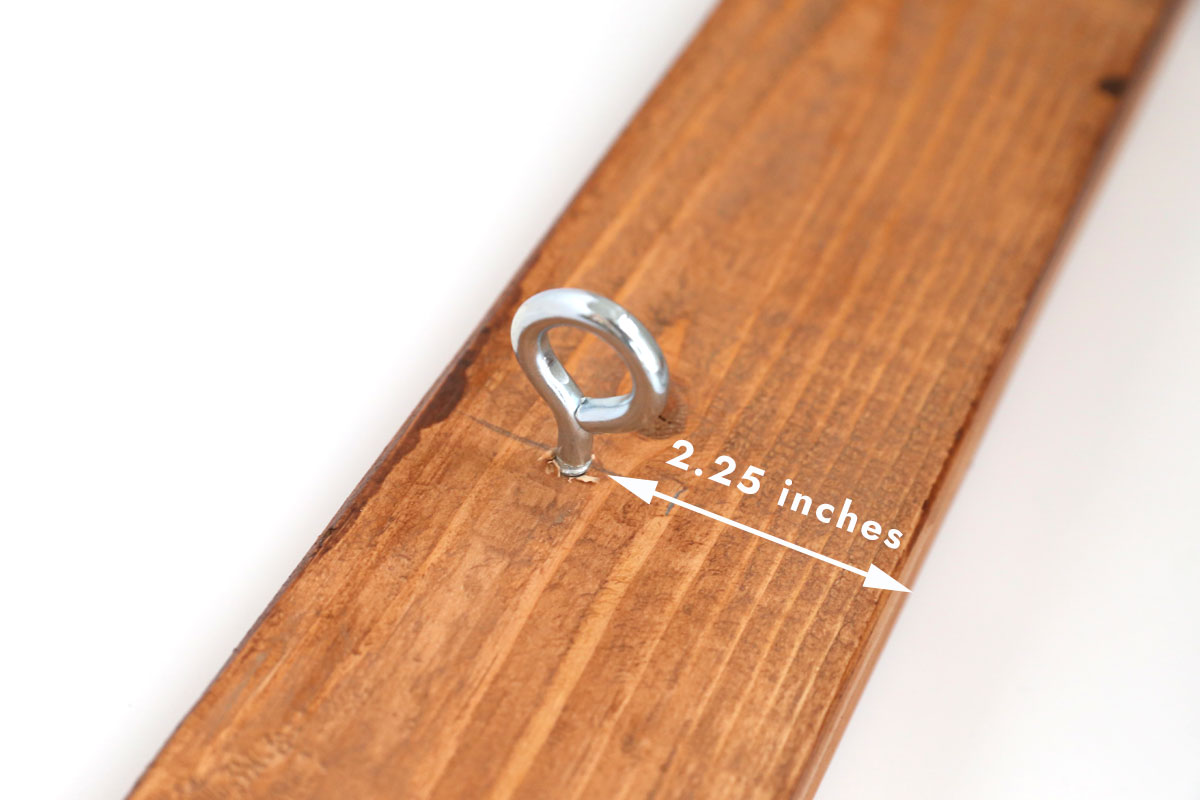
The last piece of wood, the 26 inch 2×4, is the top of your plant stand. Place the nicer looking side down. Use a tape measure to measure in 13 inches from one short end to find the center and mark it with a pencil. Along that mark, measure 2.25 inches from the front edge. Drill a hole there and screw in the eye hook.
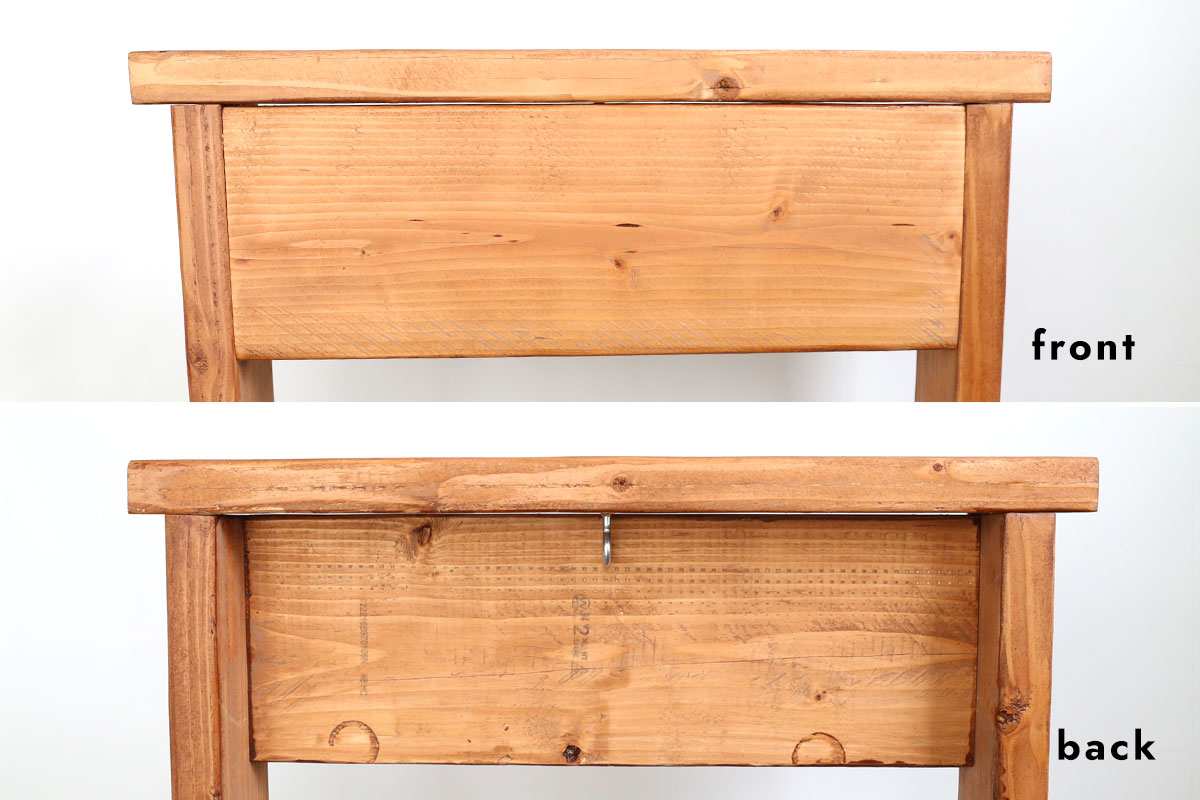
Place the top piece on top of the frame. It will extend past each side by about an inch. The hook should sit right behind the front piece, as you can see below. Screw down through the top piece into the sides, two screws on each side.
Add the Welcome Sign
At this point the construction of the plant hanger is complete and you can add the wood cutout on the front. I glued the wood cutout on using E6000 glue. You could attach it with small wood nails if you prefer. Alternately, you could apply a vinyl word, or use a stencil to paint a word. Or you could attach house numbers instead.

Ready for some Flowers!
This plant stand is built to accommodate a 14 inch metal hanging basket with a coco liner, like this one from Walmart. Add a layer of potting soil and your favorite outdoor plants. Remember to consider how much sunlight the flowers will get wherever you plan to set out your plant stand, and try mixing flowers of different colors for a gorgeous display.


DIY Hanging Plant Stand
Supplies
- 1 10 ft 2×4
- 1 8 ft 2×8 you'll only use about 4 ft of this board
- 2.5 inch screws
- paint or stain
- paint brush
- Screw Eye Hook about an inch wide
- Wood Cutout
- Glue
Want more project ideas? Sign up to get my favorite easy crafts and recipes straight to your inbox!
Equipment
- Power Drill with screwdriver bit and drill bit
- Orbital Sander or sanding block
Instructions
- Cut wood to size listed on the photo. Sand wood smooth.

- Paint or stain all six wood pieces and allow to dry.
- Create a "U" shape with the 21 inch piece of 2×4 and the two 34 inch pieces of 2×4. Attach with two screws on each side.
- Place the 21 inch piece of 2×8 in between the top sides of the "U". Attach with two screws on each side. The completes the frame.
- Place the 26 inch 2×8 down flat. Center the frame on top of it. Attach with two screws sent down through the 2×4. Flip it over and send screws through the 2×8 into the sides.
- Install the eye hook on the underside of the 26 inch 2×4.
- Place the piece with the hook on top of the stand. The hook should sit right behind the front piece. Attach the top with two screws through the 2×4 into each side.
- Glue on a wooden word cutout or attach it with small nails.
- Hang a 14 inch metal hanging plant basket from the hook and fill with flowers.


.


Jordan Becker says
This was really easy! I did use pocket holes to hide all the screws but it turned out beautifully! It was really easy to just make two with one extra 2×4! I just used my cricut and some permanent vinyl for the lettering!