
In today’s post: Learn how to make this beautiful braided bread recipe – it looks impressive and tastes amazing but is very easy to make!
Daisy braid bread was the very first bread recipe I learned to make all by myself, courtesy of Ms. Kellogg, my eighth grade home ec teacher. Despite it’s impressive appearance it’s easy enough that a bunch of 13 year olds could make it. If you’ve never made bread before, this braided bread recipe is a great one to try!

Favorite Braided Bread Recipe
I have lots of favorite bread recipes (this french bread is amazing and these garlic breadsticks are the softest you’ve ever tasted), but this braided bread has a special place in my heart. My friends and I used to get together after school to make it. It’s just delicious. Seriously. It’s a tiny bit sweet and a tiny bit rich – not enough to make it taste like a sweet bread, but enough to make it one of the more delicious white breads you’ve ever tasted. With the extra sugar and richness from eggs, it’s very similar to a challah loaf (YUM!).
Rise in the Refrigerator
My favorite part about this braided bread recipe is that it rises in the fridge, meaning you don’t have to be around all afternoon to serve this bread hot with dinner. Spend about half an hour in the morning (or the night before, or the morning before) mixing it up and shaping, then pop it in the fridge for anywhere between 2 and 48 hours. Then bake whenever you want for piping hot bread.
How to Make Braided Bread
You’ll find the recipe card at the end of the post. Here are some tips and photos to help your bread turn out amazing:
If you’re using a stand mixer: Add 5 C of flour and all other ingredients to the bowl at once, liquids first, and turn your mixer on low (using the bread hook) until flour is mostly incorporated. Turn up to 3 and knead for five more minutes, adding up to 1 C more flour until dough pulls away from the sides of the bowl (see photo below). Turn out onto floured surface and knead once or twice to pull it into a nice ball, as shown below (dough will be somewhat stiff). Cover with a towel and let rest for 20 minutes.
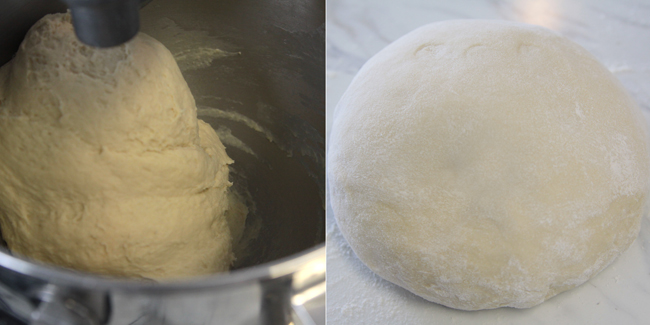
W/out a stand mixer: combine 2 C of flour with rest of ingredients in a mixing bowl and use a hand mixer to blend well. Gradually mix in 3 to 3 1/2 more cups of flour with wooden spoon until dough pulls from sides of bowl and gets too stiff to use the spoon. Turn out onto floured surface. Knead by hand for about 10-12 minutes until you get a nice smooth ball (as pictured above right), adding a little flour as needed to keep it from sticking to your work surface (do not go over 6 cups of flour total unless the dough is extremely sticky). Cover with a towel and let rest 20 minutes.
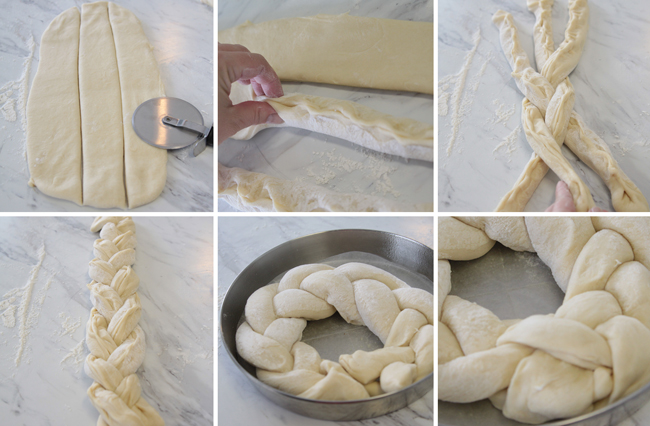
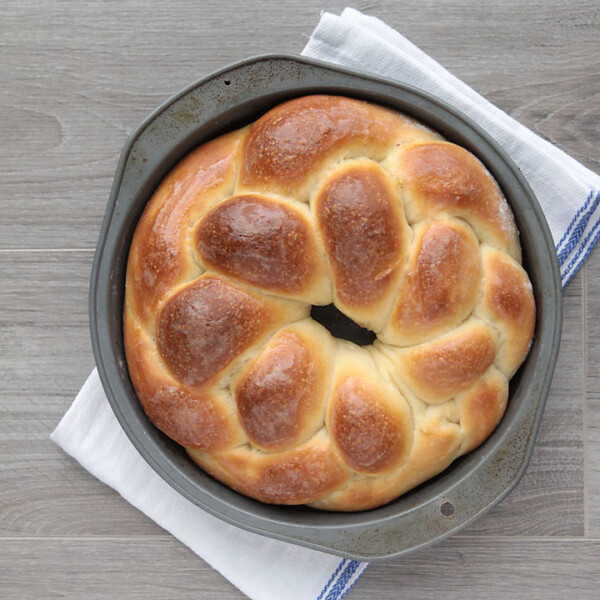
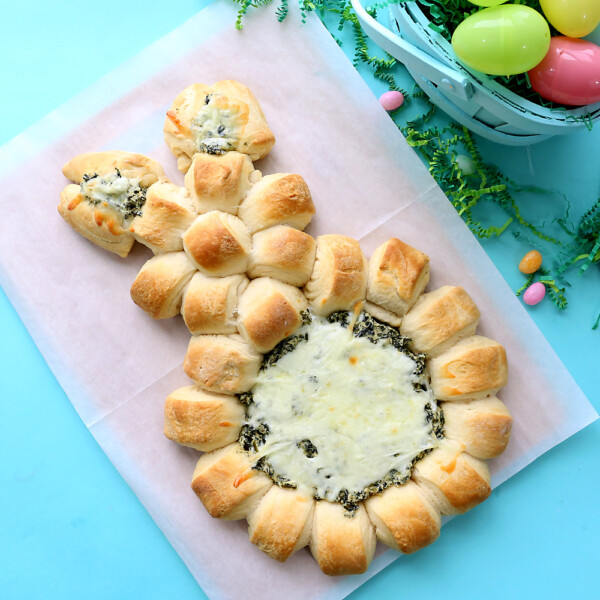
Either method continues: Diving the dough into two equal pieces. Sprinkle more flour on your work surface and use a rolling pin to roll one piece of dough into a rectangle as shown below (maybe 6 inches wide and 15 inches long – but don’t worry about being exact). Use a pizza cutter to slice rectangle into three long pieces. Pull sides of each piece up and pinch together to form a rope, as shown below. Braid pieces together, starting in the center and working down, then going back to the center and working back up. Wind braid into a circle and place into an 8 or 9 inch round cake pan that has been greased (I line mine with wax paper as well as spraying w/Pam). Where loose ends meet, tuck them together to form a complete circle.
Repeat with other half of dough. Spray a piece of plastic wrap with a little Pam and use that (Pam side down) to cover each of your dough circles, then place them in the fridge for anywhere between 2 and 48 hours.
Baking the Bread
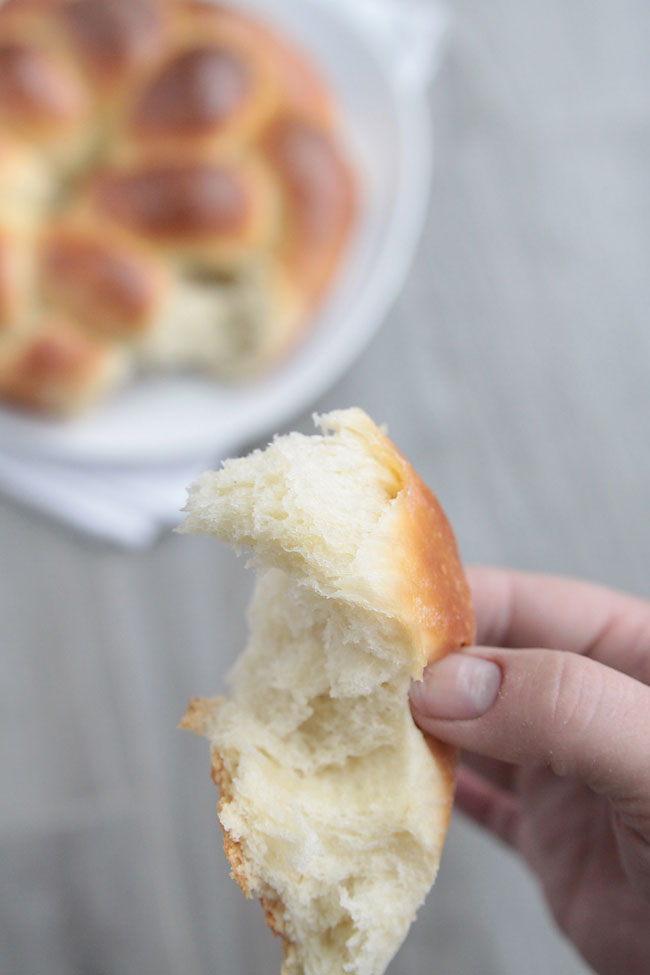
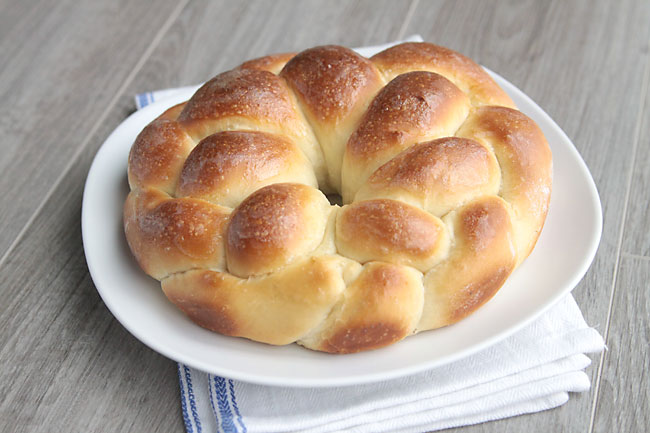
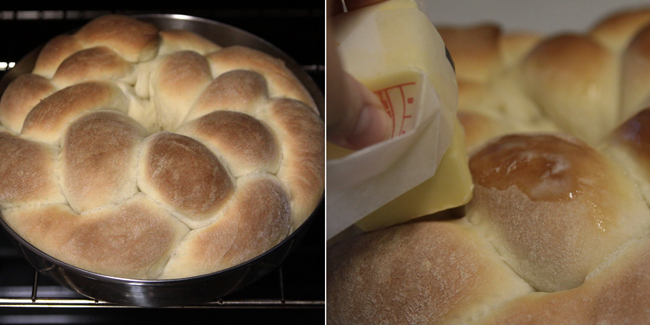
Preheat oven to 350 degrees. Remove dough from fridge and place directly in middle rack in oven (if your oven cooks hot on the bottom you might want to move the rack up a bit). Cook for about 30 minutes. The top should be brown and crusty to the touch while the grooves in the braids will remain white. Do not undercook – if you take this out when the top is just barely golden brown it won’t be cooked in the middle. Remove braided bread from pan right away and move to a cooling rack or towel. Grab some butter and rub it over the top of the bread to make it shiny, pretty, and soft on top.
Serving
This bread is delicious slightly warm, but it’s hard to slice without smashing until it has cooled all the way. So either let it cool and then slice, or just pull it into pieces to serve warm. It’s delightful with butter and/or homemade jam.
This braided bread recipe works great for gifting since you can do all the work ahead, then just bake and deliver whenever you’re ready. You can also divide the dough into 3 instead of 2 for slightly smaller loaves so you can give more away. EVERYONE loves this beautiful braided bread!
Braided Bread Recipe
Ingredients
- 2 tablespoons Yeast active dry
- 1.5 cups Warm Water
- 1/2 cup Butter or Margarine softened
- 1/2 cup Sugar
- 2 Eggs
- 1.5 teaspoons Salt
- 5-6 cups All Purpose Flour
Want more project ideas? Sign up to get my favorite easy crafts and recipes straight to your inbox!
Instructions
If Using a Stand Mixer
- Place first six ingredients in the bowl of a stand mixer, plus 5 cups of flour. Turn the mixer on to low until the flour is incorporated. Turn the mixer to speed three and continue mixing, adding up to one more cup of flour as needed until the dough pulls away from the sides of the bowl. Continue to knead for 5-7 minutes until dough is smooth and elastic. Cover bowl with a towel and let dough rest for 20 minutes.
If Kneading By Hand
- Place the first six ingredients in a large bowl, plus 2 cups of flour. Beat ingredients with a hand mixer until well combined. Add three more cups of flour and stir in with a wooden spoon. Dump mixture out onto lightly floured surface and knead it together for about 10 minutes until dough is smooth and elastic. Add up to one more cup of flour as required during the kneading process. Form dough into a ball, cover it with a towel, and let it rest for 20 minutes.
Continue to Shaping for Either Method
- Divide dough into two portions. On a lightly floured surface roll or pat one piece of dough into a 6×15 inch rectangle. Use a pizza cutter to slice rectangle into three long pieces. Pull sides of each piece up and pinch together to form a rope, as shown below. Braid pieces together, starting in the center and working down, then going back to the center and working back up.
- Wind the braid into a circle and place into an 8 or 9 inch round cake pan that has been greased (I line mine with wax paper as well as spraying w/Pam). Where loose ends meet, tuck them together to form a complete circle. Gently spray dough with nonstick spray then cover with plastic wrap.
- Repeat with the second half of the dough, making a second loaf. Place both loaves in the fridge for at least 2 and up to 48 hours.
- When ready to bake, preheat the oven to 350 degrees Fahrenheit. Remove dough from fridge and place directly into the oven. Bake 35-40 minutes until top is crusty and nicely browned (darker than golden brown).
- Allow loaf to cool before slicing.


Dee says
The recipe for Daisy Bread says 2 T Yeast, is that 2 tsp. or 2 tbs.? And is it active dry yeast?
Autumn says
2 tablespoons, and yes, active dry!
Jody says
I was also in Ms. Kellogg’s class and this has been my go-to bread recipe since! I make it several times a year. I just taught my great niece to make it last week so that the recipe will continue on in the family! Thanks fellow Edgemont Eagle😄
Neeley Reed says
Hello! I love your recipes ❤️. Any chance you still have Ms. Kellogg’s fair scone recipe? I have tried so many different ones. None of them taste quite right.
Autumn says
Hi Neeley! I don’t have that recipe but I remember making it in class and it was so good! I’m pretty sure it was Bisquick, made like the instructions say for biscuits but with extra sugar. Sorry, that’s not terribly helpful 😉
Neeley Reed says
Perfect! Thank you. I will try Bisquick.