
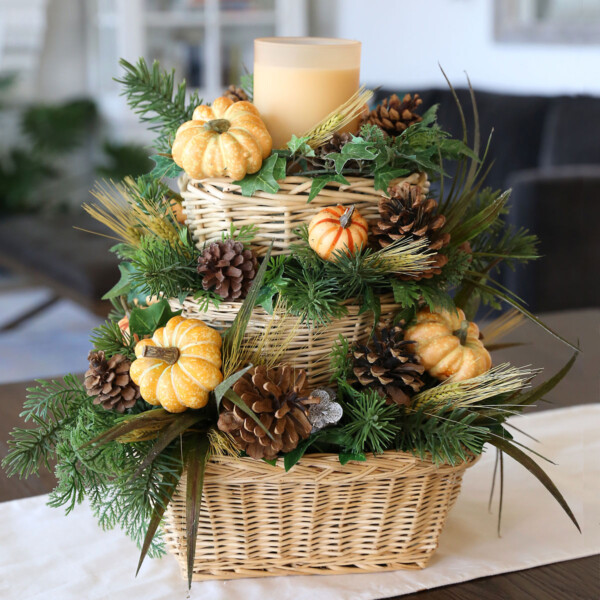
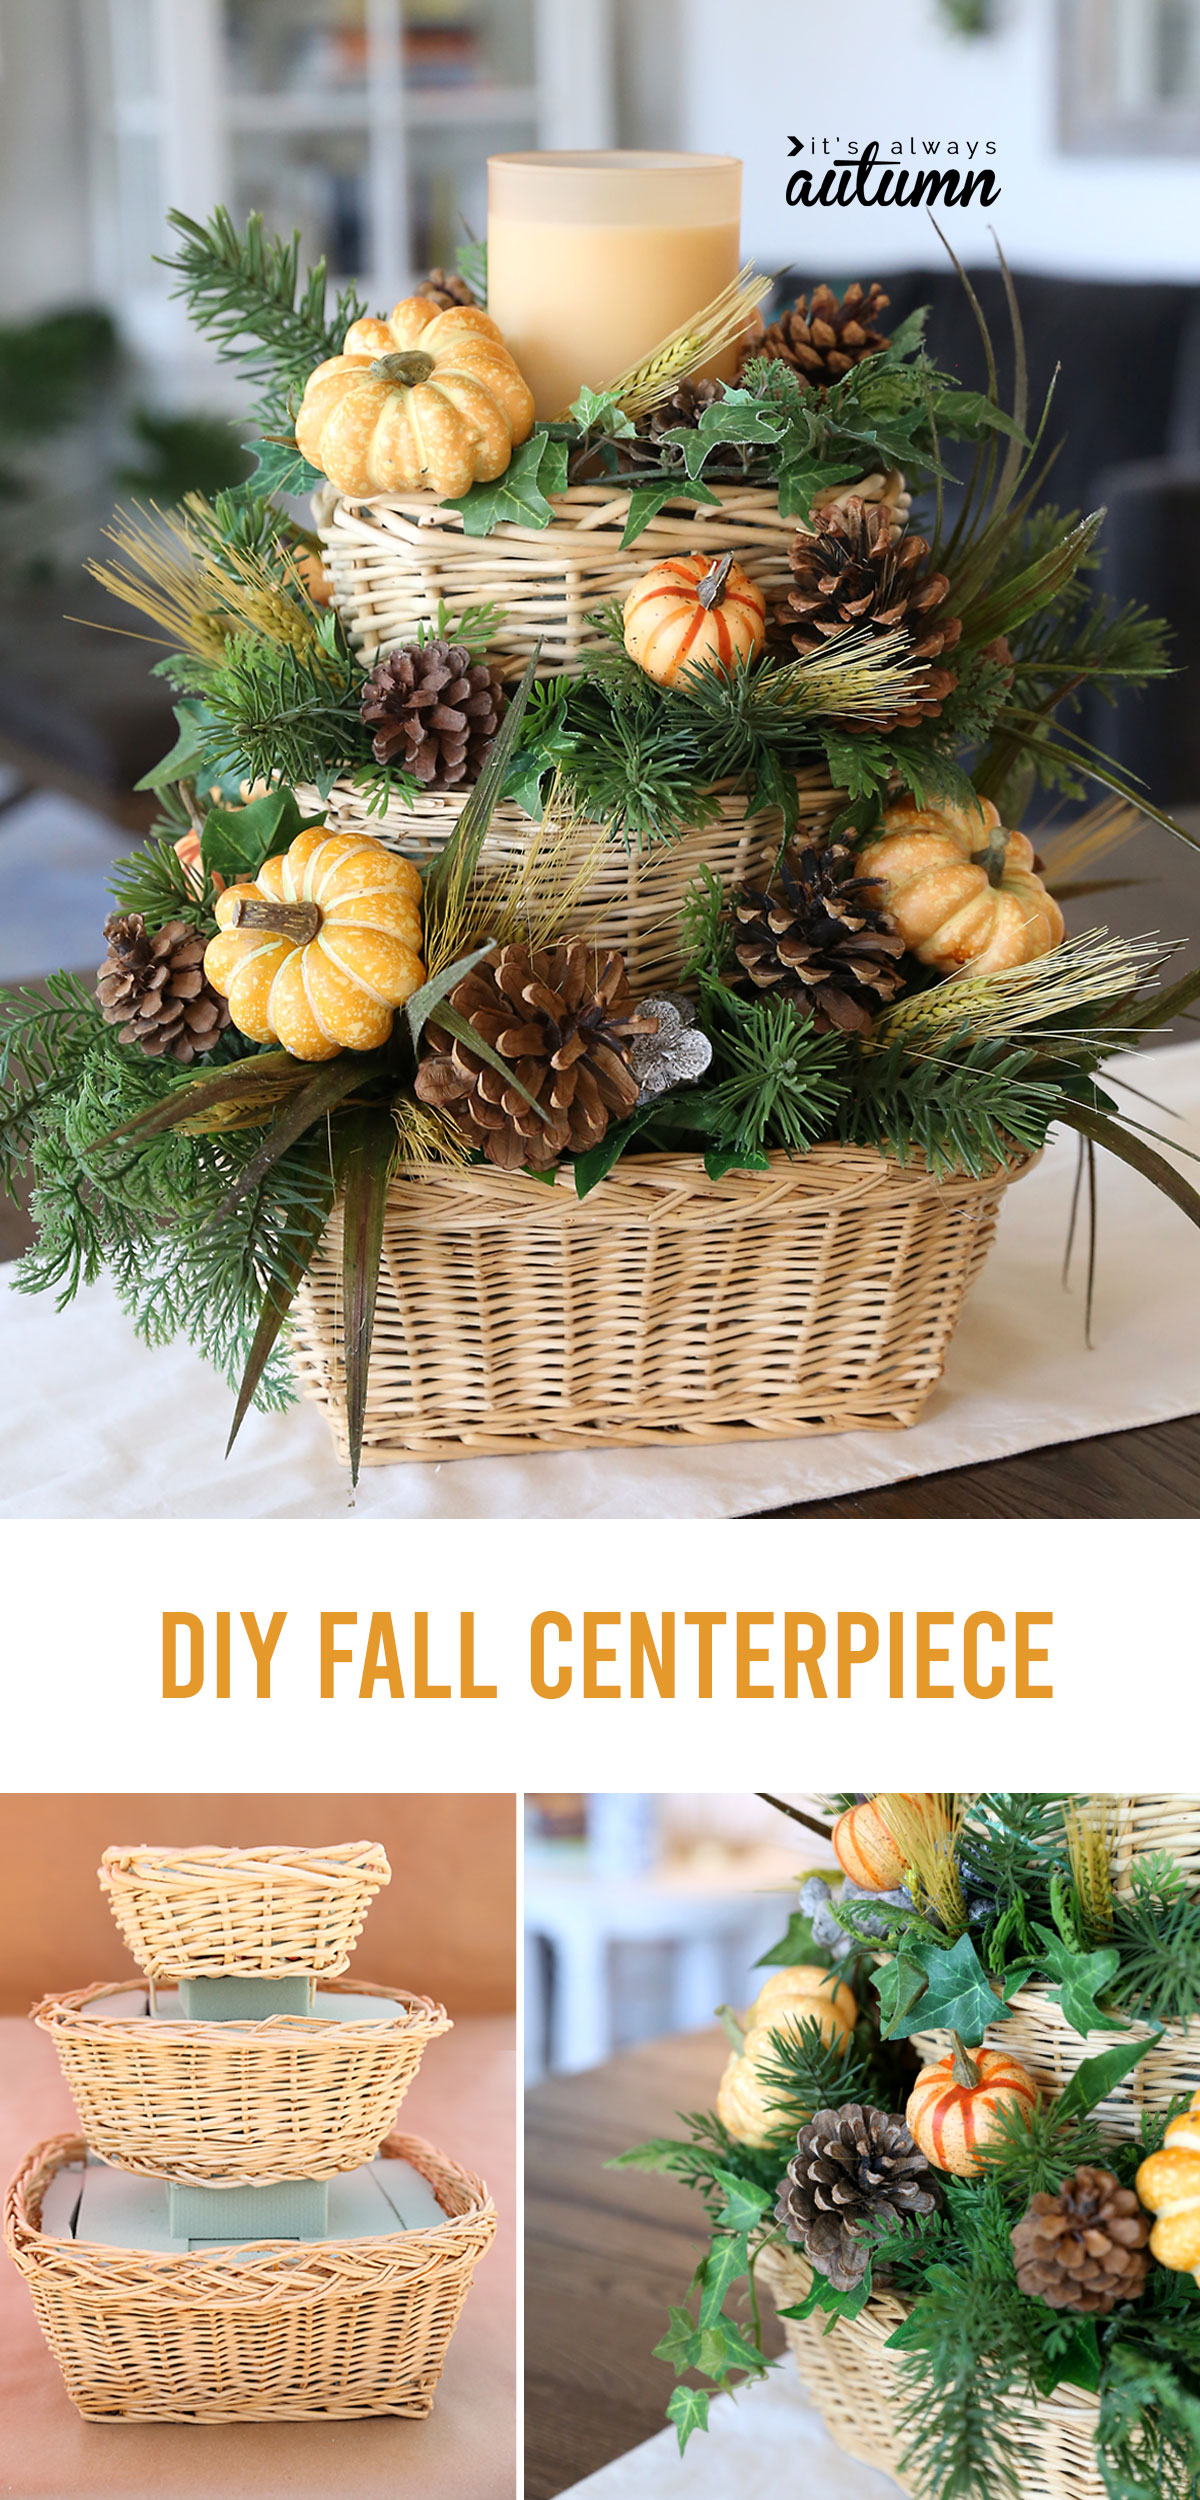
In today’s post: This pretty DIY fall centerpiece is made from three stacked baskets, and can easily be transformed for Christmas or other seasons. When using thrifted materials it only costs about $25 to make!
A few weeks ago I saw a photo of a gorgeous DIY fall centerpiece circulating around Facebook. The centerpiece was made with three baskets stacked on top of each other and overflowed with pinecones, greenery, and fall accents. After quite a bit of searching I found that the web page the photo was from unfortunately doesn’t exist anymore. However, it was pretty clear that this gorgeous centerpiece would have cost around $150 to make. That’s a whole lot more than I felt like spending on a craft project! So I decided to see if I could create a similar stacked basket centerpiece for a whole lot less.
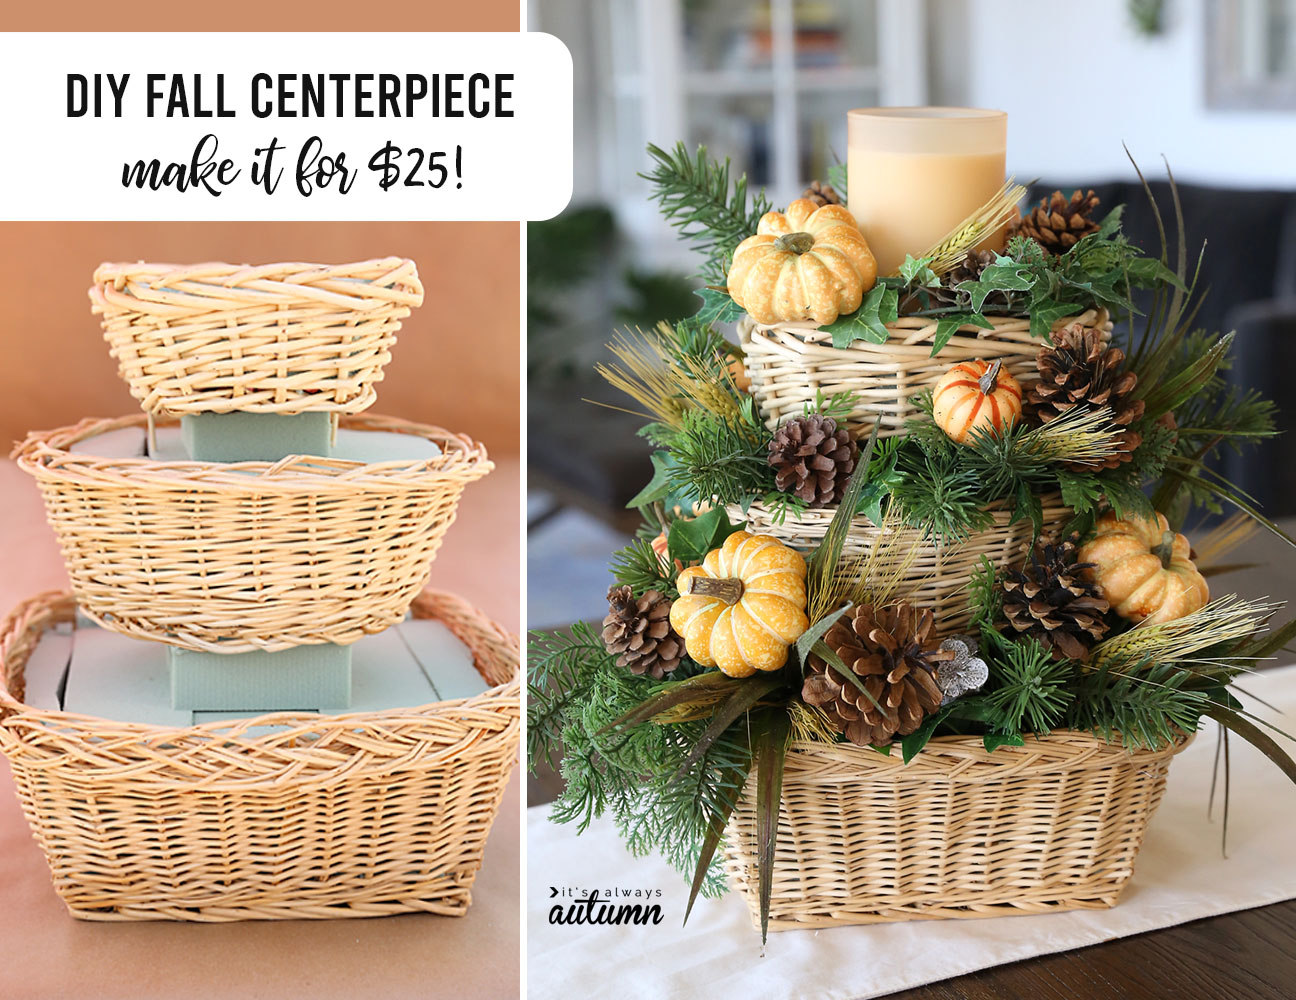
Here’s what I came up with…for under $30:
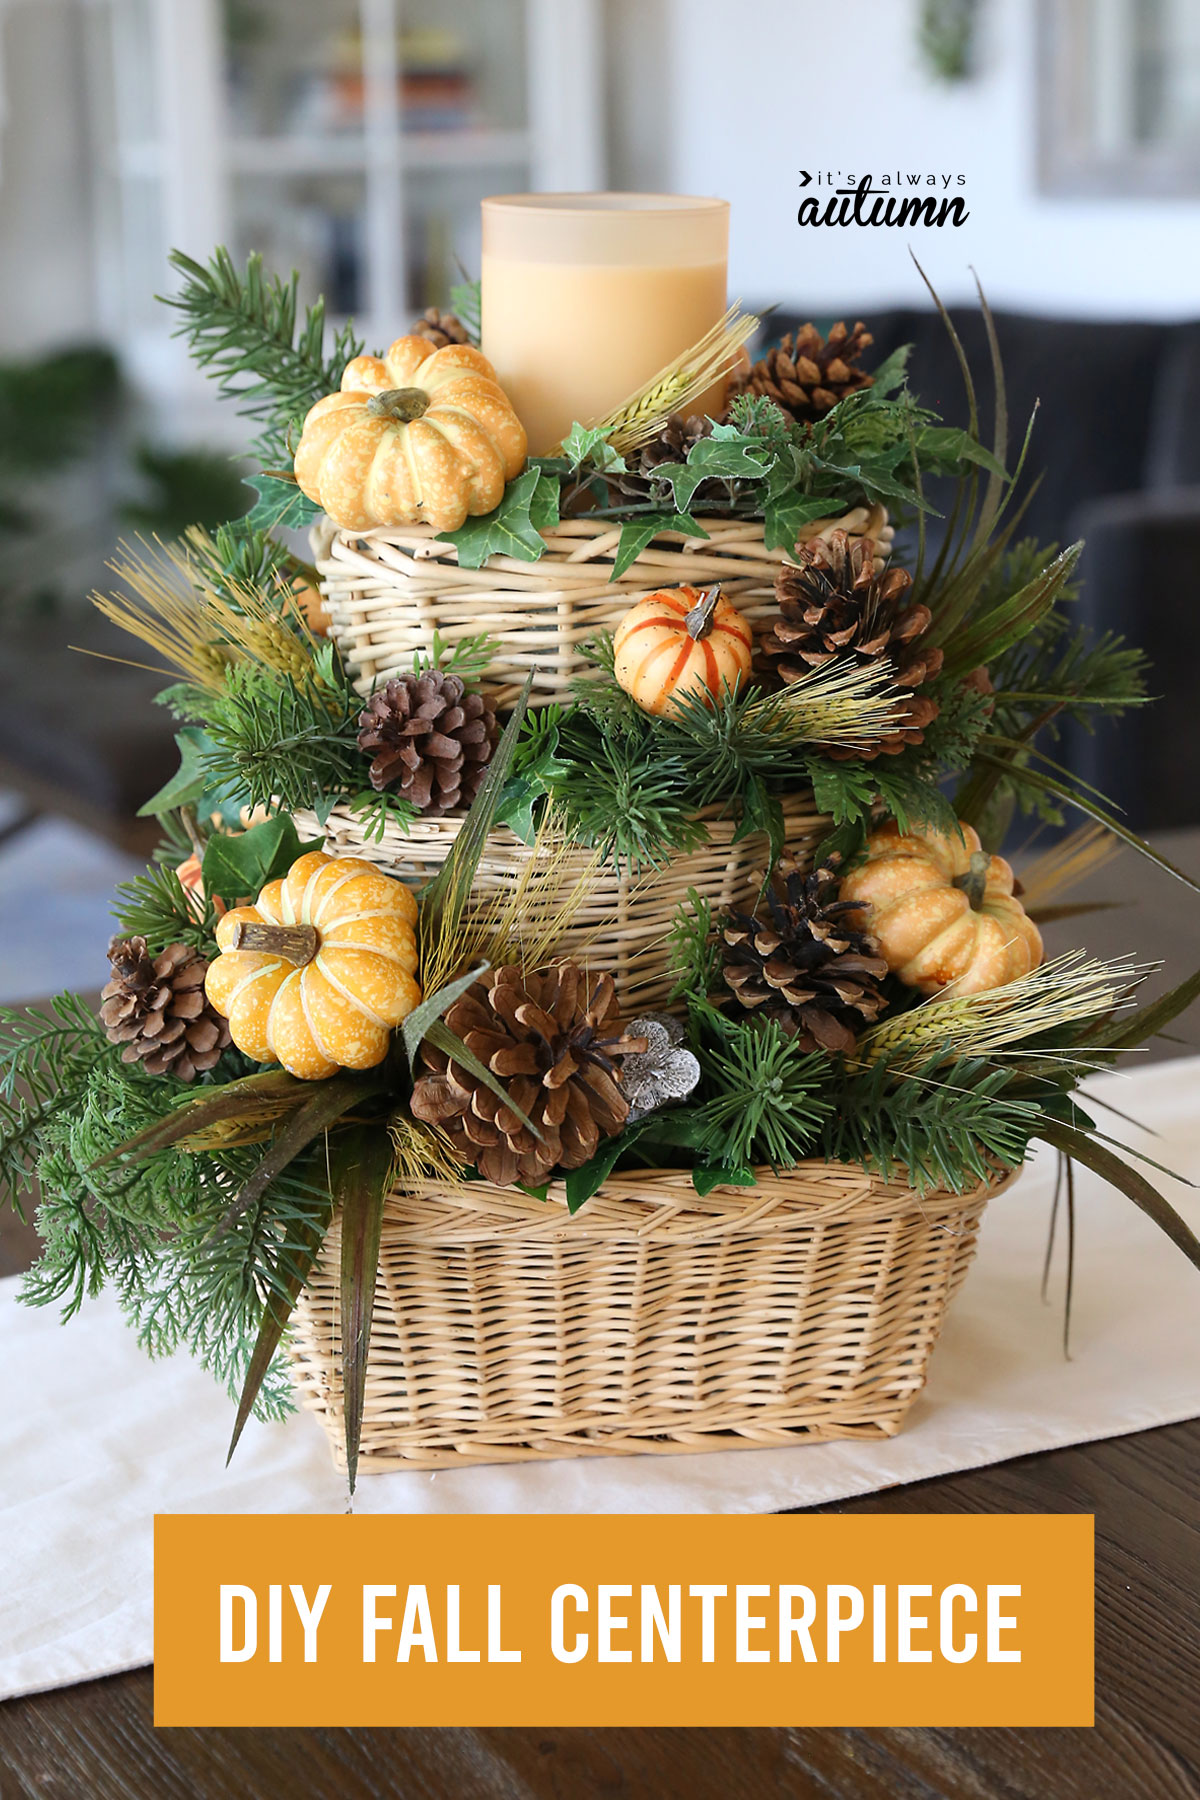
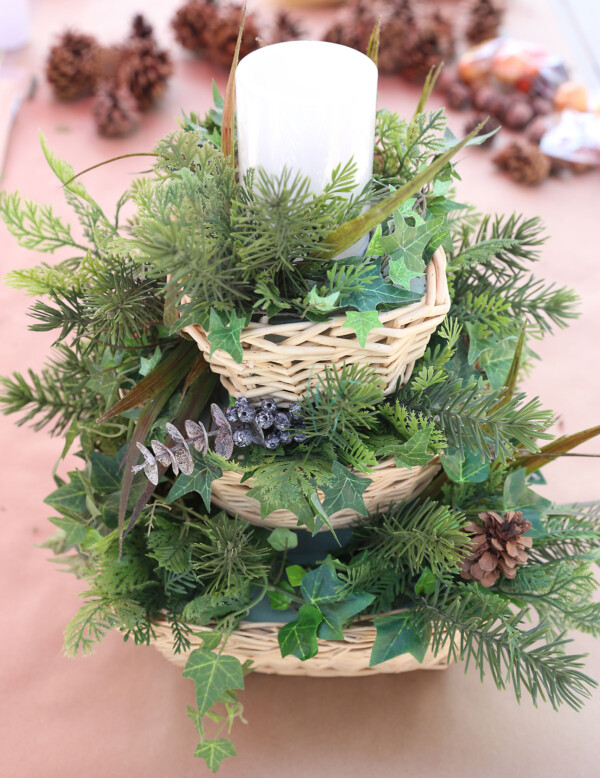
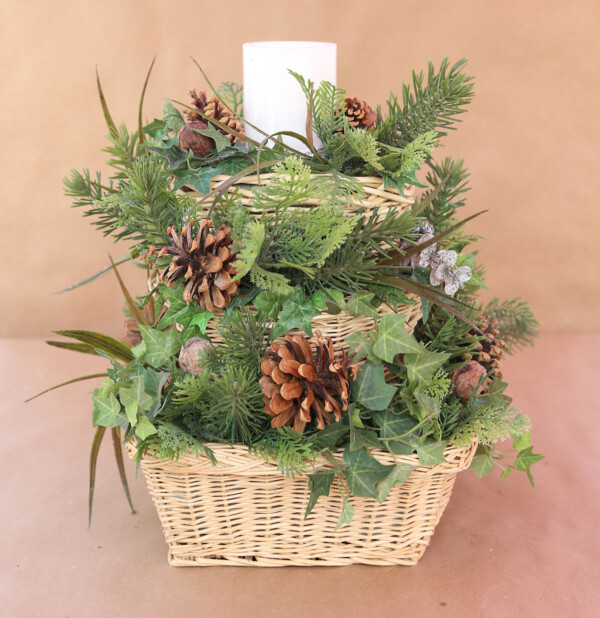
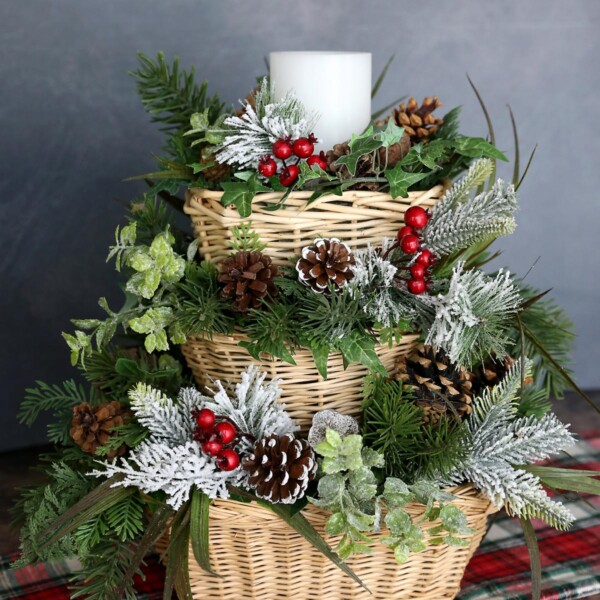
My version isn’t nearly as luxe as the original; you can tell that the baskets I used were pretty old school. But hey, they were a dollar each at the thrift store (as was much of the greenery) and I was pretty happy with how it all turned out. The best part is that when fall is over I can remove the pumpkins + wheat stalks and add in some red berries + white accents to transition the centerpiece to Christmas decor.
DIY Fall Centerpiece
A quick sidenote before we get to the tutorial: I try to generate LOTS of ideas for potential blog projects, and then narrow those down to the ones I *think* will work. And then I start experimenting. A few projects work on the first try, but most take four or five – or more – tries to get quite right. And then there are other projects that just fail spectacularly! I have to cut my losses, including the time and money invested, and move on to something else.
When I decided to try to make a centerpiece on the cheap with supplies from the thrift store I was 85% certain it was going to be one of those giant failures. Luckily I enlisted two fabulous friends to do most of the hard work while I took photos of the process, and they were able to transform my budget purchases into this pretty creation:
Stacked Basket Centerpiece Supplies + Cost
I got almost all of my supplies at my local thrift store. I did purchase the green floral foam from the Dollar Store and the small craft pumpkins from Walmart. Your cost will depend on what you can find at your thrift store/Dollar store/etc, and whether you have supplies around the house you can use. And remember, you wouldn’t need to use the exact same supplies that I used – just look for similar items.
Here’s what I used along with a cost breakdown:
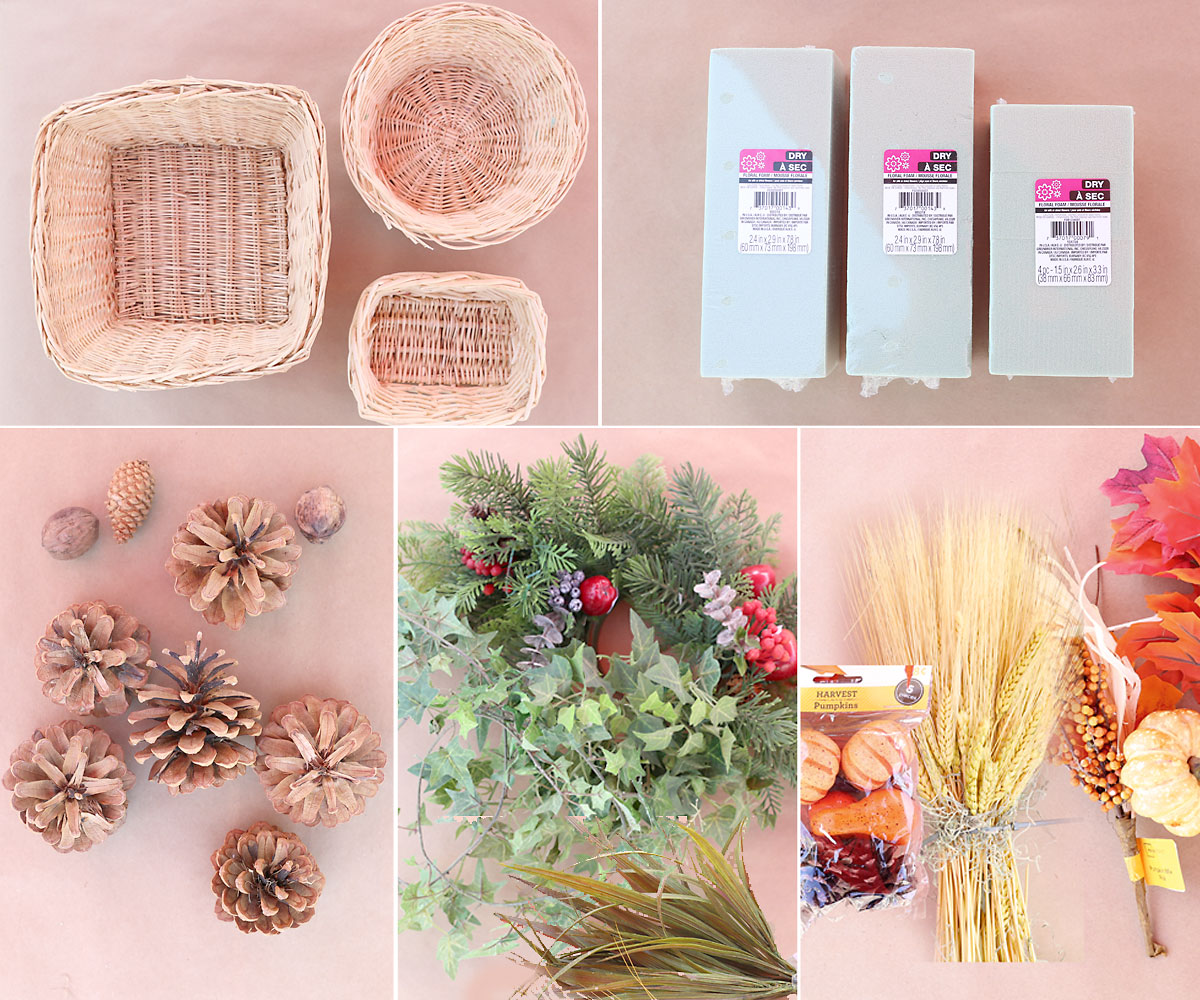
3 baskets (one each small, medium, and large) from the thrift store: $3
Floral foam, 7 bricks from the Dollar Store: $7
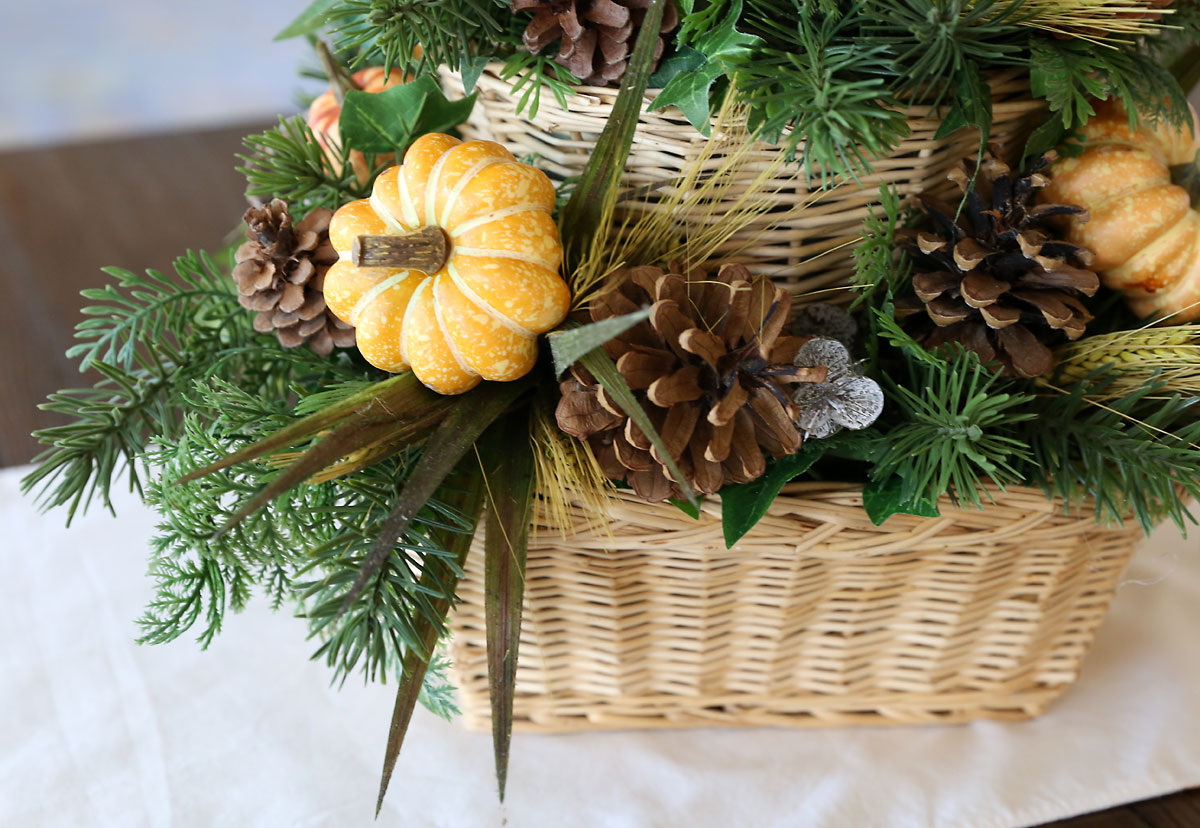
3 different kinds of faux greenery from the thrift store (I used strands of ivy leaves, Christmas pine branches, and one bunch of grassy looking stuff): $5
Pinecones and walnuts gathered from my neighbor’s yard: $0
Pillar Candle to sit on top from Walmart: $4 (in some of the photos I did swap it out for a different candle which was $8, but there are pillar candles as well as flameless battery operated pillar candles at Walmart for about $4)
Small craft pumpkins (Walmart) and faux wheat stalks (thrift store): $6
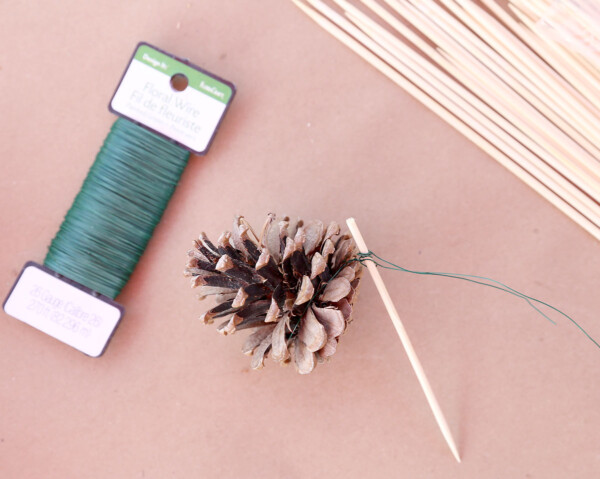
I also used a few items that I had around the house that I did not include in the cost: wood skewers and hot glue
Total: about $25 plus tax
Remember, your cost will vary. If you are trying to keep costs down, you may need to hit more than one thrift store to round up everything you need or ask friends if they have old baskets you can use. However, if you are more flexible on cost you could probably get all the supplies for this fall centerpiece at Hobby Lobby, Jo-Ann, or Michael’s. Remember to look for 3 baskets that vary in size that are all made from the same material; however, they don’t need to all be the same shape. Mine are square, round, and rectangle (from the bottom up), and the largest basket is about 11×11 inches. Additionally, try to gather 3 different types of greenery (such as leaves, branches, and grass) to provide good texture.
Also, remember that in a few months you can swap out the fall accents for Christmas ones to extend the life of your centerpiece!

How to Make a DIY Fall Centerpiece
DIY Fall Centerpiece
Supplies
- 3 Baskets small, medium, large
- Floral Foam enough to fill each basket
- 3 types of Faux Greenery
- Pinecones
- Skewers
- Fall Accents (small pumpkins, wheat stalks, fall leaves, etc)
Want more project ideas? Sign up to get my favorite easy crafts and recipes straight to your inbox!
Instructions
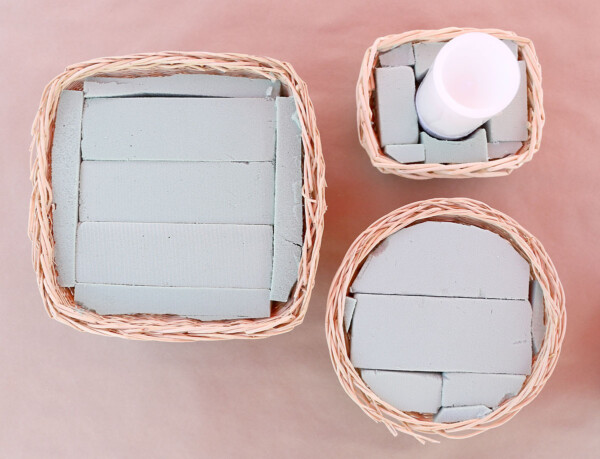
- Fill each basket to about an inch below the edge with floral foam, cutting the blocks of floral foam to fit. If you are using a tall candle in the top basket, leave space in the floral foam so the candle sits inside it.

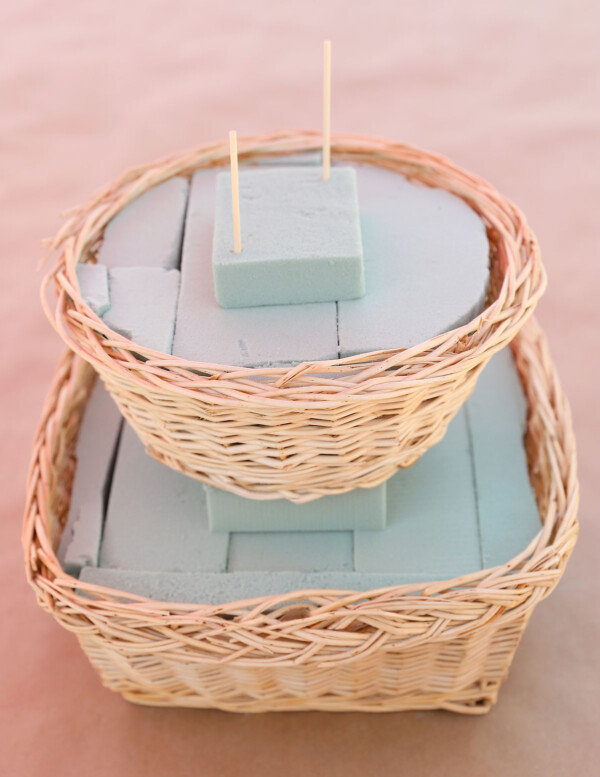
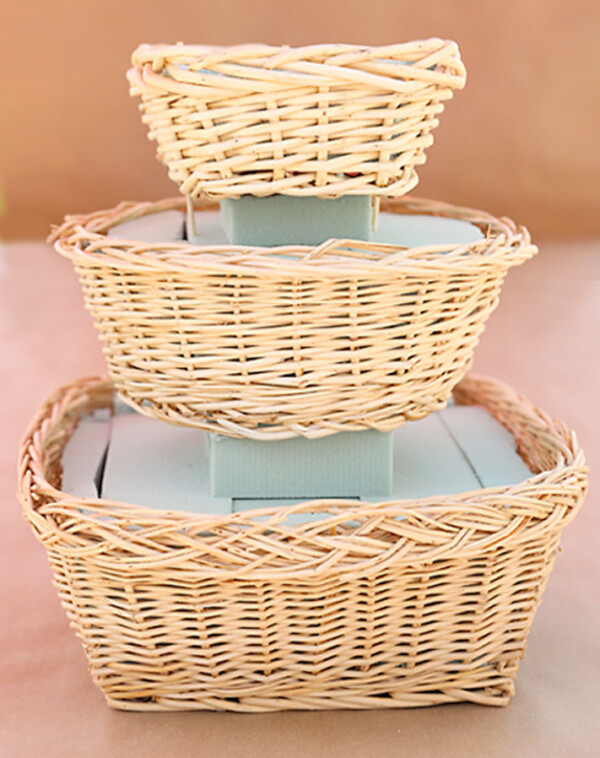
- Place an extra piece of floral foam on top of the foam already in the two larger baskets, so that when the baskets are stacked they will be lifted slighty from the basket below. Place the medium basket on top of the large basket, and push skewers down through the foam and both baskets to secure them together.

- Break off any skewers that are visible, then place the smallest basket on top of the medium basket. Again, push skewers down through the foam to secure all three baskets together. Use enough so that it feels sturdy - I used 6 total. Break off any skewers that are visible.

- Wind strands of ivy around each basket, securing by poking it into the floral foam (or use hot glue).

- Add pine branches and other greenery (such as grasses), working to mostly cover the floral foam.

- Next, add pine cones. Break off the top 4-6 inches of a skewer and wire or glue to each pinecone. Then poke the skewer into the floral foam to attach the pine cones. Use pine cones to cover any floral foam that is still visible.

- This completes the basic centerpiece. You can glue in anything that doesn’t seem very secure at this point.

- To customize for fall, add in small foam pumpkins (simply stick a skewer through the bottom of the pumpkin, then poke the skewer into the floral foam to attach the pumpkin to the centerpiece. Add other fall accents, such as wheat stalks or fall leaves, as desired. These seasonal pieces can be swapped out for winter items to make a Christmas centerpiece.

Tips

Donna says
I have a basket already for the bottom. These are things easily found and yes! Can be even an all season CenterPiece!