
In today’s post: Learn how to make a gift anyone would love: a cake made of money! Perfect for graduation, birthdays, or even a wedding!
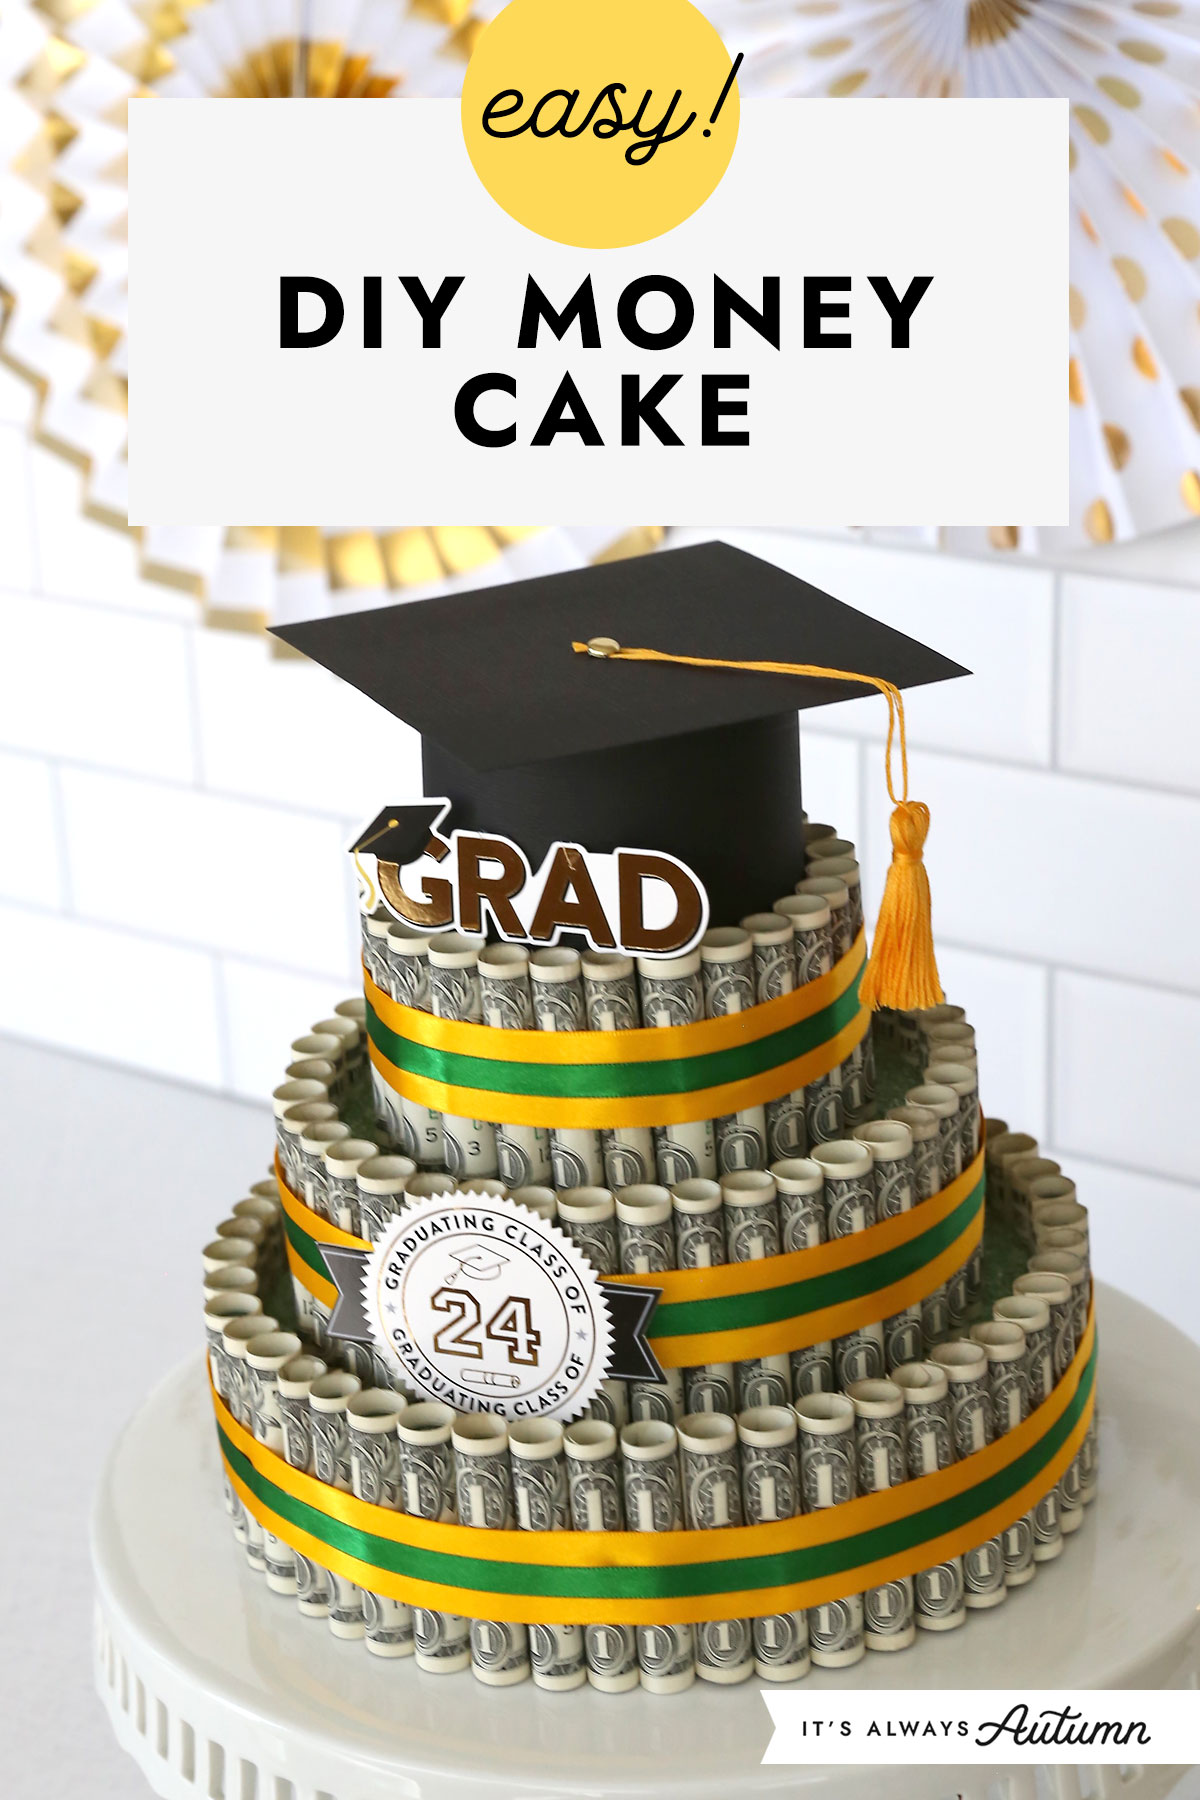
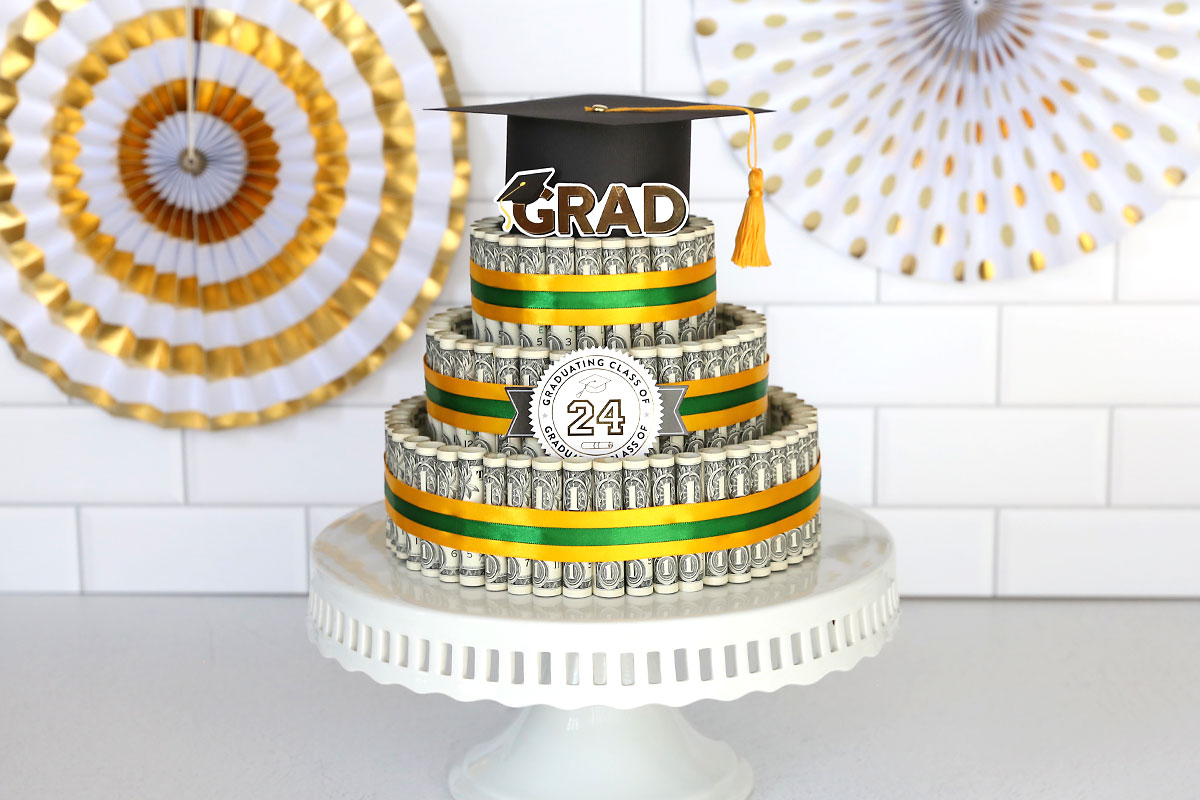
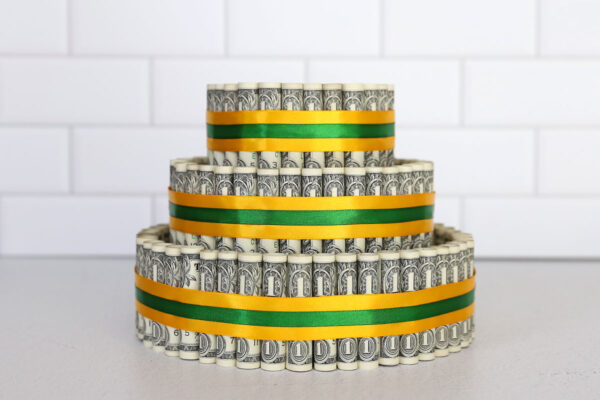
It’s graduation season again and every graduate’s favorite gift is: MONEY! Today’s project is perfect if you want to do something more fun than hand over an envelope. Instead you can present your favorite graduate with a three tiered money cake.

How to Make a DIY Money Cake
This money “cake” doesn’t have any actual cake in it; instead it’s a cute way to give money in the shape of a cake. It’s very simple to make – no baking involved! You build a base out of styrofoam, roll up dollar bills, and secure them around the base to create a cake made out of money. It takes about 2 hours to create, but it’s all quite simple things you can do while watching a show or listening to a podcast. The nice thing about this cake is that the bills are secured in rolls with small rubber bands instead of tape so it’s easy to take apart when the recipient is ready to count their cash.
How Many Bills Does the Cake Take?
To make a three tiered cake, I used approximately 115 one dollar bills. If you’d like to gift more money than that, you can include a couple larger bills right at the front of the cake. If you don’t want to gift quite that much, you could make just the two larger tiers (about 90 bills) or just the two smaller tiers (about 65 bills). These numbers are approximate because the size of the rubber bands you use will affect how many bills it takes to cover the cake.
Supplies
Here’s what you need to make this money cake:
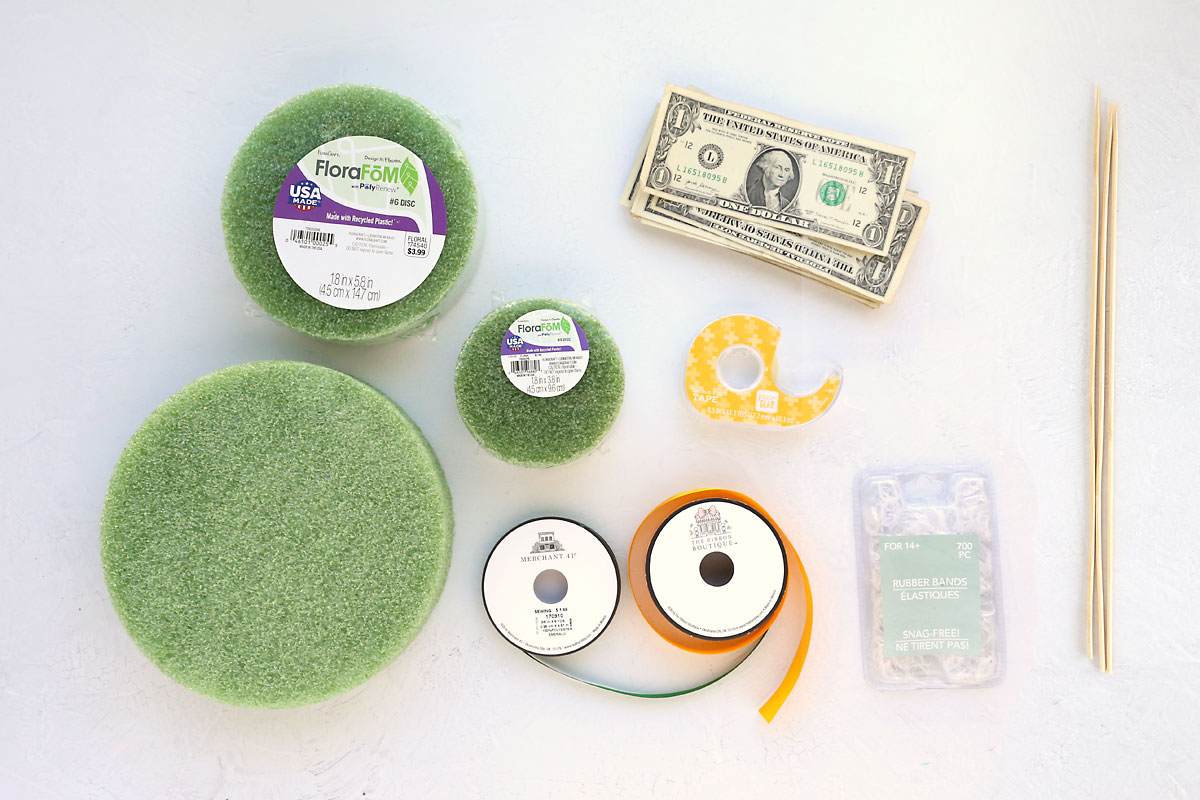
- Green Floral Foam Discs: I used three discs for this cake, a four inch disc, a six inch disc, and an eight inch disc. I found them at Hobby Lobby in the floral section.
- Dollar Bills: I used approximately 115 one dollar bills. You can ask for new bills at the bank if you like, but I did not and older bills worked just fine.
- Double Sided Tape: This is used to help secure the rolled bills around the cake.
- Small Clear Rubber Bands: I used a package from Dollar Tree but you can find these in the hair styling section at any grocery store.
- Wood Skewers: I used these to secure the three tiers of foam together and they work very well. You may be able to use an adhesive instead.
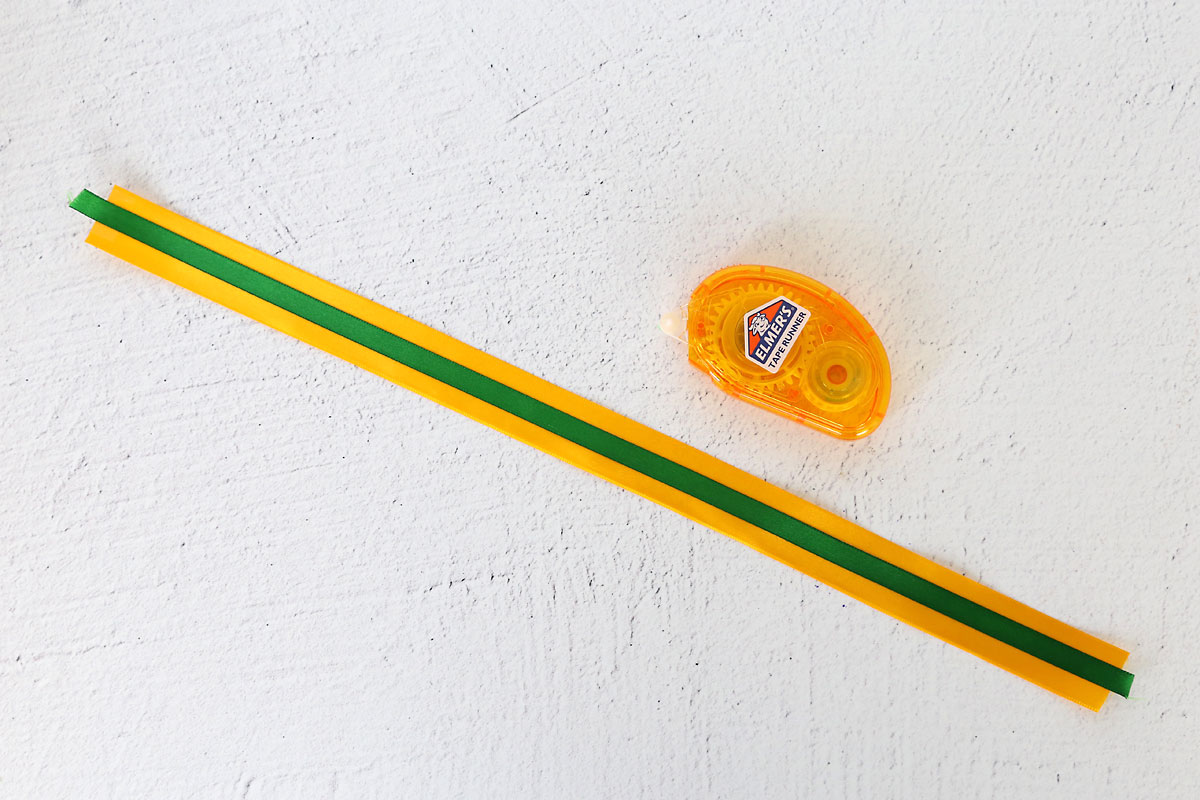
- Ribbon: I used a 7/8 inch wide ribbon in yellow and a 3/8 inch ribbon in green. Use ribbon in your graduate’s school colors! You’ll use 2-3 yards of each ribbon.
Those are the supplies needed to create the actual money cake. Then you can decorate it however you’d like! Dollar Tree, Walmart, and Hobby Lobby all sell different types of graduation decorations that might work well to decorate your cake. I made a grad cap topper from a sheet of black cardstock, yellow embroidery floss, and a brad, and then added a couple of cardstock graduation stickers.
Roll the Dollar Bills
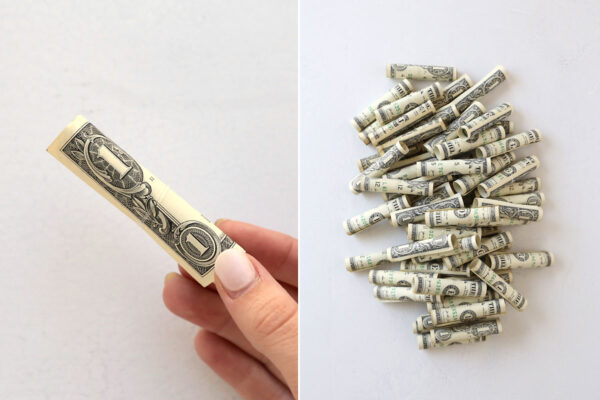
The first step to making a graduation money cake is to roll the dollar bills. Using a pencil makes this very easy! Place the dollar bill face down in front of you with the top of the words to the left. Place the pencil at one end and start rolling it up.
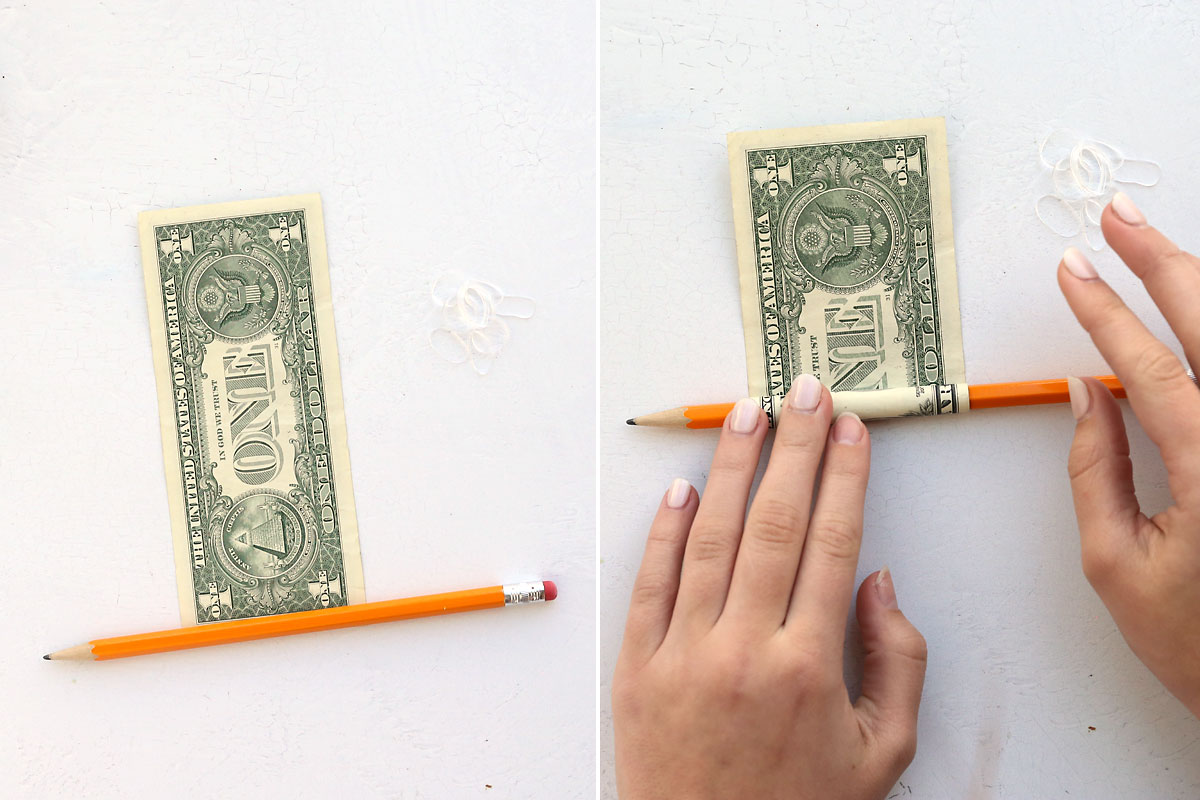
Once it’s rolled all the way, pull the pencil out and secure the bill with a clear rubber band. Repeat with all the cash you plan to add to the cake.

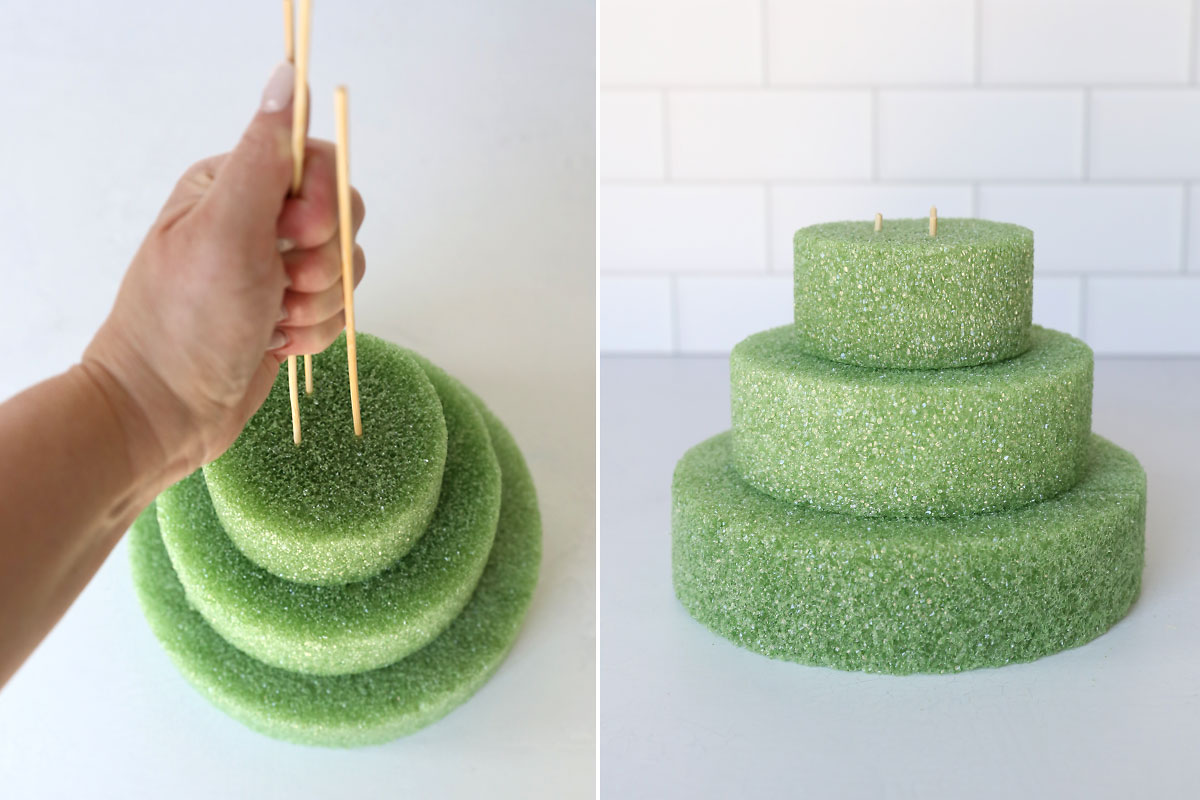
Create the Cake Base
Next you’ll create a base for your cake from the three floral foam discs. Stack them on top of each other, making sure to center them. Then push three wooden skewers down from the top through all three layers to secure them together. Use scissors to cut/break off the skewer that pokes out from the top.
You can also prep the ribbon now. Cut pieces of both the wider and narrower ribbon in these lengths:
- 20 inches
- 26 inches
- 34 inches
Then place a little bit of adhesive on the back of the narrow ribbon (a tape runner works great here) and press it down over the wide ribbon, making sure it’s centered.
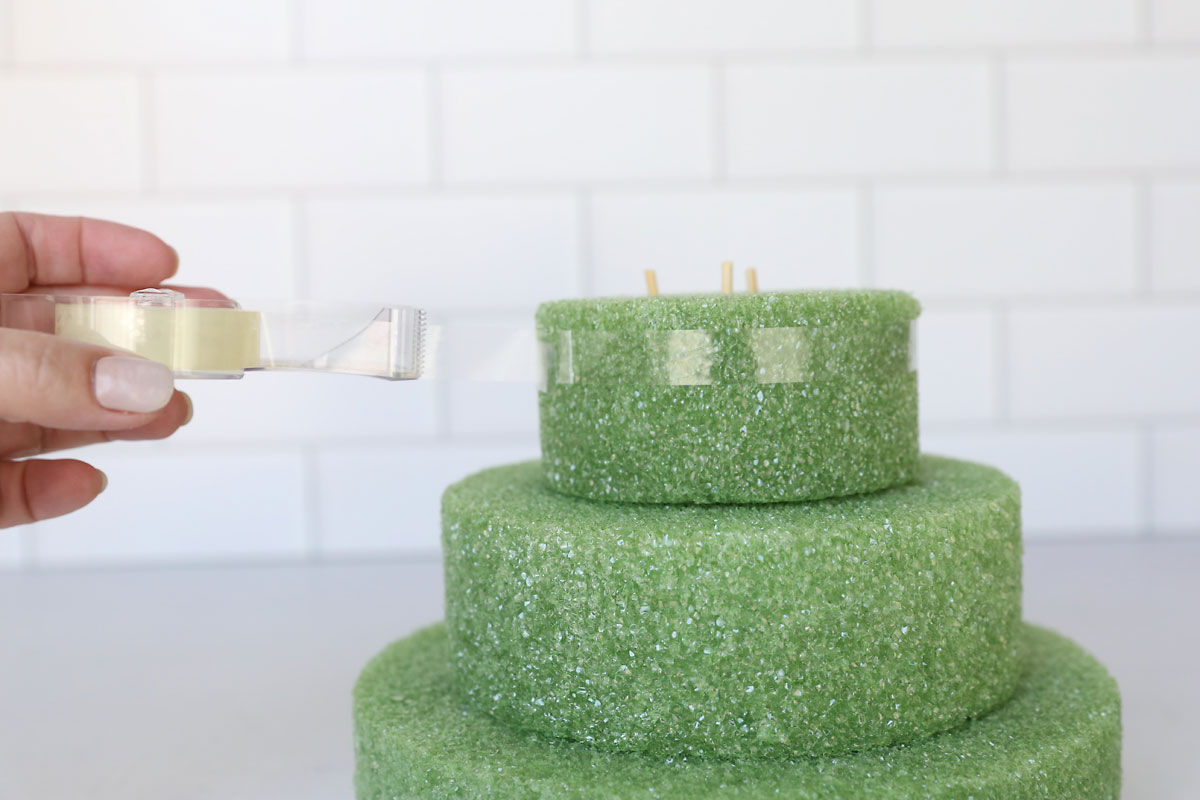
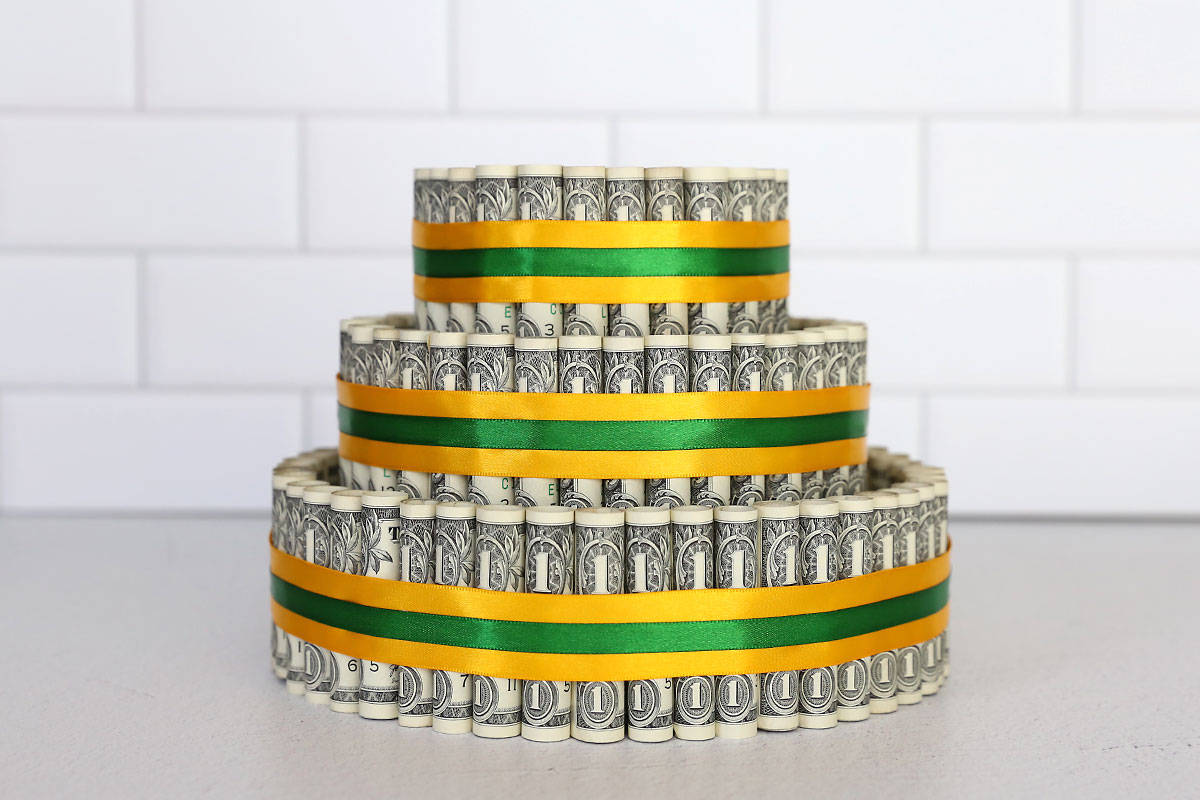
Add the Money
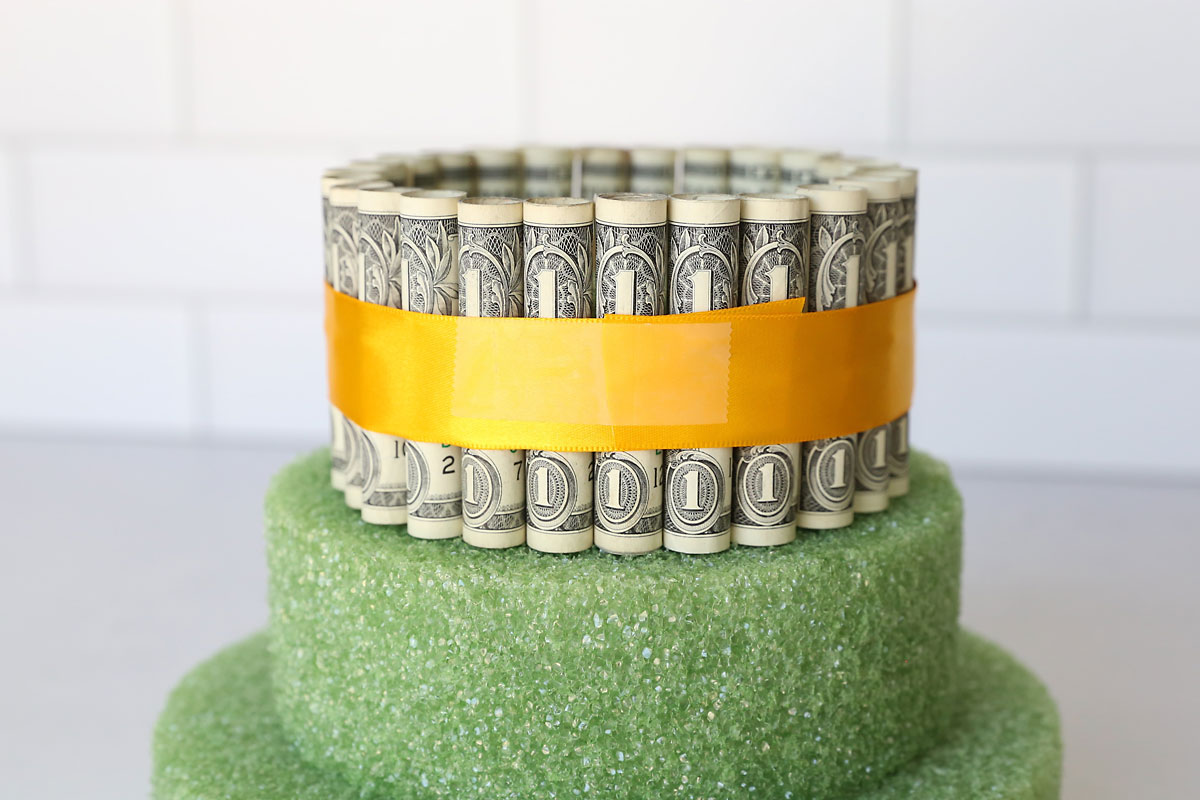
Now it’s time to add the rolled money to the cake. Run two rows of double sided tape all the way around the top tier – one row near the top of the disc and one row near the bottom of the disc.
Now start placing the rolls bills against the double sided tape, making sure the number “1” is facing out.
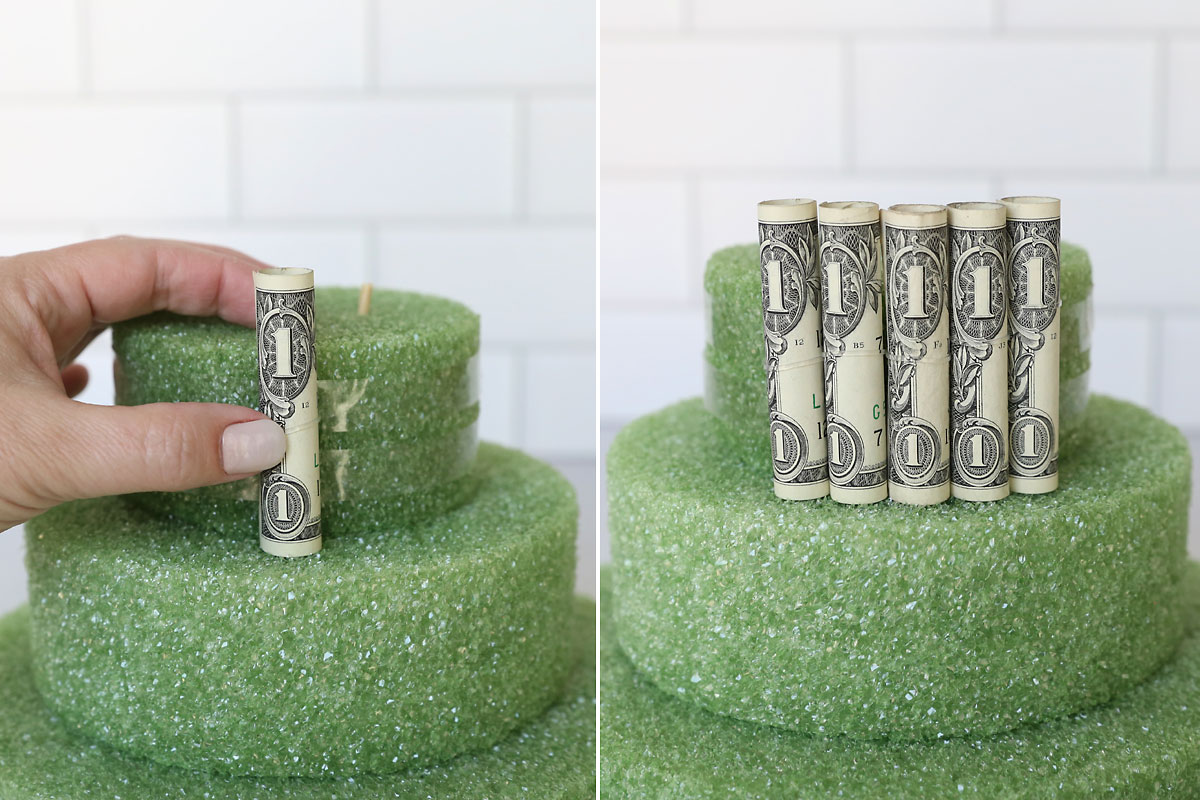
Continue until the rolled bills completely cover the top tier. The double sided tape will keep the bills from falling off as you are working, but it will not hold them on all by itself, so you should secure this tier by wrapping it with ribbon before moving to the second tier. Take the shortest piece of ribbon you prepare and wrap it around the tier, pulling it a little tight, and tape it together in the back, trimming any excess. (Note: the ribbon you see below doesn’t have the narrow ribbon glued onto it, but yours will at this point.)
Repeat this process with the second and third tiers to complete the cake.
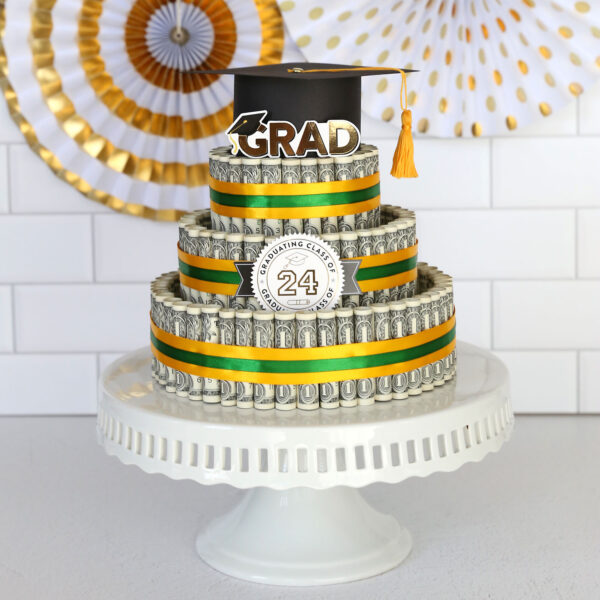
Decorate
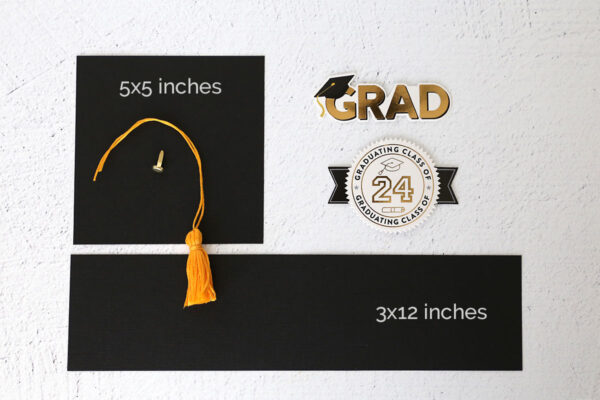
The cake is now complete and you can decorate it however you choose. You can often find small grad caps at Dollar Tree or Hobby Lobby that would look cute on top of the cake, or you could top it with curled ribbon and a graduation themed cake topper. I chose to make a graduation cap using a 12×12 sheet of black cardstock, a brad, and gold embroidery floss.
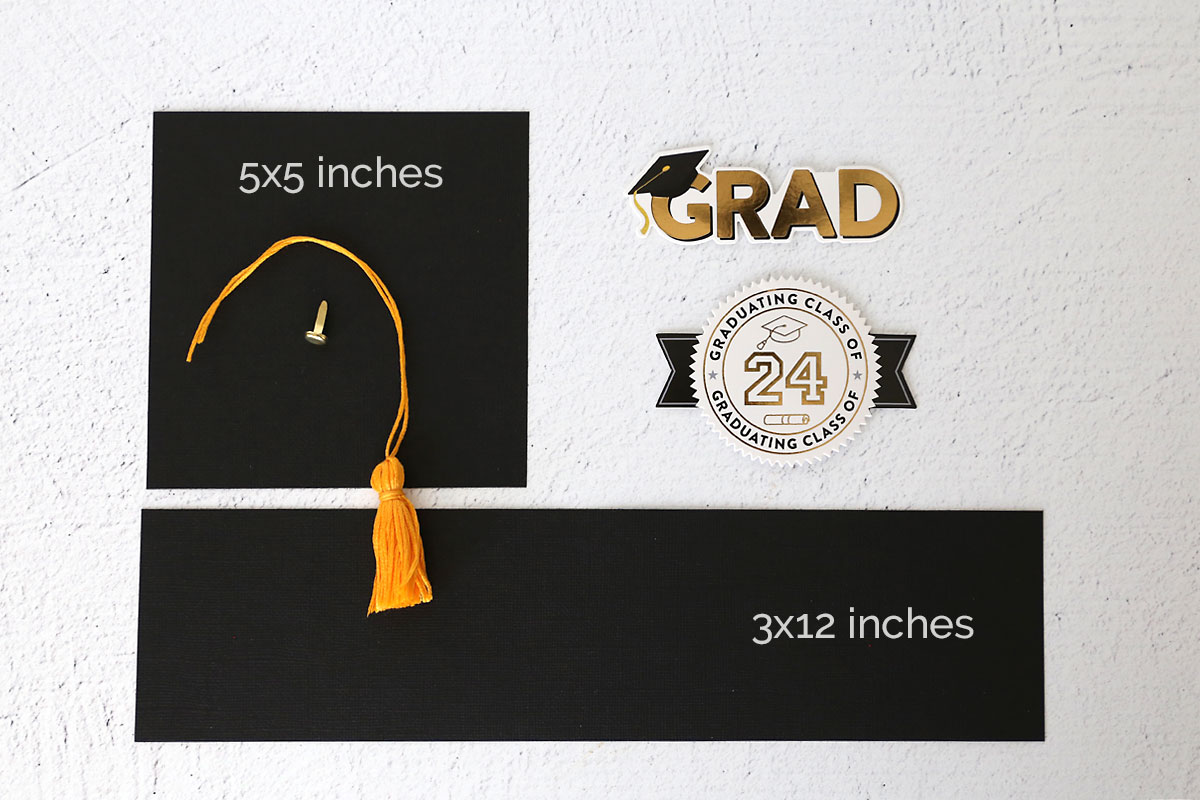
I rolled the long cardstock rectangle into a circle and secured with hot glue, then placed it down on top of the 5×5 inch square. I made sure the circle was centered, then used hot glue inside the circle to secure it. I made a tassel from embroidery floss using this tutorial, then secured it to the top of the cap with a small metal brad. Finally, I used a couple of cardstock stickers (from Hobby Lobby) to decorate the front of the money cake:
Money Cake Gift Idea
Supplies
For The Cake
- 3 Floral Foam Discs 4 inch, 6 inch, 8 inch
- 115 Dollar Bills approximately
- Double Sided Tape
- Small Clear Rubber Bands
- 3 Bamboo Skewers
- 3 yards 7/8 inch ribbon
- 3 yards 3/8 inch ribbon
For a Grad Hat Topper
- 1 piece Black Cardstock 12×12 inches
- 1 metal Brad
- Embroidery Floss
Want more project ideas? Sign up to get my favorite easy crafts and recipes straight to your inbox!
Instructions
- Use a pencil to roll up each dollar bill and secure it with a clear rubber band.

- Stack the floral foam discs on top of each other and secure together by pushing three skewers down through all layers. Break off any skewer that sticks out the top.
- Run two rows of double sided tape around the top tier and start placing rolled bills against the tape.
- Cut these lengths from both ribbons: 20 inches, 26 inches, 34 inches. Adhere the narrow ribbon on top of the wider ribbon for each length.
- Continue until bills completely surround the floral foam disc. Wrap a piece of ribbon around the bills, pull it somewhat tight, and tape it together in the back.
- Repeat with the remaining two layers.
- Decorate as desired. If you'd like to make a grad cap, cut a 3×12 inch rectangle of black cardstock and form it into a circle. Secure with hot glue. Glue it onto a 5×5 square of cardstock. Use a brad to attach a tassel made from embroidery floss.
- Glue on stickers or any other decorations as desired.


Marlene says
Thank you for the money cake directions!