
In today’s post: Make an American flag out of inexpensive wood yardsticks to hang on your front door. Fun Fourth of July craft idea for adults.
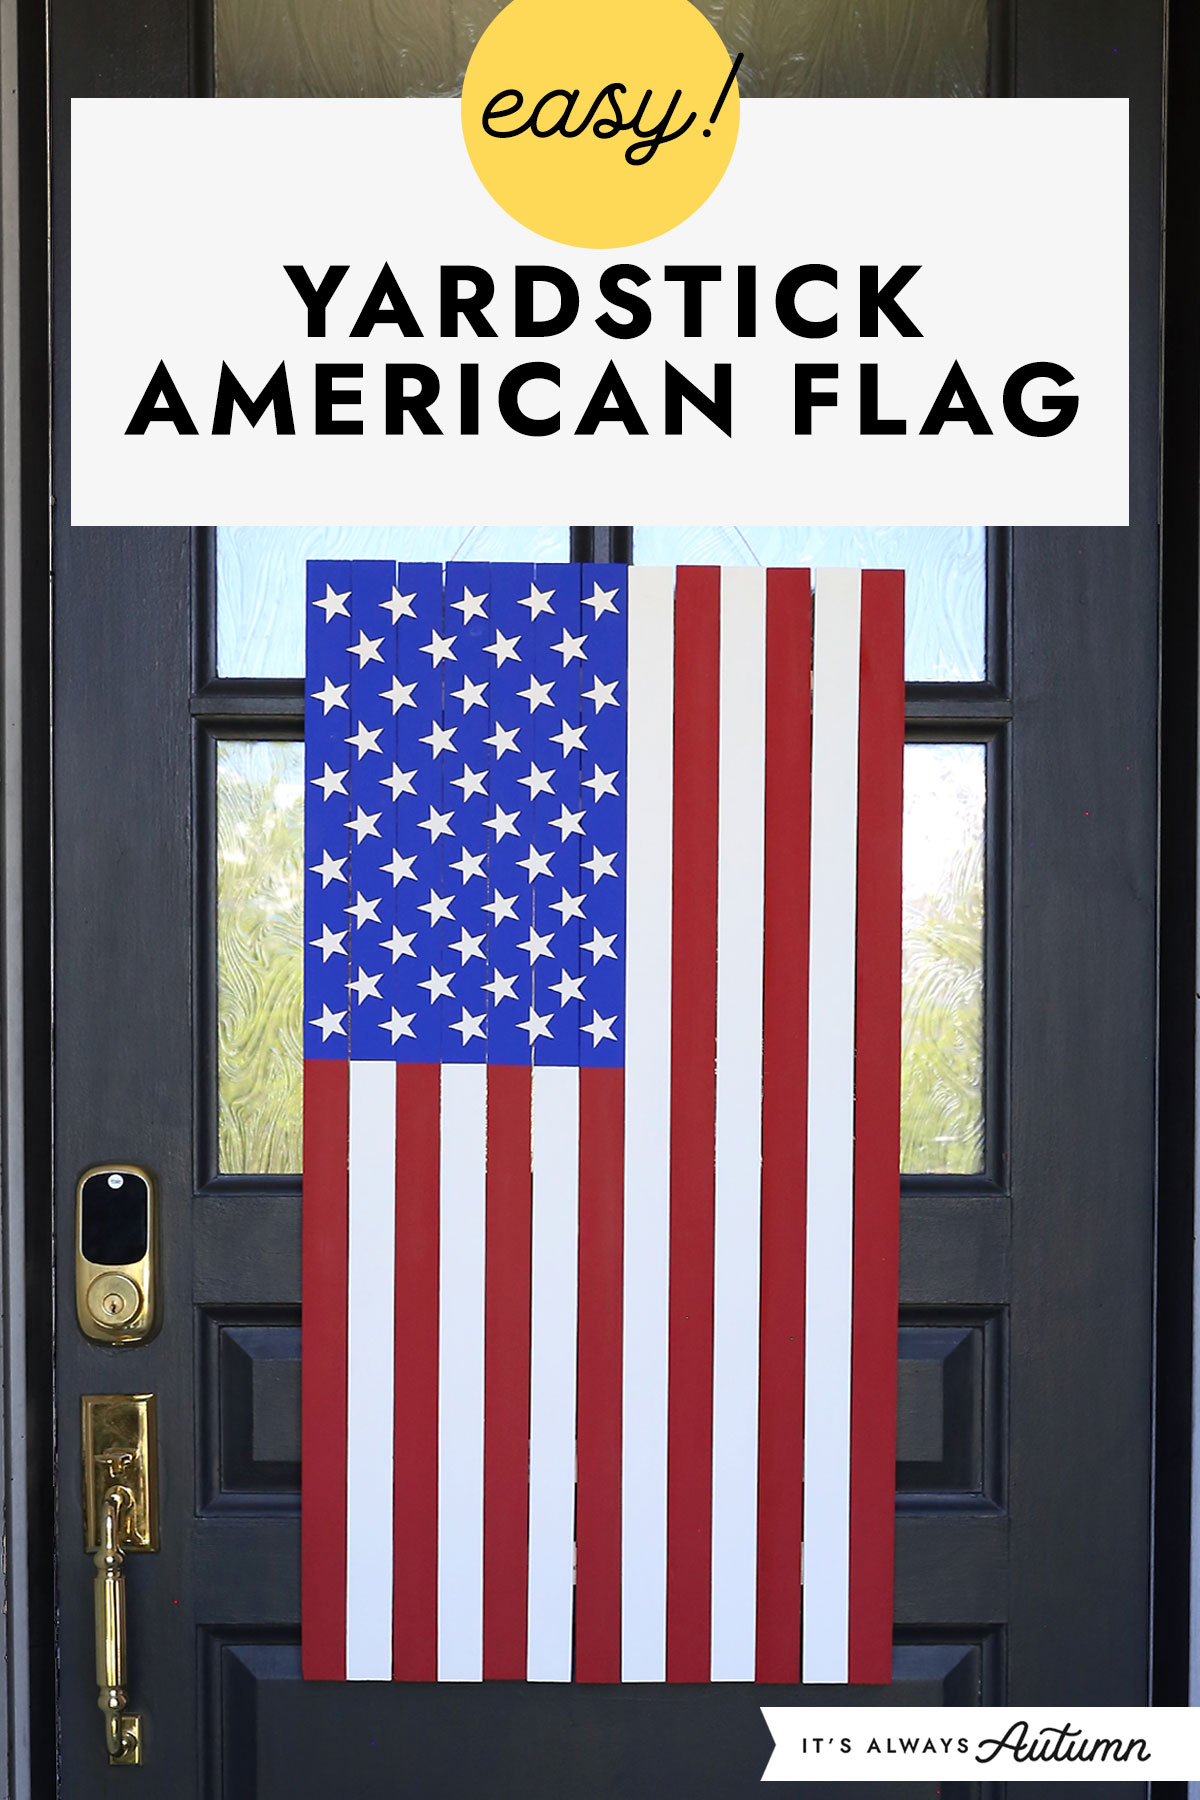
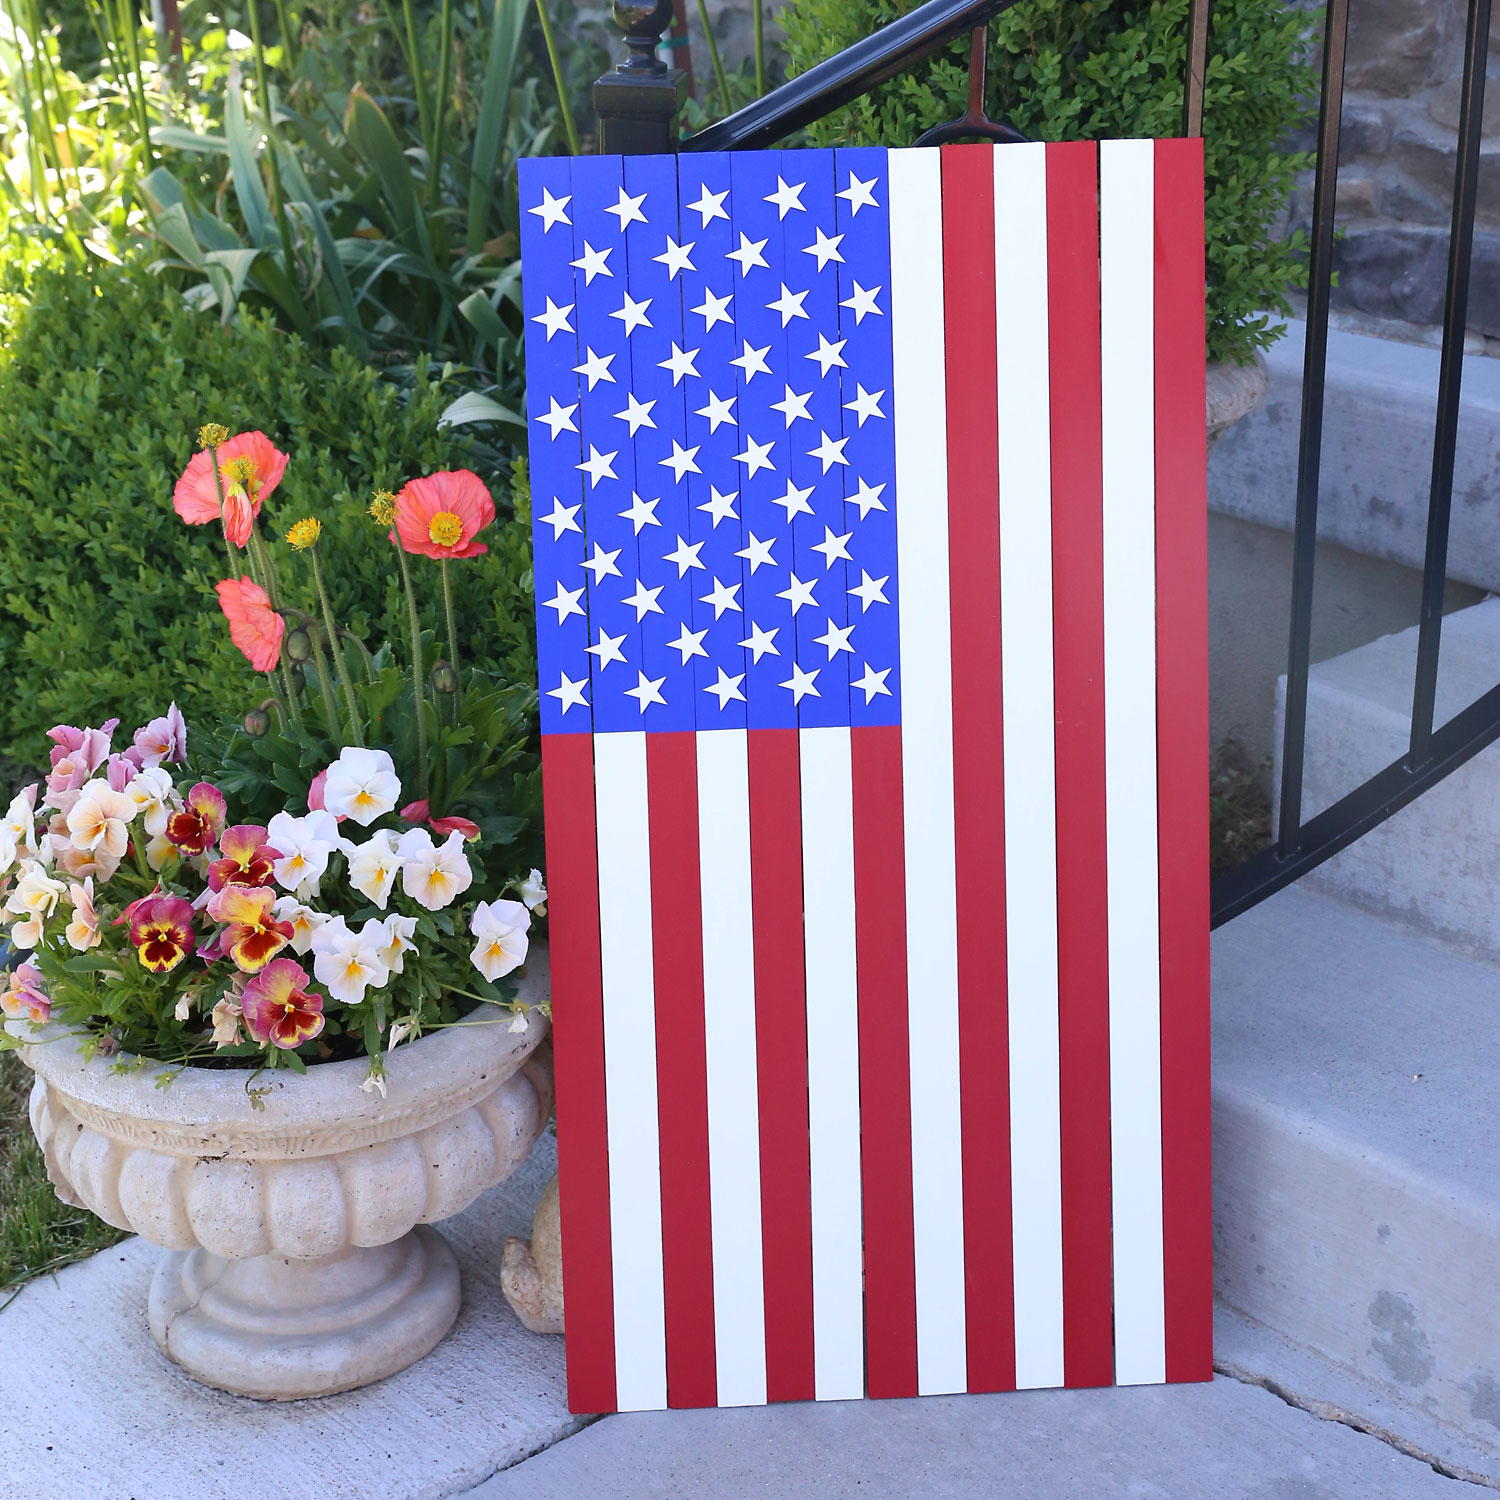
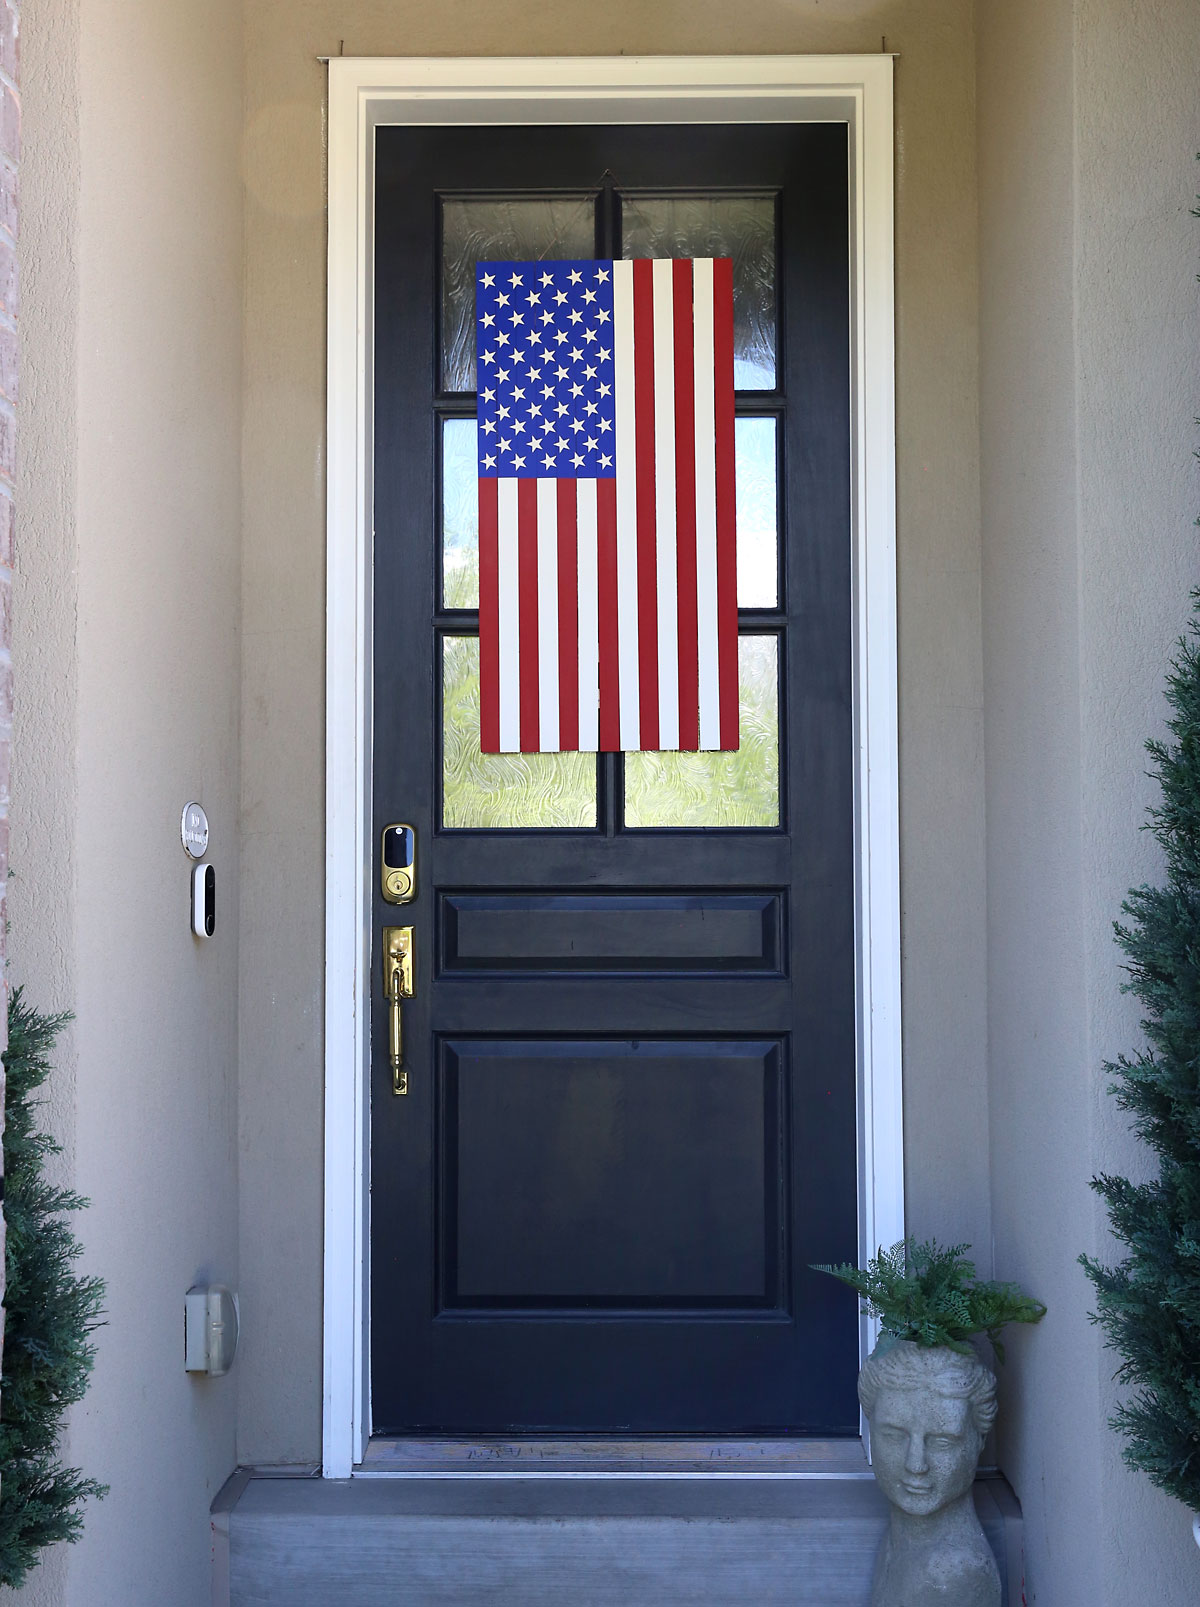
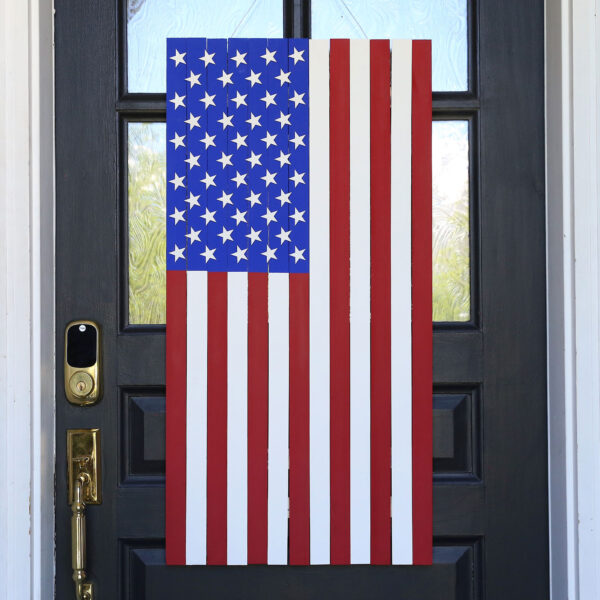
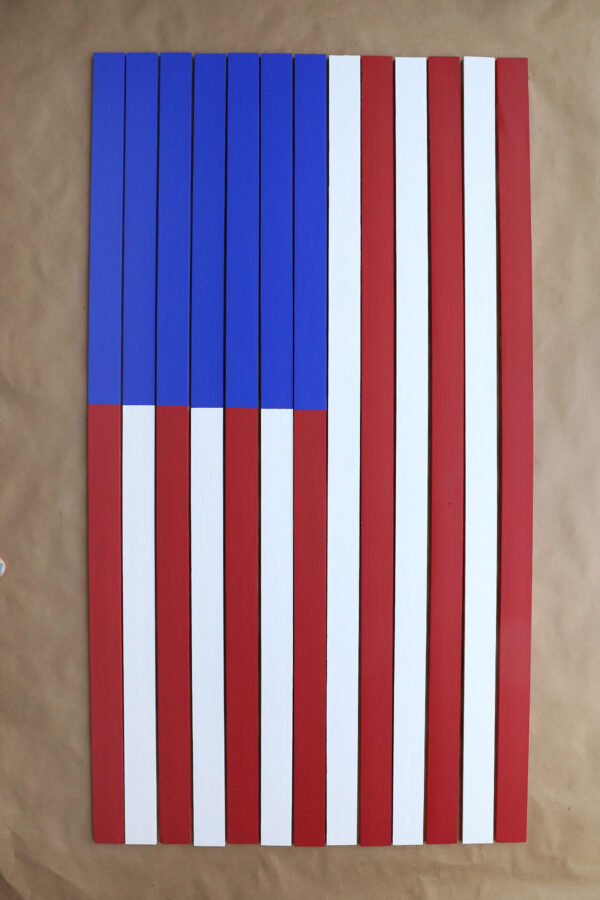
This yardstick American flag is a fun way to decorate your front door for the Fourth of July. Putting it together is fairly straightforward: just paint the yardsticks, glue a couple additional yardsticks across the back, and add some wood stars. The finished flag weighs about four pounds so most over the door wreath hangers can handle the weight easily! Or if you don’t want to hang your yardstick flag on a door, you could stand it up on your porch instead. Set it on a small table if you don’t feel comfortable standing it on the ground.
How to display a vertical flag
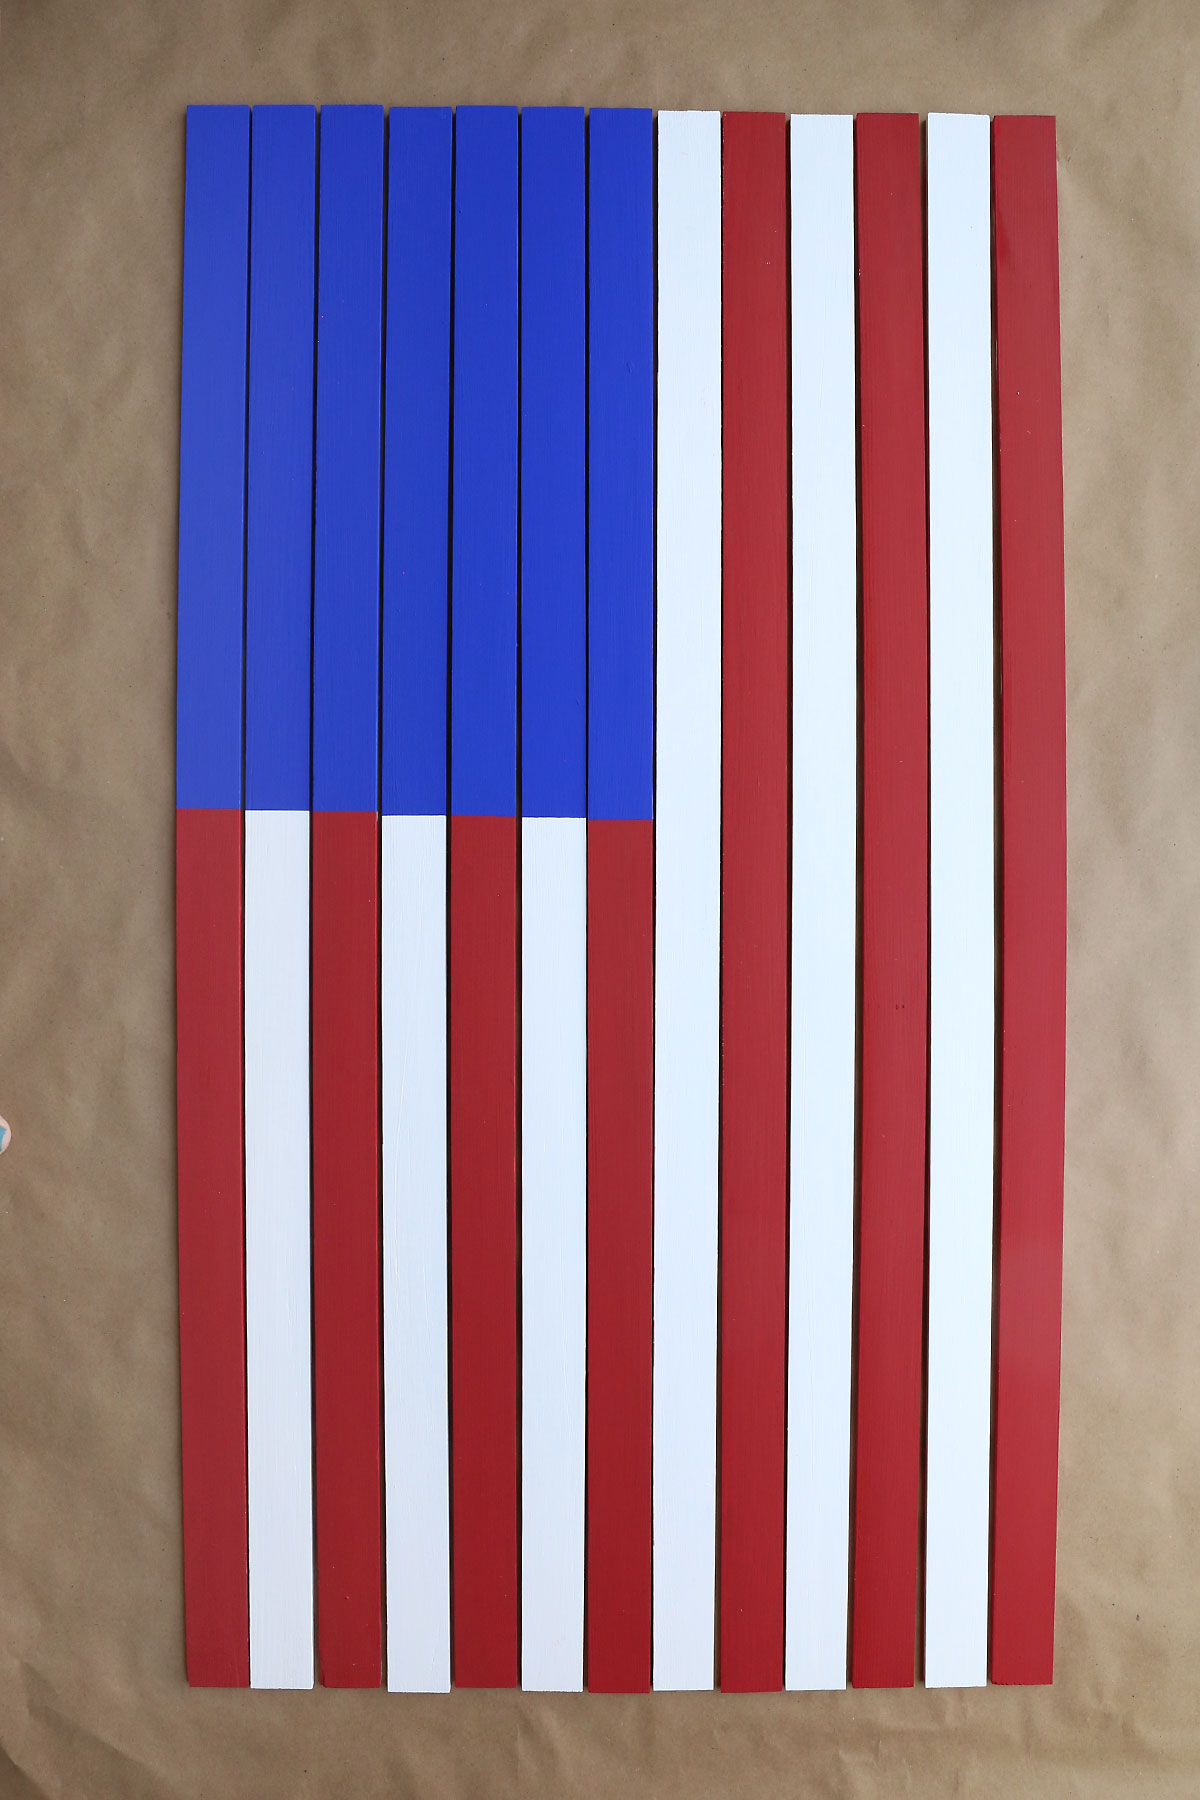
Many people don’t know this, but the American flag is always displayed with the blue section at the top left. That means you’ll have to decide whether you plan to display your yardstick flag horizontally or vertically before you glue it together. Since it’s made from yardsticks, this flag is three feet long, so for me it worked best to display it vertically on a door.

Supplies
Here’s what you need to make an American flag out of yardsticks:
- Yardsticks (15): I found yardsticks at Lowe’s in the paint section for $2 each. You’ll use 13 yardsticks to create the flag and 2 yardsticks as supports to hold it all together
- Red, white and blue paint: I used inexpensive acrylic craft paint. You will need 1 bottle of blue paint and 1-2 bottles each of the red and white paint.
- Foam paint brushes
- Painter’s Tape
- Wood stars: I used this package of 50 small wood stars from Amazon. You could also use a smaller number of larger wood stars that can usually be found at Hobby Lobby or Jo-Ann.
- Wire: This is used to create a hanger for the flag. I used 18 gauge wire found in the jewelry section of Hobby Lobby.
- Wood Glue

How to make a yardstick flag
This project is not hard, but because there are multiple things to paint it will take a few hours to complete, with additional time for things to dry. It might be best to plan to create this craft over a weekend. Also, be aware that you will need to cut two of the yardsticks in half (at 18 inches) to use as supports to hold the flag together. If you do not have a way to cut the yardsticks at home, ask an employee at the hardware store to cut them for you when you purchase them.
Paint the Stripes
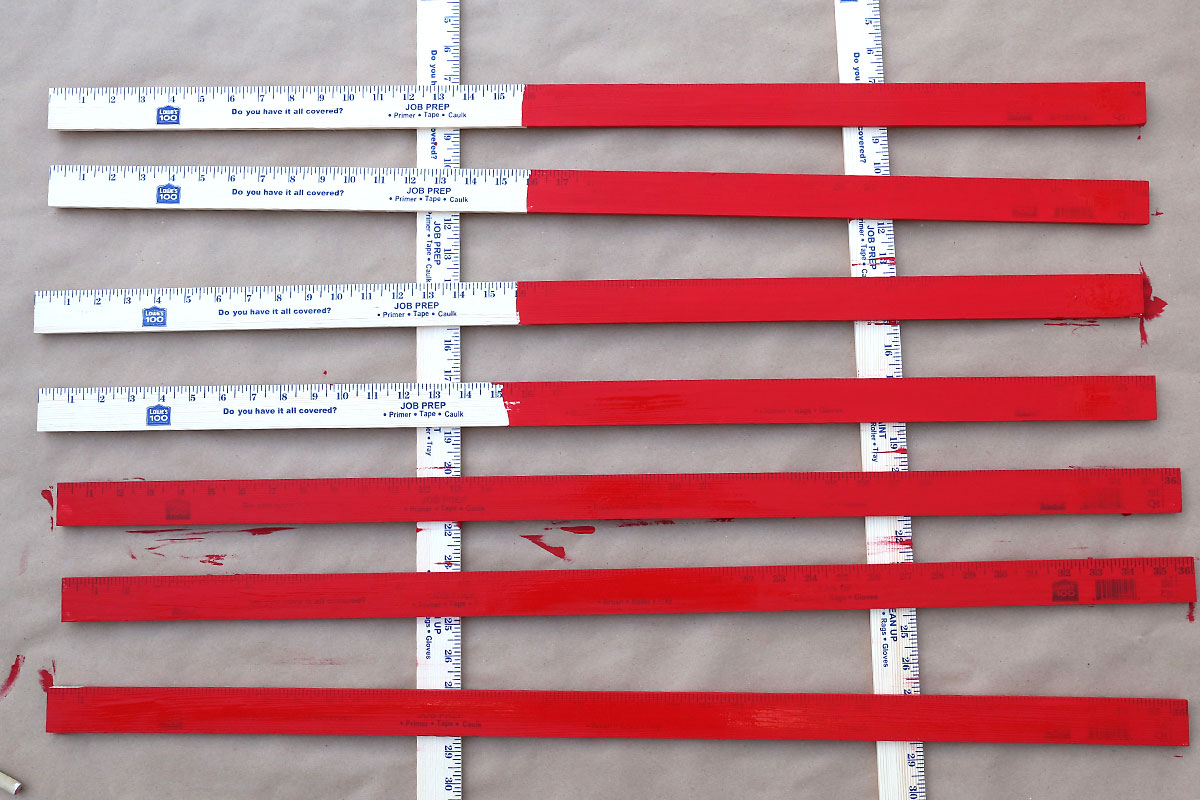
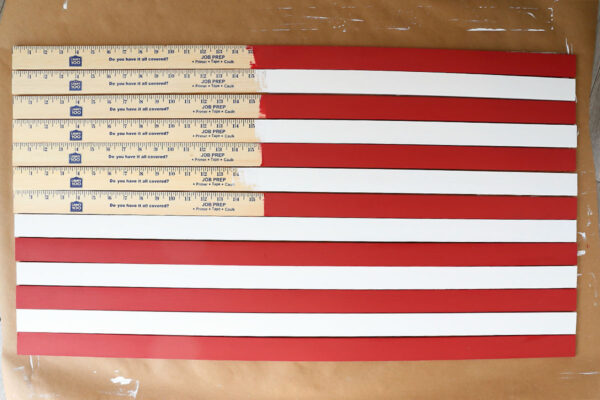
The first step in making a DIY yardstick flag is to paint the yardsticks. Cover your work area with a disposable tablecloth or a length of wide paper. Lay the two extra yardsticks down on the table, and then lay seven more yardsticks across them. These will be the red stripes in the flag.

Paint three of the yardsticks red across the top and along the sides. Paint the other four yardsticks red starting just before the 16 inch mark and going all the way to the end. Allow the paint to dry, and then give them a second coat (and a third if needed to cover all the markings on the yardsticks). You can place your paintbrush in a ziplock bag in between coats so it won’t dry out.
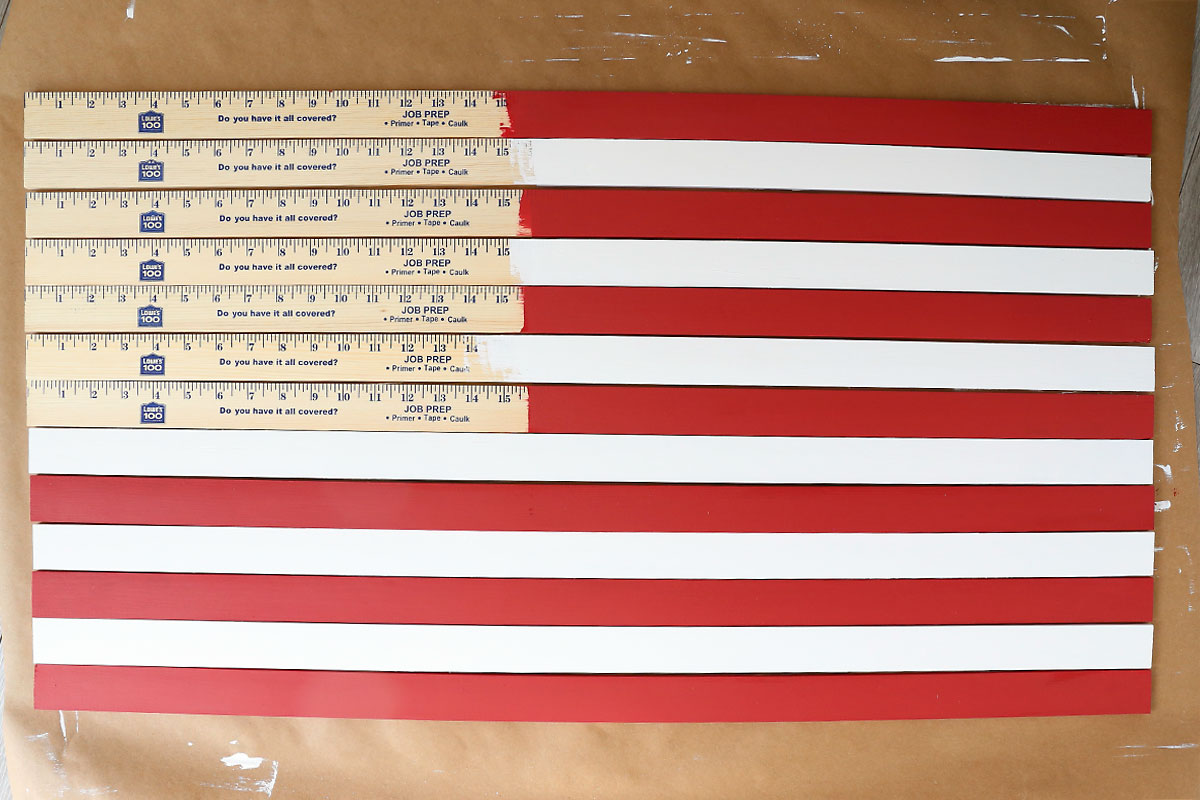
After the red sticks are dry, repeat the process to paint the six white yardsticks. Three should be painted completely white and the other three should be painted white from just before the 16 inch mark to the end. Allow the red and white yardsticks to dry completely before moving to the next step. While they are drying, paint the wood stars white. I painted the stars using the same acrylic paint I used for the stripes, but you can use spray paint to speed up the process if desired.
Paint the Blue Section
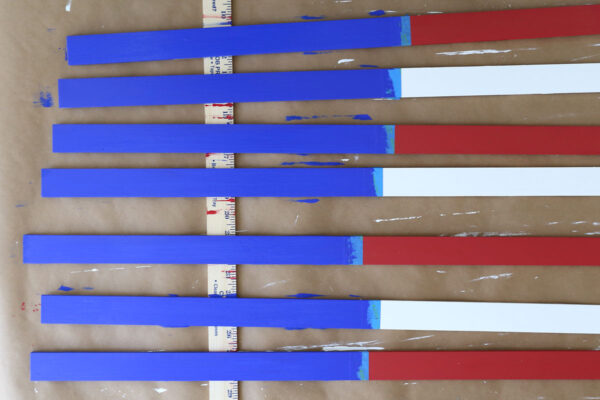
On your covered work surface, lay out the seven yardsticks that are halfway painted, leaving some room in between each one. Use one of the support yardsticks to align the left edge of these yardsticks. Then place a strip of painter’s tape down across all the sticks at the 16 inch mark. Cut the tape between each stick and wrap the tape down the sides.
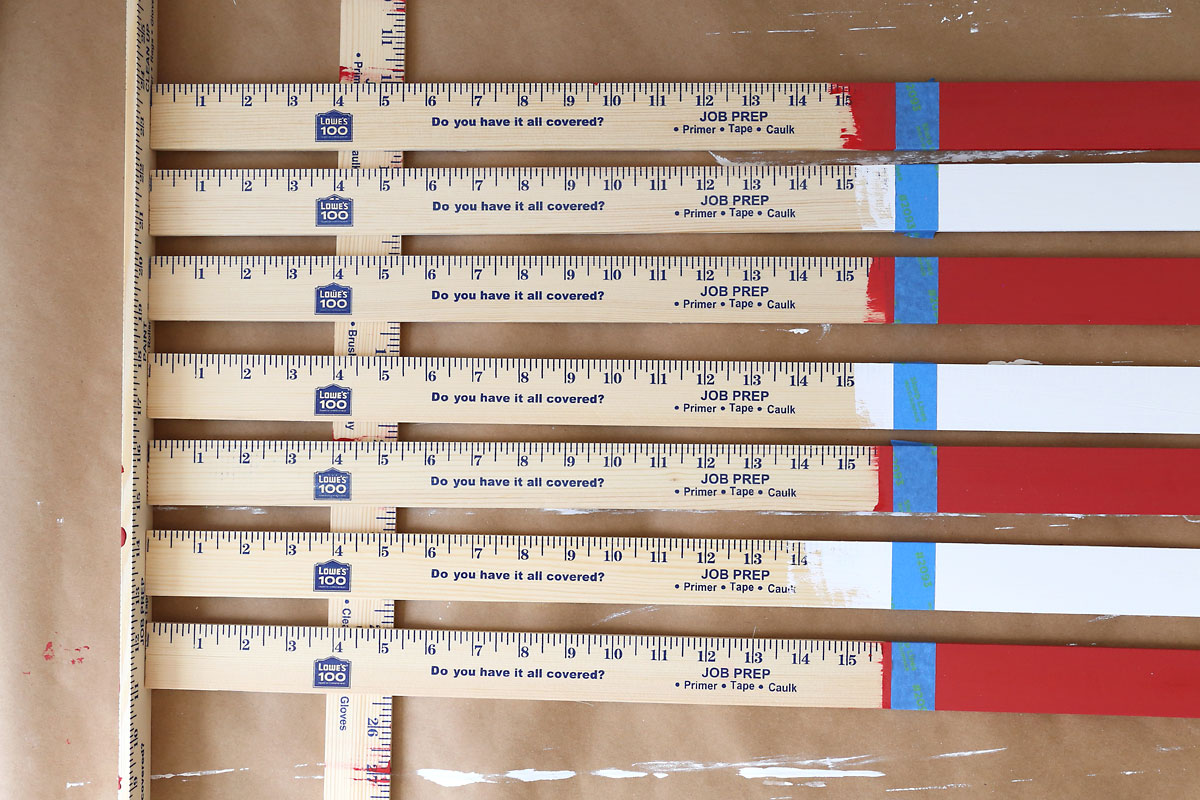
Paint from the tape to the left end of each stick blue, also painting the sides. Allow paint to dry and give them a second coat (and a third if needed). Allow to dry completely, then remove the tape.
Position the Yardsticks
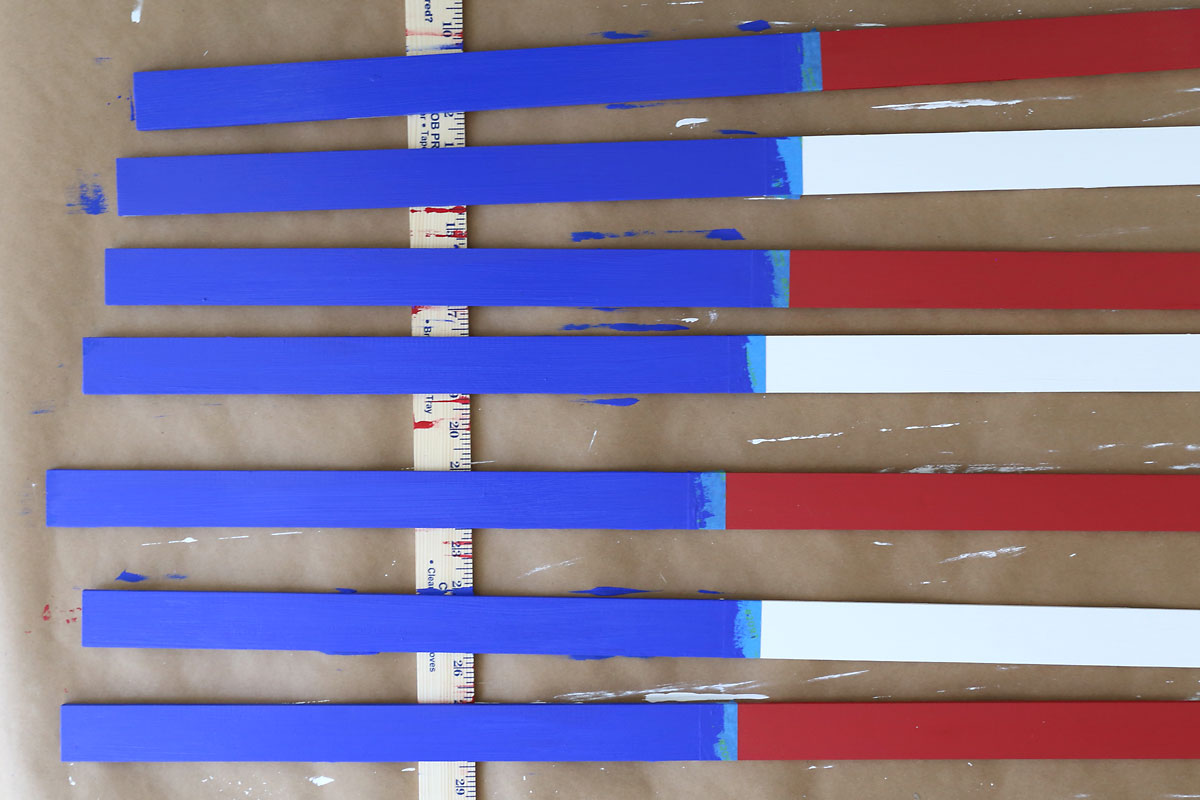
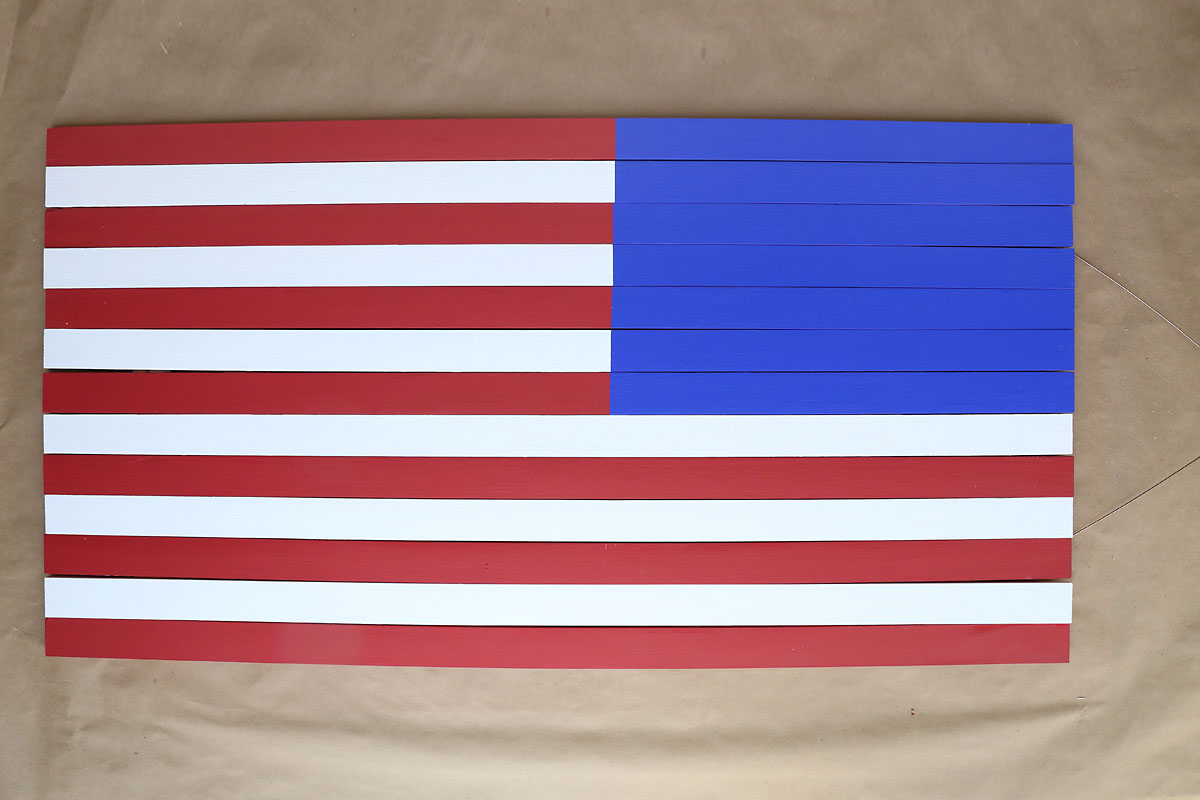
Now that your yardsticks are all painted, it’s time to glue them to the support sticks in the shape of a flag. At this point, you’ll need to decide whether you will be displaying your flag horizontally or vertically, because that will change how to sticks are assembled. When properly displayed, American flags always have the stars at the top left of the flag. Because I want to hang this on a door, my flag will be displayed vertically. That means it should be glued together so it looks like this (when looked at horizontally it appears backward or upside down):
Turn all of the sticks face down, ensuring the sticks are arranged so that when they get glued together and flipped back over they will be in the order you see above. That means that now the blue section will be at the top right, as you can see below. Use the two extra yardsticks to align the edges and square up the flag. The yardsticks won’t be perfectly straight and so you will end up with some small spaces in between some of the sticks. Just try to get the sticks close together and fairly even.
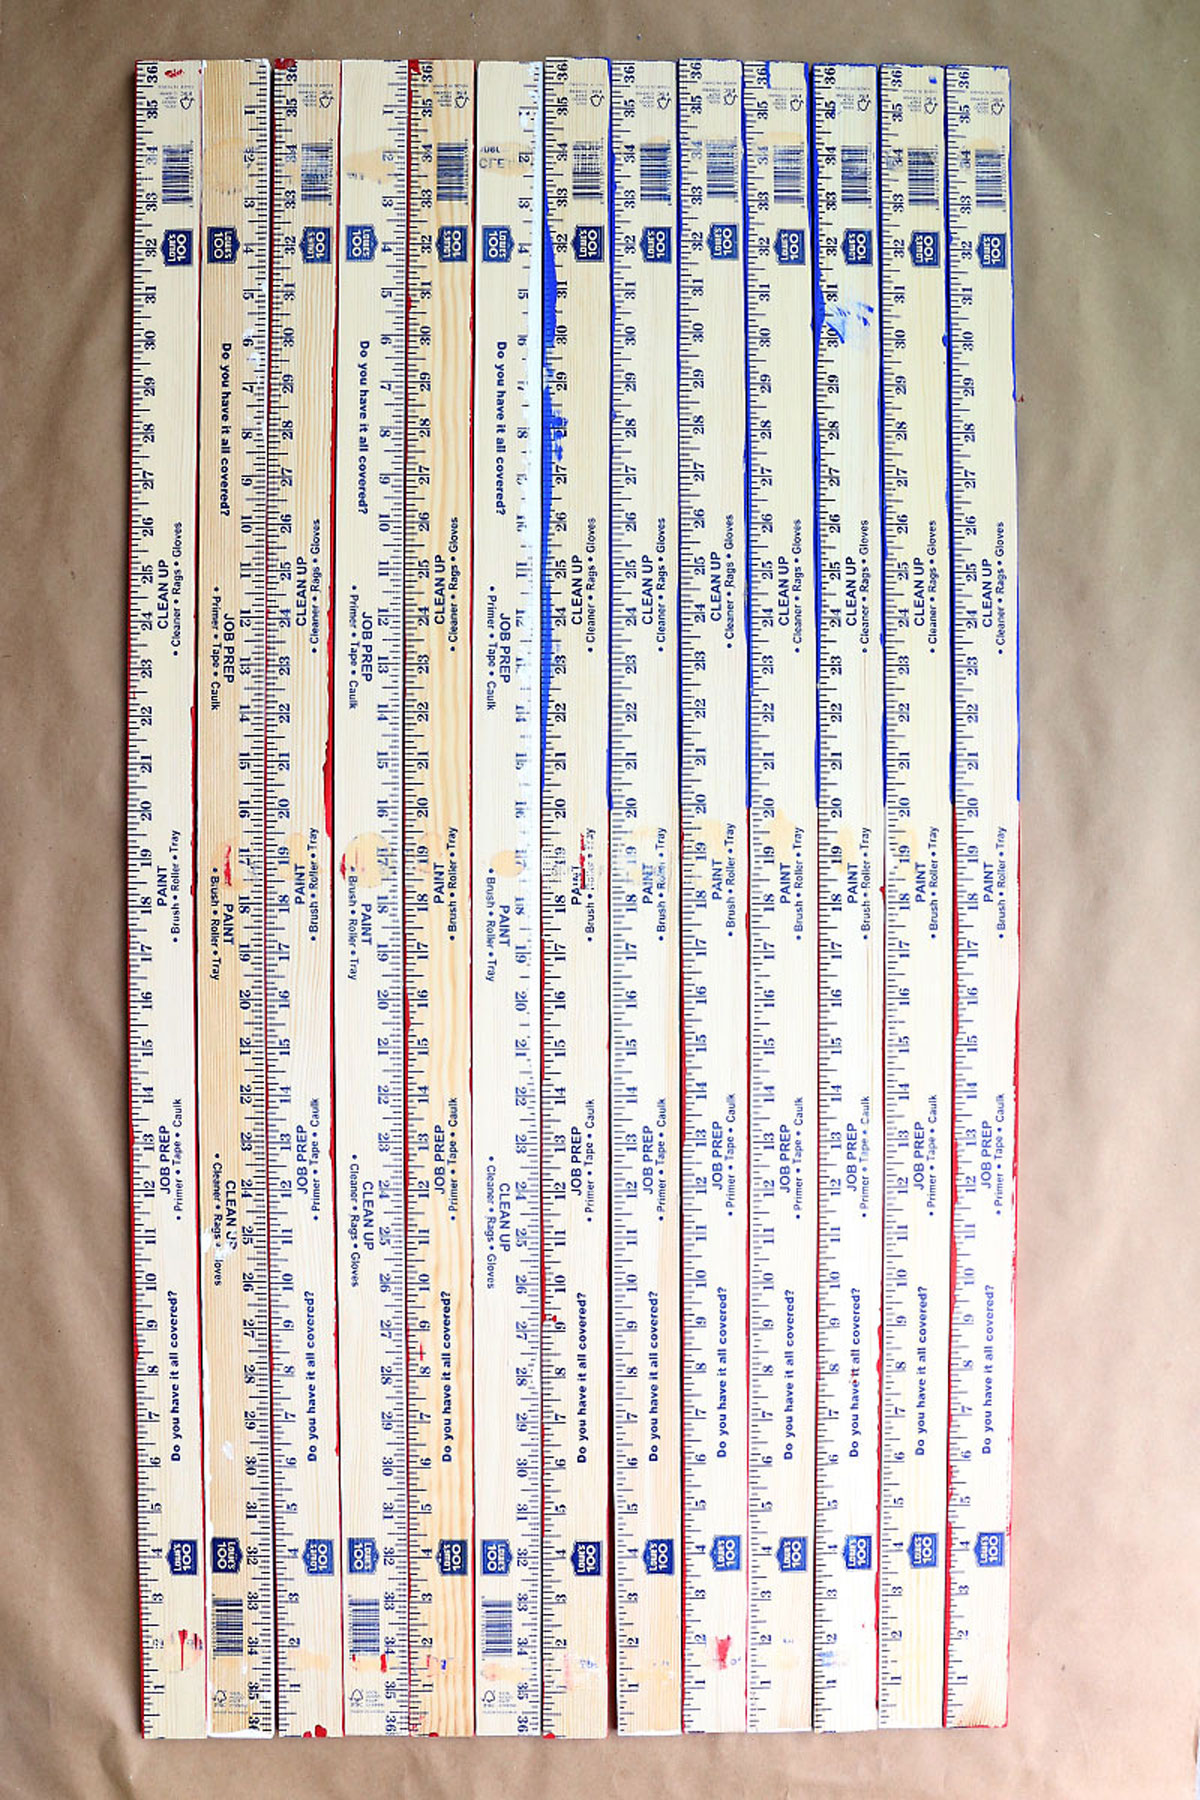
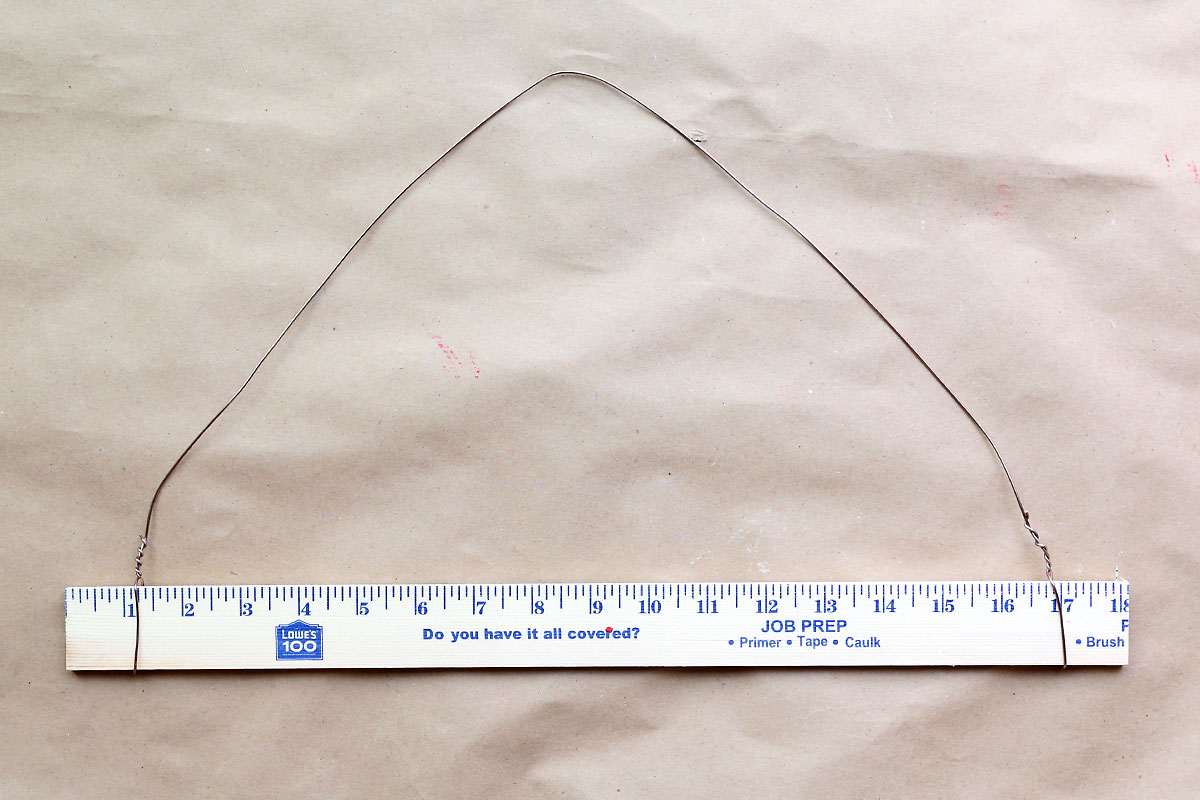
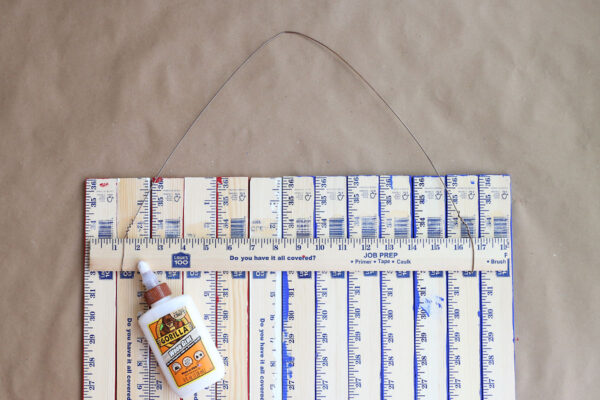
At this point, if you have not already done so, cut the two extra yardsticks in half, at the 18 inch mark. Cut about a yard of wire (it’s easy to do this with the snip portion of pliers; you may also be able to do this with heavy duty scissors). Grab one yardstick half and wrap each end of the wire around it, as shown below, to create a hanger for the flag.
Glue the Flag Together
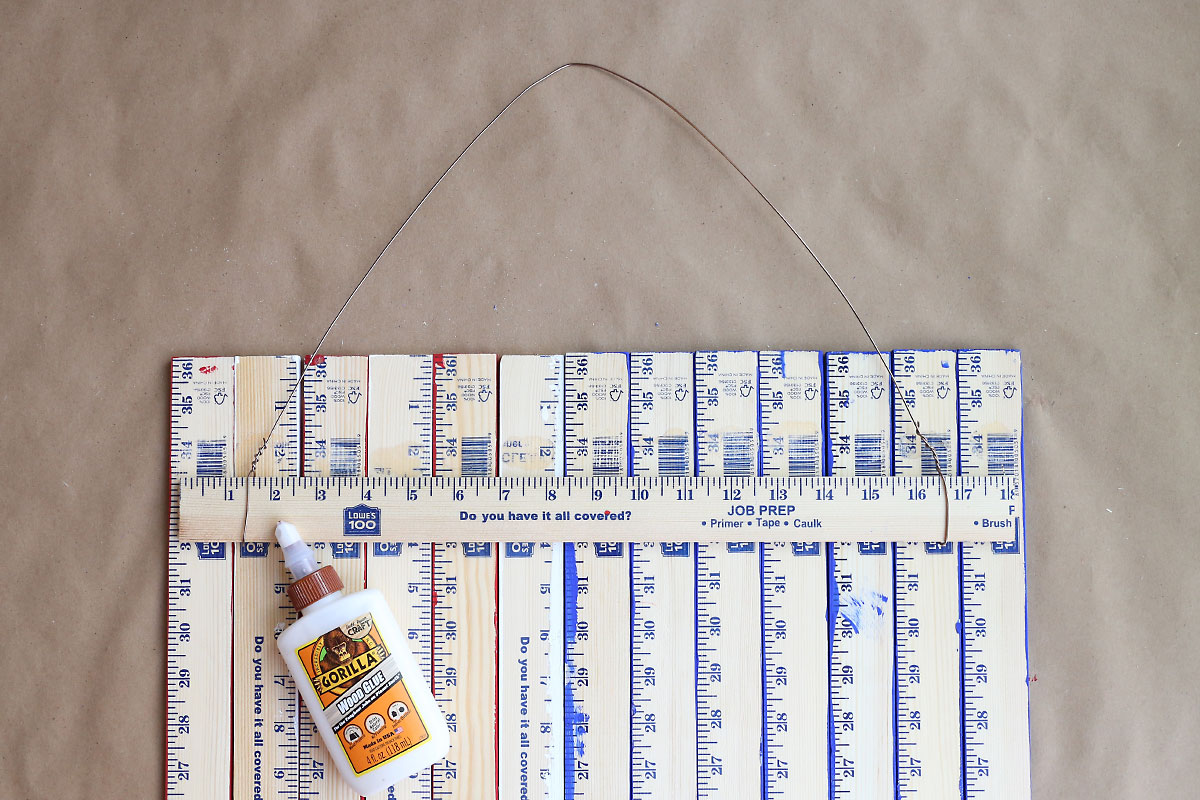
Run a line of wood glue along the back of the flag, a few inches from the top, and place the yardstick with wire down on top of the glue. You want to use a good amount of glue, but not so much that it will seep between the yardsticks and be visible on the front. Also, it’s a good idea to move the wires on the support yardstick so they can sit in between two yardsticks (so in the photo below the wire should be moved inward toward the center about an inch on each side).
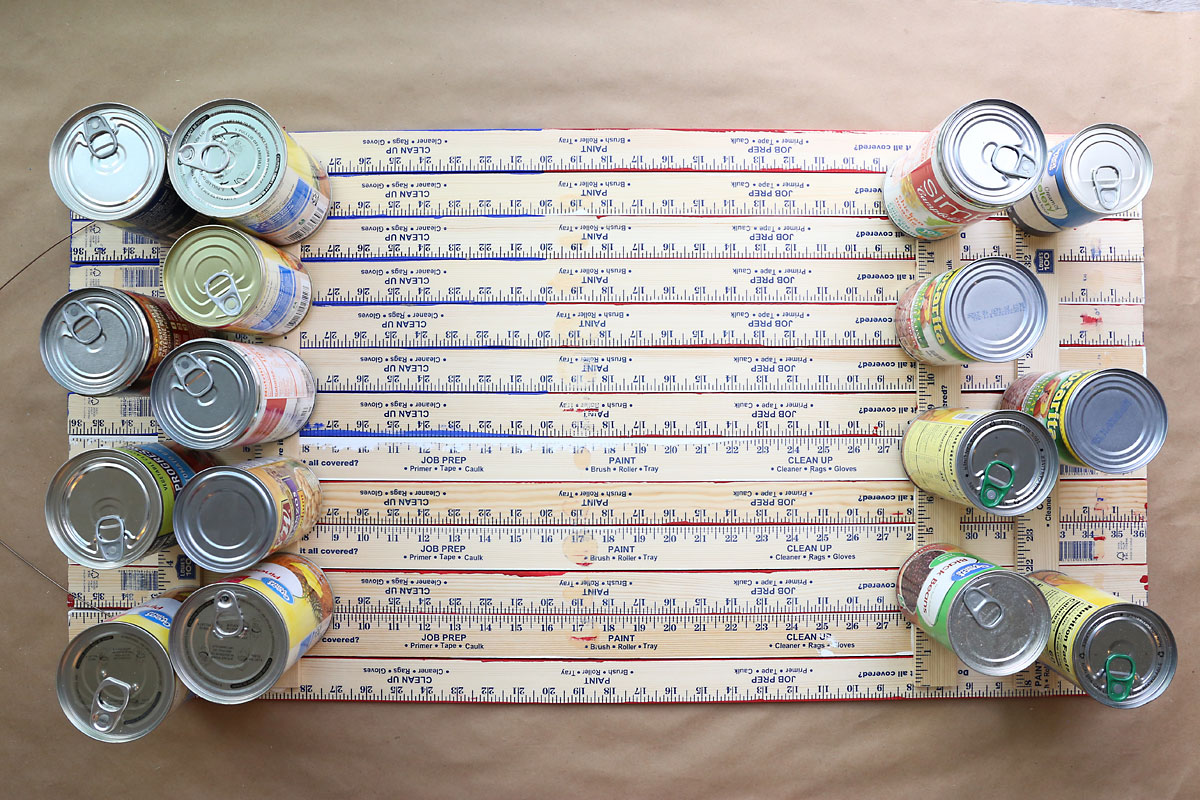
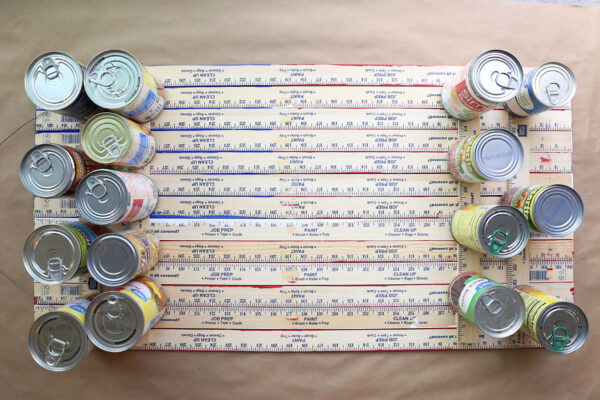
Place cans or some other heavy object on top of the support yardstick to weigh it down. Glue on another half yardstick a few inches below the first, then glue the other two yardstick halves near the bottom of the flag. Weigh them all down and leave to dry and cure for at least 6 hours, preferably 24.
Once the glue has completely cured, you can turn the flag back over. Remember, if you are looking at it horizontally, it’s going to look wrong.
Add the Stars
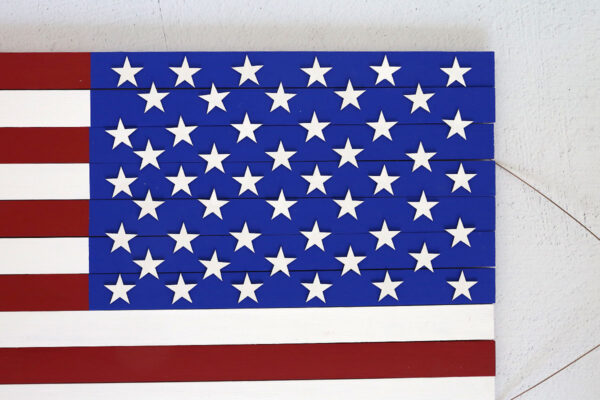
Now it’s time to glue on the wood stars. Set all the stars down on the flag to get them in the right place before beginning to glue them down. If you are using 50 stars, here’s how to get them placed the way they are on an actual American flag: Start by looking at the flag so the wire hanger is to the right and the blue section is at the top right of the flag. On the very top stripe, distribute six stars with a point directly up. On the bottom blue stripe, add six more stars. And then on the center (fourth) blue strip add six stars.
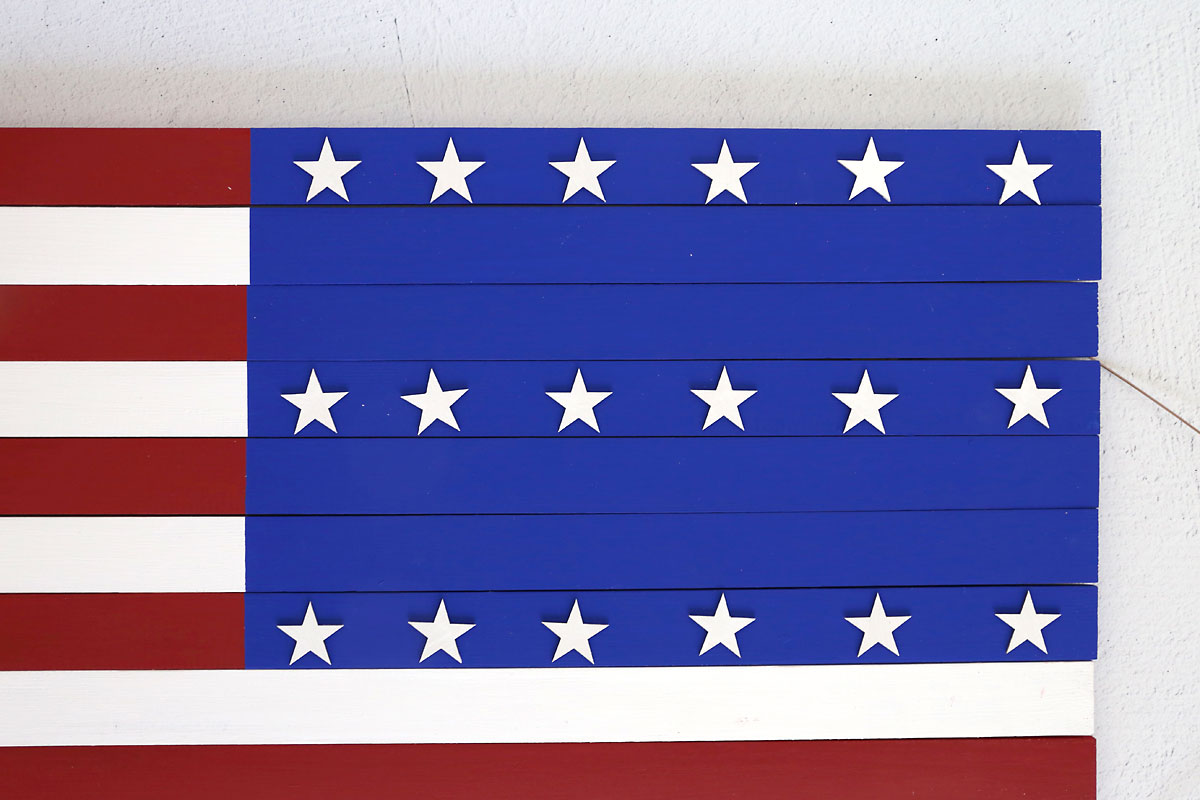
Next, add two more rows of six stars each in between the ones you’ve already created so you now have 5 rows of six stars, all evenly distributed in the blue area.
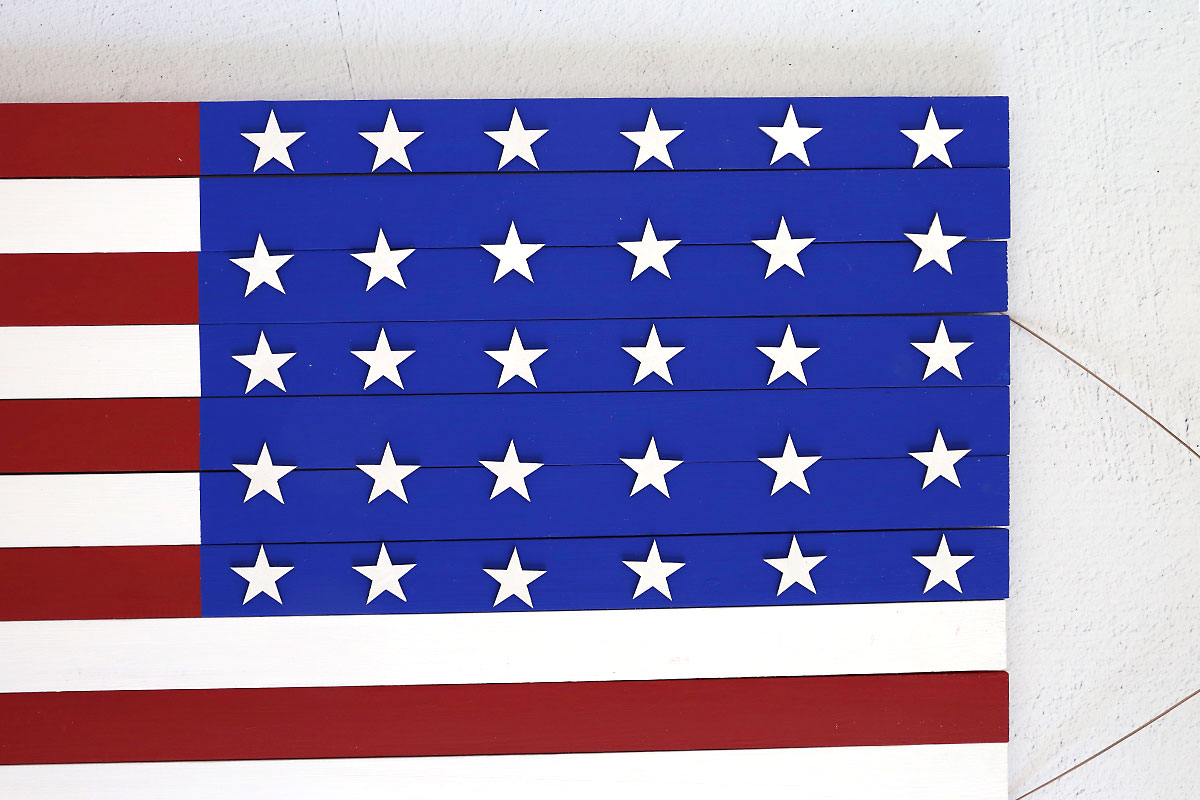
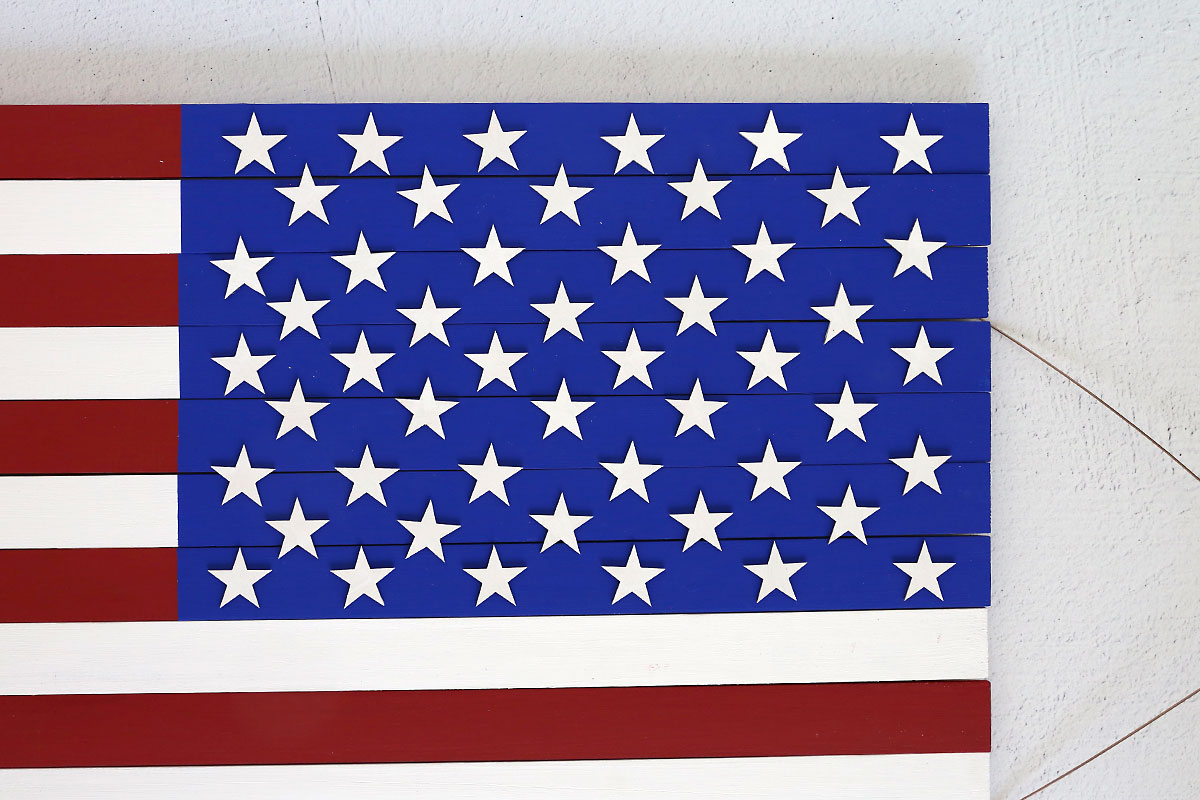
Finally, add four rows of five stars in between the rows you’ve already created. Adjust as needed so they look evenly distributed.
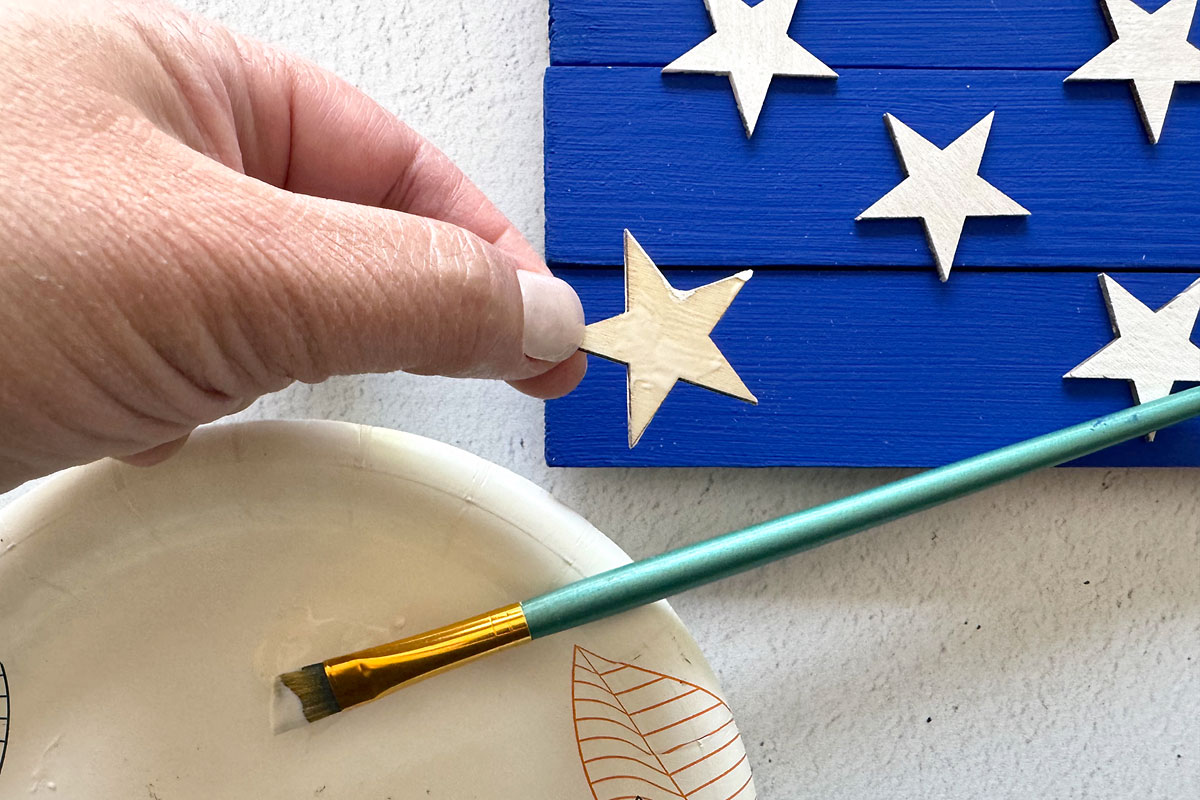
Now you can pick up each star and glue it back down. I found it easiest to use a small paintbrush to paint wood glue on the back of each star. This helps avoid excess glue getting squished out under the stars.
Allow the wood glue to set for 6+ hours, and after that, your yardstick American flag is done and ready to hang! Remember, it weighs about 4 pounds so you will need a wreath hanger that can handle that amount of weight. If you are worried the back of the flag will scratch your door, you can add some adhesive backed felt to the support bars. Finally, depending on where you plan to display the flag, you may want to spray it with a matte finish poly spray to help protect the paint from weathering.
DIY Yardstick American Flag
Supplies
- 15 Wooden Yardsticks
- Red, White, and Blue paint
- Foam Paintbrushes
- Wood Glue
- Painter's Tape
- 18 guage Wire
- Wood Stars
Want more project ideas? Sign up to get my favorite easy crafts and recipes straight to your inbox!
Instructions
- Paint four yardsticks red. Paint three yardsticks red from the 16 inch mark on. Paint three yardsticks white. Paint three yardsticks white from the 16 inch mark on. Allow to dry, recoating as needed.

- Tape off the half painted yardsticks at the 16 inch mark and paint the remaining section blue. Allow to dry completely.
- Paint the stars white.
- Position yardsticks so they make a flag shape, ensuring that the blue section is at the top left.

- Flip all the yardsticks over. The blue section should now be at the top right.
- Cut the two extra yardsticks in half, at 18 inches, to make four support sticks. Twist wire around one of the support sticks to create a hanger. Glue the support across the back of the flag, a few inches down from the top.
- Glue the other three support sticks across the back of the flag as well. Weigh them all down with cans or something else heave and leave to cure for at least six hours.
- Once the glue has fully cured, flip the flag back over and glue on the stars. If you are using small stars, it's easiest to use a small paintbrush to paint wood glue on the back of each star.
- Display by hanging the flag on a wreath hanger that can hold at least five pounds.


Leave a Comment