It's Always Autumn

creative tutorials for everyday life

  • Holidays
  • Holidays
    • back to school
    • birthdays
    • Christmas
    • Easter
    • Halloween
    • July 4th
    • Mother’s Day/Father’s Day
    • teacher appreciation
    • Thanksgiving
    • Valentine’s
  • Crafts
  • Crafts
    • crafts + DIY
    • handmade gifts
    • photo crafts
    • kid crafts + activities
  • Recipes
  • Recipes
    • bread
    • dessert
    • main dish
    • side dish
  • Sewing
  • Sewing
    • free sewing patterns
    • sewing for women
    • sewing for kids
    • how to sew
    • gifts
  • Photography
  • Photography
    • beginning photography tips
    • posing tips
    • photo editing tips
  • Tips
  • Tips
    • parenting tips
    • travel tips
    • books I love
  • FAQ

photo editing tips photography
May 21, 2014

easy fix for dark or underexposed photos | simple photo edit


It’s such a disappointment to upload photos to your computer and realize they’re dark and underexposed. This happens often when you shoot on AUTO – today’s cameras do a pretty good job with exposure, but even the smartest camera can get confused. It doesn’t know whether the person you’re photographing is supposed to have a light or dark skin tone, so photos of lighter skinned people often end up too dark. And when there’s a lot of light behind your subject you’re almost guaranteed a dark, underexposed image. To make matters worse, photos look even darker when printed than they do on our bright computer screens (turn down your monitor’s brightness to help fix this discrepancy).

How to fix dark photos! Easy photo editing tips for brightening underexposed photos.

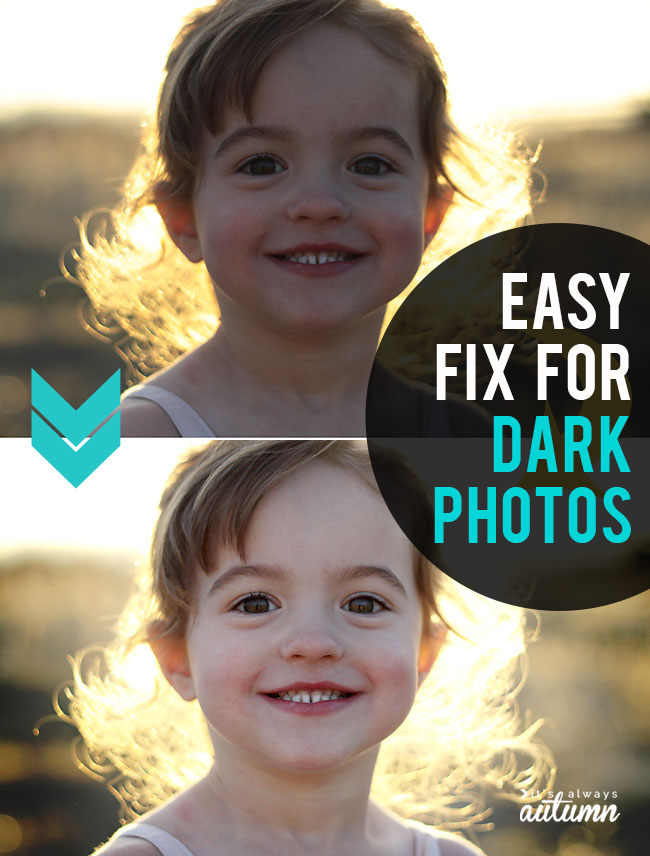
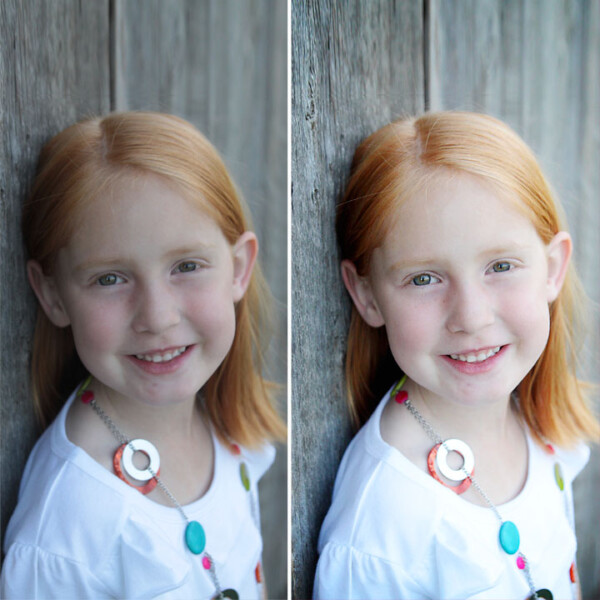
Luckily, it’s pretty simple to fix dark or underexposed photos in just a few steps. Once you’re used to the process you can complete the entire thing in less than a minute, which is worth it to make a dramatic improvement like this one:

two little boys and edited versions of the same photo

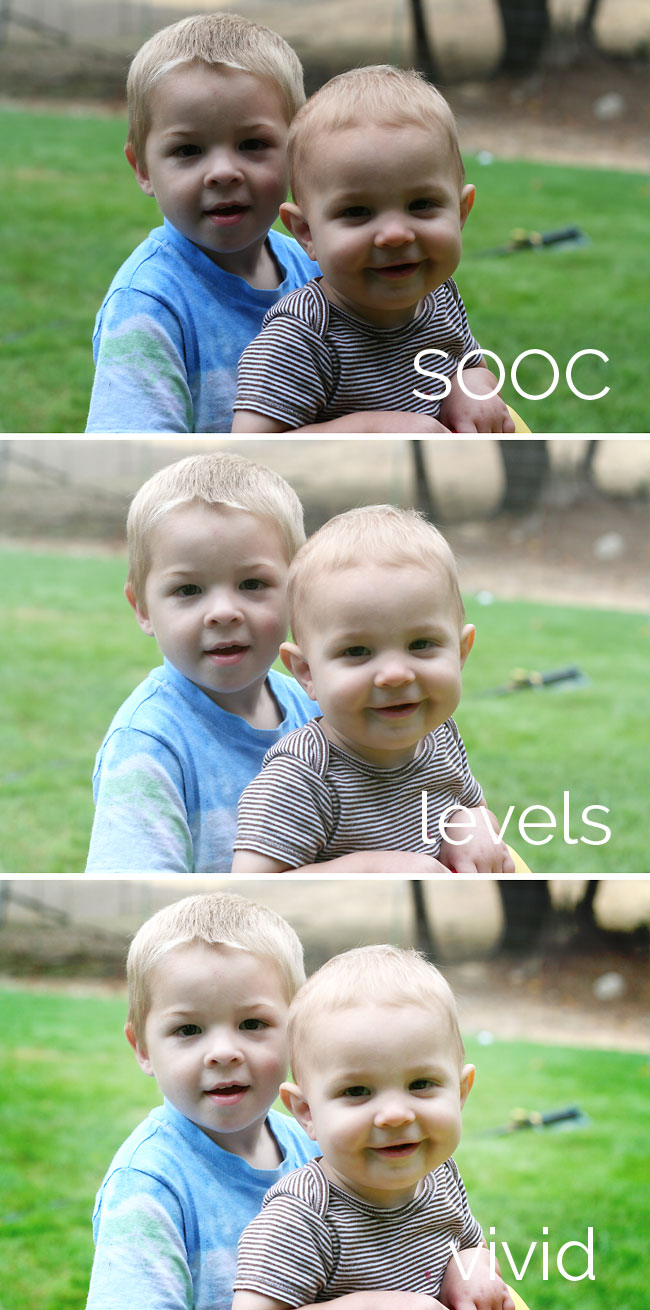
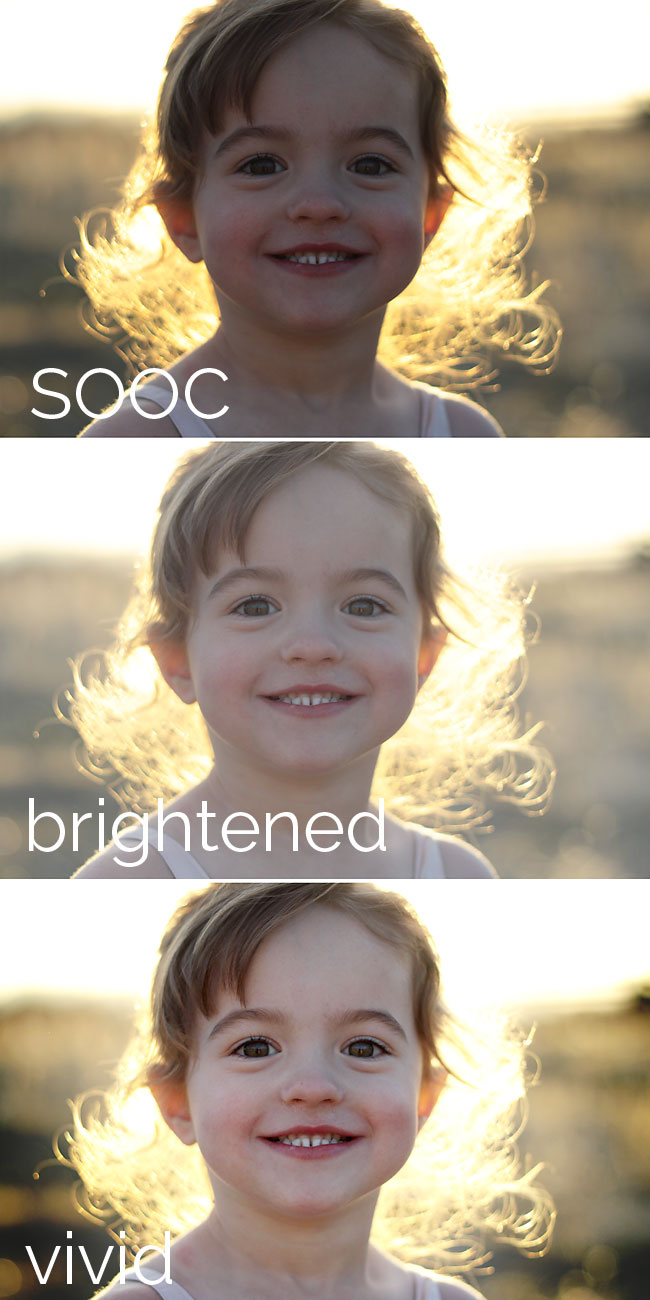
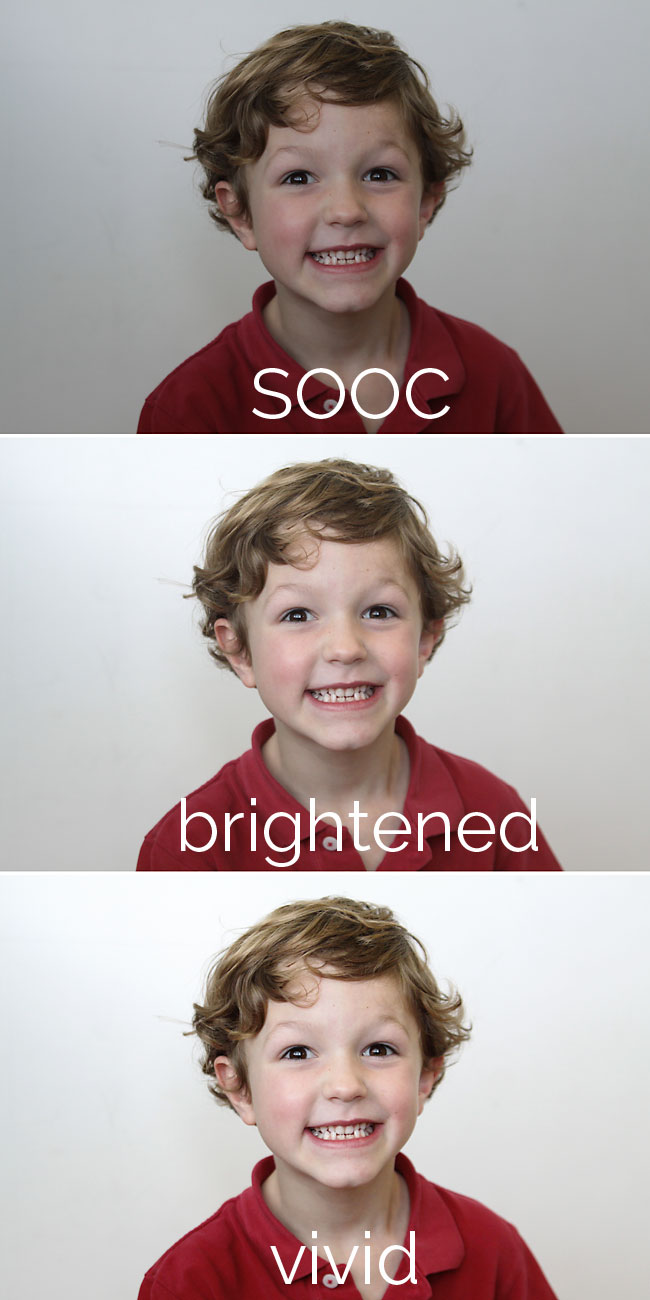
The boys’ eyes are still a little dark in the final photo (the day was very overcast), but the improvement is still pretty huge. Here’s another example of a dark photo that was saved with a little brightening:

A little girl smiling at the camera, and edited versions of the same photo

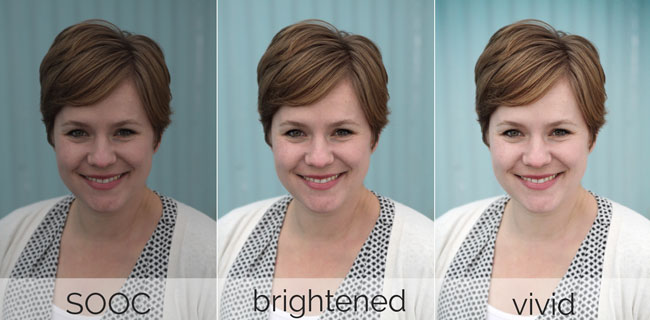
You’ll notice the photos I’m showing are labeled SOOC (straight out of camera), brightened, and vivid. I’m going to show you how to easily brighten your photos (using a method that will work in a variety of photo editing applications), and then point you to my favorite Photoshop action for making them even more vivid. The Photoshop action is very helpful for saving photos that are super dark, but if you don’t have Photoshop or Photoshop Elements, just brightening your photos will still make a huge difference.

A little boy standing in front a log pile and edited versions of the same photo

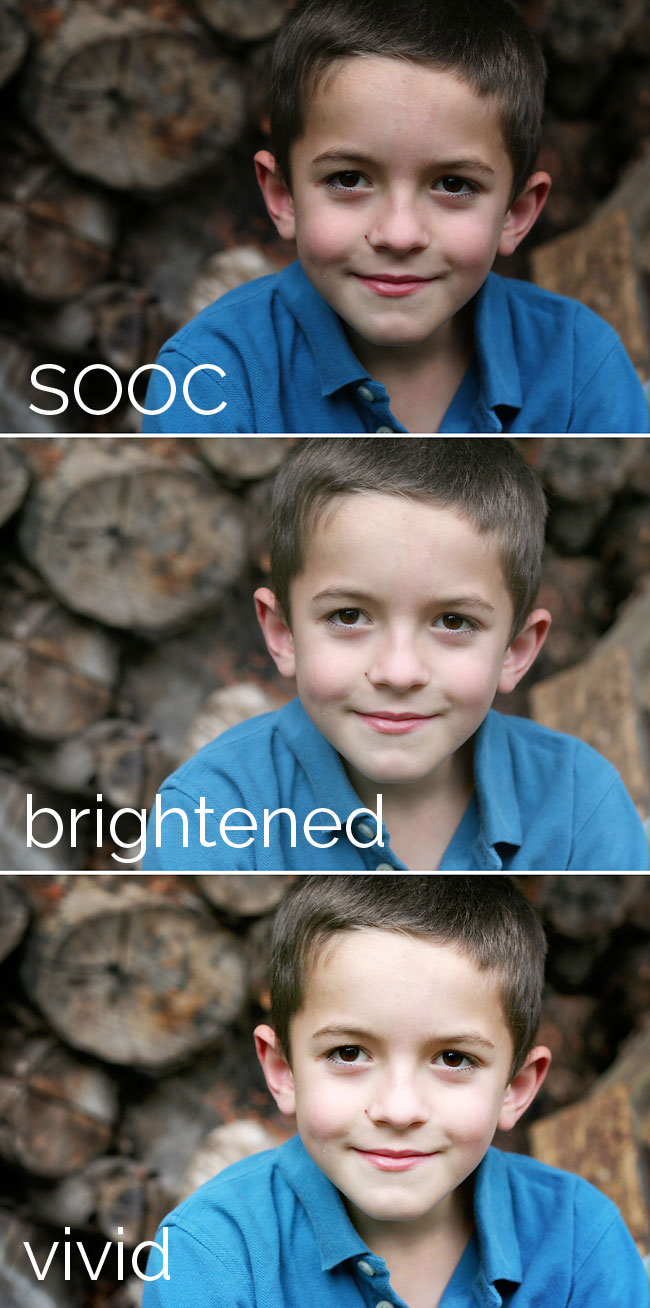
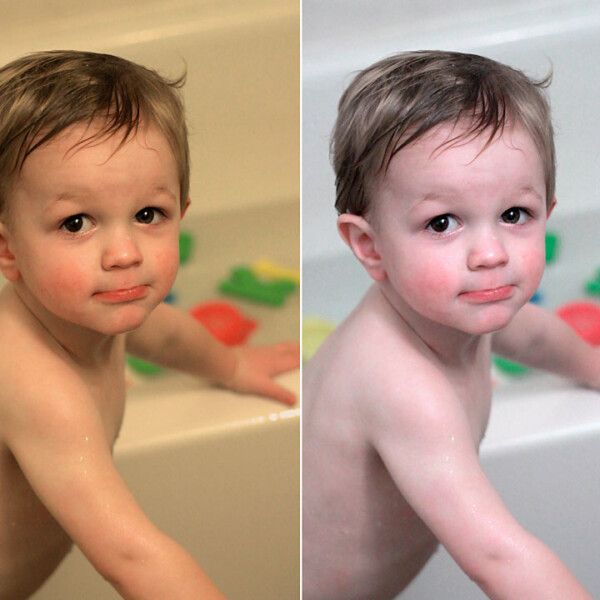
Even photos that aren’t obviously dark can often benefit from some brightening. I think that almost all photos taken on AUTO end up a little bit dark, even though you might not notice it until you see how much better it looks a little brighter. This next one’s a great example of that. (NOTE: if the after photos in this post look too bright to you, there’s a good chance your monitor’s brightness is up all the way – turn it down for a better representation of what they’ll look like when printed.)

A young boy who is smiling and looking at the camera and brightened version of the same photo

Ok, so now that you can see what a difference a little brightening can make, I’ll show you how to do it!

Some photo editing applications (like PicMonkey) just let you move a slider to lighten a photo, but I think the best way to fix a dark or underexposed photo is through the photo’s histogram. You can get to it in Photoshop Elements by hitting ctrl-L. You can access it in iPhoto under edit-adjust.

levels tool in Photoshop Elements

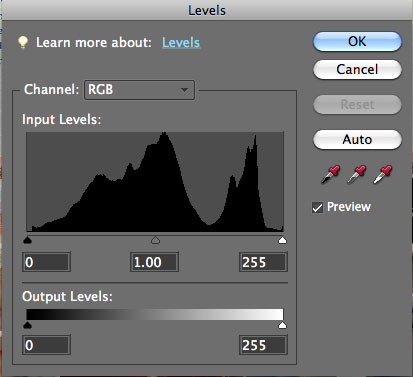
The histogram looks a bit like a mountain range. The left side of the mountains represents the dark in your photo (shadows) and the right side represents the light (highlights). A picture that’s well exposed that has a good variety of light it in will have a histogram that shows the “mountains” extending all the way from the left to the right, like the example up above. However, often your histogram may show the “mountains” all bunched up in the middle, or bunched up near the left side, like this:

A photo of a woman and the levels tool opened in photoshop elements

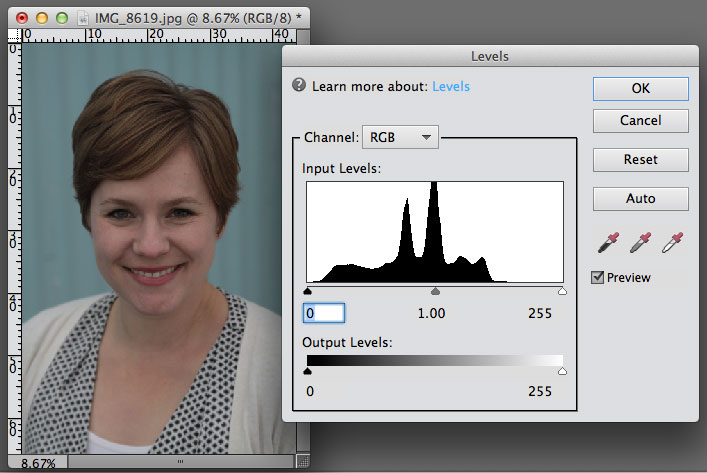
I needed a new headshot, and I liked how this one turned out, except it’s super dark, so there are no mountains on the right side of the histogram. Just beneath the histogram you’ll see three triangular sliders – these are what we’ll use to add brightness to the photo.

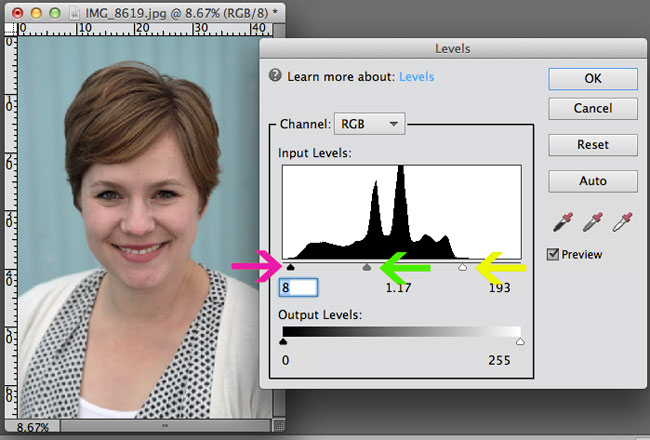
Start by grabbing the rightmost slider, which is for highlights, and pull it toward the left, until it hits the slope of the mountain (yellow arrow in the example photo below). This will brighten your highlights. Grab the middle slider (for midtones) and pull it to the left as well, until skin tones look bright (green arrow). Dont’ worry if the dark portions of your photo start to look washed out at this point – simply grab the leftmost slider and pull it back to the right until it hits the mountain on this side (magenta arrow). This will darken the shadows and add contrast back into the photo.

moving sliders on level bar to adjust lighting on a photo

Hey look – you can see my eyes now! My skin doesn’t look so dark and dull, either. Big improvement!

Now, if you want to take things a step further, you can use a color boost action in Photoshop or Photoshop Elements. I love the free Vivid 2 Action from The Coffeeshop Blog. It’s easy to use and very customizable. I generally stick with the “soft” option at a low opacity, which just adds a bit of a glow without making the photo look “photoshopped”. Find installation and use instructions (as well as tons of other free actions) at The Coffeshop Blog.

Here’s the side-by-side:

photo of a women and edited versions of the same photo

Worth a few minutes of work, right? Once you practice a few times it will go super quickly.

One caution as you start playing with this: when you’re pulling the highlights slider (the one on the right) in toward your mountains, be careful about bringing it past where the mountains start – if you do you’ll be overexposing the brightest parts of your photo which might look even worse. Just pay attention to that as you play around.

For more example photos check out how I brightened black and white photos in this post. Good luck!

how to fix dark or underexposed photos with brightening

underexposed photos that have been brightened

Share this:

  • Tweet
  • Print

Home » photography » photo editing tips » easy fix for dark or underexposed photos | simple photo edit


48 Comments

free email series

NO FAIL CRAFTS + RECIPES

Get my favorite EASY craft and recipe ideas straight to your inbox!

« easy DIY maxi dress with just one seam! | sewing tutorial
update sleeves for summer | long to short + ruching »

Comments

  1. Christina says

    May 22, 2014 at 10:00 pm

    Do you have suggestions for Lightroom users?

    Reply
    • Jelli says

      May 23, 2014 at 2:27 pm

      I’d love to know this too! I tried to do this in Lightroom, but the slider seem to work differently. I’d love a tutorial of this same thing for Lightroom, please!!

      Reply
      • Kyle says

        May 25, 2014 at 12:29 pm

        Great Post! Christina and Jelli: this is super simple to do in LR3. Simply use your “exposure” slider and slide it to the right. This will brighten the overall pic. To add the “vivid” effect, the easiest solution is to simply boost contrast and vibrance…each of which have their own sliders (under the exposure slider).

        Reply
      • Kyle says

        May 25, 2014 at 12:31 pm

        whoops…re: above post, meant to put simply LR (not LR3). 🙂

        Reply
      • Kyle says

        May 26, 2014 at 8:04 am

        Christina and Jelli: I posted a quick tutorial on how to do this in LR 🙂 : http://shultzphotoschool.com/3-easy-steps-to-brighten-dark-images-like-a-pro/ Hope it helps!

        Reply
        • autumn says

          May 27, 2014 at 7:20 am

          Thanks so much, Kyle!

          Reply
          • Kyle says

            May 27, 2014 at 4:48 pm

            No problem Autumn! Love your blog and you do such a great job teaching practical photo tips for moms and dads! Keep up the awesome work!!

    • autumn says

      May 27, 2014 at 2:04 pm

      Sorry, I don’t use lightroom, but one of the other commenters posted a tutorial for doing the same thing in lightroom!

      Reply
  2. Marisela says

    May 23, 2014 at 5:21 pm

    Thank you so much! This is very helpful. I’ve mainly been using my iphone because It feels like too much work to download pictures from the camera. I really should start using my DSLR, but I hadn’t because I wasn’t sure how to edit them to fix the darkness. This, of course gives me an idea on how to fix my iphone pics too. I have already been brightening, but I love the tip on adding the vivid glow. Visiting from Ahalogy 😉

    Reply
  3. Z says

    June 1, 2014 at 2:47 pm

    WOW! Found this on Pinterest and have used it for a bunch of photos that I thought were useless – now I love them! Thanks so much for the easy tutorial. :]

    Reply
  4. Yasmina says

    June 8, 2014 at 9:40 am

    You have no idea how much helpful it is! I actually forgot about doing this, all those disappointment hahaha.
    Thank you!
    Xo
    Yasmina

    Reply
  5. Shannon says

    June 9, 2014 at 2:25 pm

    Perfect timing! I really needed this for some pics that I just took recently. I have Photoshop and never tried “actions” before. Thank you for the introduction.

    Reply
  6. Mark says

    June 30, 2014 at 7:42 am

    I found a really quick way in Photoshop is to duplicate layer, then set that layer to “screen”.

    Reply
  7. Julie R. says

    July 22, 2014 at 12:54 pm

    Thank you so much for these wonderful photography posts! I don’t have a DSLR, just a point and shoot, and so I never tried to take portraits of my children, thinking that I couldn’t get them to look nice enough. But now I feel that I have the knowledge necessary to start trying. Thanks so much for your help!

    Reply
  8. Kelsey Apley says

    August 20, 2014 at 2:31 pm

    Thank you so much, I had no idea you could add actions! I really appreciate you helping me! I hate when pictures are dark, I normally junk them, now I know I can revive them!

    Reply
  9. Becky Porter says

    August 20, 2014 at 7:30 pm

    THANK YOU SO MUCh for this tutorial. I just recently bought a new camera and have been struggling with this issue. I also just got PSE12 and I’ve been using the “auto smart tone” to help remedy this problem, but I love that this is more controllable. I will never be a fabulous photographer or PSE user, but this helps so much! Thank you again!

    Reply
  10. Courtney D. says

    October 29, 2014 at 10:19 pm

    Any tips for overexposed photos?

    Reply
    • autumn says

      November 8, 2014 at 8:58 pm

      Hey, Courtney, sorry to be slow in getting back to you on this. Overexposed photos are a lot harder to fix because the camera didn’t capture any info in the blown out (super white) areas (unless you shot in RAW). You can try pulling the middle slider toward the right to made the mid tones darker, but you’re not going to get back much detail in the very bright areas.

      Reply
  11. Deanna Bushman says

    November 6, 2014 at 8:46 am

    Idk if it’s been mentioned yet, but to help avoid under exposure in the first place, you can use your flash, esp. for pictures like the one with the little girl in front of the sun. It’ll brighten her face without letting that beautiful halo effect on her hair become washed out.

    It seems silly to say, but I think there are more than a few photographers who forget they have a flash. Imo it’s not desirable to use in the controlled conditions you have when shooting food or stuff like that, but when you’re taking pictures of your kids outside, it can be a huge boon.

    Reply
    • autumn says

      November 8, 2014 at 8:27 pm

      Thanks, Deanna – great tip! I get so used to never using my flash indoors that I sometimes forget to pop it up outside in backlit situations.

      Reply
  12. Diatta @ Femme Fitale Fit Club says

    January 26, 2015 at 5:13 pm

    Ok dumb question, how do I access ACTIONS on Photoshop? I downloaded the zip file by The CoffeeShop Blog.

    Reply
  13. Niki says

    March 8, 2015 at 2:42 pm

    Shoot — this doesn’t seem to work with Photoshop Elements 13! Bummer. : (

    Reply
    • autumn says

      March 9, 2015 at 9:25 am

      the levels adjustment doesn’t work in PSE13? That seems really strange – it’s a feature that hasn’t changed in any of the previous versions. I don’t have 13 yet so I can’t try it out – I wonder if anyone else has tried it in 13? Anyway, sorry I’m no help there!

      Reply
  14. Maranda says

    March 19, 2015 at 10:32 am

    So, this program is called Photoshop Elements?

    Reply
  15. Michael P says

    April 5, 2015 at 9:53 am

    SOOOOOOOO EASY, THANKS

    Reply
  16. Jessica says

    May 2, 2015 at 7:40 pm

    Thank you so much for all your tutorials and the link to the photoshop action. I’ve been on photoshop for hours and getting nowhere. I finally have a good looking edit!

    Reply
  17. Lamar barnett says

    May 9, 2015 at 7:02 pm

    Huge! Thanks!

    Reply
  18. Linda Shea says

    May 21, 2015 at 2:57 pm

    Does anybody know if there’s a way to take away the sunburned face look in portraits. I have photoshop Elements.

    Reply
  19. Olivia says

    May 25, 2015 at 11:06 am

    Love this tutorial! Thanks for sharing!

    Olivia @ silverspiralstudio.com

    Reply
  20. Iva says

    July 20, 2015 at 9:08 am

    Do you know how can I get some photoshop like Lightroom? Do I have to buy it I can find i for free?

    Reply
  21. Rara says

    October 30, 2015 at 3:47 pm

    Love your tutorial but I although I’ve downloaded “vivid 2” Idon’t know how to use it!
    Could you add instructions on your tutorial ?
    Because I’m new and I don’t understand coffee shop’s instructions.

    Reply
  22. srinivasan gautam says

    November 22, 2015 at 3:07 am

    Can u guide me the name of the software or article to get like this photo Edits

    Reply
  23. Madel says

    January 17, 2016 at 1:13 pm

    Very useful

    Reply
  24. Renee Janssen says

    January 31, 2016 at 12:09 am

    Thank you so much for this! I have been so terrified to try anything in Photoshop Elements – I’ve just followed these instructions and it worked really well! I’m printing photos of my granddaughters to post overseas to their great grandparents! Great tutorial!

    Reply
  25. manda says

    June 6, 2016 at 6:50 am

    Thanks so much for this was having difficulty with a pic and managed to adjust it in paint.net (free) as I dont have photoshop.

    Reply
  26. Jessica says

    October 17, 2016 at 10:29 am

    This post was so helpful. I had a crappy phone camera and all of the Halloween photos from last year turned out like dark blurs. By using this I was at least able to salvage them (they still aren’t great, but the phone had no flash). Thank you!

    Reply
  27. Bishoy says

    April 9, 2017 at 11:55 pm

    very useful n easy step by step illustration…
    thanks 🙂

    Reply
  28. Janice says

    December 12, 2017 at 7:07 pm

    This will save me hours of time, thank you!

    Reply
  29. tools for photographers and creative professionals says

    August 31, 2018 at 1:38 am

    I don’t know if it’s just me or if perhaps everyone else experiencing issues with your blog.
    It appears as if some of the written text within your content are running off the screen.
    Can someone else please provide feedback and
    let me know if this is happening to them as well?
    This could be a issue with my internet browser because I’ve had
    this happen previously. Thanks

    Reply
  30. Natalia says

    April 26, 2020 at 4:38 pm

    Thanks!!! very helpful

    Reply
  31. subhranil de says

    October 21, 2020 at 10:18 am

    Wow, this is kinda unique article. know the benefits of needle therapy.

    Reply

Trackbacks

  1. CraftCrave | DigiFree | CraftCrave says:
    May 22, 2014 at 1:03 am

    […] easy fix for dark or underexposed photos | simple photo edit – 1 freebie(s)? […]

    Reply
  2. 3 Easy Steps to Brighten Dark Images Like A Pro says:
    May 26, 2014 at 7:46 am

    […] I ended up on this blog from a Pin.  The post was talking about how to brighten dark (underexposed) images in Photoshop or […]

    Reply
  3. Cooking and Food Pornography Photography | project easier says:
    November 7, 2014 at 11:00 am

    […] perfect, or at least closer to it!  Plus lots of good teachers on the interwebs!   I checked out this nifty little tutorial which really helped me edit my photos a little more.  It’s fun to fool around with the […]

    Reply
  4. take photos says:
    January 5, 2017 at 8:01 am

    take photos

    easy fix for dark or underexposed photos | simple photo edit – It's Always Autumn

    Reply
  5. visual pictures says:
    January 6, 2017 at 1:13 am

    visual pictures

    easy fix for dark or underexposed photos | simple photo edit – It's Always Autumn

    Reply
  6. different social networks says:
    January 8, 2017 at 1:07 pm

    different social networks

    easy fix for dark or underexposed photos | simple photo edit – It's Always Autumn

    Reply
  7. social media users says:
    January 8, 2017 at 2:48 pm

    social media users

    easy fix for dark or underexposed photos | simple photo edit – It's Always Autumn

    Reply

Leave a Reply Cancel reply

Your email address will not be published. Required fields are marked *

Recipe Rating


Hey, glad you’re here!

I'm Autumn, a mom of five who loves ice cream, Masterpiece Theatre, and clothes that hide the fact that I eat so much ice cream. When I was 18 I got a job at a craft store and told everyone (regularly) how much I hated crafts. Well, things change! Read More…

Find me here

  • Facebook
  • Instagram
  • Pinterest
  • Twitter

free email series

NO FAIL CRAFTS + RECIPES

Get my favorite craft + recipe ideas straight to your inbox!

Popular Posts

101 fun activities that kids can do at home list on a colorful striped background

101 Fun + Easy Activities kids can do AT HOME

50 easy crafts and activities kids can do indoors! Perfect for cold or rainy days.

50 best indoor activities for kids: easy crafts + games

Gorgeous art projects for kids! Easy art that turns out amazing.

20 easy art projects for kids that turn out AMAZING!

Collage of different paper flowers tutorials

How to make GORGEOUS paper flowers

Various flavors of baked mini donuts made from cake mixes

How to make mini donuts! {baked cake mix donuts recipe}

Blog policy

All posts and pictures are copyrighted by Autumn Baldwin and blog content may not be reposted elsewhere. However, linking back to my content is just fine. You may use one photo as long as you link directly back to the specific post. Thank you!

Please view our Privacy Policy here.

Also, please note that this blog is a participant in the Amazon Services LLC Associates Program, an affiliate advertising program designed to provide a means for sites to earn advertising fees by advertising and linking to Amazon.com.

Copyright © 2021 · Divine theme by Restored 316192.168.1.1 router login

Copyright © 2021 · Divine Theme on Genesis Framework · WordPress · Log in

free email series

NO-FAIL CRAFTS + RECIPES

Get my favorite EASY craft + recipe ideas straight to your inbox!

x