It's Always Autumn

creative tutorials for everyday life

  • Holidays
  • Holidays
    • back to school
    • birthdays
    • Christmas
    • Easter
    • Halloween
    • July 4th
    • Mother’s Day/Father’s Day
    • teacher appreciation
    • Thanksgiving
    • Valentine’s
  • Crafts
  • Crafts
    • crafts + DIY
    • handmade gifts
    • photo crafts
    • kid crafts + activities
  • Recipes
  • Recipes
    • bread
    • dessert
    • main dish
    • side dish
  • Sewing
  • Sewing
    • free sewing patterns
    • sewing for women
    • sewing for kids
    • how to sew
    • gifts
  • Photography
  • Photography
    • beginning photography tips
    • posing tips
    • photo editing tips
  • Tips
  • Tips
    • parenting tips
    • travel tips
    • books I love
  • FAQ

free sewing patterns gifts sewing sewing for kids
September 19, 2014

free pattern for easy to sew teddy bear clothes (build-a-bear)

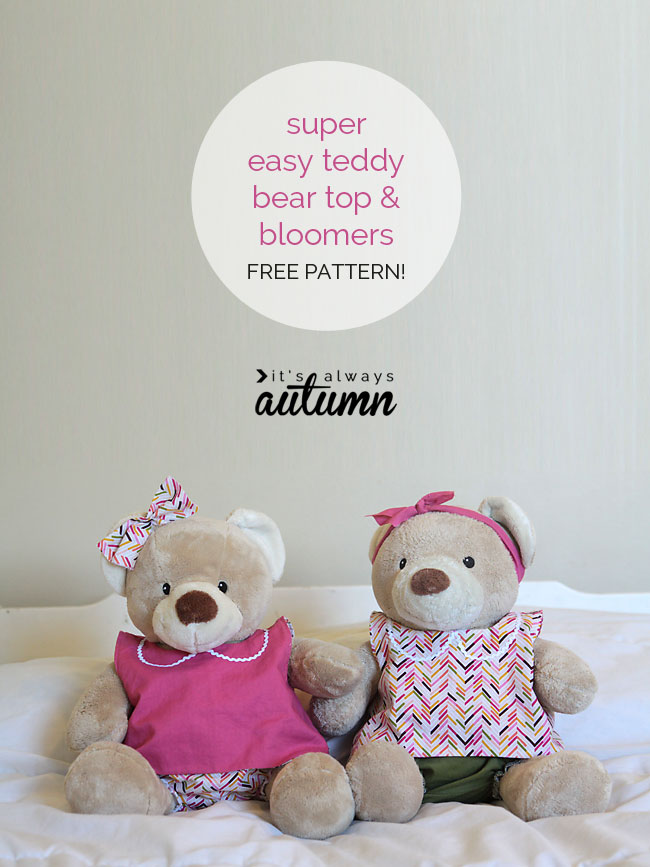
Growing up with four older brothers, my daughter doesn’t have as many “girly” toys as she’d probably like. That’s ok with me – I love watching her play with LEGOS and trains and all those other things hers brothers have enjoyed – but I recently realized that out of the boxful of Build-a-Bear clothes we have, not one outfit is for a girl bear! Apparently all her stuffed animals have been running around nekkid all this time because they don’t want to wear “boy” clothes. I figured it wouldn’t be hard to come up with a cute girly top and bloomers for her teddy bears to wear, and I put together a tutorial and FREE PATTERN so you can make some girly bear clothes too.

teddy bear top and bloomers

Sometimes (read: lots of times) I think something is going to be so simple…and then it isn’t. For one thing, all Build-a-Bear animals are not created equal, as in they vary a surprising amount in size – specifically neck size. That made drafting up this simple pattern a little less simple. Then both my sewing machine and my serger decided to get fouled up on the same day, causing me to complain dramatically to my husband that the sewing universe was conspiring against me.

But once I have a project in mind, you better believe I’m going to finish it, even if that darn top and bloomers did end up taking three times as long as I had planned. But once I finally got the pattern figured out (with an adjustable neck!), I was able to sew up a second set in about an hour, making my daughter (and her bears) very, very happy.

A large brown teddy bear wearing a pink top and green bloomers with a boy around her head

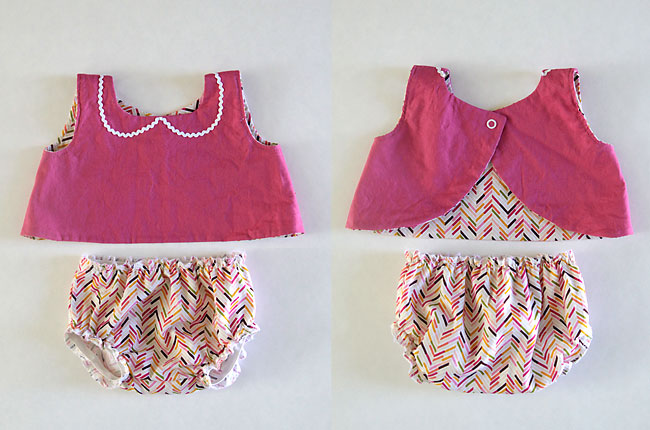
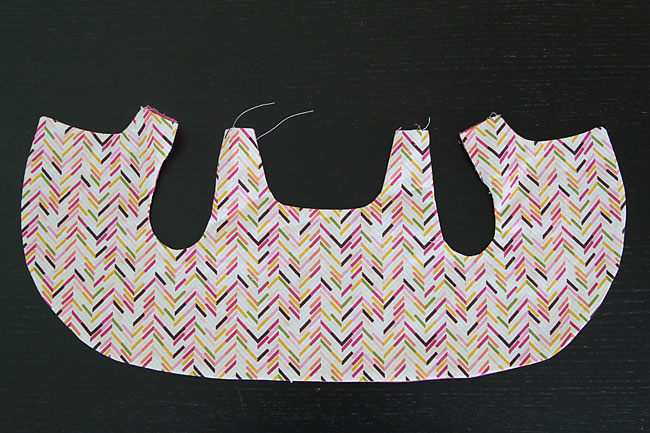
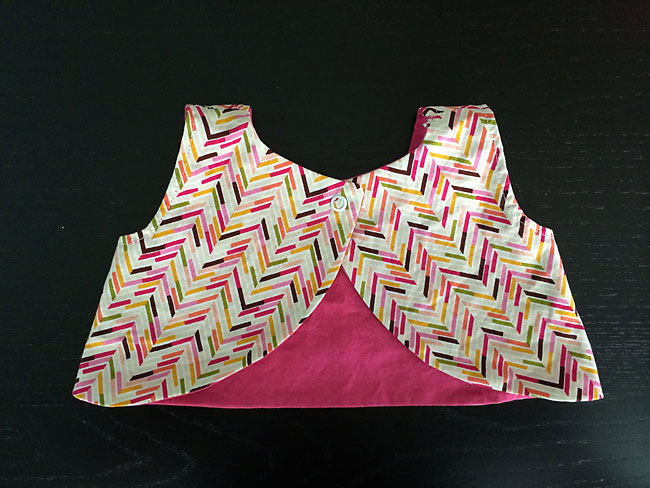
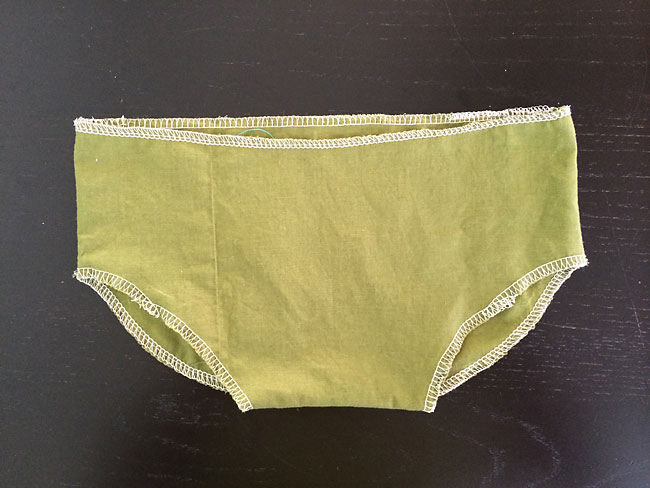
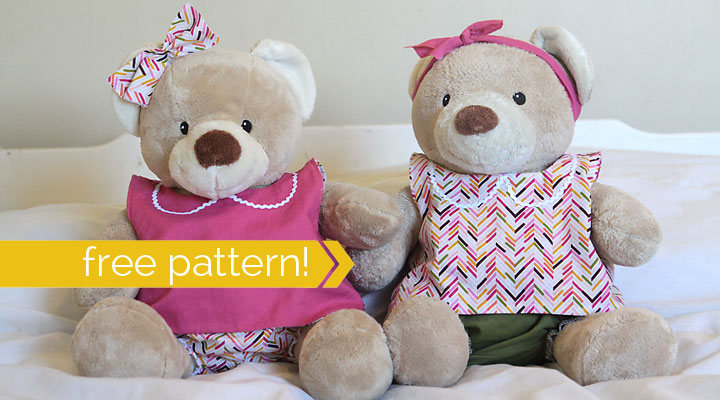
This really is a pretty easy sew, and it should fit most Build-a-Bear sized stuffed animals pretty well. Here’s the front & back view:

Pink top and patterned bloomers for a teddy bear

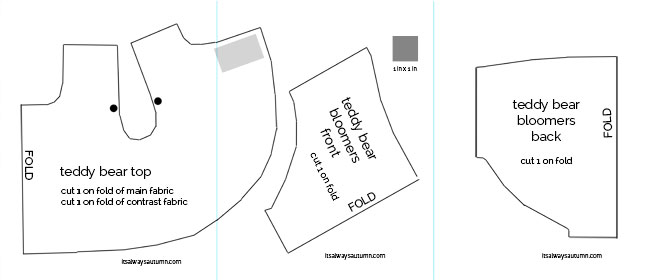
Click here to download the free teddy bear top and bloomers sewing pattern. Print it out, making sure to print at 100% or full size. There’s a grey box that should measure exactly 1 inch by 1 inch. Tape the pieces together (do not trim them first!) and cut out the pattern pieces from fabric, making sure to line up any edge that’s labeled “fold” with a folded edge of fabric.

teddy bear top and bloomers sewing pattern

Here’s how you sew the top. Cut out two top pieces (on the fold), in contrasting colors or prints – did I mention this top is fully reversible? Be careful when you cut because you really need these pieces to be pretty exact.

Teddy bear top pieces cut from pink fabric and lining cut from printed fabric

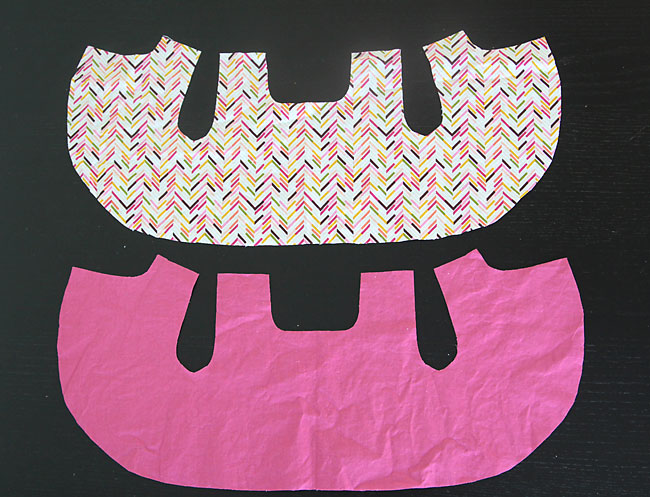
Place the two pieces right sides together, and sew as you see below, leaving the tops of the straps open. Use a 1/4 inch seam allowance. When sewing the curves that will go under the arms, start and stop at the dots marked on the pattern.

top pieces sewn together around edges

Iron a small rectangle of interfacing at the spot where snaps will be attached (marked on the pattern).

rectangle of interfacing fused on where the button will be

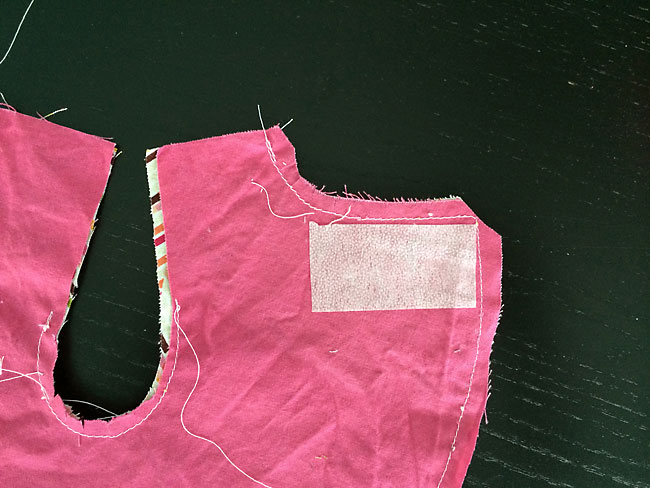
Clip the corners and curves, and turn the whole thing right side out, then iron it all flat.

teddy bear top turned right side out and pressed

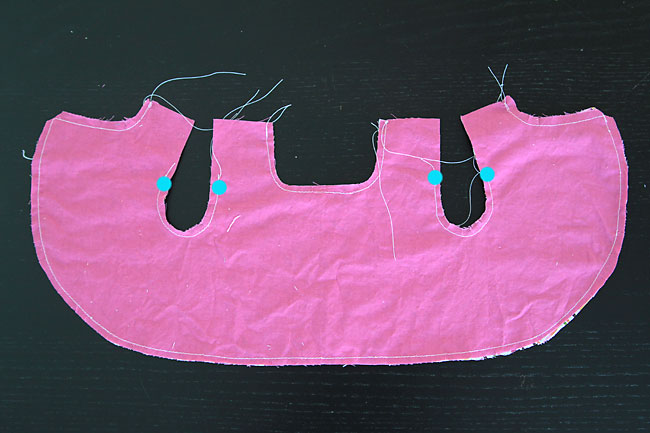
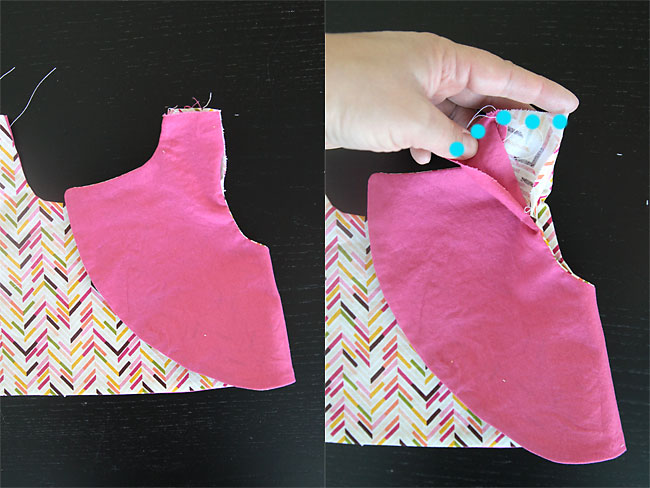
Now, fold back the right side as you see in the 1st photo below, lining up the straps. Open up the straps and sew them together, 1/2 inch from the edge, as shown by the blue dots on the 2nd photo. Make sure the seams in the middle of the straps line up as you sew.

sewing straps of teddy bear top together

Now you can turn the straps back right side out and press them flat, folding in the part that isn’t sewn together. Topstitch close to the edge all around each armhole. You may also top stitch around the hem/neckline if you’d like.

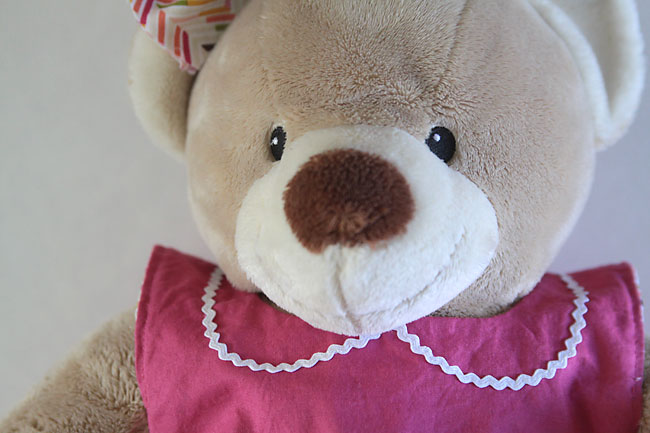
I added a faux collar using mini ric-rac. I just pinned the ric-rac to the front of the top (lots of pins is helpful) and then sewed it on with a straight stitch. I clipped off the excess ric-rac and used a dab of Fraycheck on it.

teddy bear top with ric rac collar sewn on

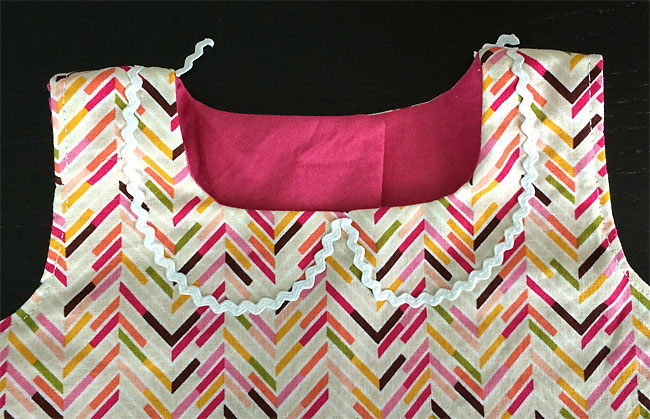
Then I added a snap in the back to close the shirt. NOTE: the bear I was making this shirt for is a little tubby with a thick neck, so I just overlapped the back pieces enough for one snap. If you’re making this for an animal with a skinnier neck, you may want to overlap the back pieces quite a bit more, and use two snaps, one at each corner.

back of teddy bear top with snap closure

Cute, yes?

A teddy bear wearing a top made from a free sewing pattern

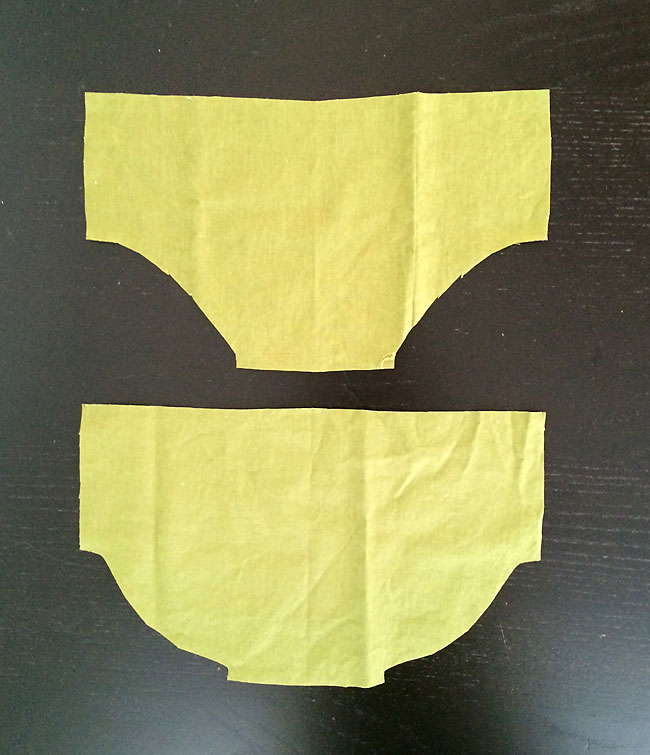
On to the bloomers! Cut one front and one back piece (both on the fold).

teddy bear bloomers front and back pieces

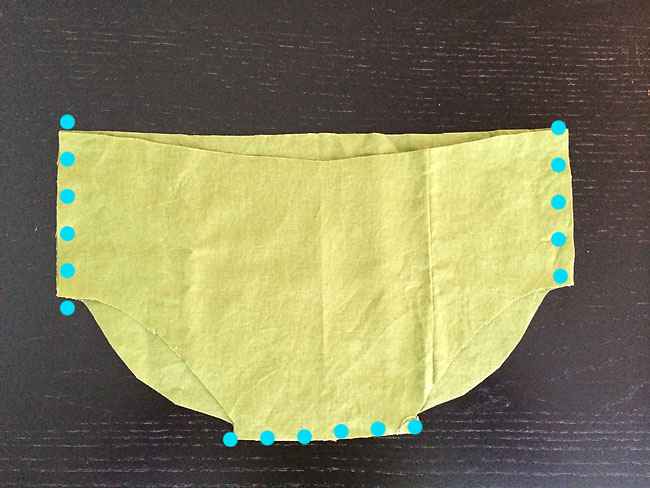
Lay the bloomers front on top of the bloomers back, right sides together, and sew as shown:

bloomers with side and lower seams marked

Next, finish the edges of the waist and leg holes with a serger, or by zigzagging close to the edge. I think it looks cute with a contrasting thread color (I used white) but you can use matching thread if you like.

bloomers sewn together with edges finished by serging

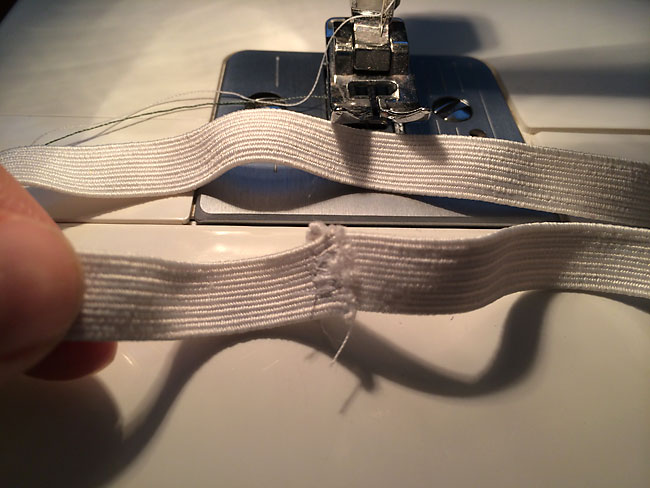
Cut three pieces of narrow elastic (1/4 inch or 1/2 inch wide). One piece should be 14 inches long and the other two should be 7 inches each. Overlap the ends of each piece and sew together, creating three circles of elastic.

A loop of elastic

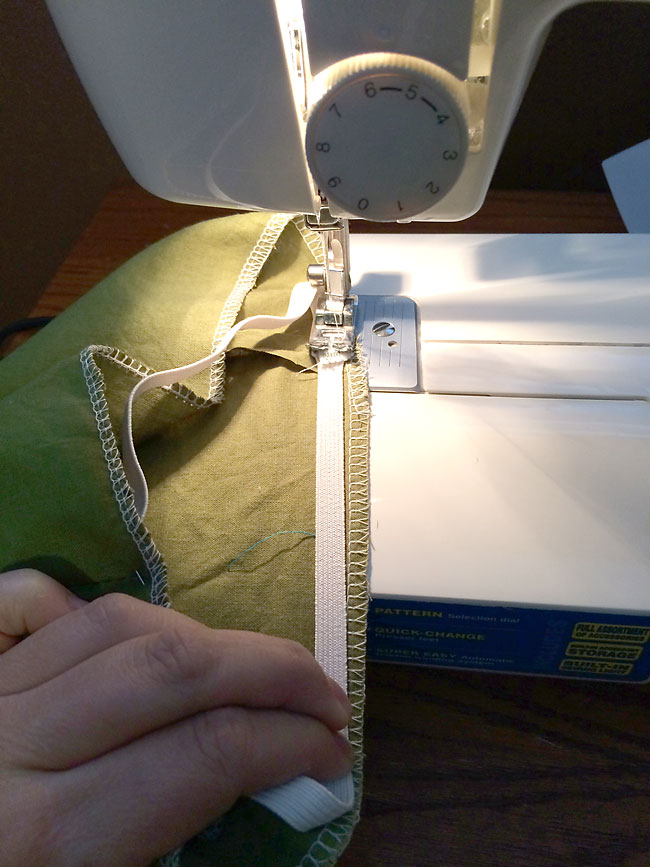
Take the longest piece of elastic and pin it to the waist of the bloomers on the inside, just below your serged or zigzagged edge. The elastic will be quite a bit shorter than the waistline, so distribute it evenly inside the waistline and pin in about 4 places. Sew the elastic to the waistline using a straight stitch, stretching the elastic as you sew so that it lays flat along the fabric. Once it’s sewn on, it will gather up the waist, creating a cute little ruffle along the top.

Sewing the elastic into the top of the bloomers on a sewing machine, elastic stretched to fit

Repeat with the shorter elastic pieces in each leg hole.

Finally, try on the bloomers and snip a hole (straight up and down) for the tail to go through. For the most professional look you could actually put in a buttonhole. Or, if you’re like me, you could just cut the hole and figure you’ll go back and sew a straight stitch around it later to keep it from fraying too much.

Teddy bear tail peeking out through hole in the bloomers

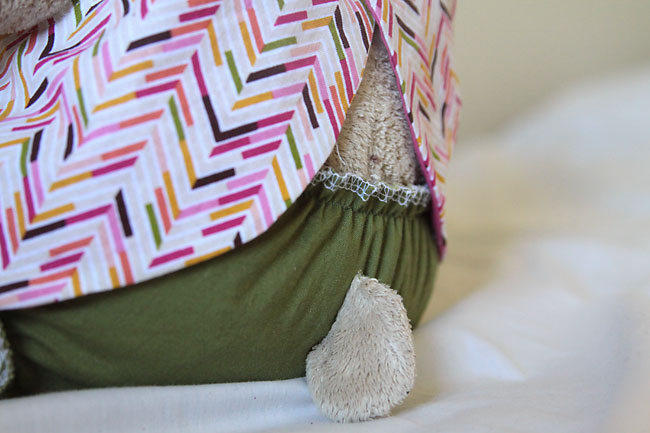
And that’s it! My daughter now has a pair of very well dressed bears.

Teddy bears wearing handmade tops and bloomers

If you make a teddy bear outfit using this pattern, I’d love to see a photo – thanks!

Teddy bears wearing clothes made from a free bear clothes sewing pattern

Want to sew more stuff for your bears? 

Stuffed animal sleeping bag pattern

Teddy Bear pajamas pattern

Teddy Bear robe pattern

Share this:

  • Tweet
  • Print

Home » sewing » free sewing patterns » free pattern for easy to sew teddy bear clothes (build-a-bear)


26 Comments

free email series

NO FAIL CRAFTS + RECIPES

Get my favorite EASY craft and recipe ideas straight to your inbox!

« HUGE list of shows like Downton Abbey + seasons 1-4 giveaway!
20 delicious bread recipes »

Comments

  1. Kerry says

    June 28, 2020 at 4:42 am

    Thank you for doing all the work required to share these patterns with us. My grand daughter has a Build a bear. This afternoon I made two of the little suits like you made and I adapted the pattern to make pyjamas. Now I am going to knit some hats, socks and a sweater. Thanks again.

    Reply
  2. Chris Burrows says

    May 29, 2020 at 3:26 am

    Thank you so much for this pattern. It worked really well & was surprisingly quick to sew! The reversibility is fantastic! I made 2 for my granddaughters as ‘lockdown’ gifts while I can’t be with them.

    Chris

    Reply
  3. Mollieanna says

    April 3, 2019 at 8:02 am

    I make my own full sized clothes and now I can match my teddy, who travels in the car with me, with my outfits.
    I found this pattern very easy to follow, but the shoulders were a bit fiddly for my fat fingers!! But I got there in the end.
    Very pleased with the end results. Thank you for being so clear and explaining every step.

    Reply
  4. Grandma Riley says

    April 4, 2018 at 5:49 pm

    I am enjoying creating the Build-A-Bear pj’s for my granddaughter. I have seen some other patterns that I want to try. So, Thank you..

    I printed out the patterns, but I can’t read the directions because the print is a light color. Any help you can offer would be greatly appreciated.
    Thank you.
    Grandma Riley

    Reply
  5. Betty says

    June 18, 2017 at 9:20 pm

    Thanks for this; I’ve been making boy Build-a-Bear clothes, and need to think about some for the girl. This outfit will be perfect. I found your comment about the neck sizes rather interesting. I had read that Cabbage Patch patterns would work for B-a-B, but still had neck issues. Glad it wasn’t just me . . . .

    I noticed that someone mentioned shoes for these bears. Those things have big feet! I tried a crocheted pair (sneakers) for a different bear, just changing to heavier yarn/larger hook to make them bigger, and that bear couldn’t even get his big toe in that shoe (well, he couldn’t have if he had actually had a big toe, but you get the idea). I re-did the shoes, making sure the sole was as big as the bottom of the foot, and I’ve been told they fit. I haven’t actually seen them on the bear yet, though . . . . I do think crochet may be a better option than trying to sew shoes, though.

    Reply
  6. Kerry Brophy says

    May 27, 2015 at 9:08 pm

    Hi there I am just wondering if you have any other clothes patterns
    for the builder bear bears

    Reply
  7. Helen Rafferty says

    April 24, 2015 at 9:48 am

    I made the teddy bear outfit but can’t figure out how to s post it.

    Reply
  8. Debbie Swick says

    October 3, 2014 at 7:06 pm

    Very cute pattern. I just got a new teddy from the Vermont Teddy Bear Company and want to make some clothes for her. Do you have any idea where I might find a pattern for a 3 foot teddy bear. I would like to find a dress pattern for it.

    Reply
    • autumn says

      October 5, 2014 at 8:30 am

      Oh, I don’t know! I do know my kids would love a bear that huge!

      Reply
  9. Susan M. says

    September 29, 2014 at 10:59 am

    I can’t believe the timing – I was just this a.m. searching for free pattern for these guys. Plan is to take my three granddaughters to Build-a-Bear as a Christmas present and wanted to be able to have an additional outfit for them to open. So thank you so much!

    BTW, I have an entry in this challenge: SAYS IT ALL PLAY MAT. If you or any of your readers would feel compelled to vote for it/me, I would be ever so thankful!

    Off to make bear clothes….

    Reply
  10. Anne says

    September 28, 2014 at 3:16 pm

    Adorable! Thank you for sharing the pattern! I’ve got a Craft Gossip post scheduled for tomorrow morning that links to your tutorial:
    http://sewing.craftgossip.com/free-pattern-teddy-bear-pinafore-and-bloomers/2014/09/29/
    –Anne

    Reply
  11. Shannon says

    September 21, 2014 at 10:21 pm

    Will you make some bear shoes too? Those little BAB shoes are darling but pricy.

    Reply
    • autumn says

      September 24, 2014 at 6:36 am

      Oh, I hadn’t thought of making shoes. I’ve made baby shoes before and they’re a little tricky just because they’re so small. I think build a bear shoes might be even tricker. I’ll have to think through that and see what I can come up with!

      Reply
  12. Lynda says

    September 21, 2014 at 9:21 pm

    Thank you so much! Little man just told me that his B-A-B rabbit needs pjs. This pattern will come in very handy. I just made her a pillow case style dress last night. The things we do for our little ones! LOL.

    Reply
  13. Meghan says

    September 19, 2014 at 6:49 pm

    Thanks so much, what a great tutorial!

    Reply
  14. KT Hom says

    September 19, 2014 at 11:41 am

    Oh! Thank you for this idea PLUS the pattern! I don’t have grandchildren yet, but I’ve started a board on Pinterest called “To Do with Little Ones” and this idea has been pinned!

    Reply
  15. Kathy says

    September 19, 2014 at 10:38 am

    Cutest things ever, hope Lilypad gets some new duds, makes me want to take my serger in to get fixed.

    Reply
  16. Lara says

    September 19, 2014 at 8:36 am

    Thank you for this. The pattern is supposed be JPG not PDF right? I just want to make sure.

    Reply
    • autumn says

      September 19, 2014 at 2:53 pm

      Good catch, Lara! Totally supposed to be a PDF but I put the wrong link in – it’s fixed now. Thanks so much!

      Reply
      • Lara says

        September 20, 2014 at 4:04 pm

        Thank you, funny thing yesterday Build-a-Bear sent me a $12 coupon off of any stuff it animal, so we went and got a new one today. Just in time for me for me to sew something for this new bear – Lilly

        Reply
      • kimberly says

        April 23, 2019 at 9:46 am

        Hey! I have a question about the straps. I still can’t wrap my mind around sewing them and it still be reversible? When I saw it I had a major seem across the top. What am I missing?? Thanks

        Reply
        • Patty says

          November 14, 2020 at 1:39 am

          I hope you made this work. It was a little odd. But once it’s been turned inside out, then you sew across the straps (looks like 4 parts that are RST). That’s so the eels stay on the inside. And she left the opening along the side of the seams so you can sew the top of the straps RST. (I hope this made sense.)

          Reply
        • Patty says

          November 14, 2020 at 1:46 am

          “Eels” should be “seams”. Sorry for the typo.

          Reply

Trackbacks

  1. 30 Fun and Easy Sewing Projects for Kids and Teens - Hello Sewing says:
    October 1, 2017 at 1:52 am

    […] Let your child enjoy making some girly teddy bear clothes by itself. All you need to provide for this project is some fabrics, a piece of elastic, a sewing machine suitable for kids …and lots of enthusiasm. via It’s Always Autumn […]

    Reply
  2. 1-Hour Sewing Projects: 150+ Fun Ideas When You Only Have An Hour – Sewing Essentials says:
    August 9, 2017 at 7:19 pm

    […] Teddy Bear Clothes […]

    Reply
  3. Suede Blog says:
    May 13, 2017 at 9:05 am

    The Teddy Fold Down

    […] dots on the 2nd photo. Make sure the seams in the middle of the straps line up a […]

    Reply

Leave a Reply Cancel reply

Your email address will not be published. Required fields are marked *

Recipe Rating


Hey, glad you’re here!

I'm Autumn, a mom of five who loves ice cream, Masterpiece Theatre, and clothes that hide the fact that I eat so much ice cream. When I was 18 I got a job at a craft store and told everyone (regularly) how much I hated crafts. Well, things change! Read More…

Find me here

  • Facebook
  • Instagram
  • Pinterest
  • Twitter

free email series

NO FAIL CRAFTS + RECIPES

Get my favorite craft + recipe ideas straight to your inbox!

Popular Posts

101 fun activities that kids can do at home list on a colorful striped background

101 Fun + Easy Activities kids can do AT HOME

50 easy crafts and activities kids can do indoors! Perfect for cold or rainy days.

50 best indoor activities for kids: easy crafts + games

Gorgeous art projects for kids! Easy art that turns out amazing.

20 easy art projects for kids that turn out AMAZING!

Collage of different paper flowers tutorials

How to make GORGEOUS paper flowers

Various flavors of baked mini donuts made from cake mixes

How to make mini donuts! {baked cake mix donuts recipe}

Blog policy

All posts and pictures are copyrighted by Autumn Baldwin and blog content may not be reposted elsewhere. However, linking back to my content is just fine. You may use one photo as long as you link directly back to the specific post. Thank you!

Please view our Privacy Policy here.

Also, please note that this blog is a participant in the Amazon Services LLC Associates Program, an affiliate advertising program designed to provide a means for sites to earn advertising fees by advertising and linking to Amazon.com.

Copyright © 2021 · Divine theme by Restored 316192.168.1.1 router login

Copyright © 2021 · Divine Theme on Genesis Framework · WordPress · Log in