It's Always Autumn

creative tutorials for everyday life

  • Holidays
  • Holidays
    • back to school
    • birthdays
    • Christmas
    • Easter
    • Halloween
    • July 4th
    • Mother’s Day/Father’s Day
    • teacher appreciation
    • Thanksgiving
    • Valentine’s
  • Crafts
  • Crafts
    • crafts + DIY
    • handmade gifts
    • photo crafts
    • kid crafts + activities
  • Recipes
  • Recipes
    • bread
    • dessert
    • main dish
    • side dish
  • Sewing
  • Sewing
    • free sewing patterns
    • sewing for women
    • sewing for kids
    • how to sew
    • gifts
  • Photography
  • Photography
    • beginning photography tips
    • posing tips
    • photo editing tips
  • Tips
  • Tips
    • parenting tips
    • travel tips
    • books I love
  • FAQ

free sewing patterns sewing sewing for women
October 13, 2017

cute + easy Peplum Top Pattern and sewing tutorial

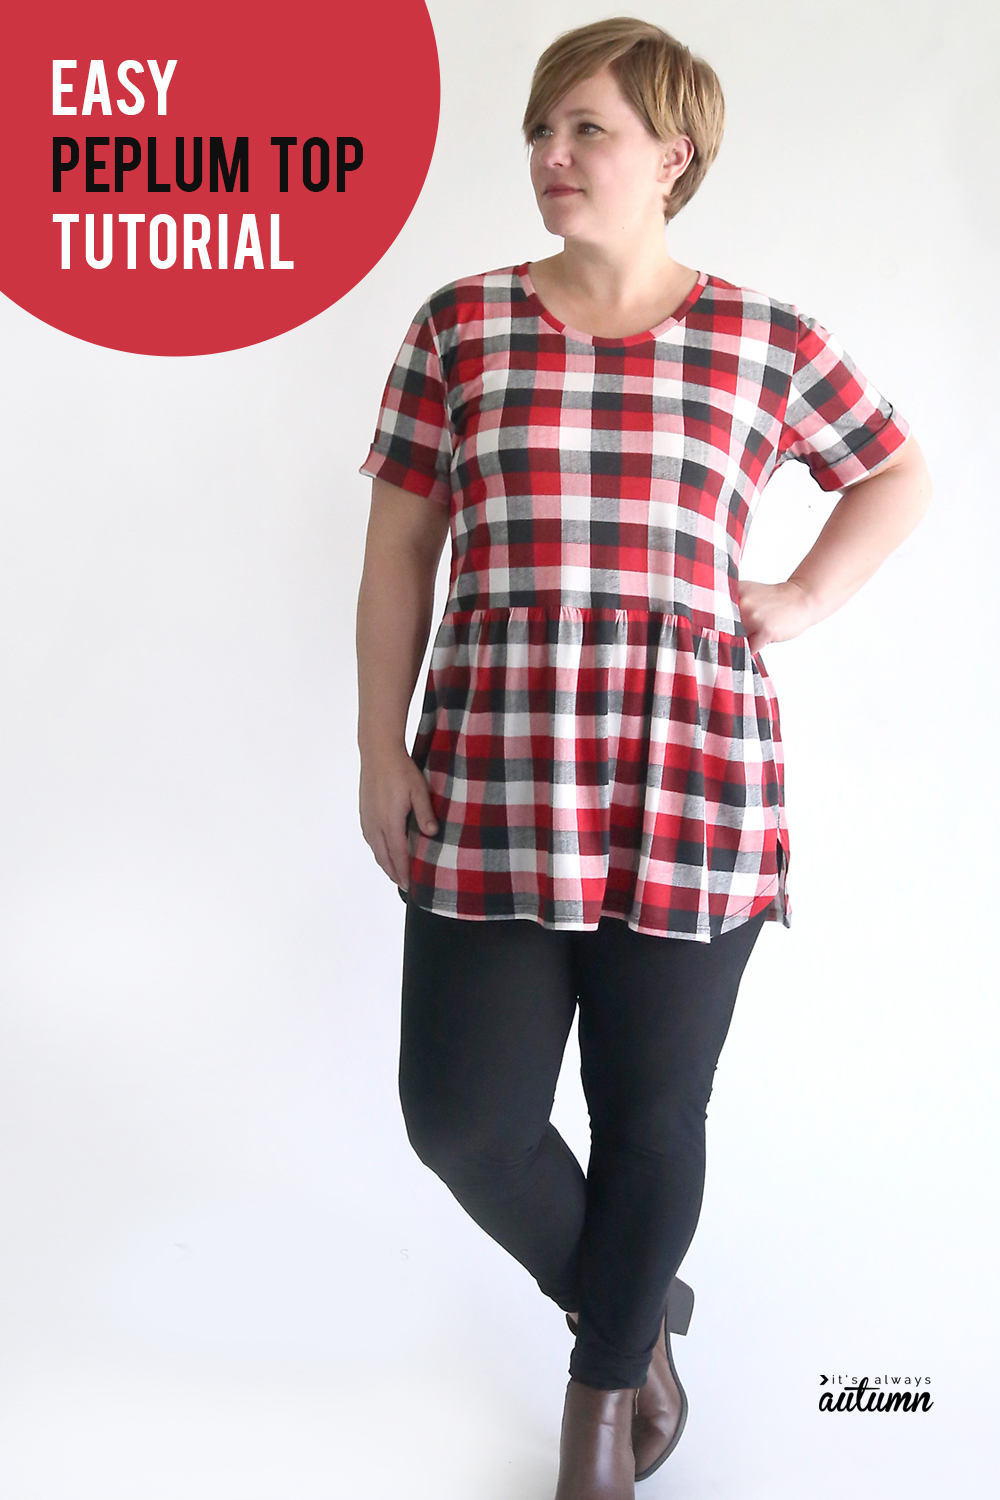
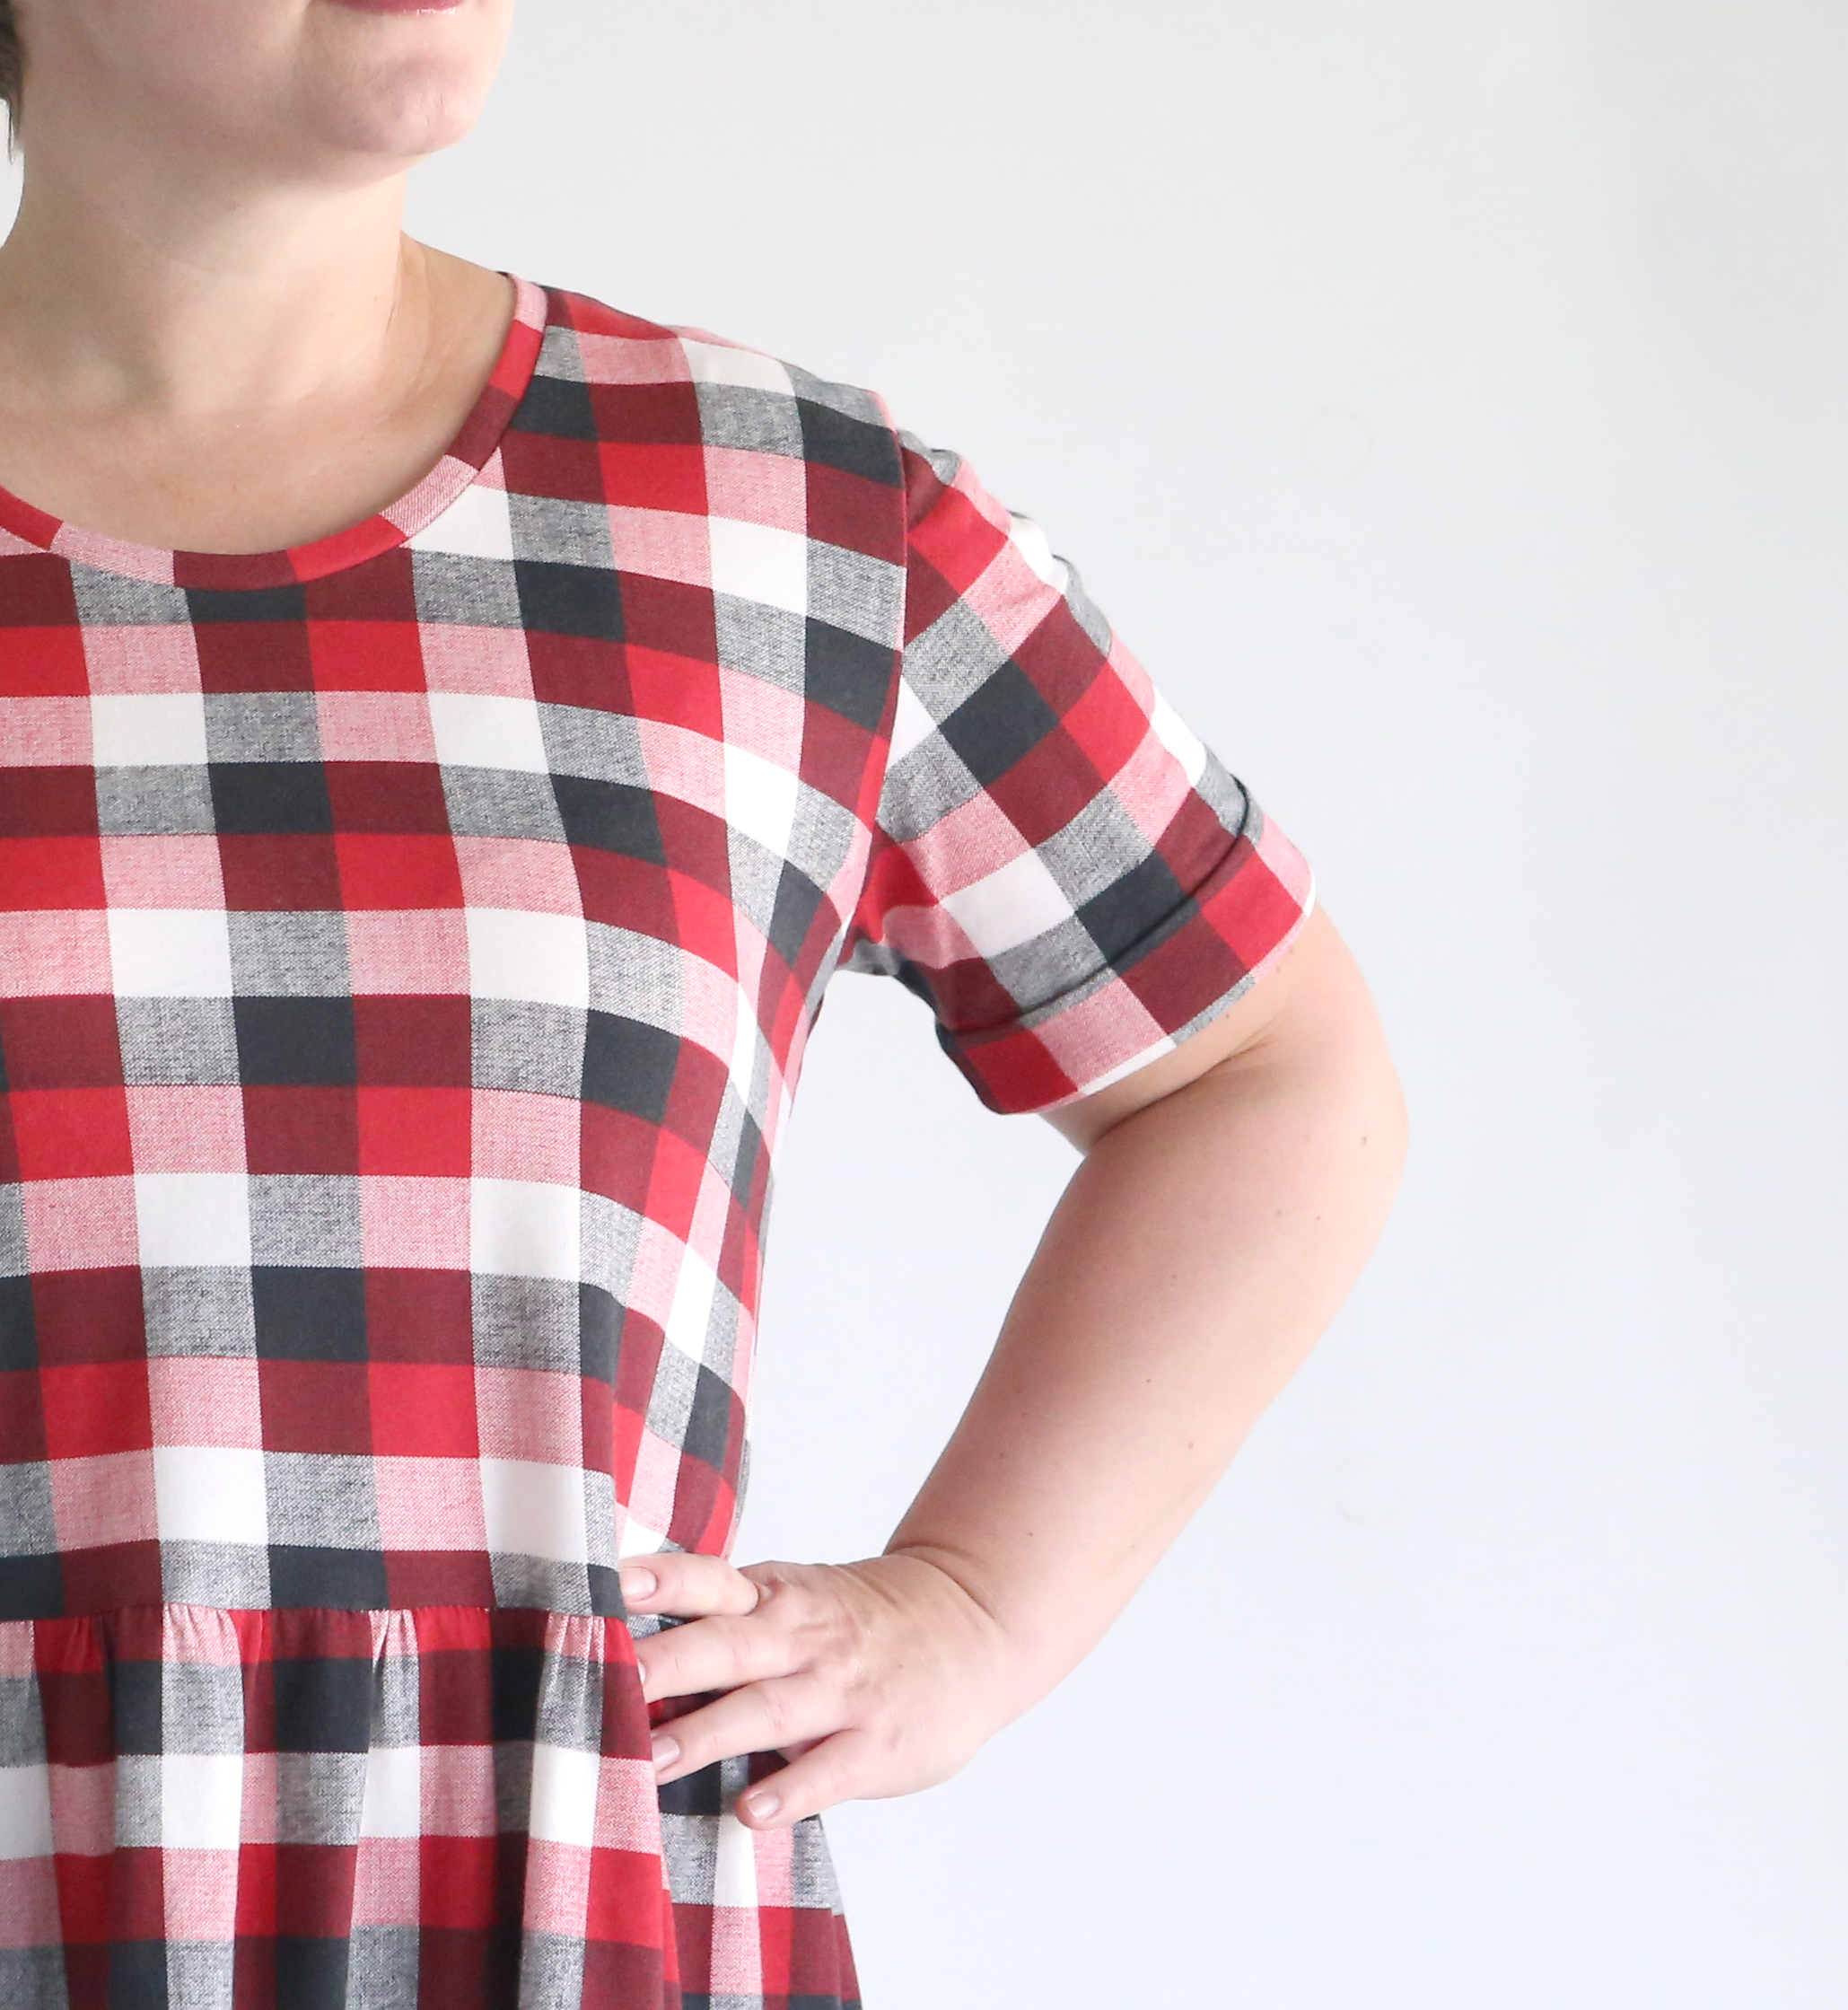
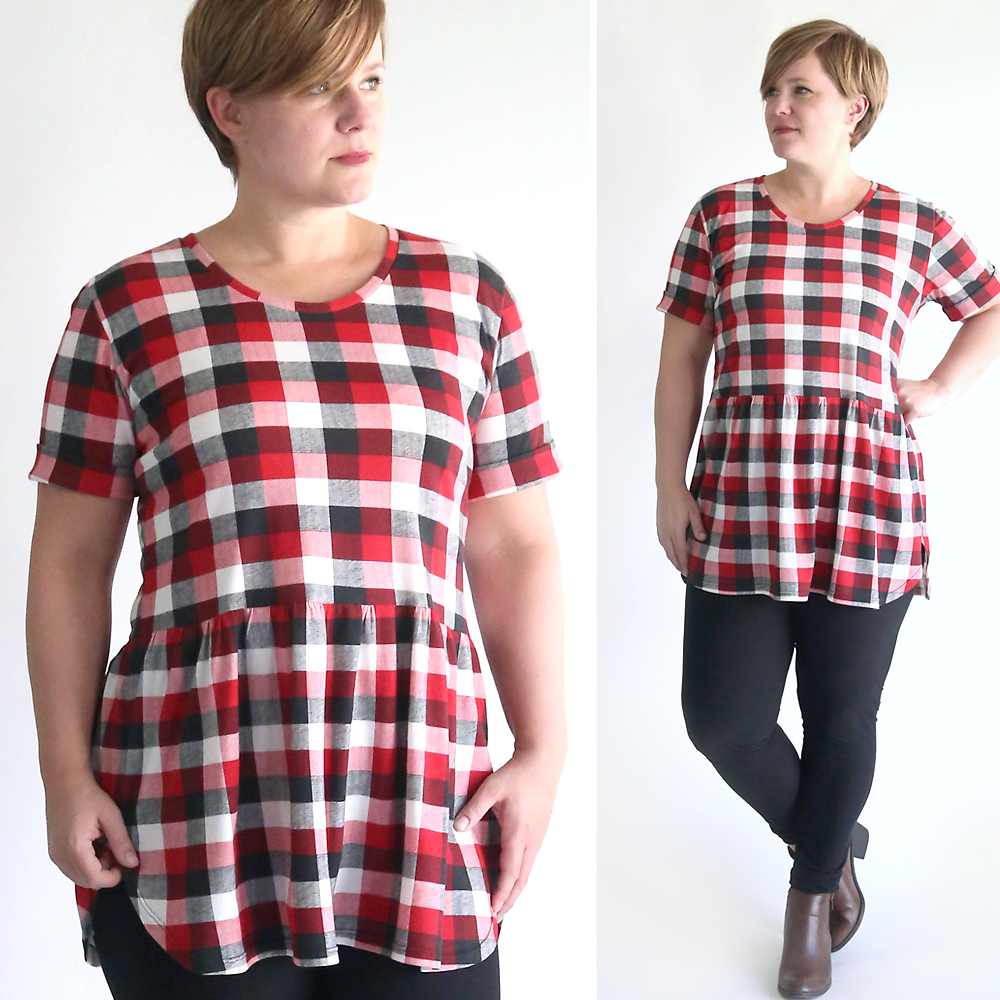
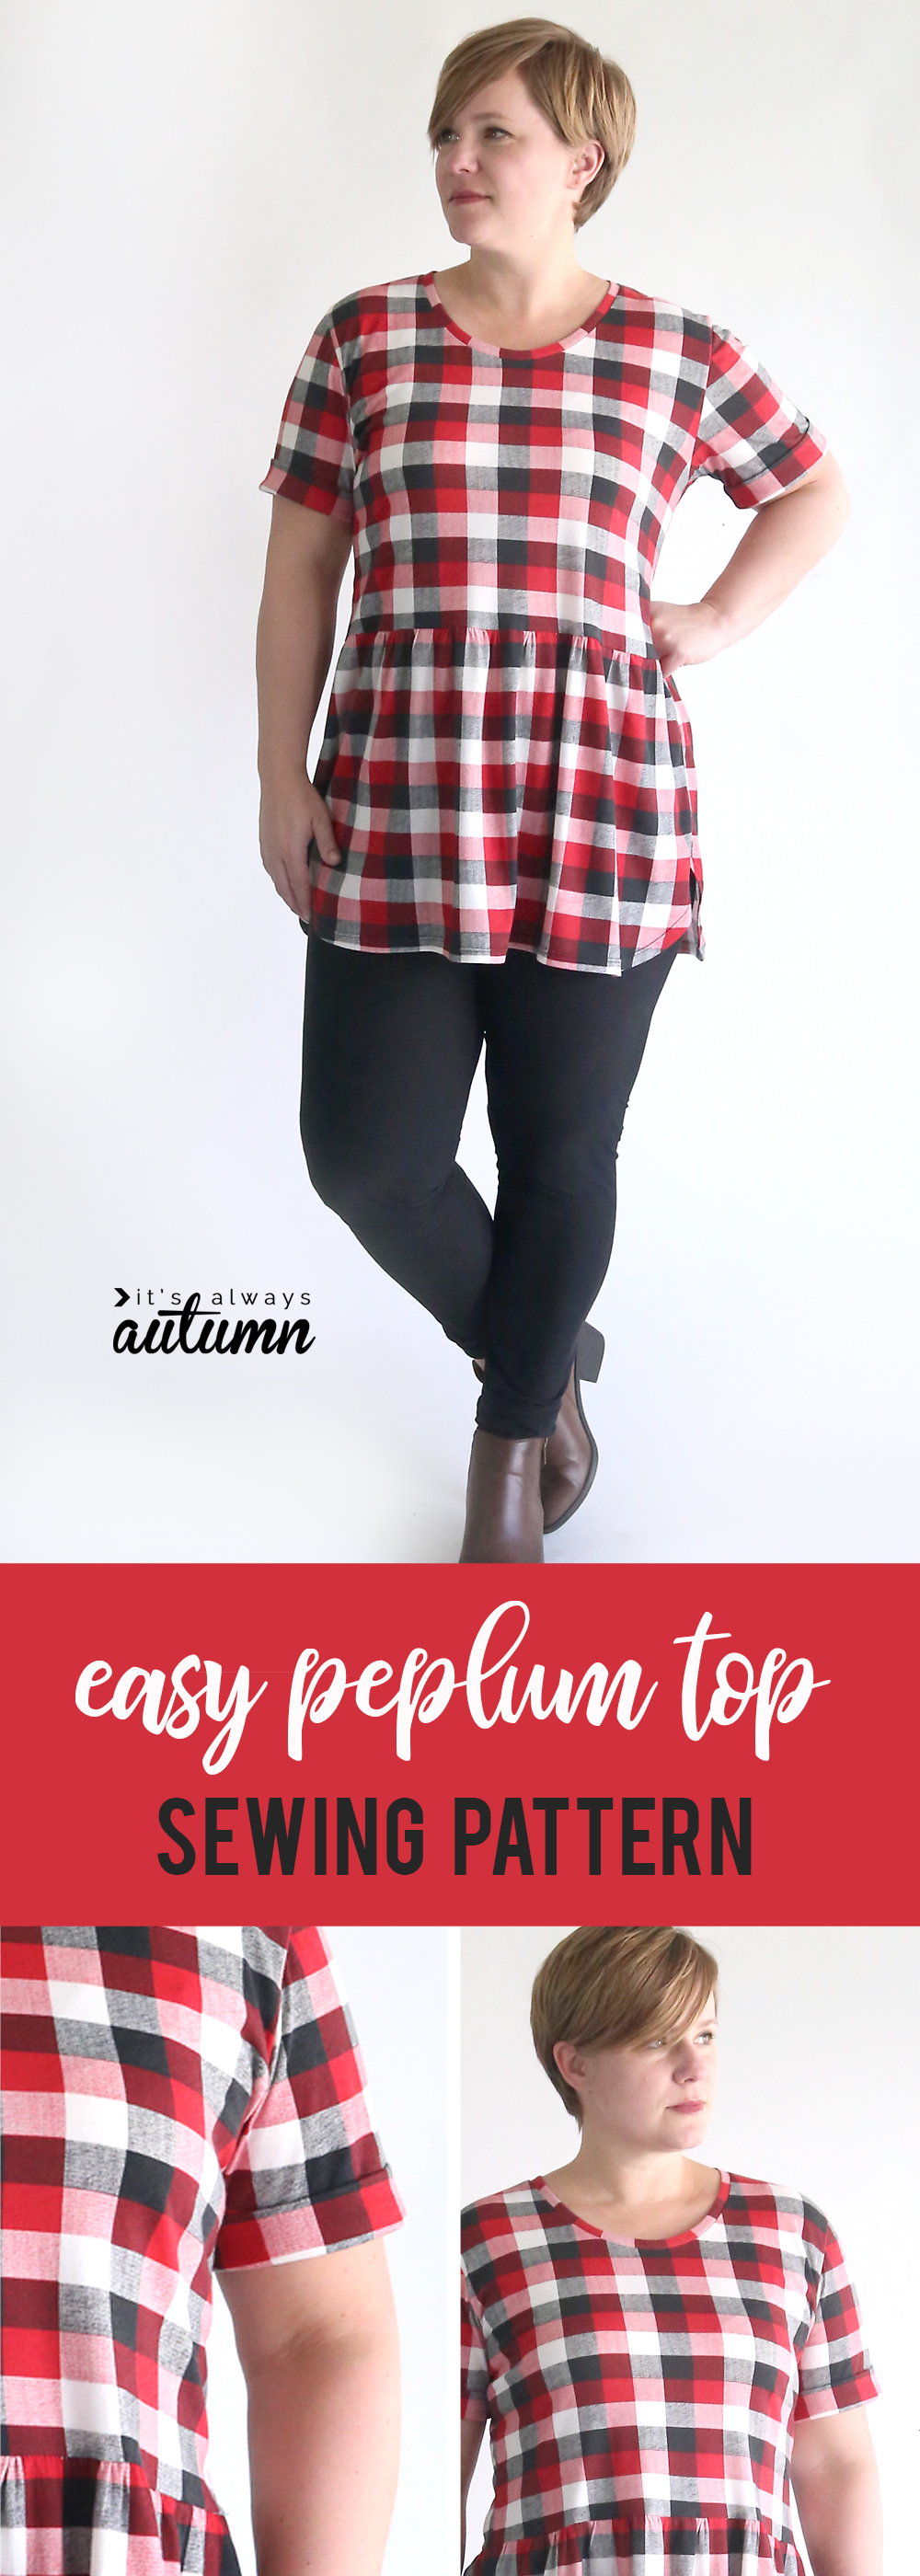
In today’s post: Learn how to make this cute top with a free peplum top pattern and sewing tutorial. Make it shirt length to wear with jeans or tunic length to wear with leggings!

I had a friend over yesterday for a little sewing pow wow and she was surprised to find that I sew on a rather inexpensive Brother sewing machine (affiliate link). Since I blog about sewing, she’d expected me to have something a bit fancier. I reminded her that most of my sewing is very basic: I like easy projects that I can finish quickly, and the things I sew don’t require fancy stitches, multiple presser feet, or any of the other bells and whistles you get on an expensive machine. I don’t have anything against pricey machines, I’ve just come to the conclusion that the machine I have meets my needs, especially when my most recent project is another easy to sew tunic.

Easy peplum top sewing tutorial.

I already shared a new free swing tunic sewing pattern and showed you how I hacked my Breezy Tee pattern to make a tunic. Today’s post will show you how to turn my Classic Tee pattern into a Peplum Top Pattern. Actually, you can use this same technique to turn any t-shirt pattern into a peplum top!

A woman wearing a plaid peplum top made from a free sewing pattern and leggings

I made my peplum tunic length because I want more things to wear with the LulaRoe knockoff leggings I found on Amazon (affiliate link) for half the price, but you can make yours any length you like!

Peplum Top Pattern

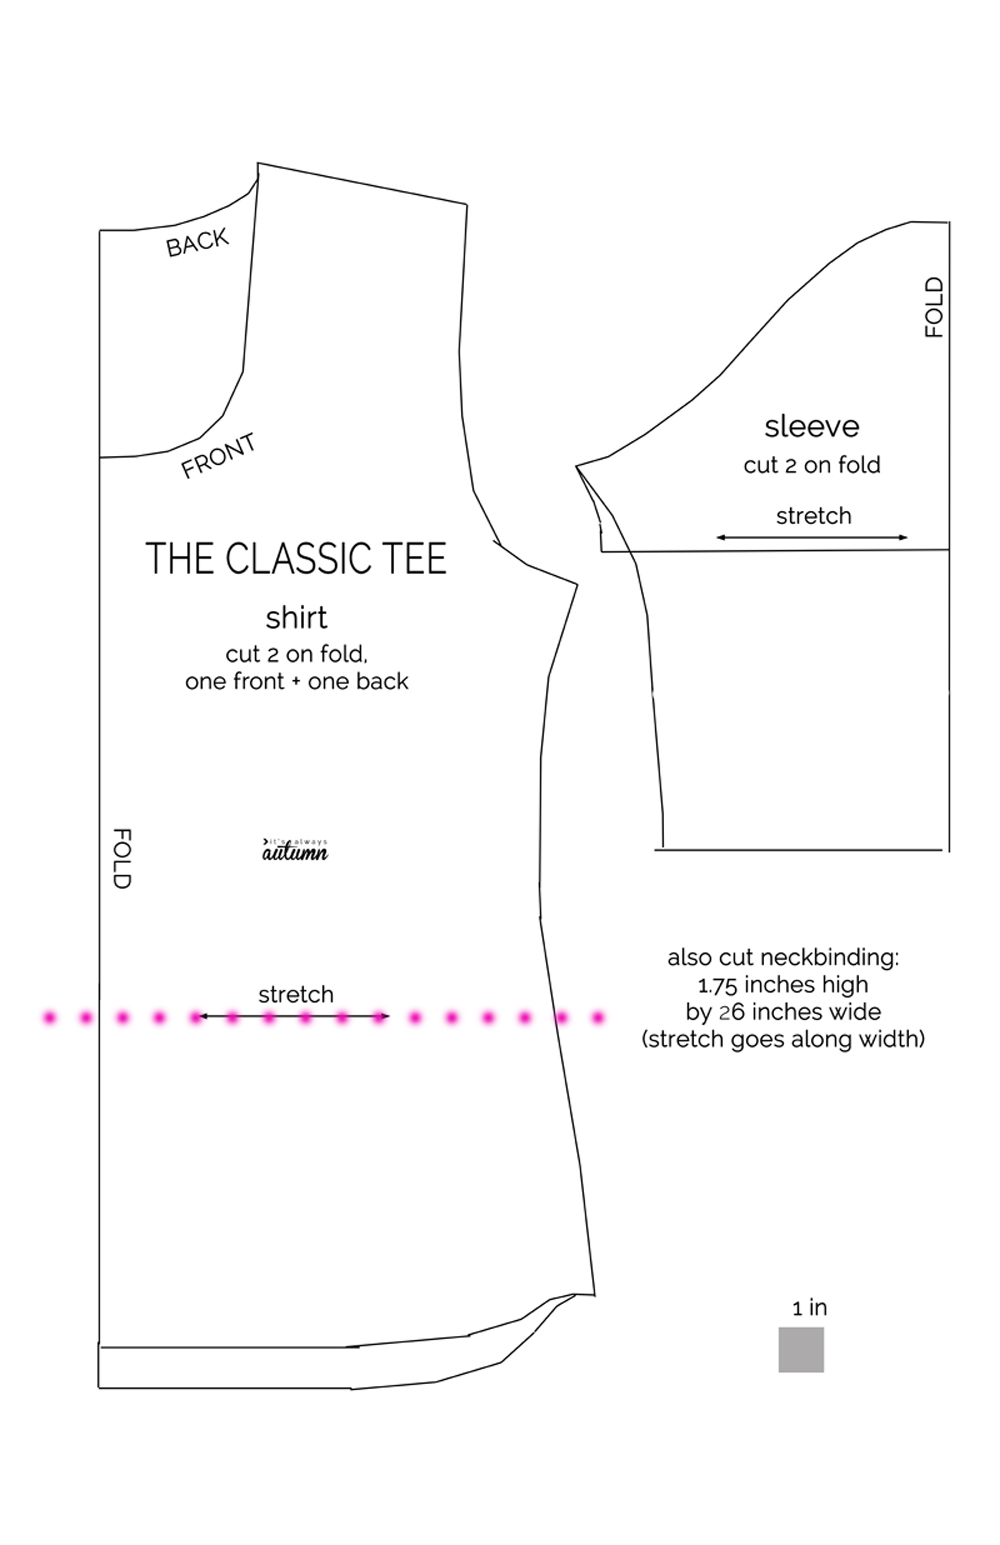
You’ll want to start by clicking over to my Classic Tee post and downloading the pattern. It is a size large (about a 38 inch bust). If you are a different size, you can visit this post to find another free t-shirt pattern you can use.

If you are using my pattern, print it out at 100% or full size and butt the pages together without overlapping. Tape and cut out the pattern, choosing short or elbow length sleeves. Then slice the pattern right along the arrow under the word “stretch” as shown in the photo below. This is right about the natural waist, so if you want your gathered peplum to be attached higher or lower, then slice the pattern accordingly.

The classic tee shirt sewing pattern, marked at the waist

Then it’s time to cut out your pieces from fabric. I used 1.5 yards of prewashed knit (stretchy) fabric. You *may* be able to make this from woven (non-stretch) fabric, it just obviously won’t have as much give, so don’t do that unless you’ve made my Classic Tee before and know that it’s roomy enough on you to fit in a fabric that doesn’t stretch.

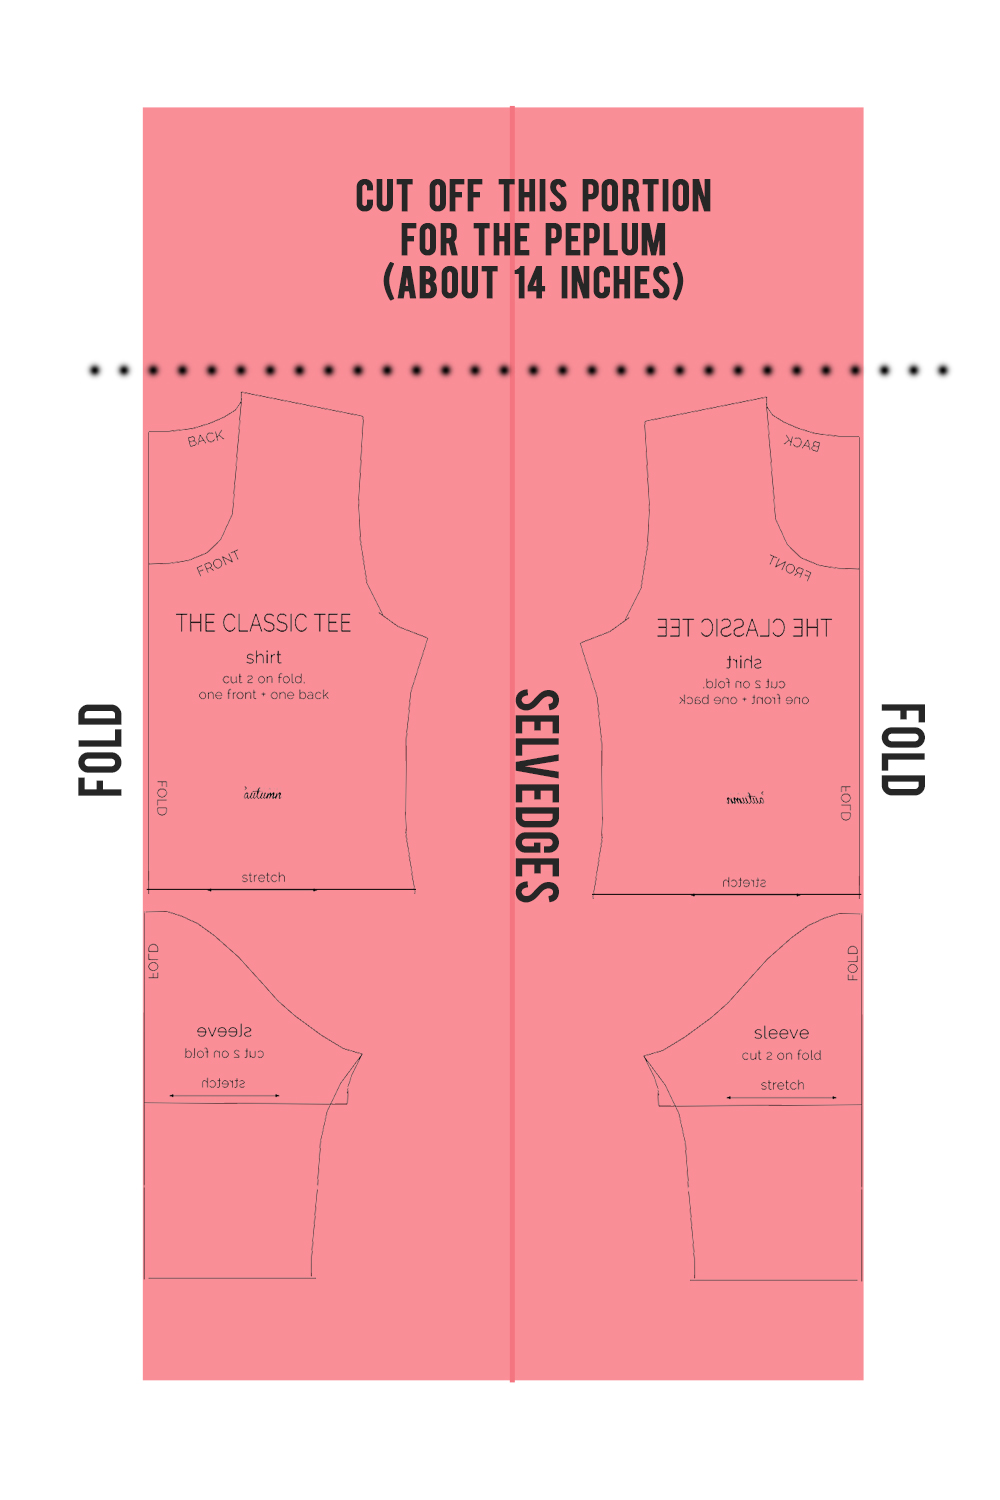
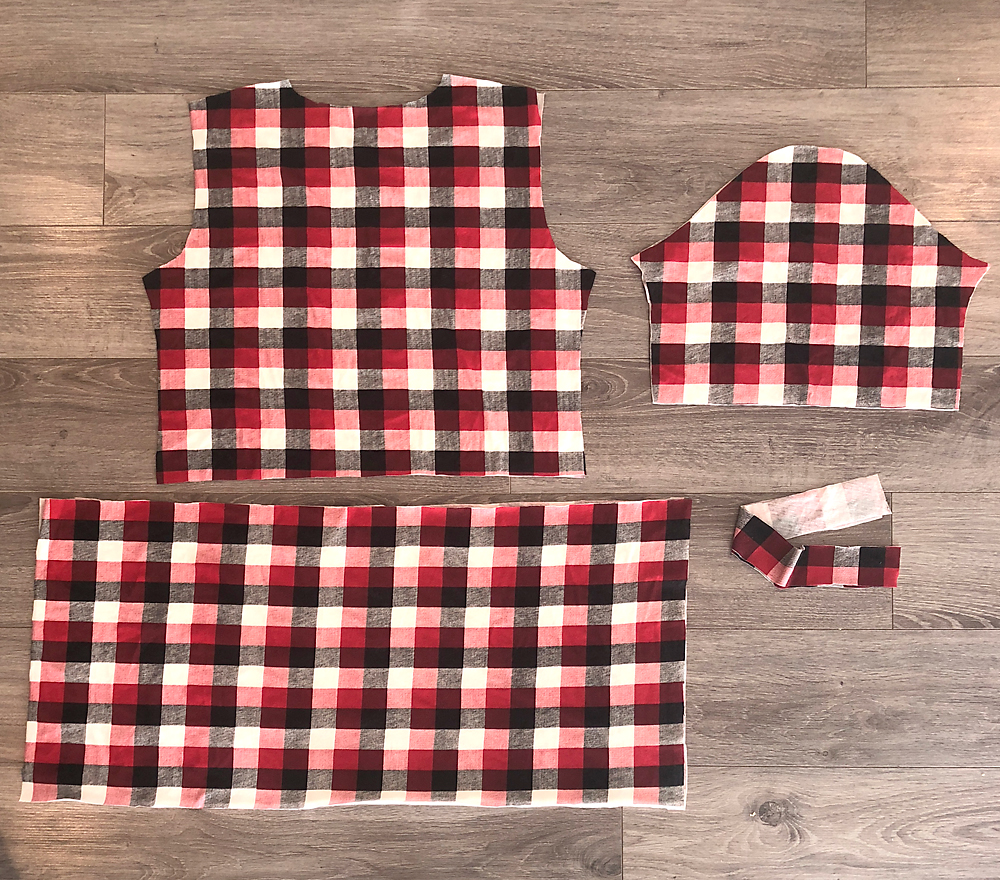
I laid the fabric down flat, then folded in each selvedge edge to meet at the middle. First, I cut off the top 14 inches and then cut that into 2 pieces that were each 14 inches tall and 30 inches wide. Then I cut the front and back shirt pieces and two sleeve pieces, all on the fold as shown below. I also cut a strip about 24 inches long and 1.75 inches high to use as the neckbinding.

Peplum top pattern cutting diagram

Now, one thing you will notice in looking at the photos of this shirt is that the peplum is not super gathered. It’s not much wider than the shirt itself. I did this on purpose because I don’t like a lot of extra volume at my waistline, but you can cut your rectangles for the peplum any width you’d like. So if you want more gathers in the peplum, use 2 full yards of fabric and then cut TWO 14 inch strips off the top instead of just one. Then you can cut your peplum pieces 14 inches tall by however wide you’d like.

Here are my pieces all cut out:

Pattern pieces for peplum top: top front and back, skirt front and back, sleeves, neckbinding

How to sew a peplum shirt

Start by sewing 2 rows of gathering stitches along the top (long) edges of the peplum pieces. I sew the gathering stitches 1/4 inch from the edge, and then just over 1/2 inch from the edge. Use pins to mark the bottom of the shirt piece in quarters, and then mark the top of the peplum piece in quarters as well. Pull on the bobbin threads to gather up the peplum until it is the same width as the bottom of the shirt, as shown below.

Peplum shirt piece with skirt gathered to the same width

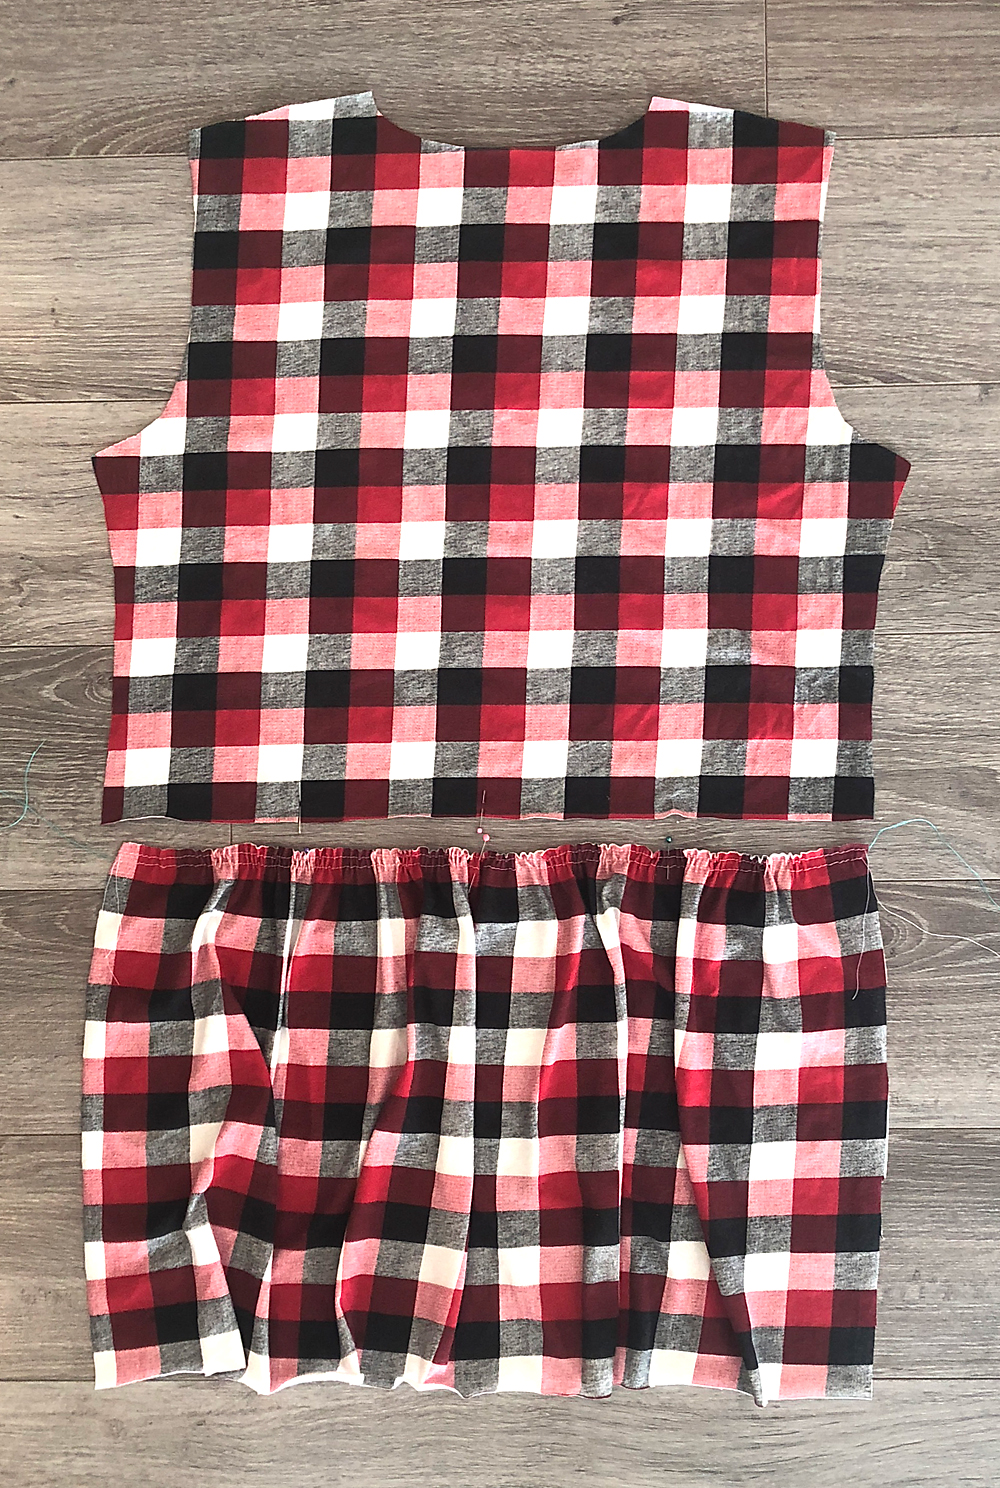
Be sure to evenly distribute the gathers and match up the pins. Then lay one shirt piece right sides together with one gathered peplum piece, matching the pins, and sew together using a 1/2 inch seam allowance. Remove the gathering stitches, and press the peplum down:

Peplum top front piece with skirt sewn on

Note: If you are using a very stretchy fabric, it’s possible that the gathers will start to stretch out the bottom of the shirt piece, making it look really wide. If this happens, you’ll want to sew some narrow elastic into the seam you just sewed to stabilize it. You can see an example of that in this post.

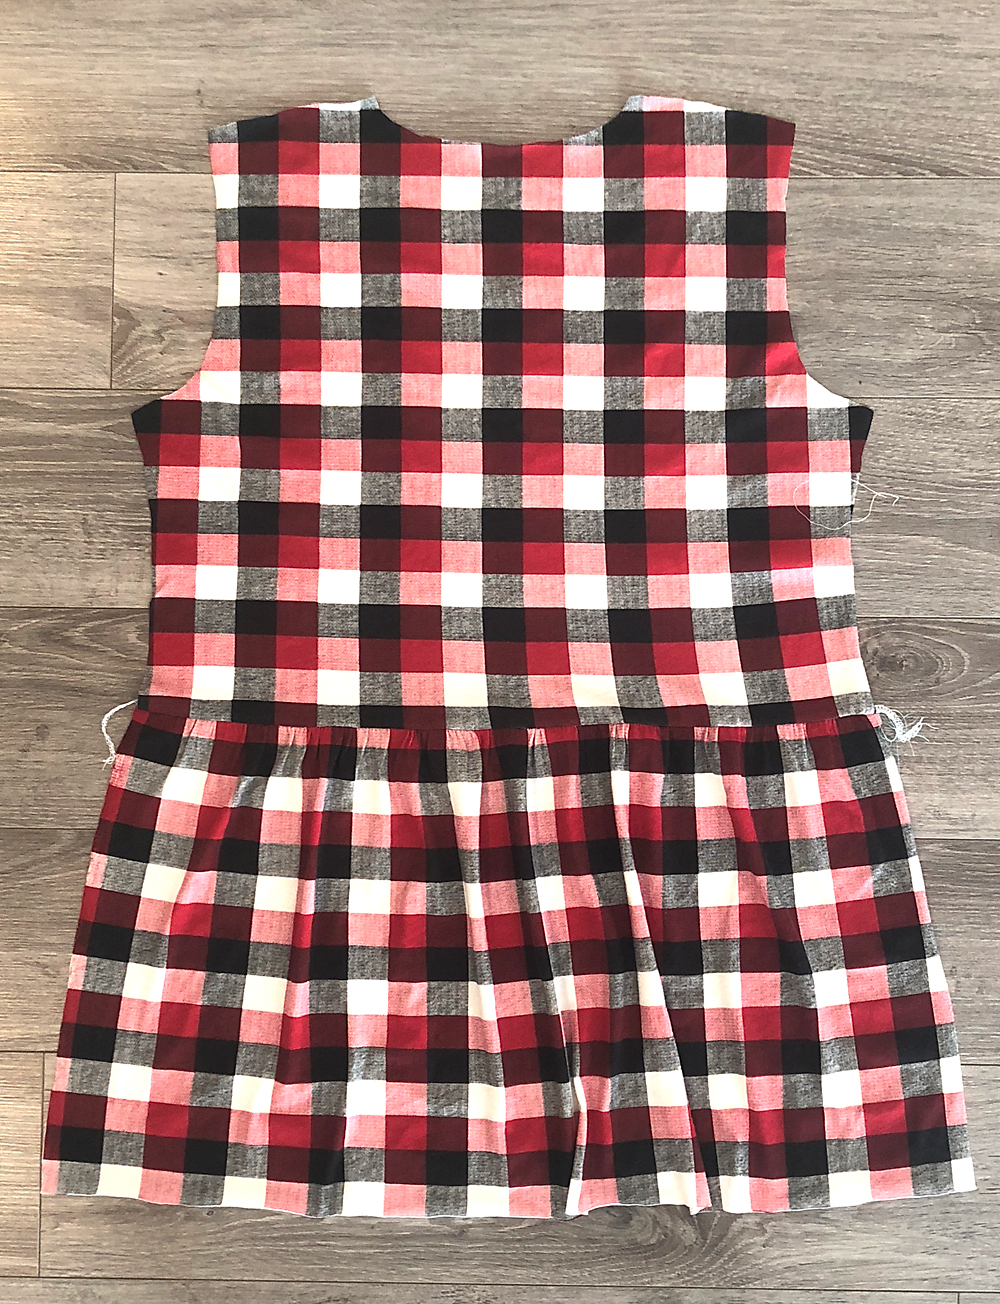
Once you’ve attached peplum pieces to the front and back shirt pieces, you can continue to sew up the shirt the same way as is described in the Classic Tee post.

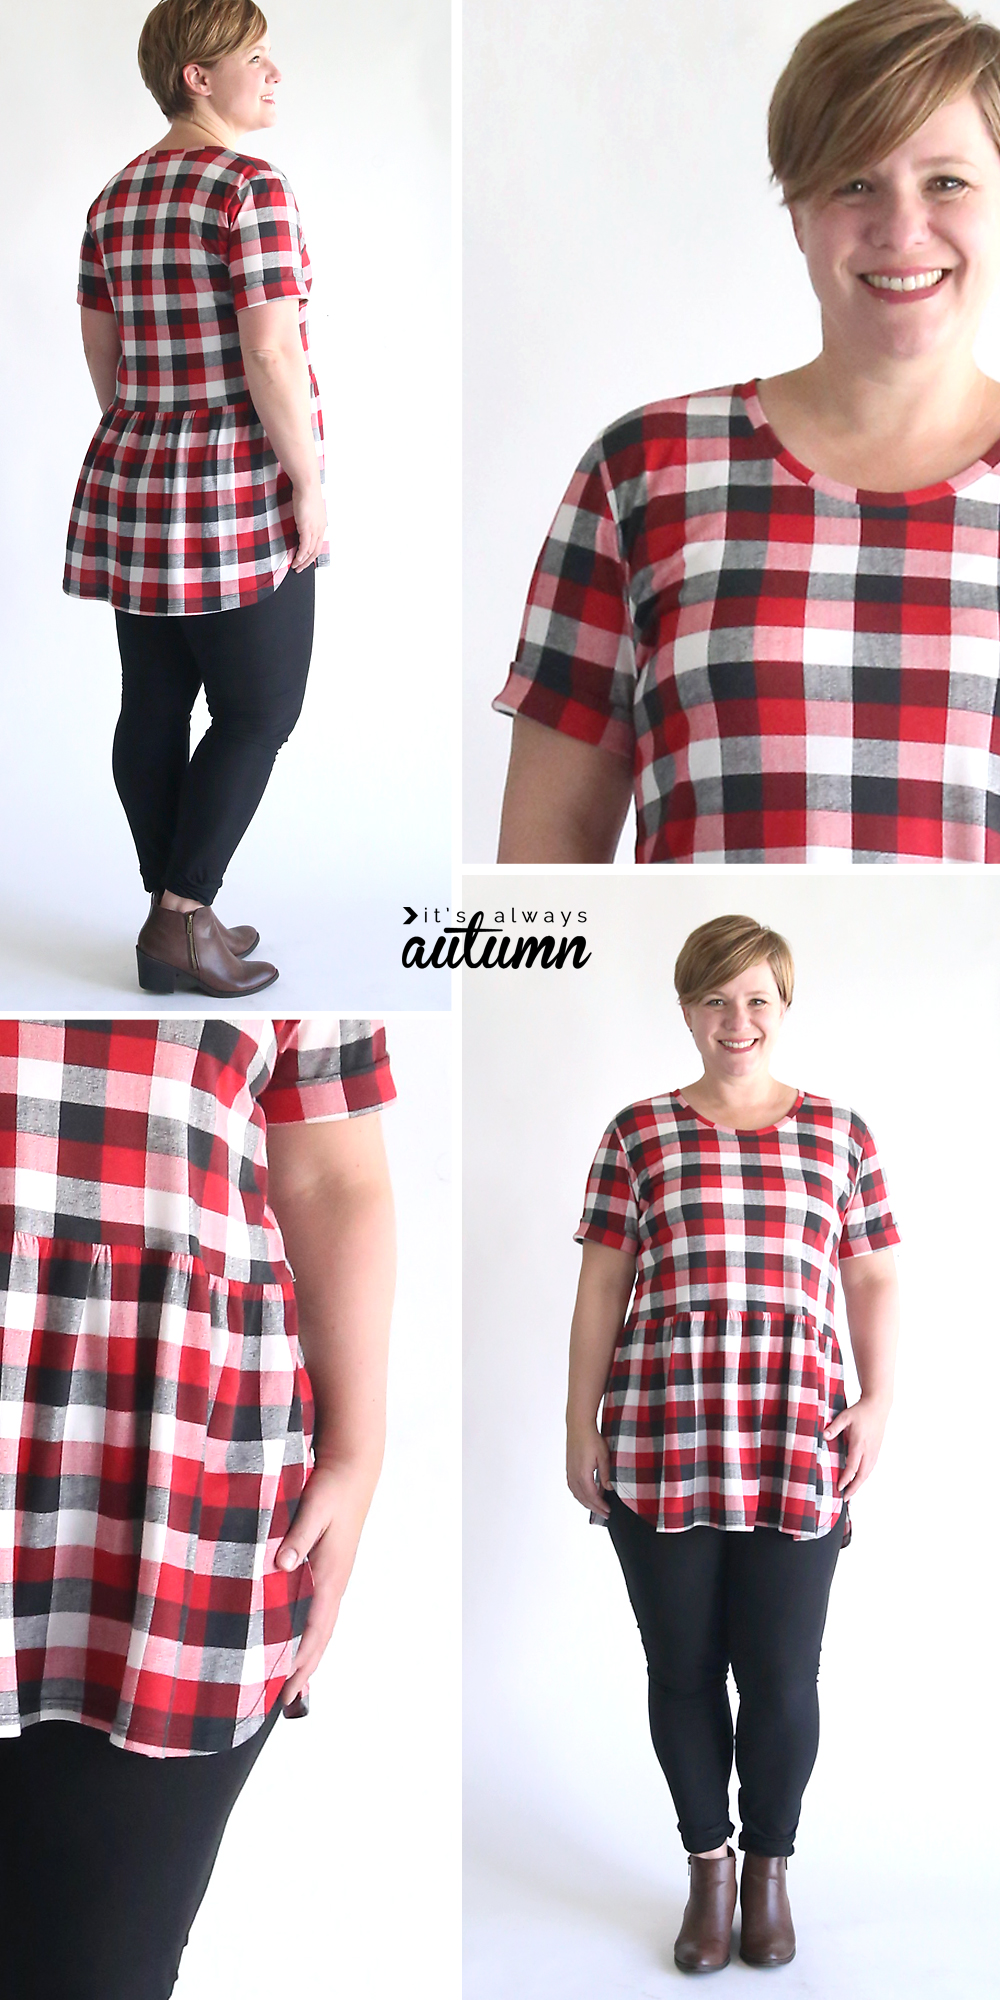
Finish the neckline, hem the sleeves, and hem the bottom of the shirt. For my sleeves I cut the elbow length but turned up a very wide hem. Then I rolled the bottom of the sleeve up once to make it look cuffed.

Person wearing a t-shirt with cuffed sleeve

I also curved up the sides of the peplum pieces and hemmed them BEFORE sewing the side seams together.

A woman wearing a plaid peplum top made from a free sewing pattern and leggings

Good luck making your own new shirt with this peplum top pattern. Thanks for reading!

A woman wearing a plaid peplum top made from a free sewing pattern and leggings

Share this:

  • Tweet
  • Print

Home » sewing » cute + easy Peplum Top Pattern and sewing tutorial


8 Comments

free email series

NO FAIL CRAFTS + RECIPES

Get my favorite EASY craft and recipe ideas straight to your inbox!

« How to change the background in your photo to something way cooler!
Cute + easy mini Halloween donuts to make with your kids »

Comments

  1. SewingSpider says

    March 27, 2020 at 9:18 am

    Thanks for the pattern & great instructions! Love the longer length for covering my belly pooch?

    Reply
  2. Autumn says

    February 6, 2020 at 9:10 am

    Just wanted to say THANK YOU for all of these amazing free patterns and tutorials. It makes us beginners real easy to get started. I like peplums because they’re great for pregnant mommas. How could you make this top nursing friendly? Like adding an invisible zipper? Thank you for all of your work it is really appreciated.

    Reply
  3. Brief Summary says

    July 1, 2019 at 2:11 am

    Great job, it looks fashionable and comfortable! I studied at the university as an engineer in sewing production, but I do not work in my specialty, I am not good at sewing, I work as a writer at an educational site and keep my blog.

    Reply
  4. Anita says

    October 17, 2018 at 6:19 pm

    Mmm … thinking that I might lengthen this and make into a comfy dress! Thanks for all your lovely sewing patterns and tips

    Reply
  5. Liz says

    January 26, 2018 at 8:17 pm

    Hi!
    I’m curious where the link for the sleeve patterns are? I see the patterns for the tee’s, but none have sleeves nor are there any links to the sleeves.
    Did they disappear?

    Reply
  6. Esther says

    December 15, 2017 at 3:54 am

    Thanks for the pattern & great instructions! Love the longer length for covering my belly pooch?

    Reply
  7. shehnaz kadri says

    November 13, 2017 at 10:25 pm

    Very nice article. Helpfuk for the beginners.The explanation with images and proper cut pattern is really very good,I feel wth this…also the selection of proper sewing machine is important. I would like to recommend here Brother cs6000i computerised sewing machine. It really gives nice finishing.

    Reply
  8. Kristie says

    November 4, 2017 at 8:10 pm

    I just saw this. I have been tossing around an idea like this in my head, but with the gathering on the back. Yours is so cute though. I now need to decide which way I want to do it. Thanks for sharing a great basic pattern that is so easy to embellish.

    Reply

Leave a Reply Cancel reply

Your email address will not be published. Required fields are marked *

Recipe Rating


Hey, glad you’re here!

I'm Autumn, a mom of five who loves ice cream, Masterpiece Theatre, and clothes that hide the fact that I eat so much ice cream. When I was 18 I got a job at a craft store and told everyone (regularly) how much I hated crafts. Well, things change! Read More…

Find me here

  • Facebook
  • Instagram
  • Pinterest
  • Twitter

free email series

NO FAIL CRAFTS + RECIPES

Get my favorite craft + recipe ideas straight to your inbox!

Popular Posts

101 fun activities that kids can do at home list on a colorful striped background

101 Fun + Easy Activities kids can do AT HOME

50 easy crafts and activities kids can do indoors! Perfect for cold or rainy days.

50 best indoor activities for kids: easy crafts + games

Gorgeous art projects for kids! Easy art that turns out amazing.

20 easy art projects for kids that turn out AMAZING!

Collage of different paper flowers tutorials

How to make GORGEOUS paper flowers

Various flavors of baked mini donuts made from cake mixes

How to make mini donuts! {baked cake mix donuts recipe}

Blog policy

All posts and pictures are copyrighted by Autumn Baldwin and blog content may not be reposted elsewhere. However, linking back to my content is just fine. You may use one photo as long as you link directly back to the specific post. Thank you!

Please view our Privacy Policy here.

Also, please note that this blog is a participant in the Amazon Services LLC Associates Program, an affiliate advertising program designed to provide a means for sites to earn advertising fees by advertising and linking to Amazon.com.

Copyright © 2021 · Divine theme by Restored 316192.168.1.1 router login

Copyright © 2021 · Divine Theme on Genesis Framework · WordPress · Log in