
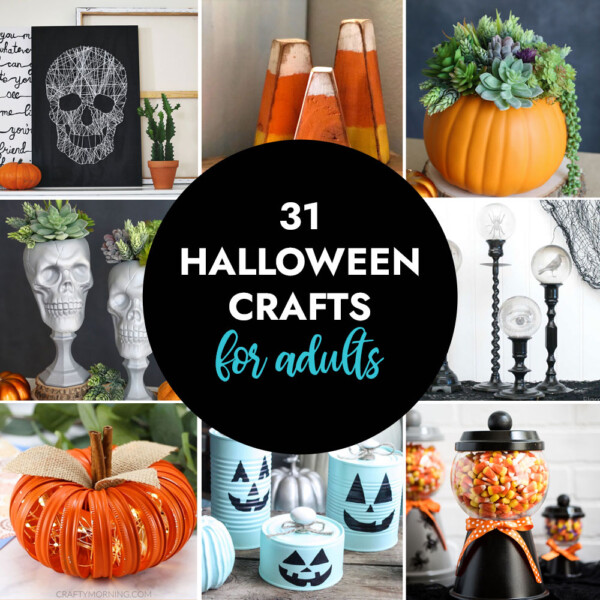
In today’s post: Learn how to make your own version of the viral Michael’s ghost wall art – it’s so easy! This is a fun Halloween craft you can complete in about an hour.
Easy Halloween Craft
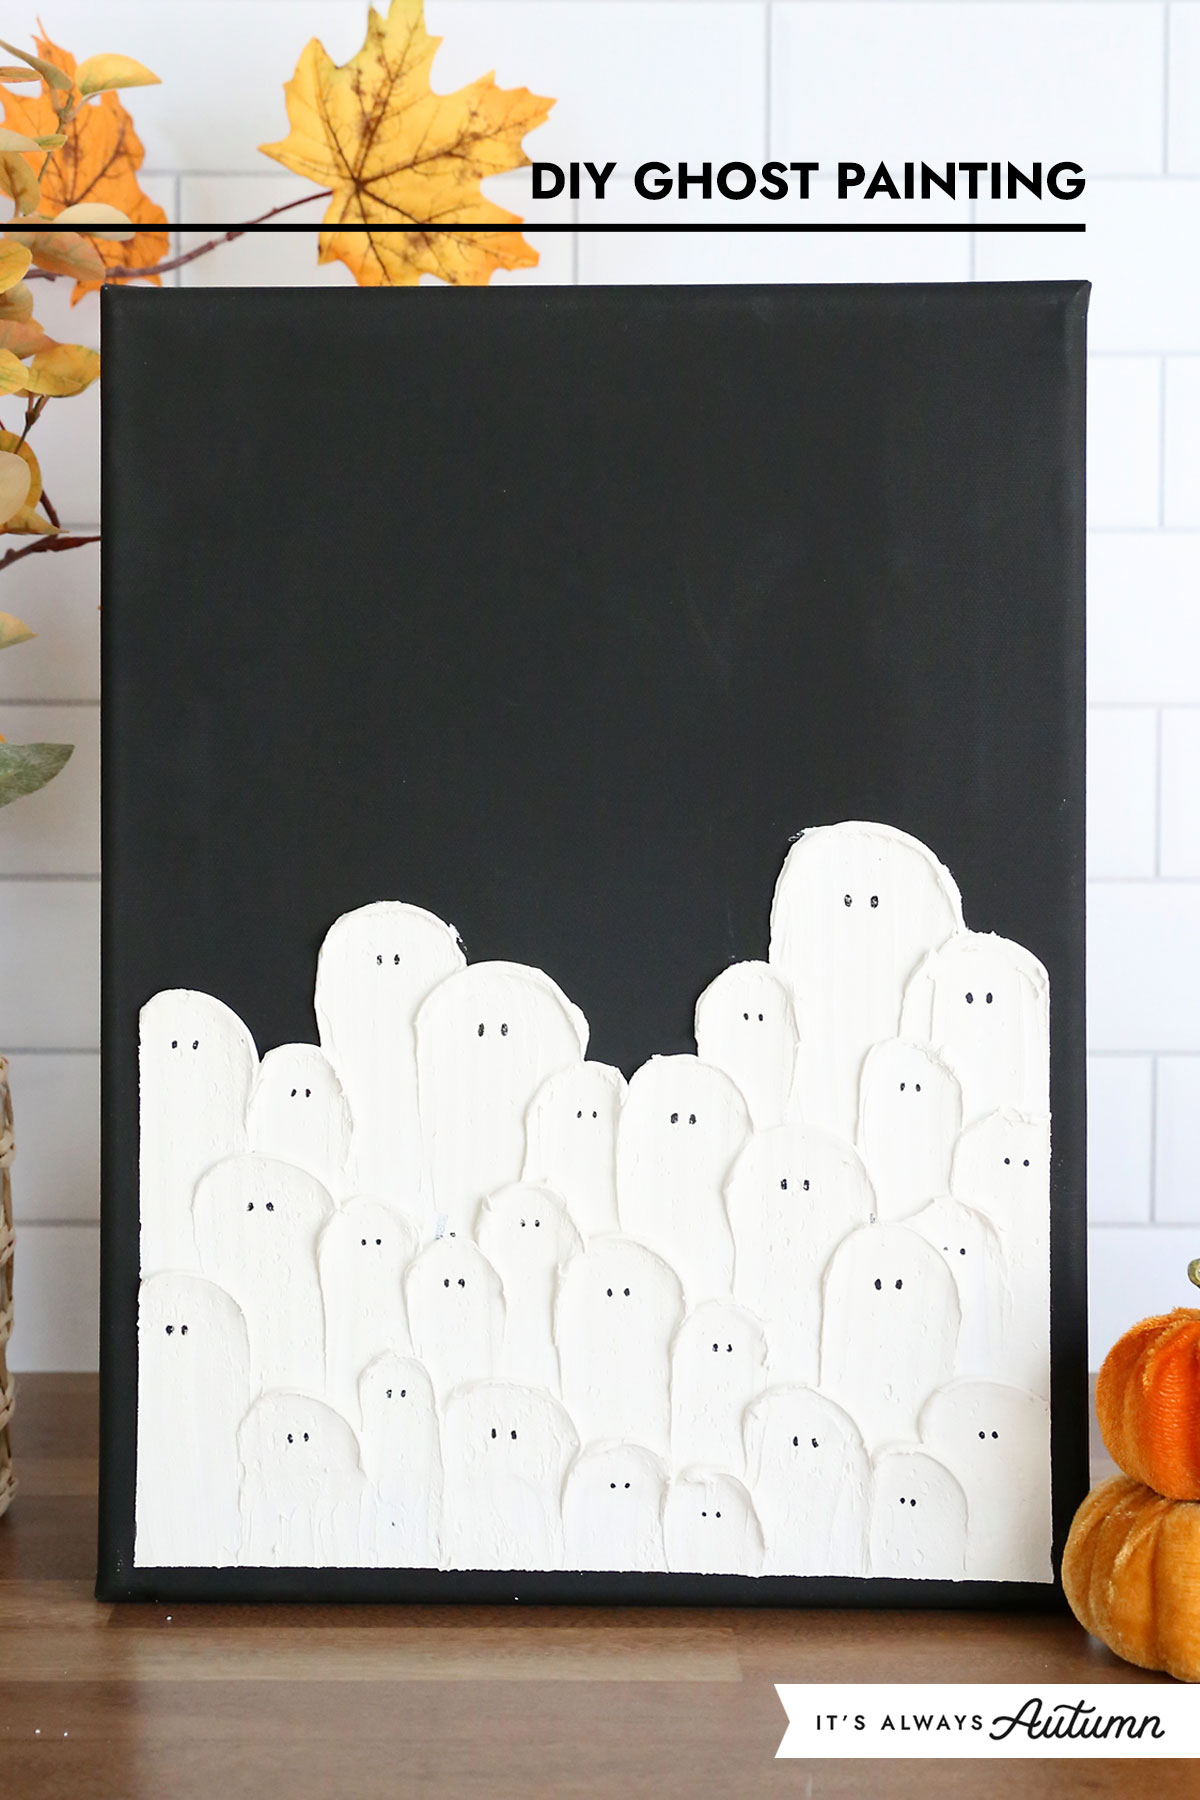
I’ve always been a pretty terrible artist, but making this Halloween ghost wall art was so easy! It’s a take on this ghost painting sold at Michael’s – which retails for $70! My version is slightly smaller but only cost about twelve bucks, plus it was fun to make. This would be a great Halloween craft for a craft night, or even something you could do with older kids!

DIY Ghost Wall Art
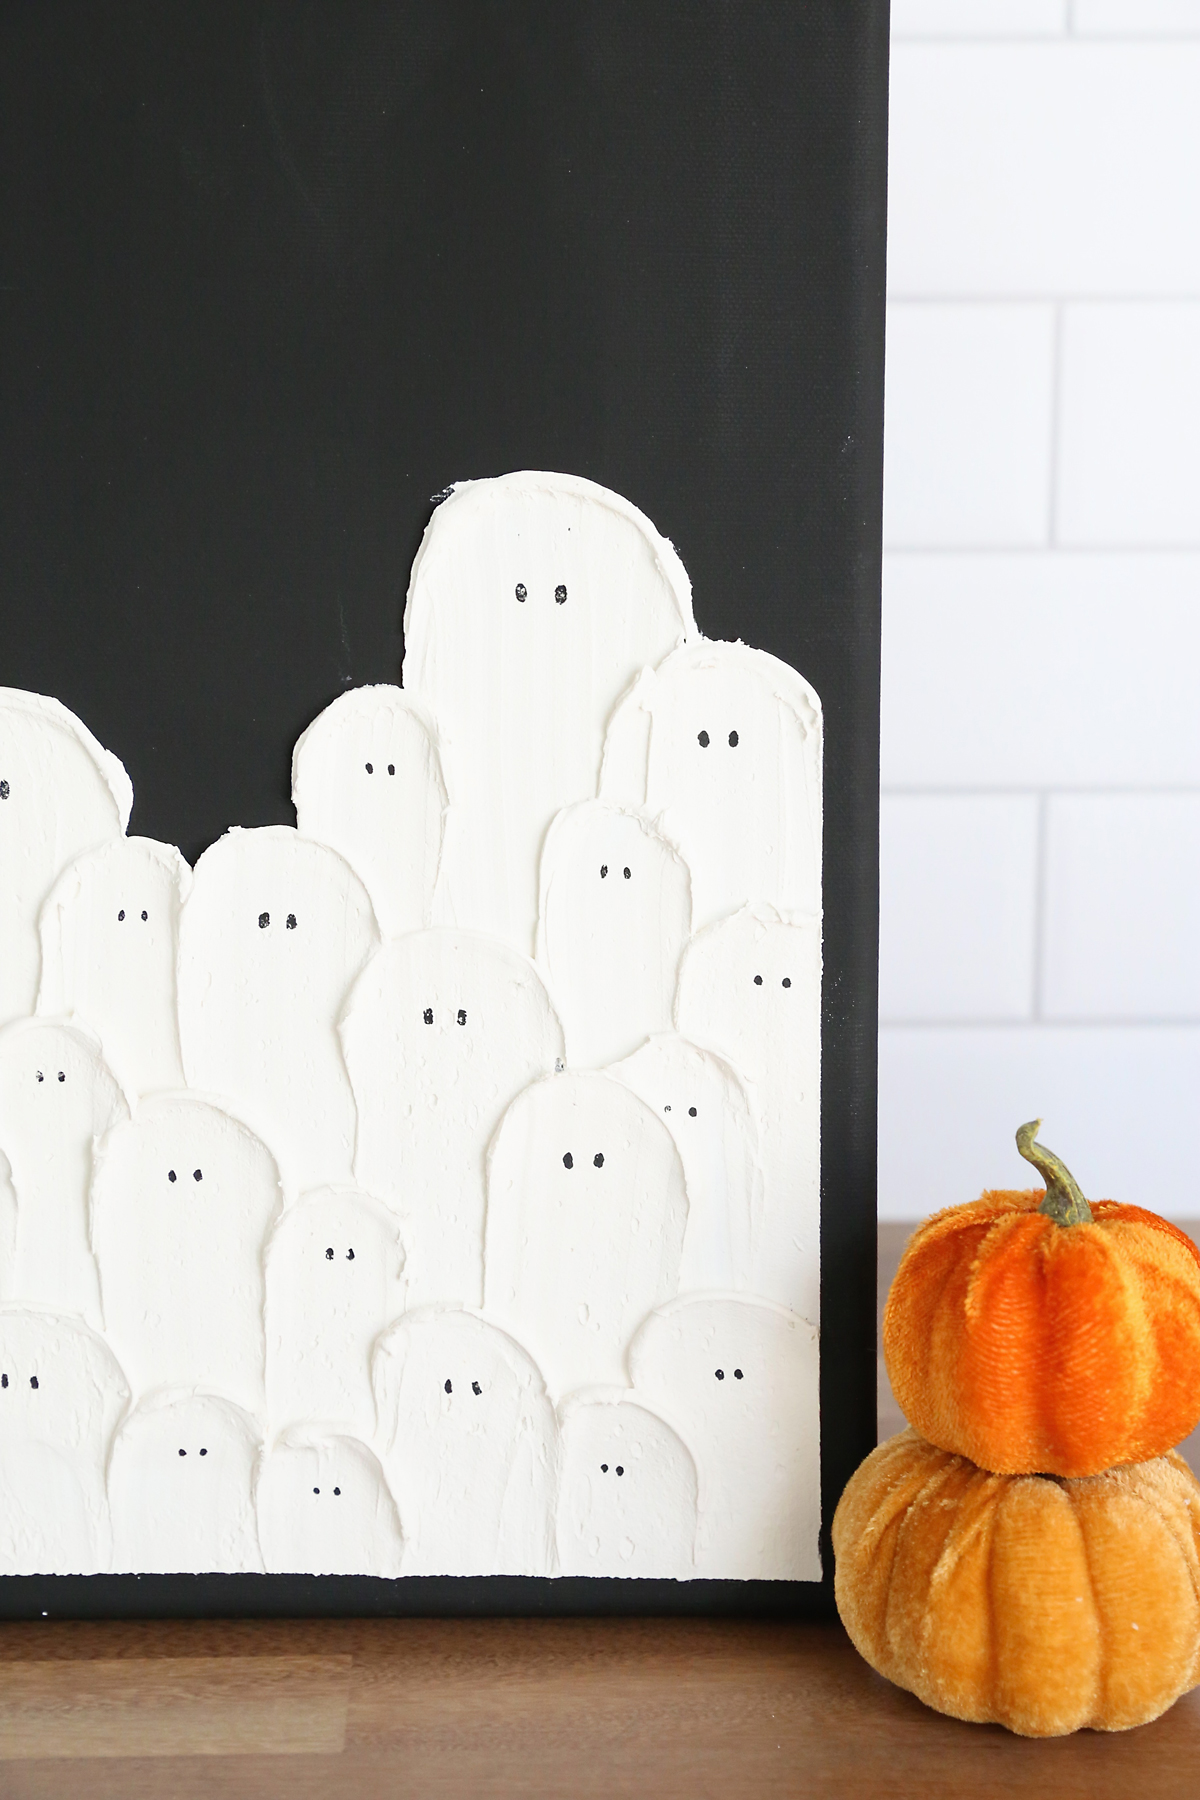
The fun of this DIY ghost wall art is the texture that “outlines” each ghost. This is easy to achieve using spackling paste instead of paint and a piece of cardboard instead of a paintbrush. “Painting” the ghosts will take about half an hour and would be fun to do as a group. Just be aware that you will have to let the spackling paste dry fully (12 hours is a good idea) before adding the eyes – so if you do this for a craft night everyone will need to finish their project the next day.
Idea Source: @thathollywoodmom and @chrissy.rae
Supplies
Here’s what you’ll need to make DIY Ghost Wall Art:
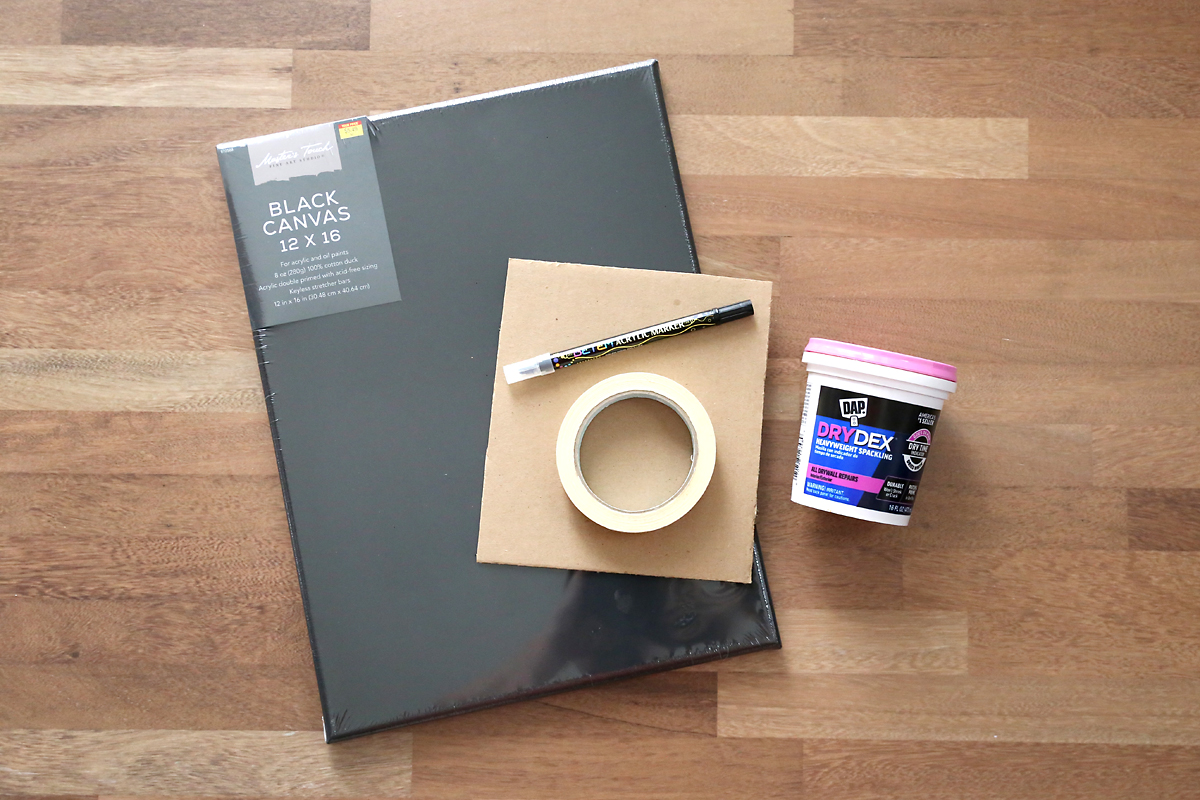
- Black Canvas: I found inexpensive black canvasses in different sizes at Hobby Lobby. The one I used is 12×16 inches and cost $5.50. The original art at Michael’s is 16×20, so you could purchase a slightly larger canvas if you want to.
- DryDex Spackling Paste: You can get an 8 oz can for about $5 or a 16 oz can for about $10 at Walmart or hardware stores. 8 oz will be plenty for one painting.
- Masking Tape
- Piece of Cardboard
- Black Paint Pen OR Black Acrylic Paint and small paintbrush: This is for adding the eyes. Do not try to use a Sharpie, it does not work well on the dry spackling. A paint pen is very easy to control, but if you don’t have one on hand and don’t want to buy one you can use the inexpensive craft paint found at Walmart and craft stores.
How to Make Ghost Wall Art
Prep
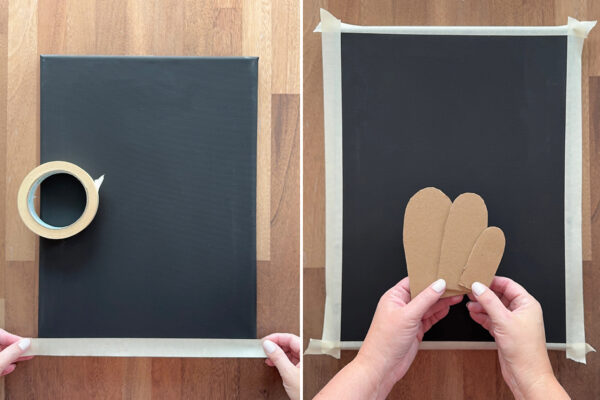
Begin by placing masking tape on the front of the canvas on all four sides. Have the tape cover just under 1/2 an inch of canvas on each side. This will create a border around the finished art. Next, cut out three or four different size ghost shapes from cardboard. I used three sizes: 2.25 inches wide, 1.75 inches wide, and 1.25 inches wide.

Use Cardboard to Create Ghosts
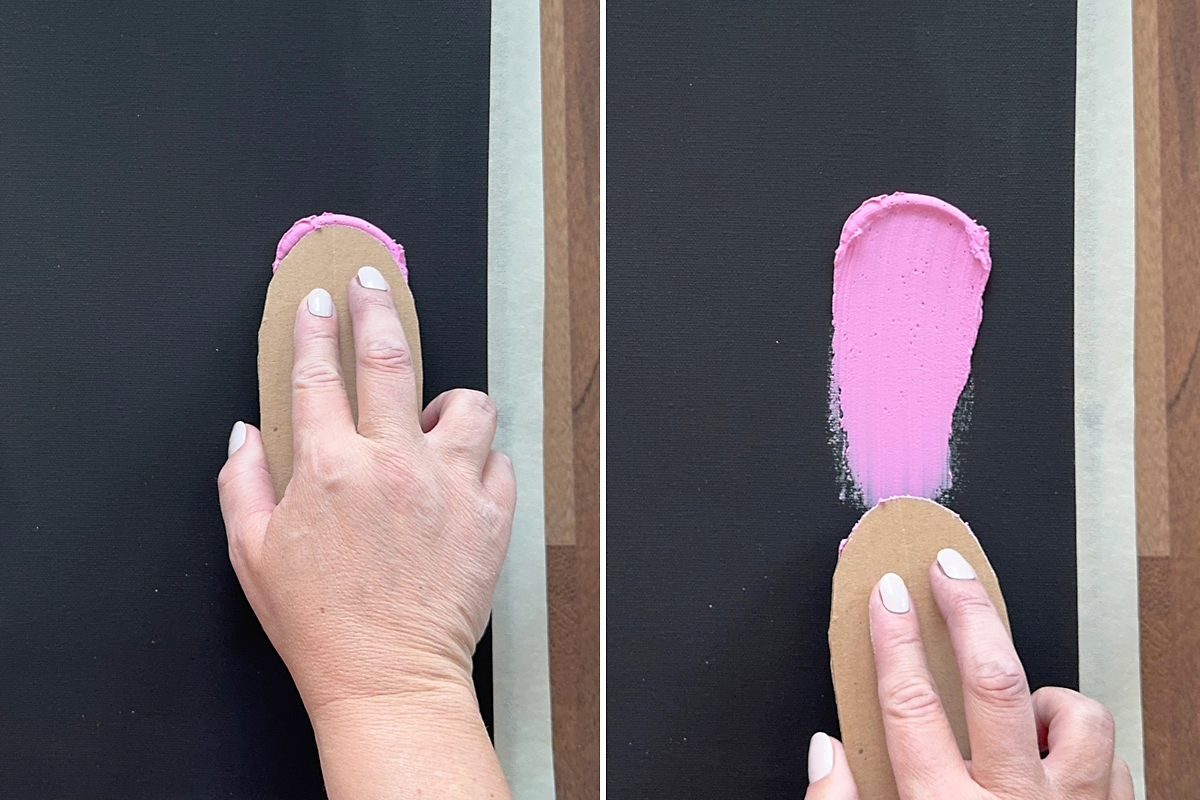
*Before working on your canvas, it’s a good idea to try out this technique on a piece of black paper or cardstock just to get the feel it.* To begin, open up the can of spackling paste. Starting with the largest cardboard piece, dip it in the spackling and scoop up a small amount as shown below.
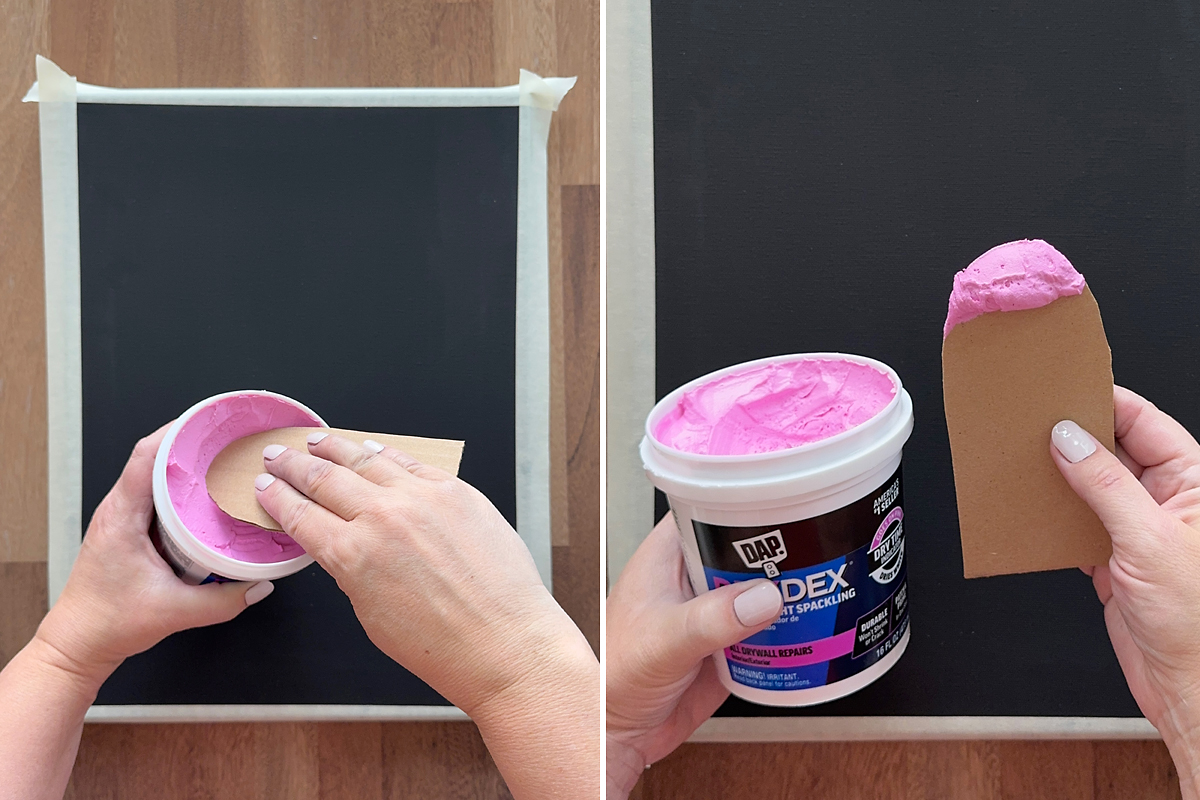
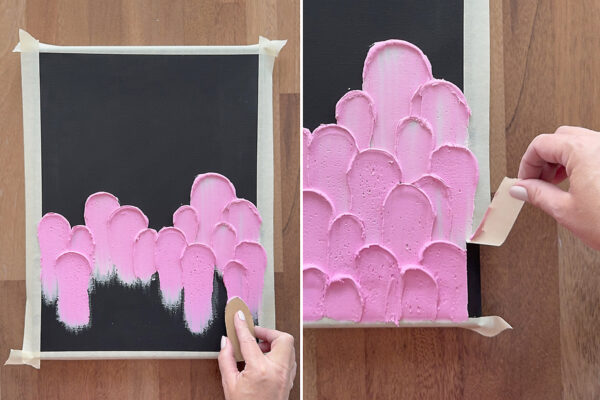
Press the cardboard down on the canvas about halfway down from the top. As you press the cardboard down, the spackling will ooze out around the cardboard creating a textured outline. Pull the cardboard down along the canvas to create a ghost as shown below:
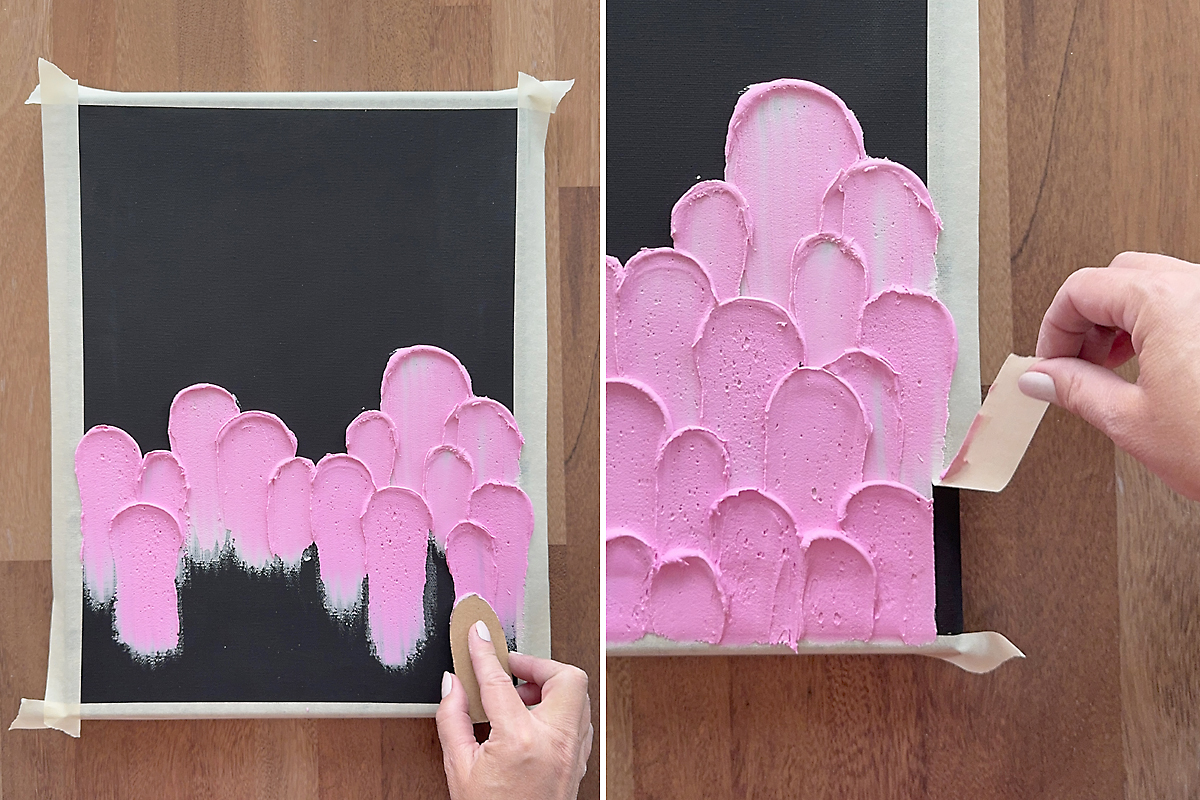
Repeat this process, overlapping the ghosts you create. Switch between the different size cardboard pieces to create different size ghosts. You can refer to the original painting to get an idea of how the ghosts overlap. For the most part, you’ll want to fill in one horizontal layer of ghosts before moving down to the next layer. Make sure to vary where the tops of the ghosts hit and how big they are as you continue to add them.
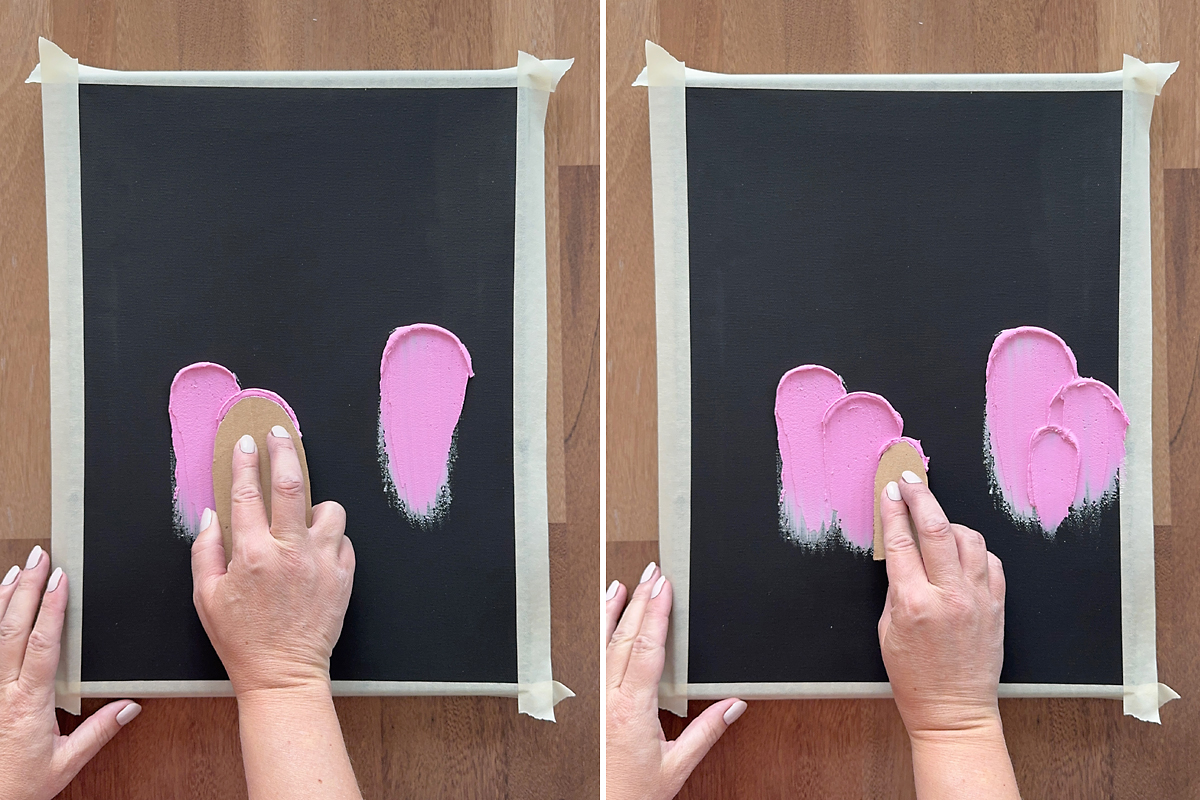
Keep creating more ghost shapes until you fill in the entire bottom half of the canvas. If any of the spackling ends up sticking up, you can use your finger to gently press it down. Don’t worry about perfection here; you are just trying to get a textured outline in the general shape of a ghost each time. As soon as you have finished adding ghosts, slowly remove the masking tape while the spackling is still damp and pink.
Allow to Dry
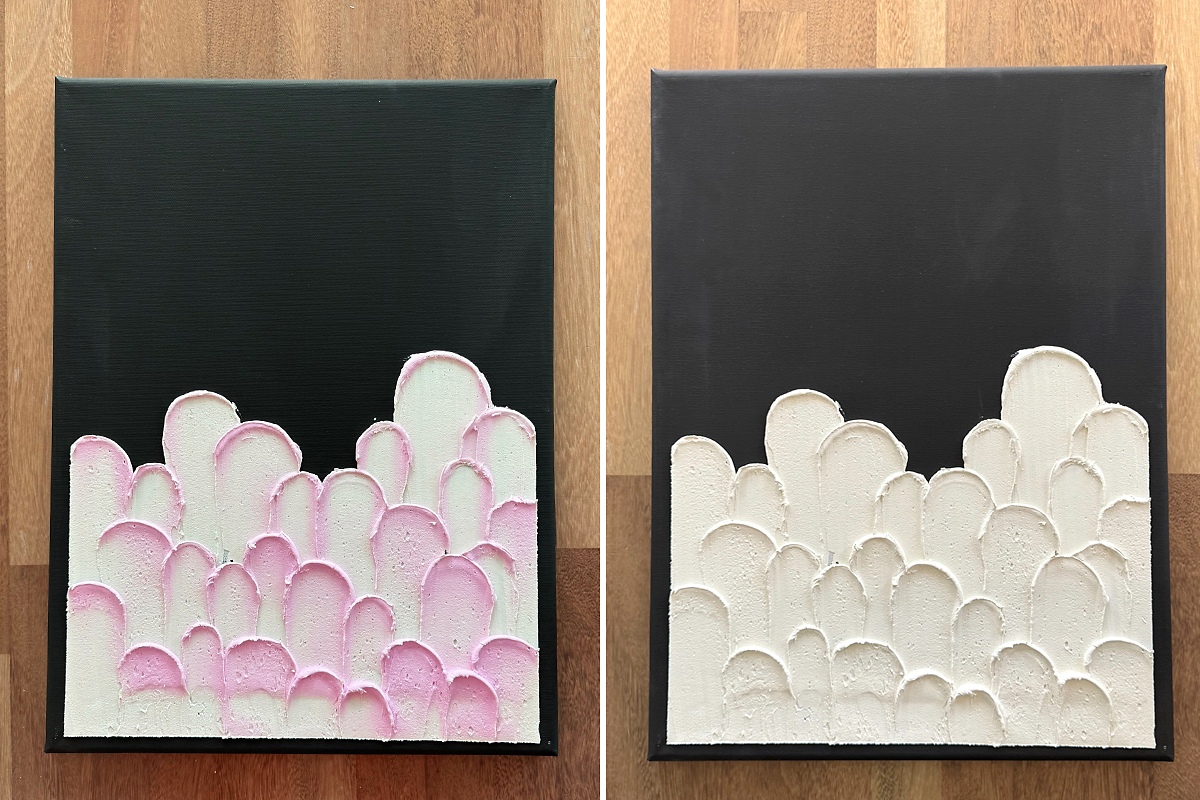
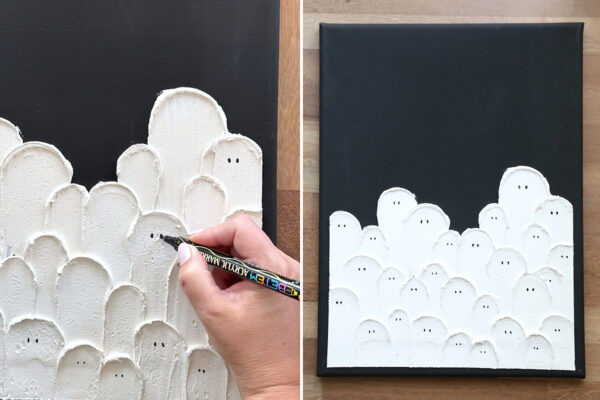
Now you will need to set aside the project for 8-12 hours until the spackling is completely dry. It turns white as it dries so it’s easy to tell when it’s completely dry. Depending on the humidity in your area it may dry faster or slower.
Add the Eyes
Once the spackling is completely dry, you can add a pair of eyes to each ghost. I like the look of small eyes, so mine are mostly little dots, but the original painting has larger eyes on each ghost. An acrylic paint pen is very easy to work with for adding eyes, just be aware that you’ll need another piece of paper handy to draw on occasionally to keep the paint flowing. If you don’t want to purchase a paint pen, you can use acrylic craft paint and a small paintbrush – either paint the eyes with the brush OR dip the end of the brush in the paint and use it as a stamp to add the eyes.


DIY Ghost Wall Art
Supplies
- Black Canvas
- Cardboard
- Masking Tape
- Spackling Paste 8 oz
- Black Paint Pen or Black Acrylic Paint and Small Paintbrush
Want more project ideas? Sign up to get my favorite easy crafts and recipes straight to your inbox!
Instructions
- Tape off about 1/2 inch on all sides of the canvas to create a border. Cut out three different size ghost shapes from cardboard: 2.25 inches wide, 1.75 inches wide, and 1.25 inches wide.

- To begin, open up the can of spackling paste. Starting with the largest cardboard piece, dip it in the spackling and scoop up a small amount.
- Press the cardboard down on the canvas about halfway down from the top. As you press the cardboard down, the spackling will ooze out around the cardboard creating a textured outline. Pull the cardboard down along the canvas to create a ghost shape.
- Repeat this process, overlapping the ghosts you create. Switch between the different size cardboard pieces to create different size ghosts. You can refer to the original painting to get an idea of how the ghosts overlap. For the most part, you’ll want to fill in one horizontal layer of ghosts before moving down to the next layer. Make sure to vary where the tops of the ghosts hit and how big they are as you continue to add them.
- Keep creating more ghost shapes until you fill in the entire bottom half of the canvas. If any of the spackling ends up sticking up, you can use your finger to gently press it down. As soon as you have finished adding ghosts, slowly remove the masking tape while the spackling is still damp and pink.
- Now you will need to set aside the project for 8-12 hours until the spackling is completely dry. It turns white as it dries so it’s easy to tell when it's dry.
- Once the spackling is completely dry, use a paint pen to draw eyes on each ghost. If you don’t want to purchase a paint pen, you can use acrylic craft paint and a small paintbrush – either paint the eyes with the brush OR dip the end of the brush in the paint and use it as a stamp to add the eyes.


Amy Hunter says
Soooo cute!!! I want to try and make it!