
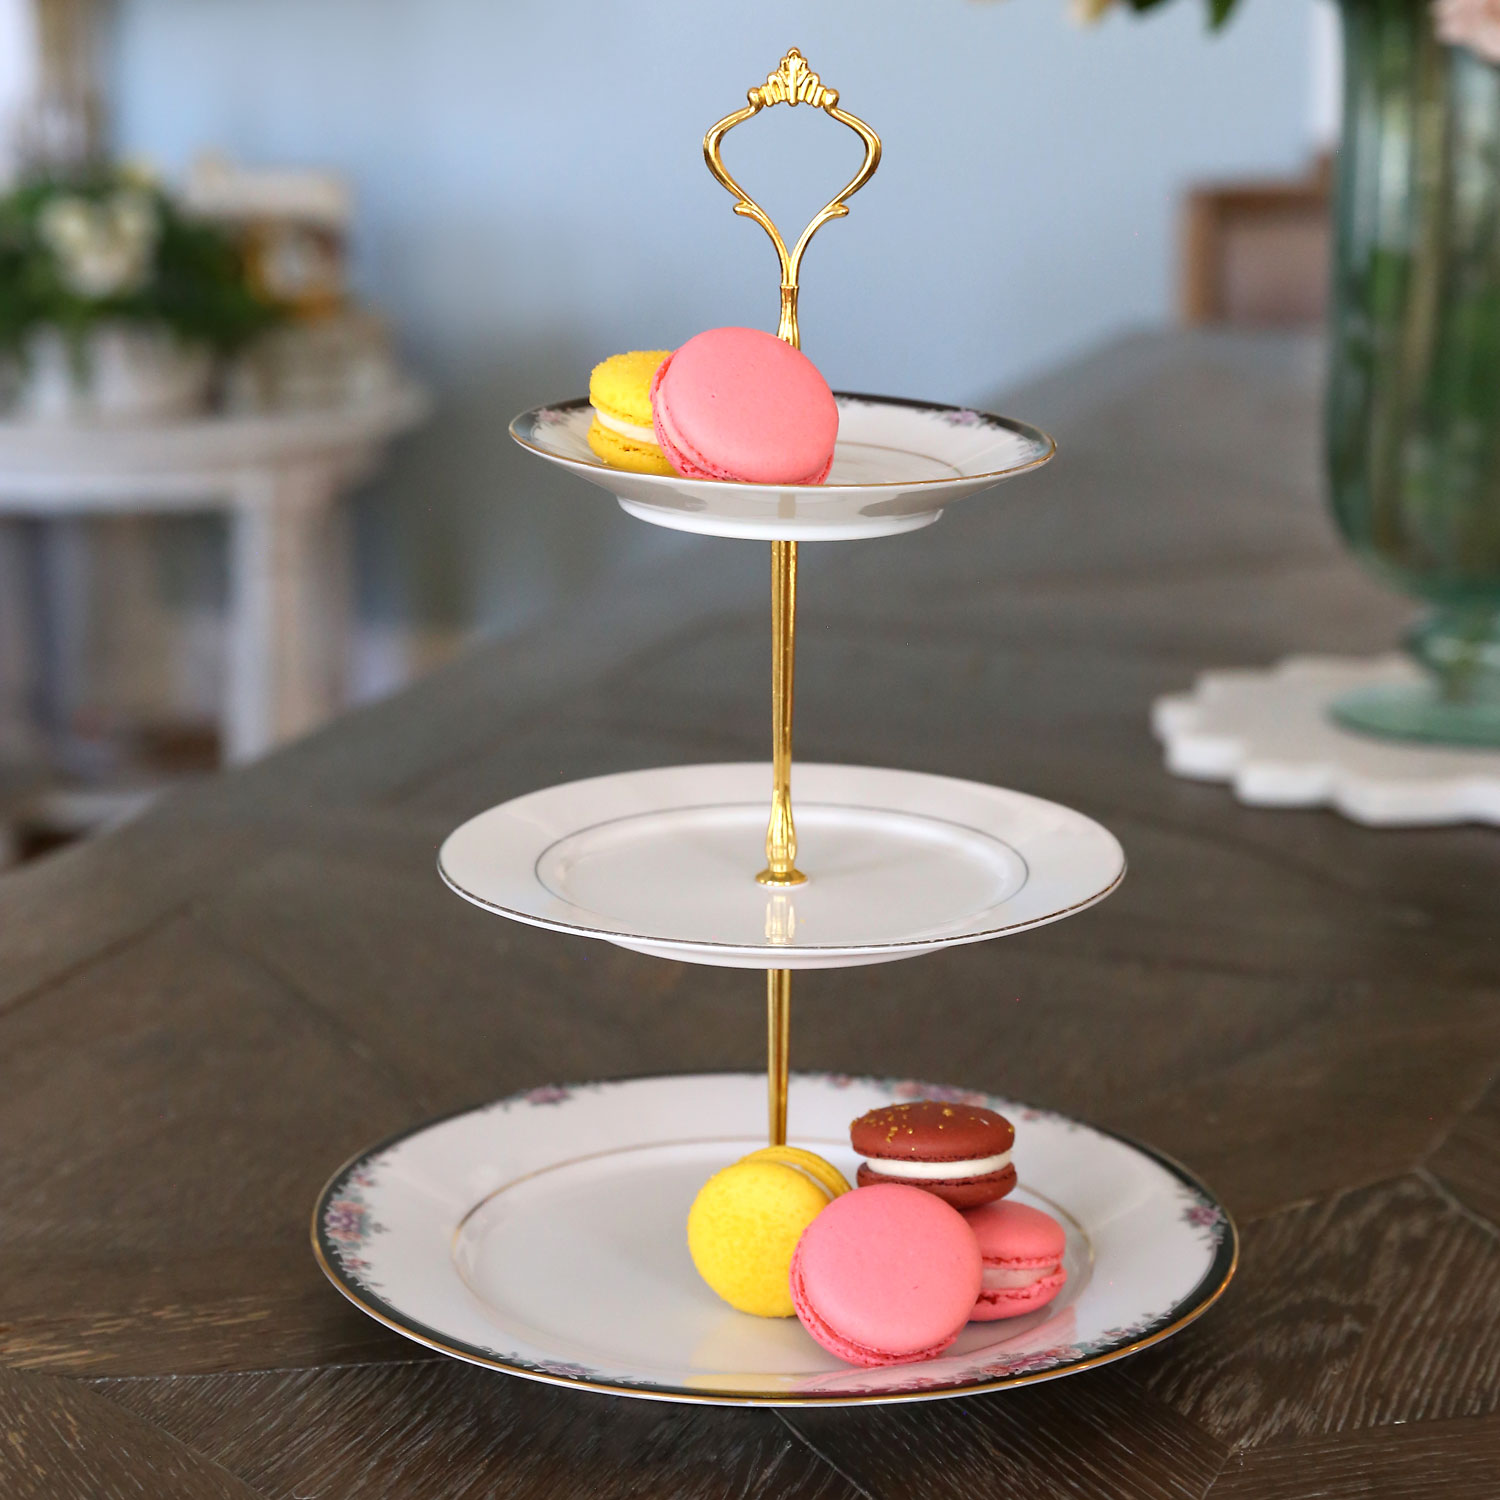
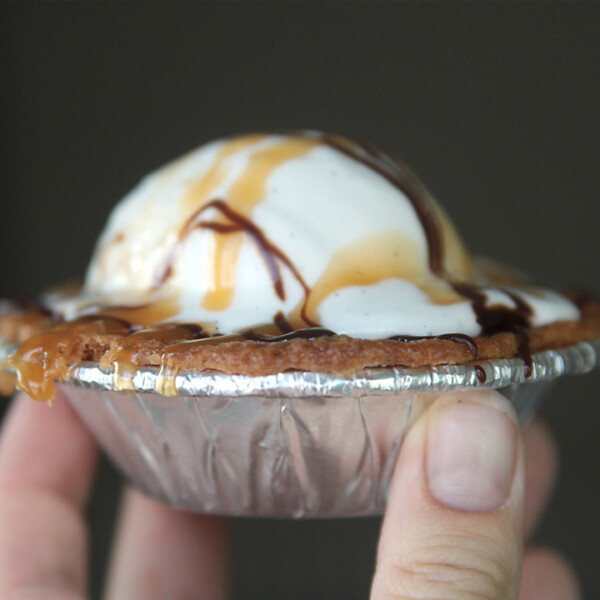
In today’s post: Learn how to make an adorable DIY tiered tray using plates from the thrift store. This easy craft project for adults can be completed in about half an hour.
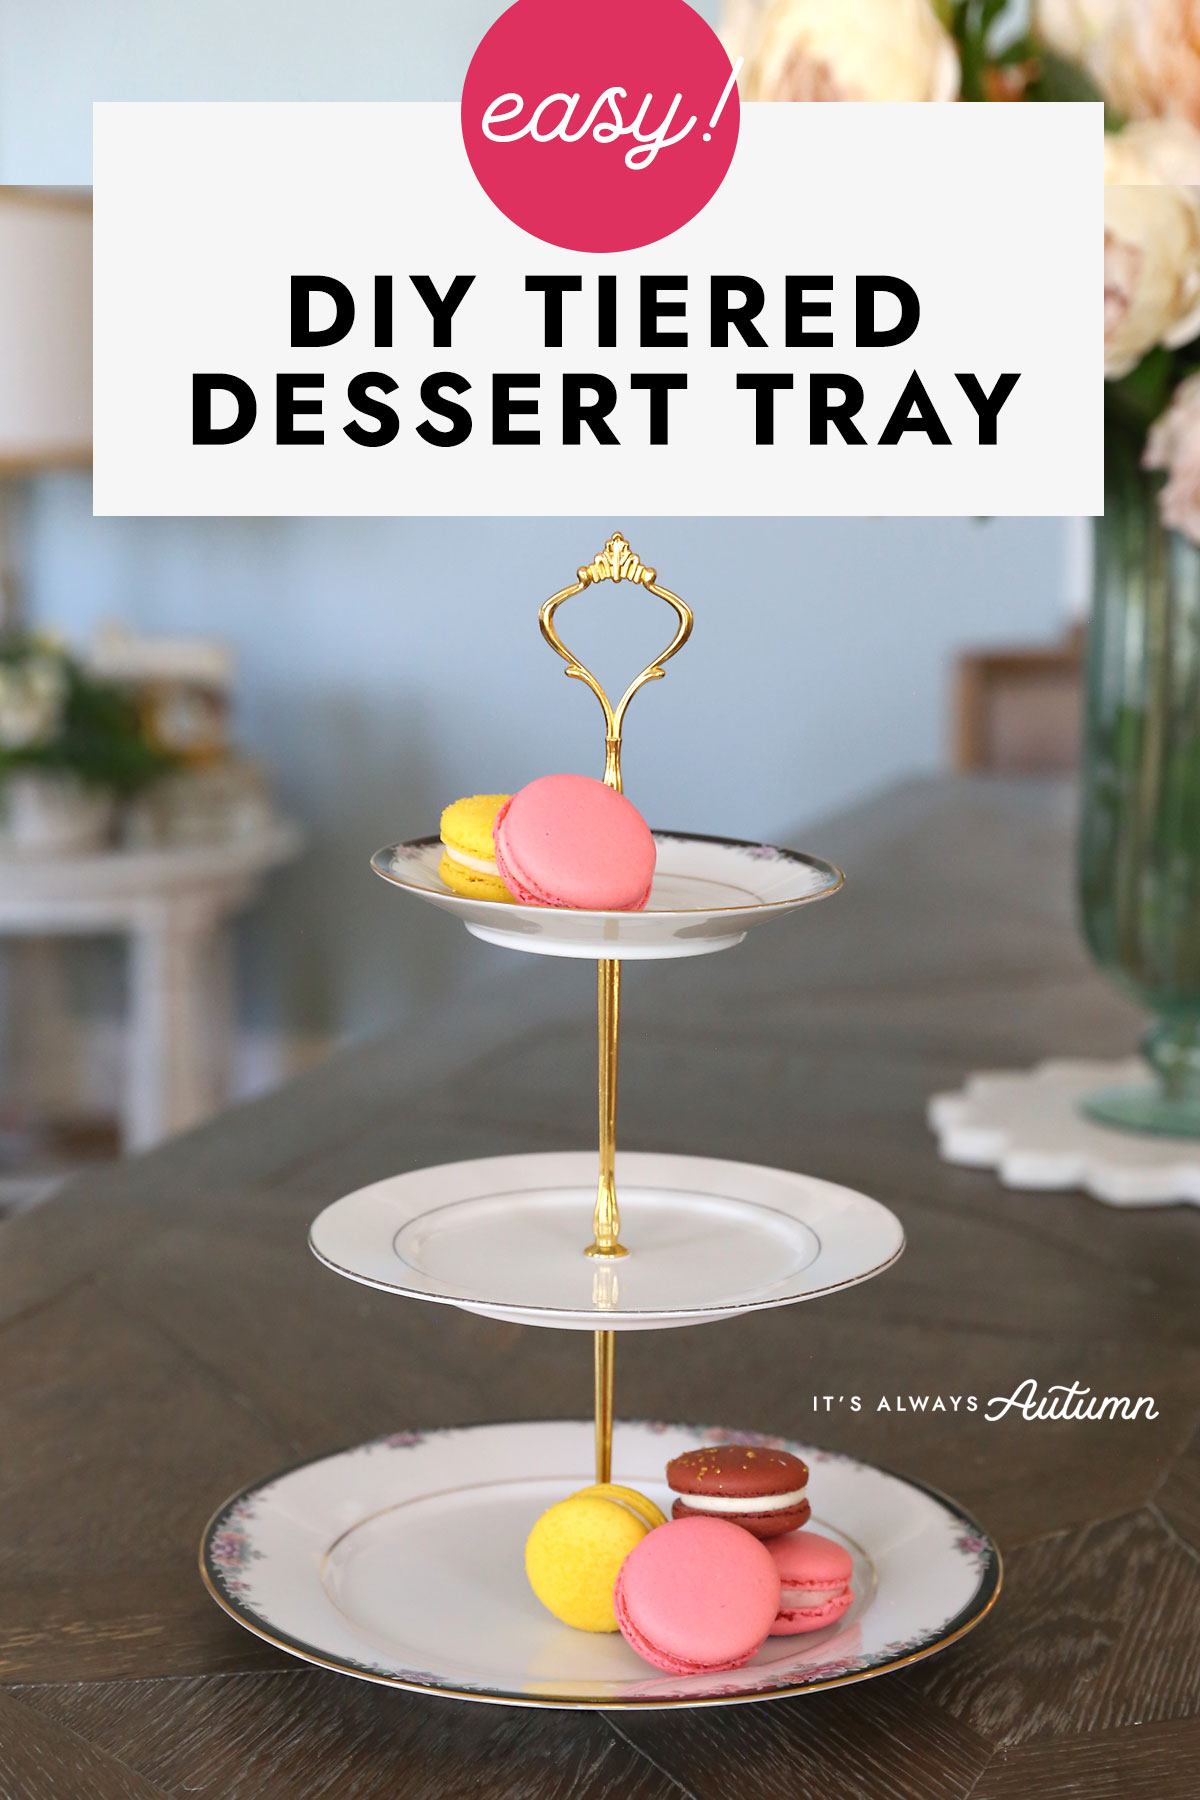
This pretty tiered tray is perfect for serving cupcakes, cookies, or other treats at a party, wedding, or baby shower. I found the plates at the thrift store for just a dollar each, but you could also use vintage plates (Etsy is a good place to find them). The hardware for this elegant dessert stand comes from Amazon.
You do have to drill holes through the plates in order to make this, but I’ve included very thorough instructions below (as well as a video) to walk you through the process.

Supplies
You’ll make your tiered tray out of two components:
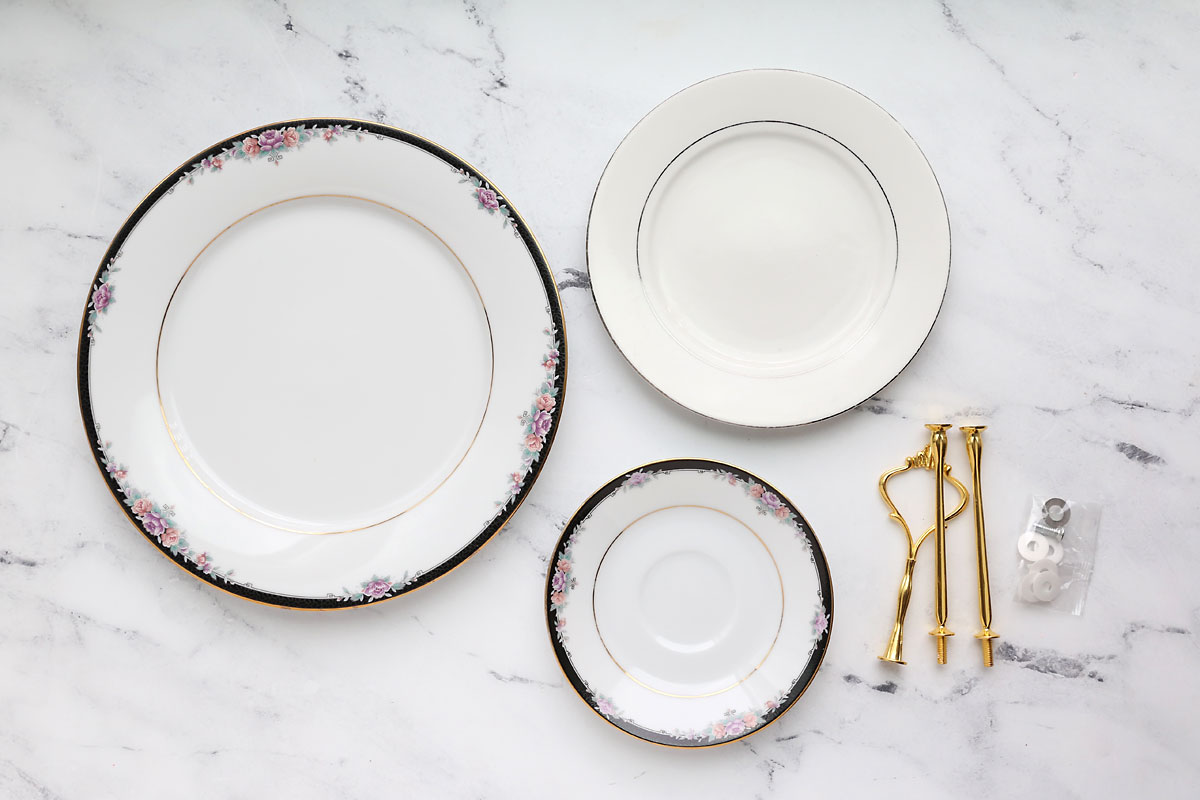
- Plates: I found the plates I used at a thrift store for a dollar each. I like the look of a dinner plate for the bottom tier, a salad plate for the middle tier, and a dessert plate or saucer for the top tier. I was able to find a dinner plate and dessert plate that came from the same set at the thrift store, then I found a salad plate that I thought “went with” the other two. I’ve also seen these tiered cupcake stands made with mismatched plates and they turn out very cute too. Because you’ll need to drill a hole through each plate, look for thinner, lighter weight plates. The thick, heavy stoneware type would take FOREVER to drill through. While you are at the thrift store, grab an extra plate that you can use for practice drilling.
- Tiered Tray Hardware: I ordered this tiered tray hardware from Amazon. It came with five sets of hardware so I could make four more tiered trays with it – which would be perfect if you were hosting a wedding or bridal shower!
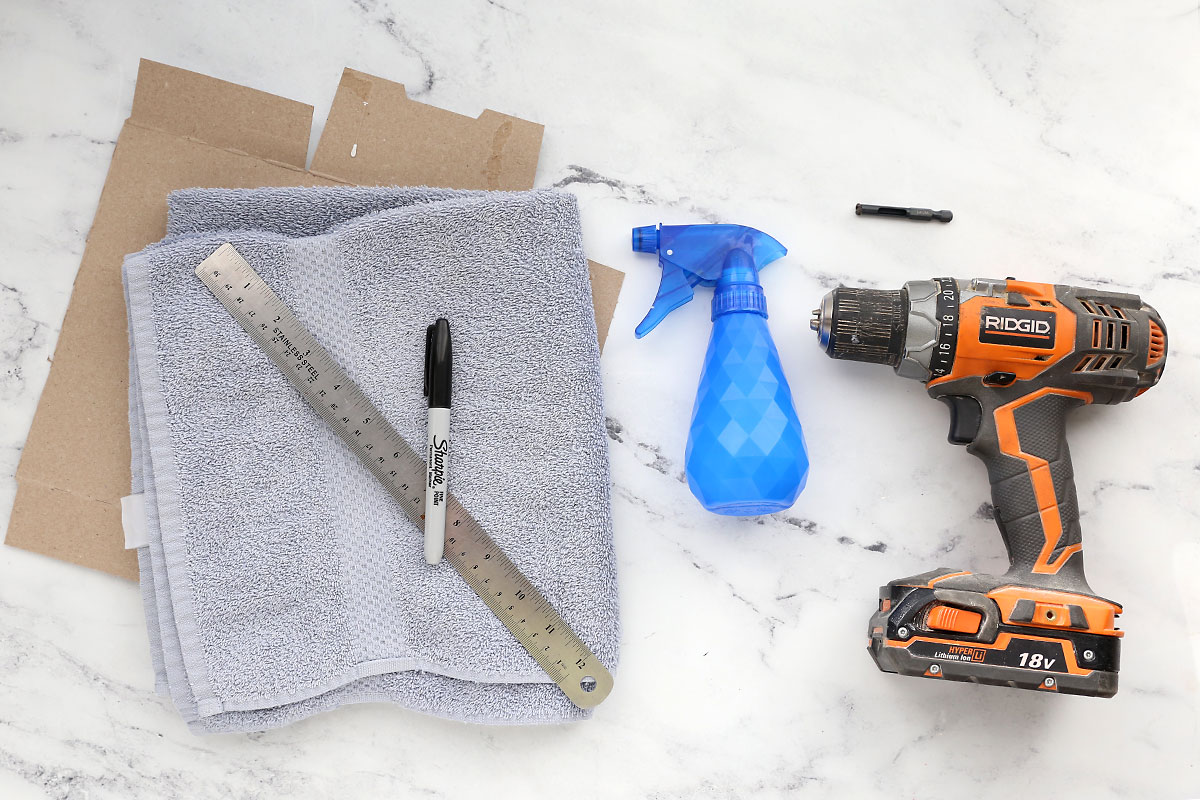
In order to drill holes through the plates, you will need these supplies:
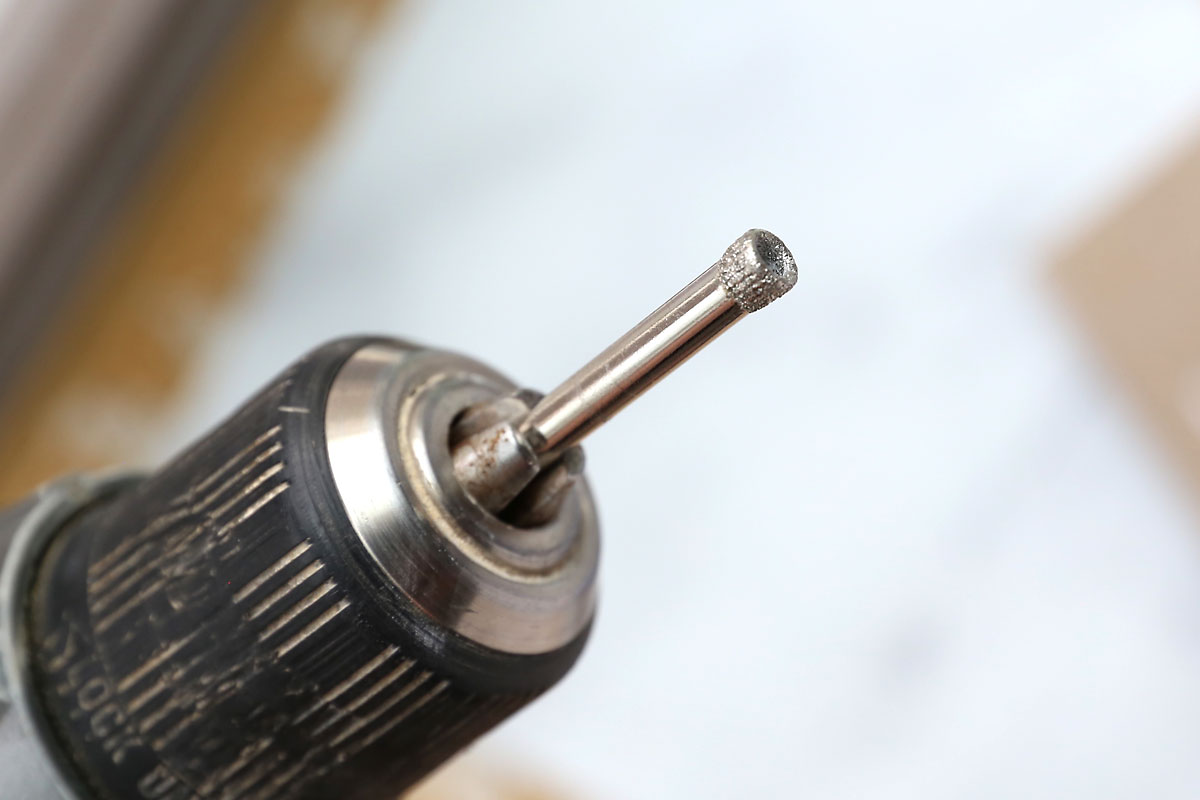
- Diamond Drill Bit (1/4 inch or 6mm): If you try to drill through plates with a standard drill bit you’ll likely end up with a broken plate. A diamond drill bit works best for things like ceramic, tile, glass, and plates.
- Battery Powered Drill: Because you need to use water to keep the drill bit cool when drilling through plates, it’s safer to use a batter powered drill than one that plugs in
- Safety Goggles to wear while drilling
- An old towel or a piece of wood to put under the plate while drilling; I used a piece of cardboard as well
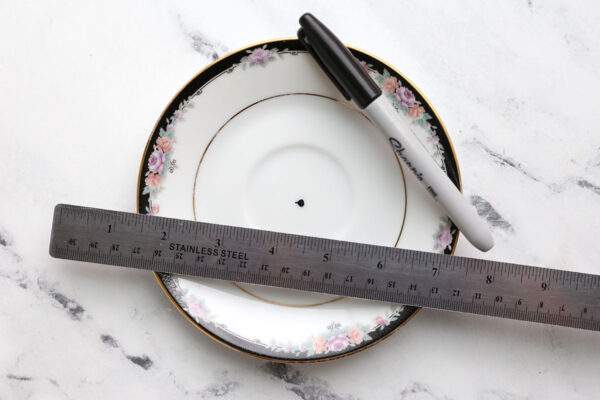
- Ruler and Sharpie to mark the center of the plate
- Spray bottle OR Sponge to add water to the plate while drilling
What Drill Bit should I Buy?
I tested out both cheap diamond drill bits from Amazon (in a ten pack for about a buck a bit), and an $18 Diamond Hole Saw bit from Lowes. I actually really liked the cheap drill bits from Amazon; just be aware that each bit will probably only work for about 5 holes before it gets worn down – which is not a problem since you’ll have ten of them.
How to Make a Tiered DIY Dessert Tray
This project can seem intimidating if you’ve never drilled through a plate before. But it’s not! There is a simple technique involved that makes it completely doable as long as you have the supplies listed above. I highly recommend purchasing an extra plate at the thrift store to practice on. That way if the first hole you drill isn’t perfect it hasn’t ruined the plates you chose for your tiered tray.
You’ll find written instructions and photos below. Additionally, there’s a video showing exactly how to drill through your plates at the end of section 3 below.
Mark the Centers of the Plates
Measure the width of each plate and use a Sharpie to mark the center. Remember to measure in a couple different directions to get the very center of the plate.

Prep for Drilling
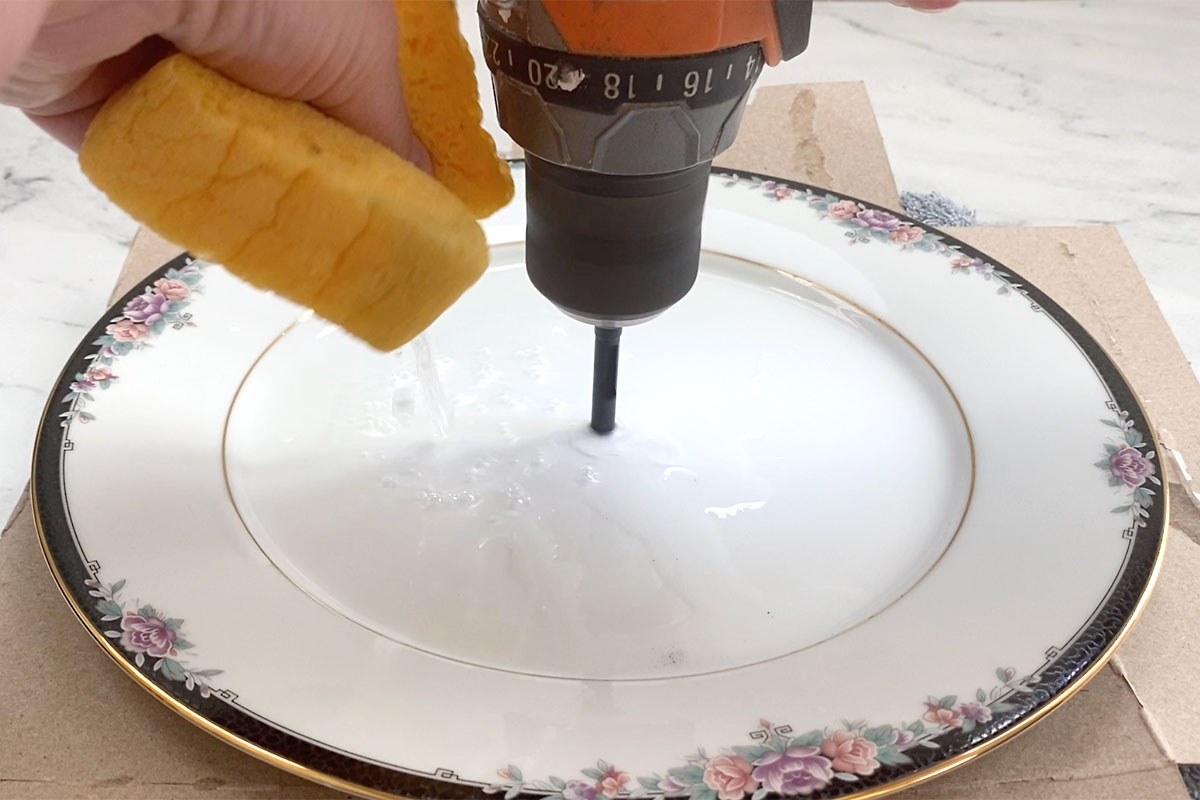
Make sure you have a quarter inch diamond tip drill bit in your drill. Place a folded up towel or piece of wood down on a surface you aren’t worried about, like the concrete floor of a garage or an old table. (The towel or wood should protect your surface just fine – I drilled plenty of holes without ever hitting the counter I was working on, but I don’t want anyone to accidentally mark up their kitchen countertops here.) Because I was using a towel, I covered it with a piece of cardboard torn from a cereal box to minimize the shards of plate that would get onto the towel. Also, have a spray bottle with cold water in it or a sponge soaked in cold water right next to where you plan to drill. Finally, put on safety goggles before you begin drilling.
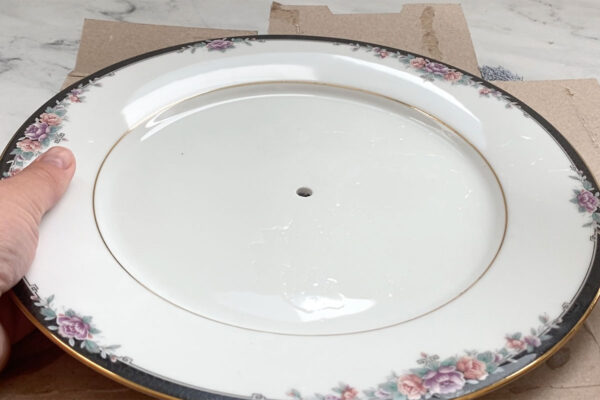
Drill Holes
***VIDEO is at the end of this section*** Place the marked plate on top of the towel or wood board. I held the plate with my left hand and the drill with my right hand. In order to get the hole started, get the drill spinning at a fairly high speed BEFORE you touch it to the plate and hold it at an angle. Touch the drill to the plate right next to the dot you’ve marked at an angle, so only small portion of the drill bit is touching the plate. Hold the spinning drill in place with very light pressure. If you try to push hard, the drill bit will skitter across the plate. After 10 seconds, pull the drill away from the plate. You should have a tiny groove or “start” to the hole, which will help anchor the drill.

At this point you need to squeeze cool water from a sponge or spray bottle directly onto the plate to make sure it doesn’t get too hot. Start the drill and touch it to the plate again right in that groove you created, using just a little pressure at this point.
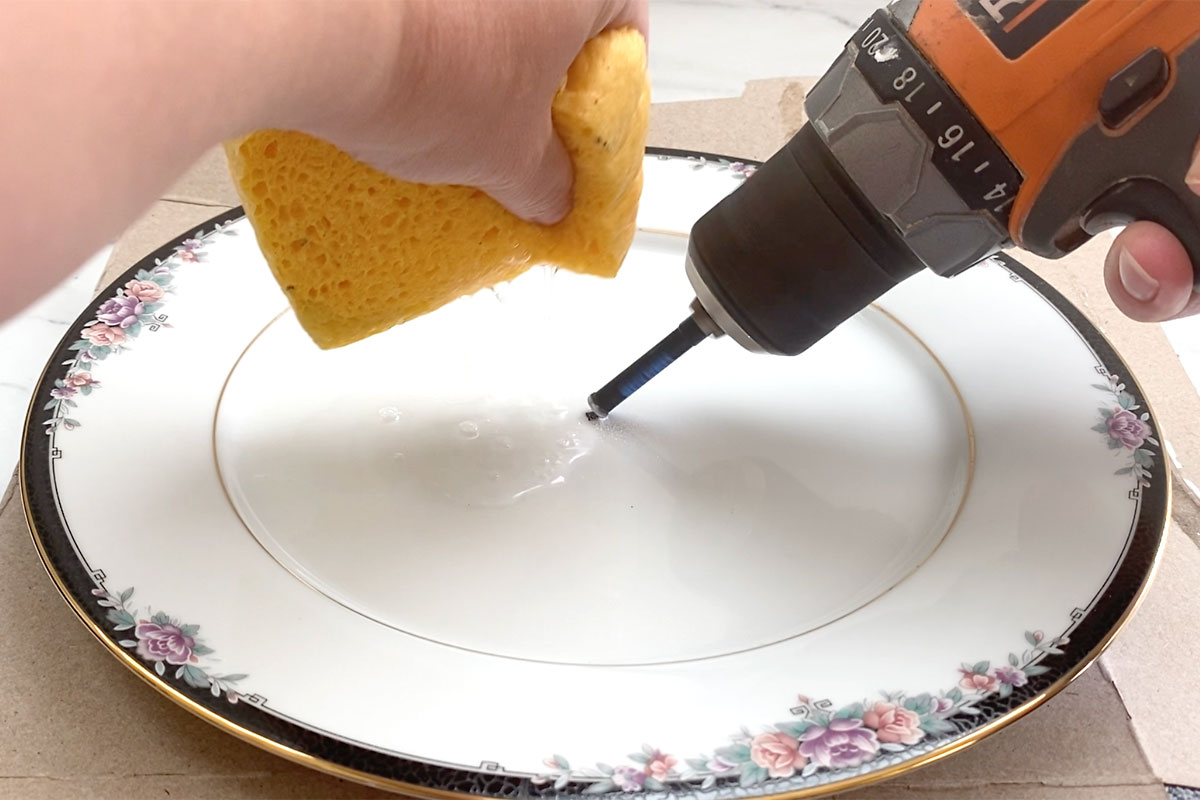
Very slowly angle the drill up until it’s perpendicular to the plate. Continue to drill for another 15 seconds or so.
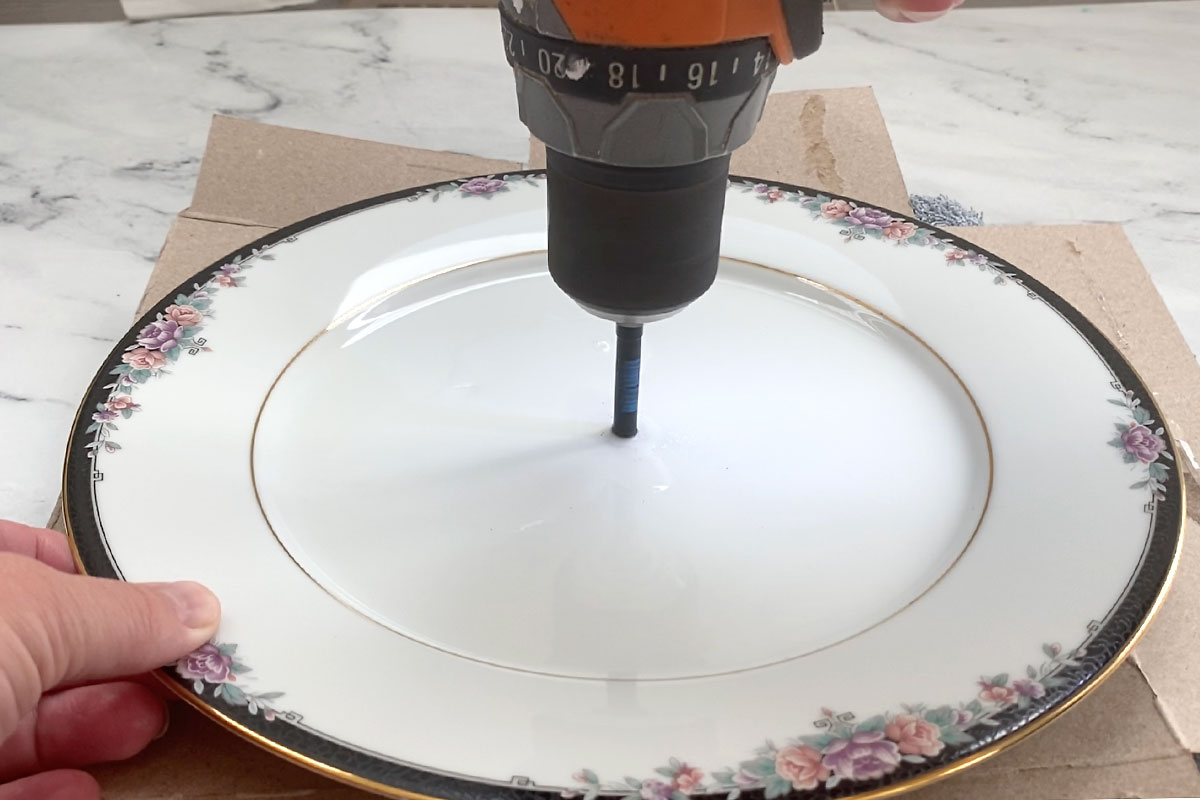
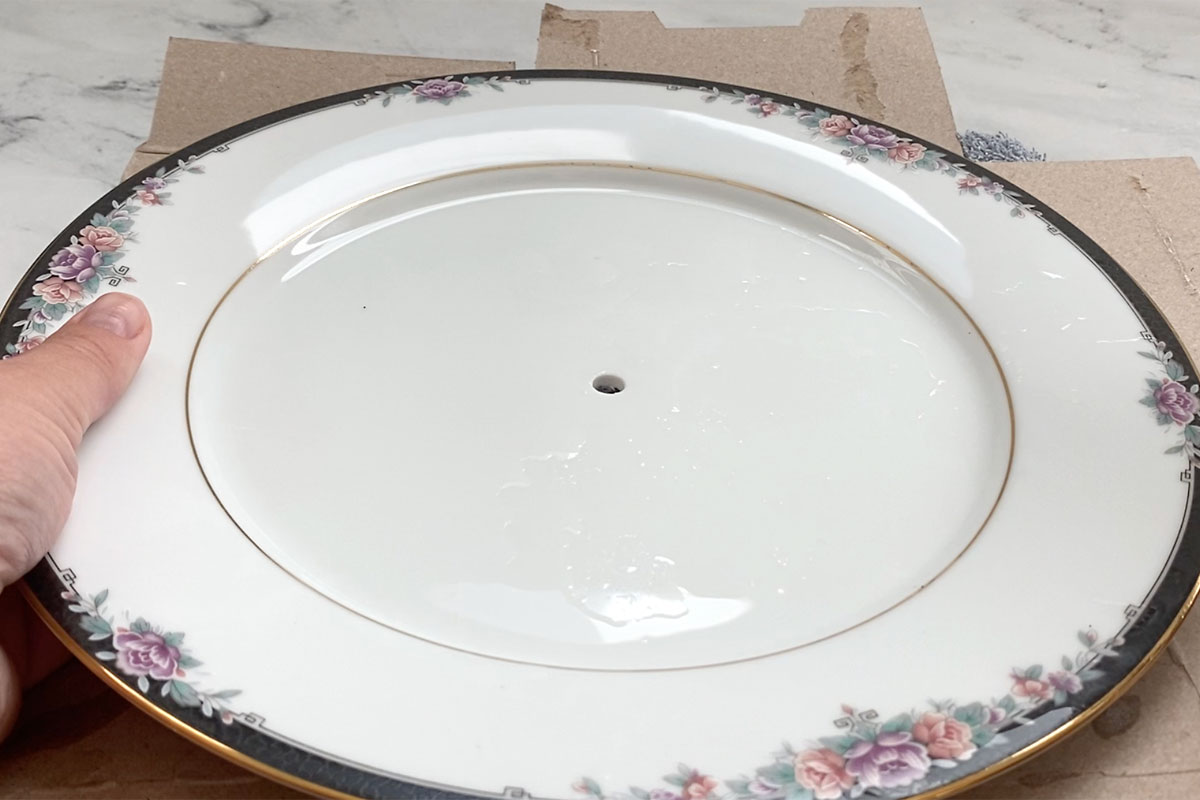
After about 15 seconds, pull the drill away from the plate and stop it. Now you should see that you have a circular groove right in the center of the plate – which means the hard part is done!
From here on out drilling is very easy because the drill will not move around on the plate. Squeeze a little more water onto the plate, and continue to drill, making sure the drill is upright. Do not press down hard; use gentle pressure and just keep drilling, dropping a little more water down every 30 seconds or so to keep the plate and drill bit cool. Depending on the plate, it took me about 2-3 minutes to drill all the way through once the drill was upright.
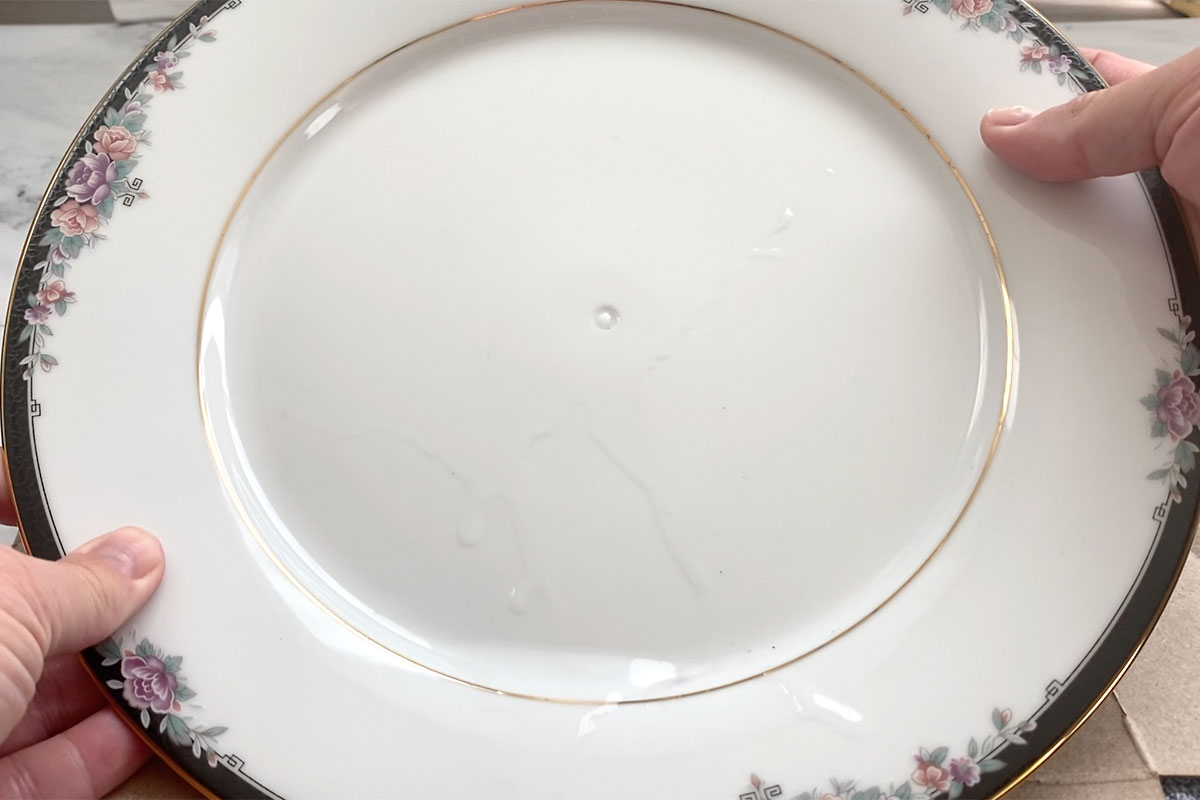
If at any point you are worried the drill bit or plate is getting hot, just stop drilling. If the drill bit feels hot you can dip it into some cold water to cool it off. Continue to drill until you feel the drill punch through the plate, then stop drilling and pull the drill away from the plate. You’ll have a beautiful quarter inch hole right in the middle of your plate!
Here’s a video that shows the process of drilling:
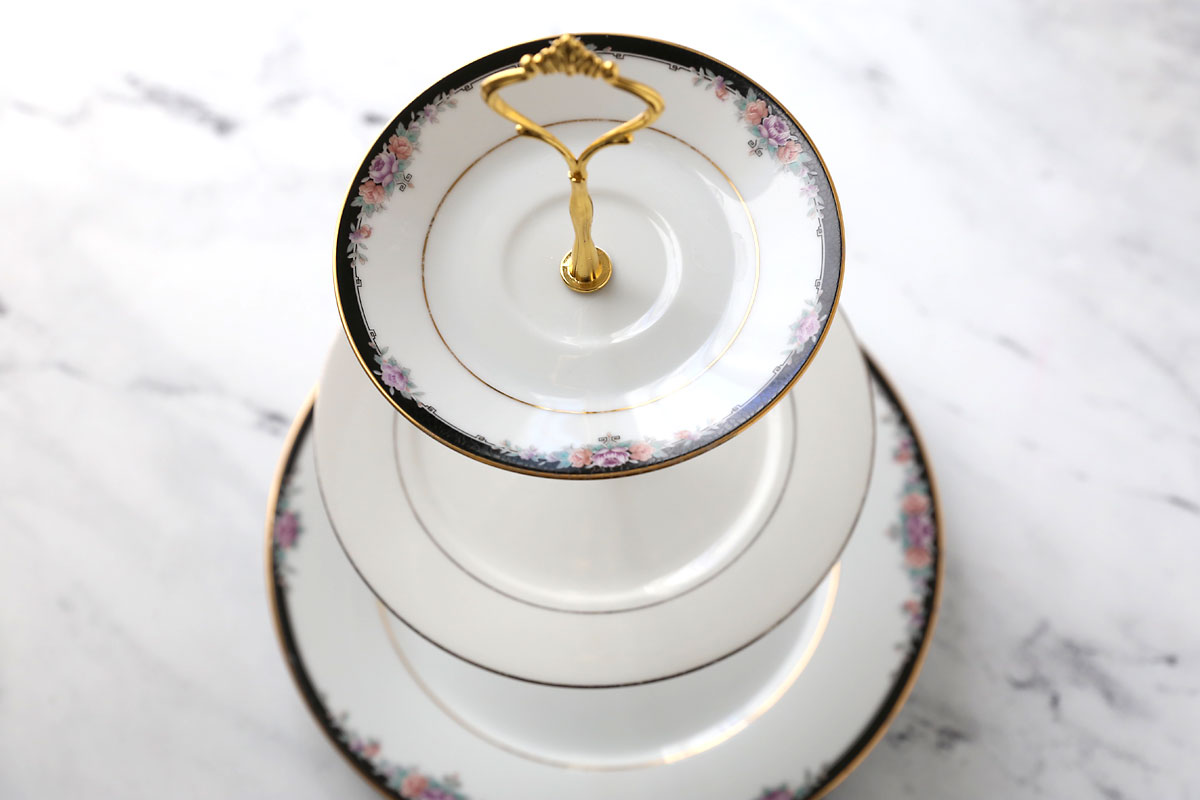
Assemble the Tiered Tray
Once you’ve drilled a hole in the center of each plate, it’s time to assemble your tiered tray, and this part is really easy! Grab the three plates and the tiered tray hardware. The hardware includes two gold stand pieces, one gold topper piece, six soft washers, one screw and one metal washer.
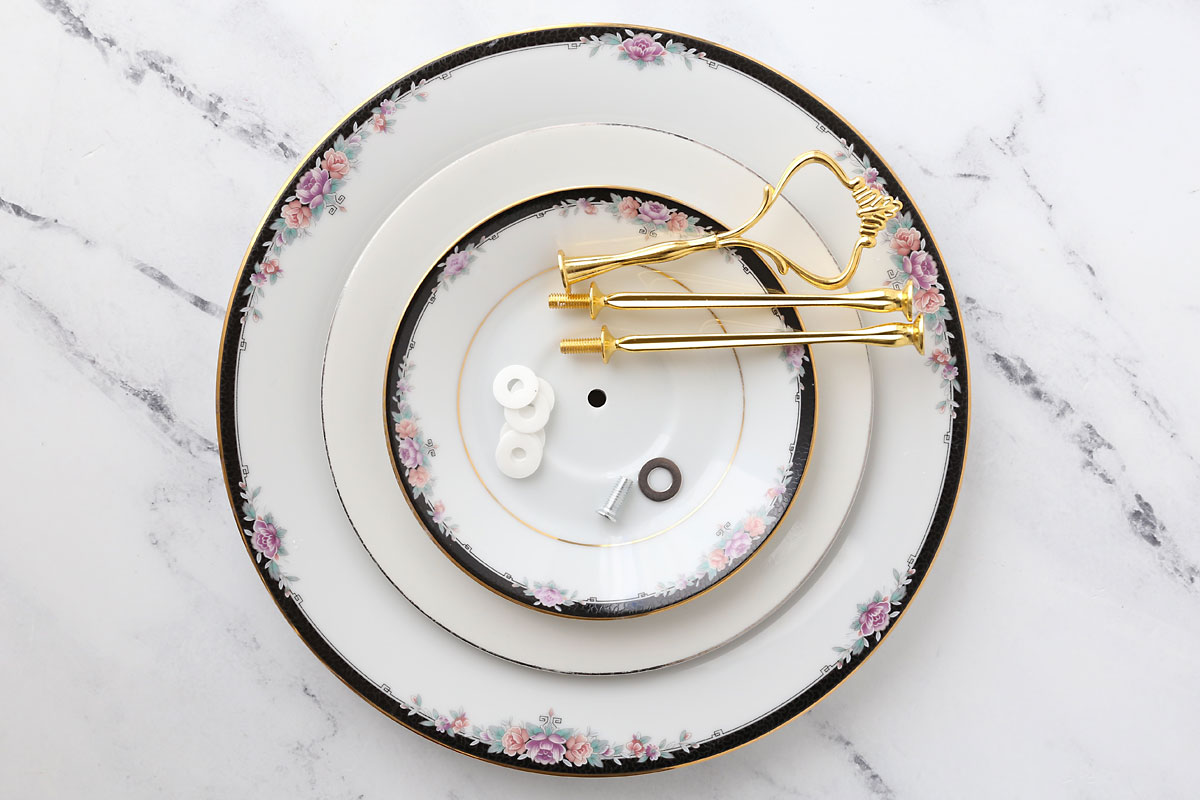
Begin by placing the metal washer on the screw, and then a soft washer over the metal washer. Thread the screw and washers through the hole in the largest plate, coming up from the bottom. Then screw on one of the stand pieces, making it as tight as you can by hand. I do not recommend using any tools here because you don’t want to put enough pressure on the plates that they’ll break.

Place another soft washer at the top of the stand piece, then place the middle plate on it, then place another soft washer on the middle plate. Now you can grab the second stand piece and screw it into the first, again tightening it so it feels secure. Repeat with another soft washer, top plate, and soft washer, and then screw the topper on to finish assembly.

DIY Tiered Dessert Tray
Supplies
- 3 Thrifted Plates dinner plate, salad plate, dessert plate
- Tiered Tray Hardware
Want more project ideas? Sign up to get my favorite easy crafts and recipes straight to your inbox!
Equipment
- Battery Powered Drill
- 1/4 inch Diamond Drill Bit
- Sharpie
- Ruler
- Towel or Wood Board
- Spray Bottle or Sponge
- Safety Goggles
Instructions
- Measure and mark the center of each plate.

- While wearing safety goggles, drill a hole through the center of each plate. Start drilling at an angle and slowly bring the drill into a perpendicular position. Spray or drop water onto the plate as you drill to keep it cool and prevent cracking.
- Once you've drilled holes in each plate, open the tiered tray hardware.
- Assemble the tiered tray, making sure that each plate has a soft washer above and below it. Tighten the hardware by hand.


Emily says
I am about to begin this project. I was curious if you wash the plates after you finish the drilling process?
Autumn says
Yes a quick hand wash is a good idea!