
In today’s post: Learn how to make a cool explosion box full of photos and notes for a fun DIY gift. Use our printable template and cutting chart to make it easy.
DIY Explosion Box
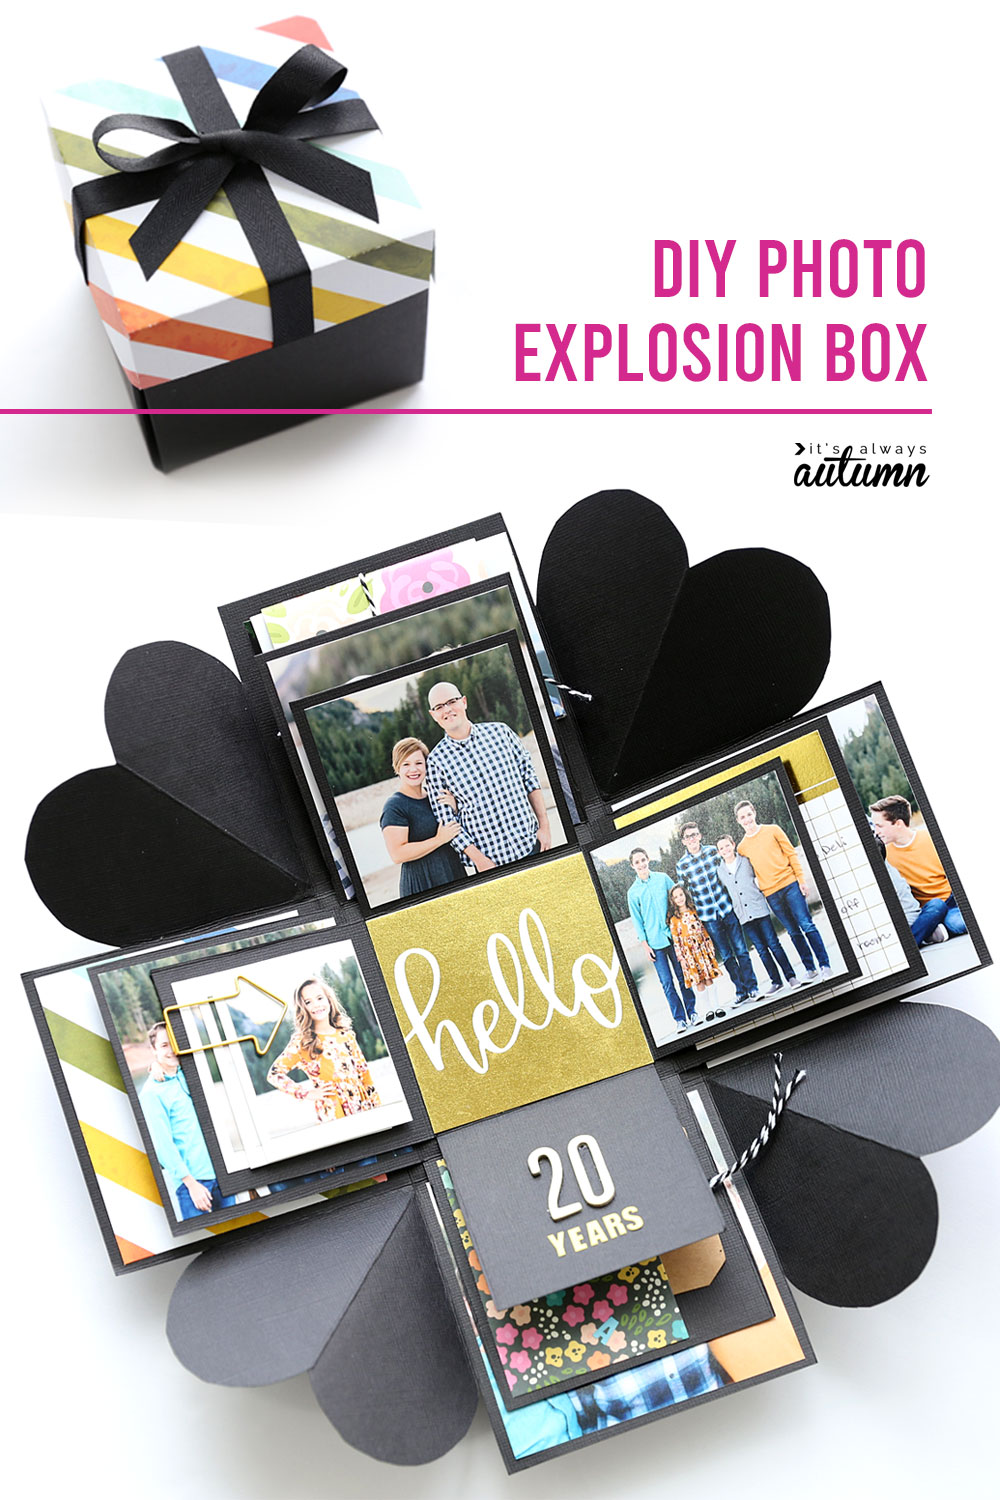
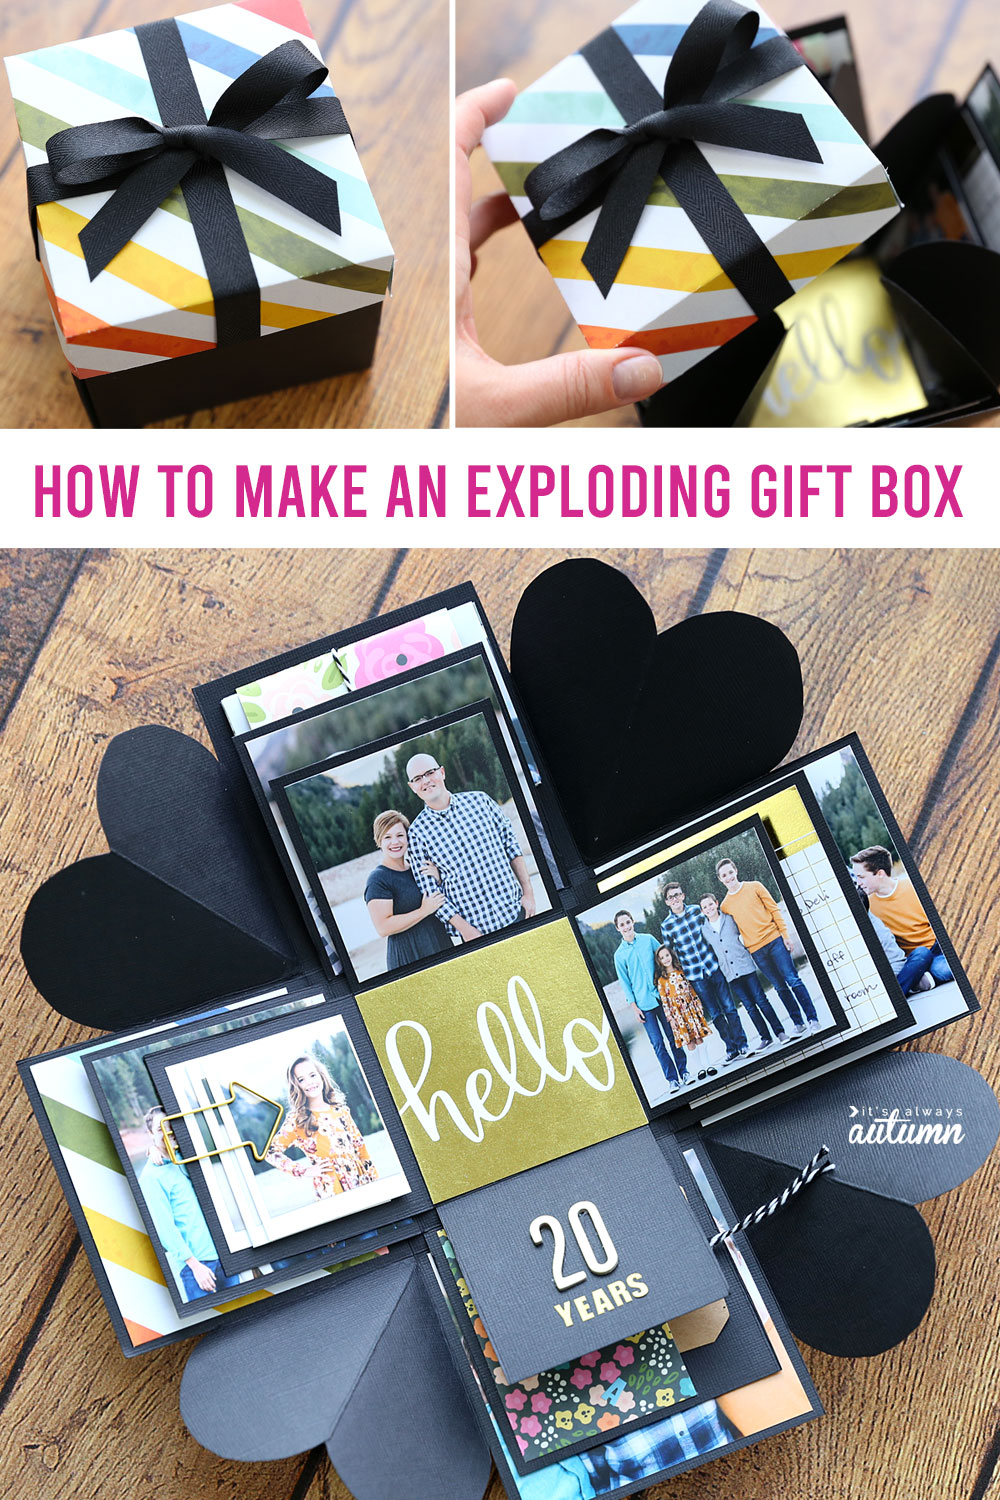
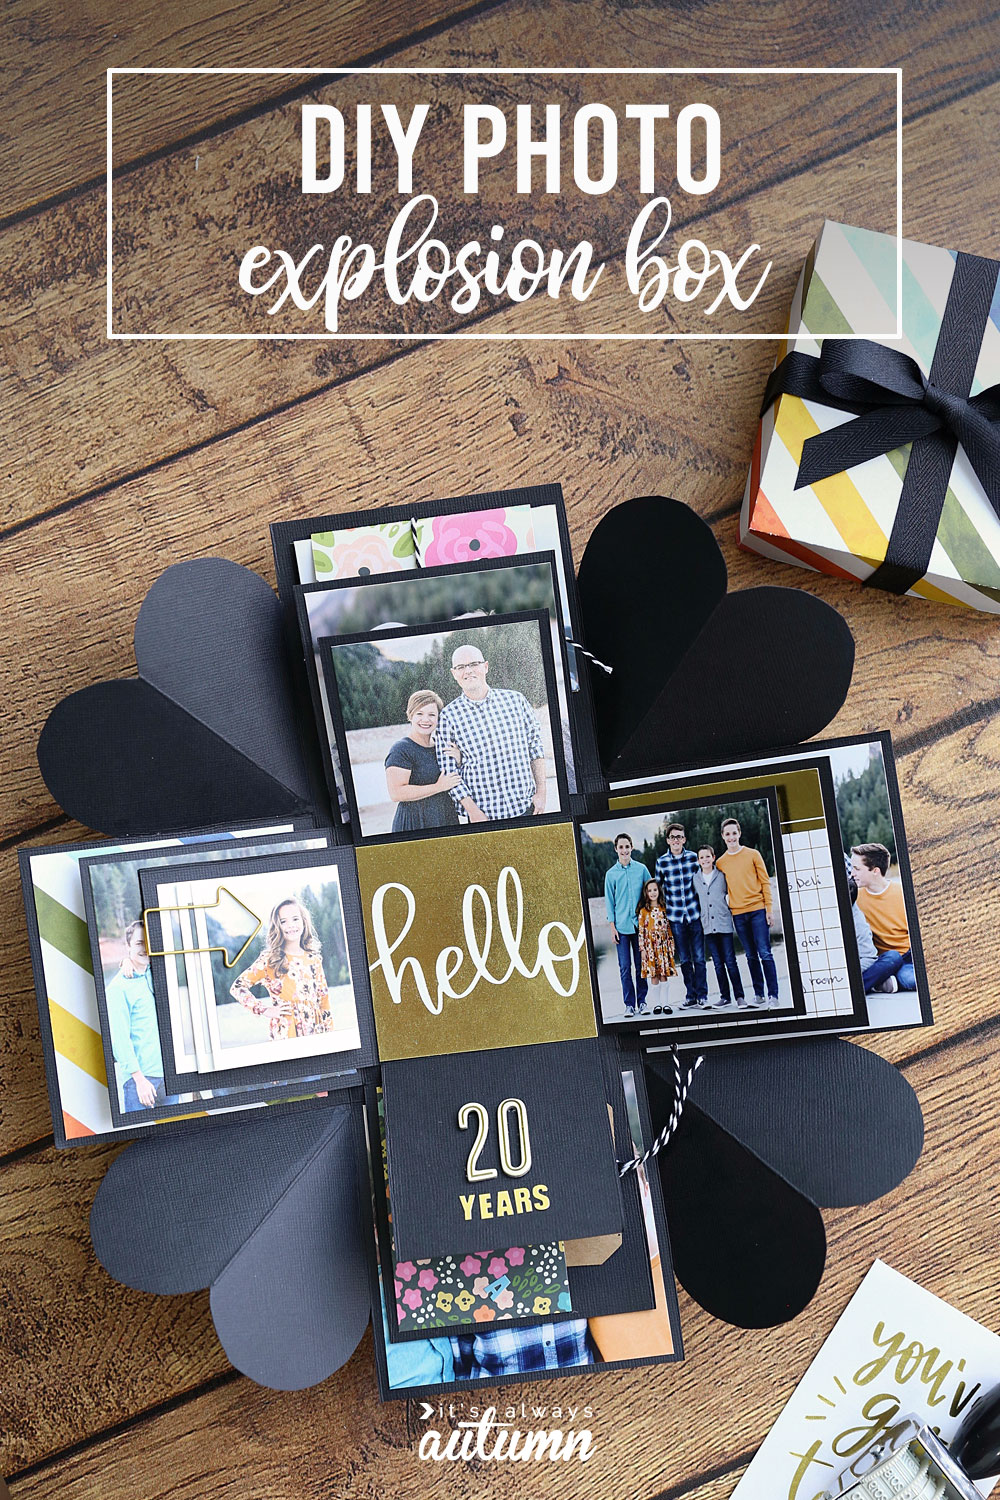
A few years ago my husband and I celebrated our twentieth anniversary with a trip to Costa Rica. Because of the trip we decided not to buy each other gifts, but I still wanted to give him something, so I made him an explosion box full of photos and notes. A DIY explosion box is a super fun handmade gift idea. When it’s folded up it looks like a normal gift box:
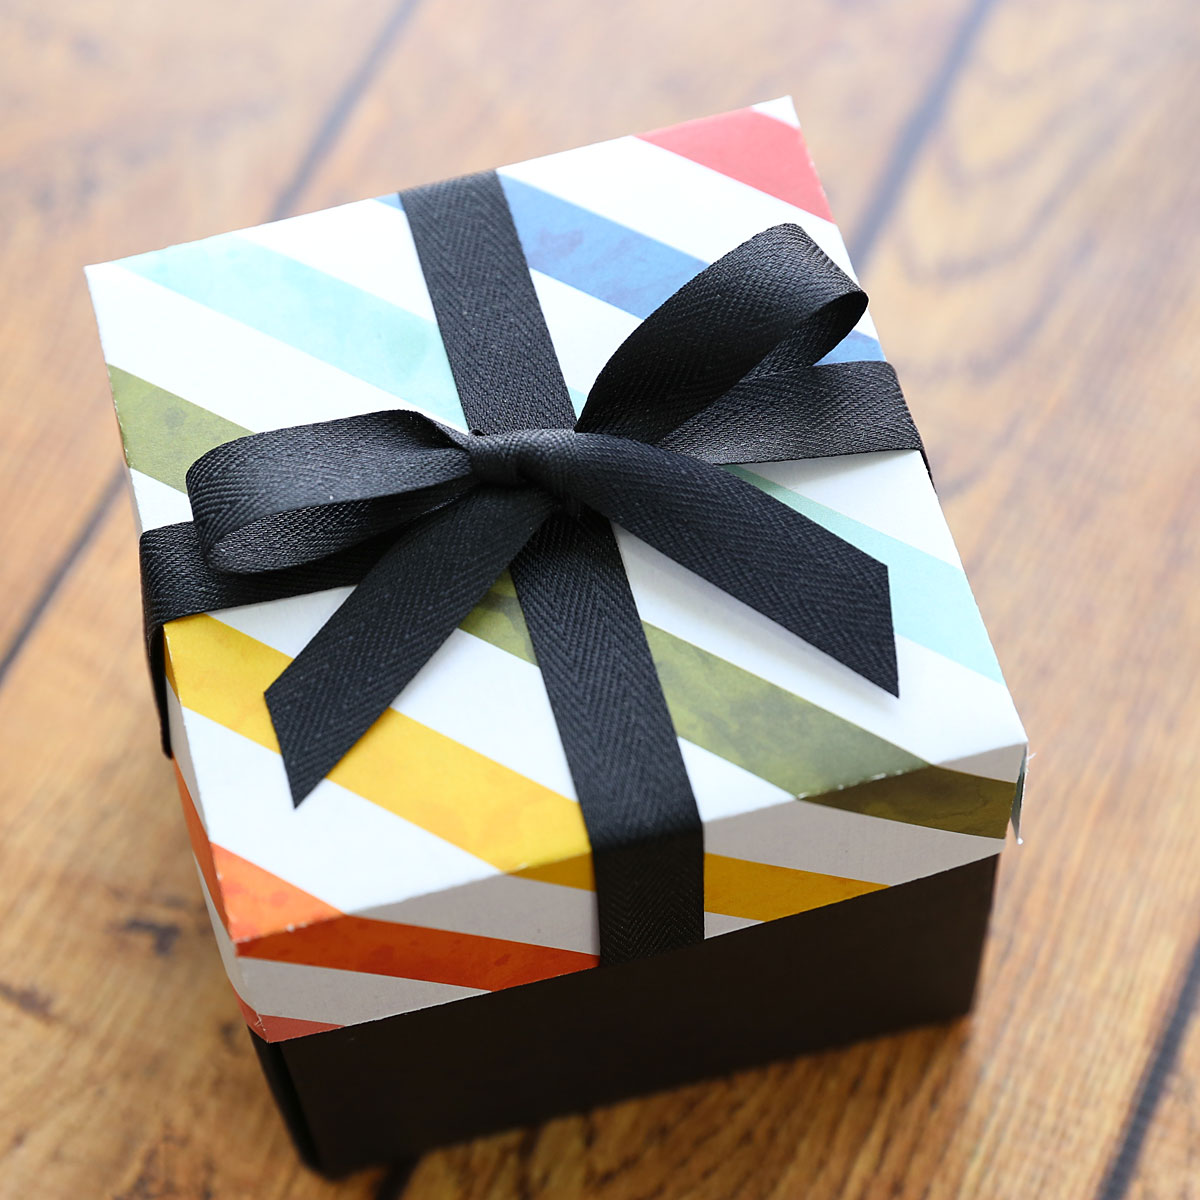
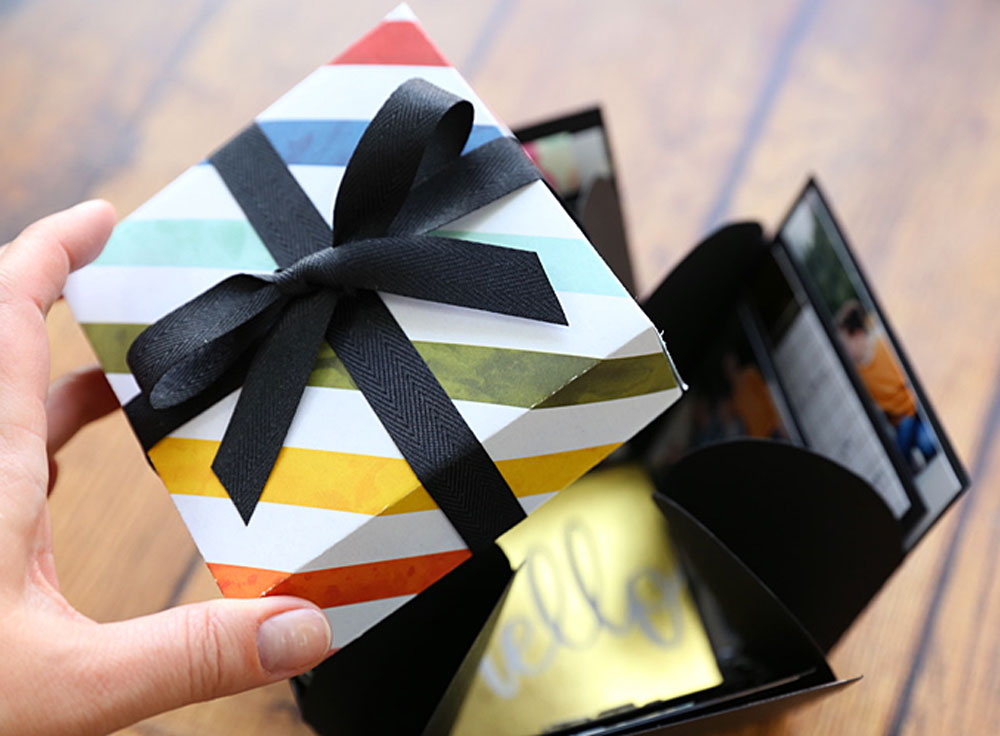
But when you take off the lid the layers “explode” to reveal photos, notes, and other decorations inside. I’ve seen lots of explosion boxes online, but had never made one of my own before. It was really fun to put together using cardstock and other scrapbook supplies. This unique gift is perfect for birthdays, anniversaries, graduations, or a wedding or Christmas gift. It’s a great way to preserve and share your favorite memories.
Easy DIY Gift
An explosion gift box looks complicated, but it’s actually not that hard to construct. I’ve created a printable cutting and scoring guide for you that will tell you how big to make each layer. The cutting guide also comes with a template to make the hearts in the corners of the base layer. Additionally, I have a printable template for the lid to minimize the amount of measuring you need to do. Finally, I’ve made a step-by-step instructional video so you can see exactly how to put it all together.
Explosion Box Video Demonstration
Photos don’t really do an explosion box justice, so if you’d like to see my box in action, you can start by watching this quick video:
Explosion Box Supplies
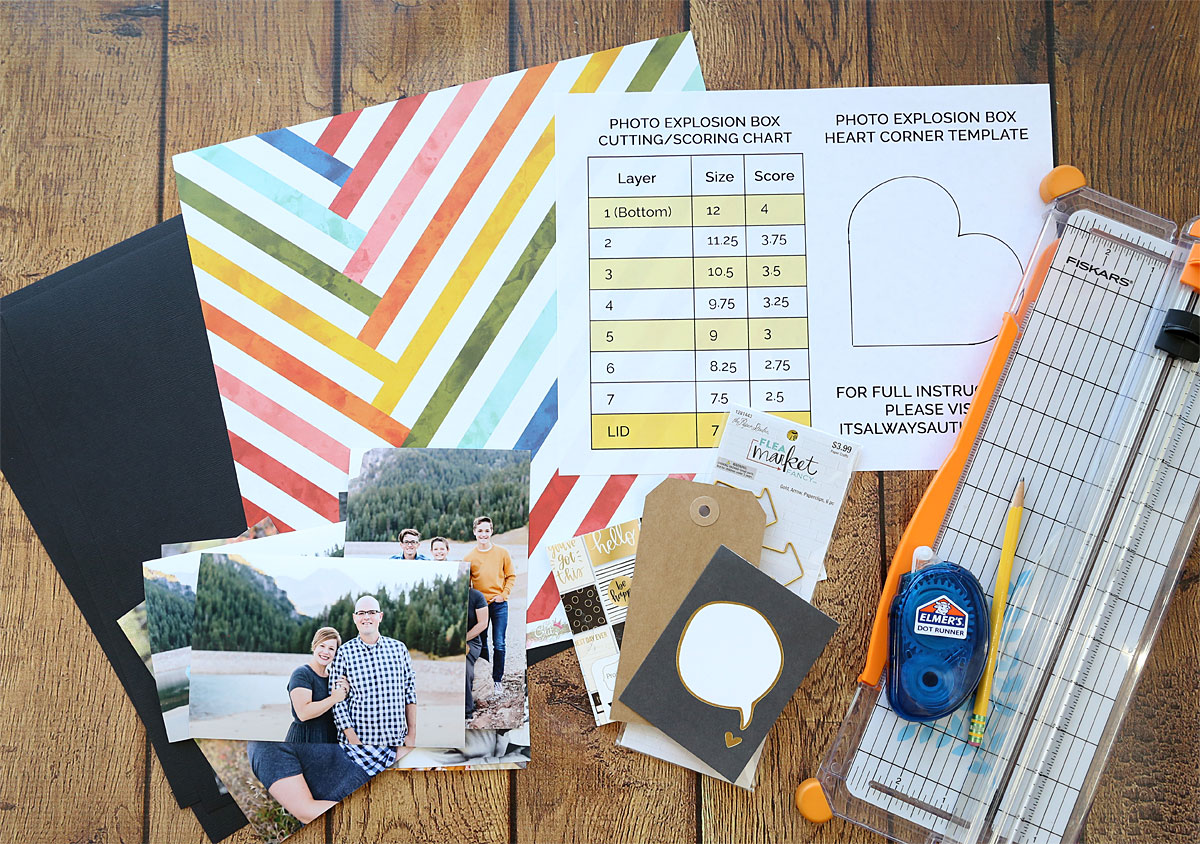
To create an explosion gift box, you’ll need the following basic supplies, all of which can be found at your local craft store or big box store:
- 12×12 inch solid colored cardstock (one for each layer)
- 12×12 or 8.5×11 inch printed cardstock (for the lid)
- Adhesive
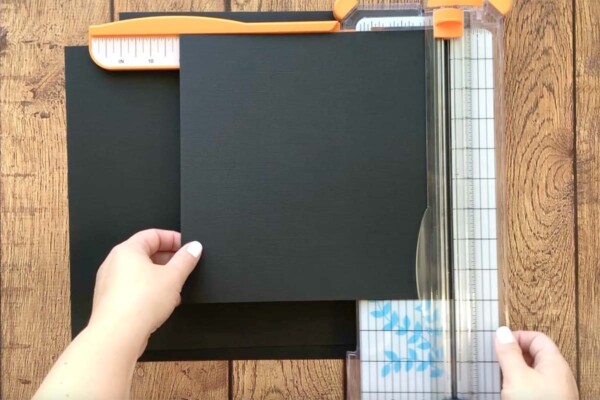
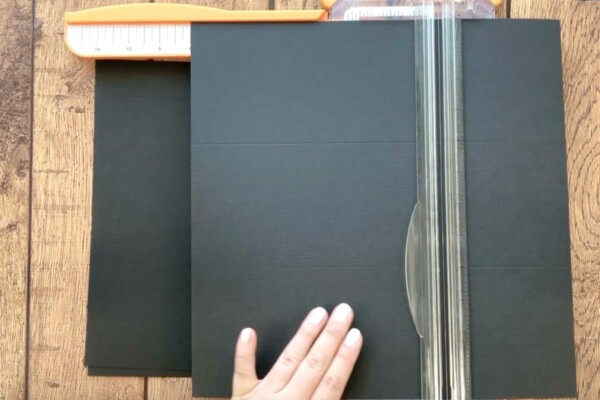
- Paper trimmer with scoring blade OR another way to trim + score cardstock
- Photos
- Embellishments (optional: this is a good time to pull out any scrapbook supplies you have tucked away!)
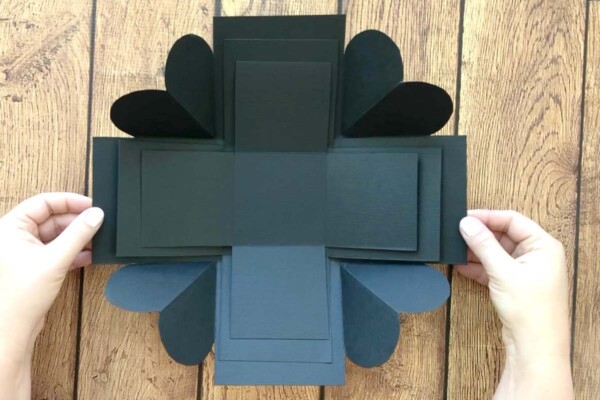
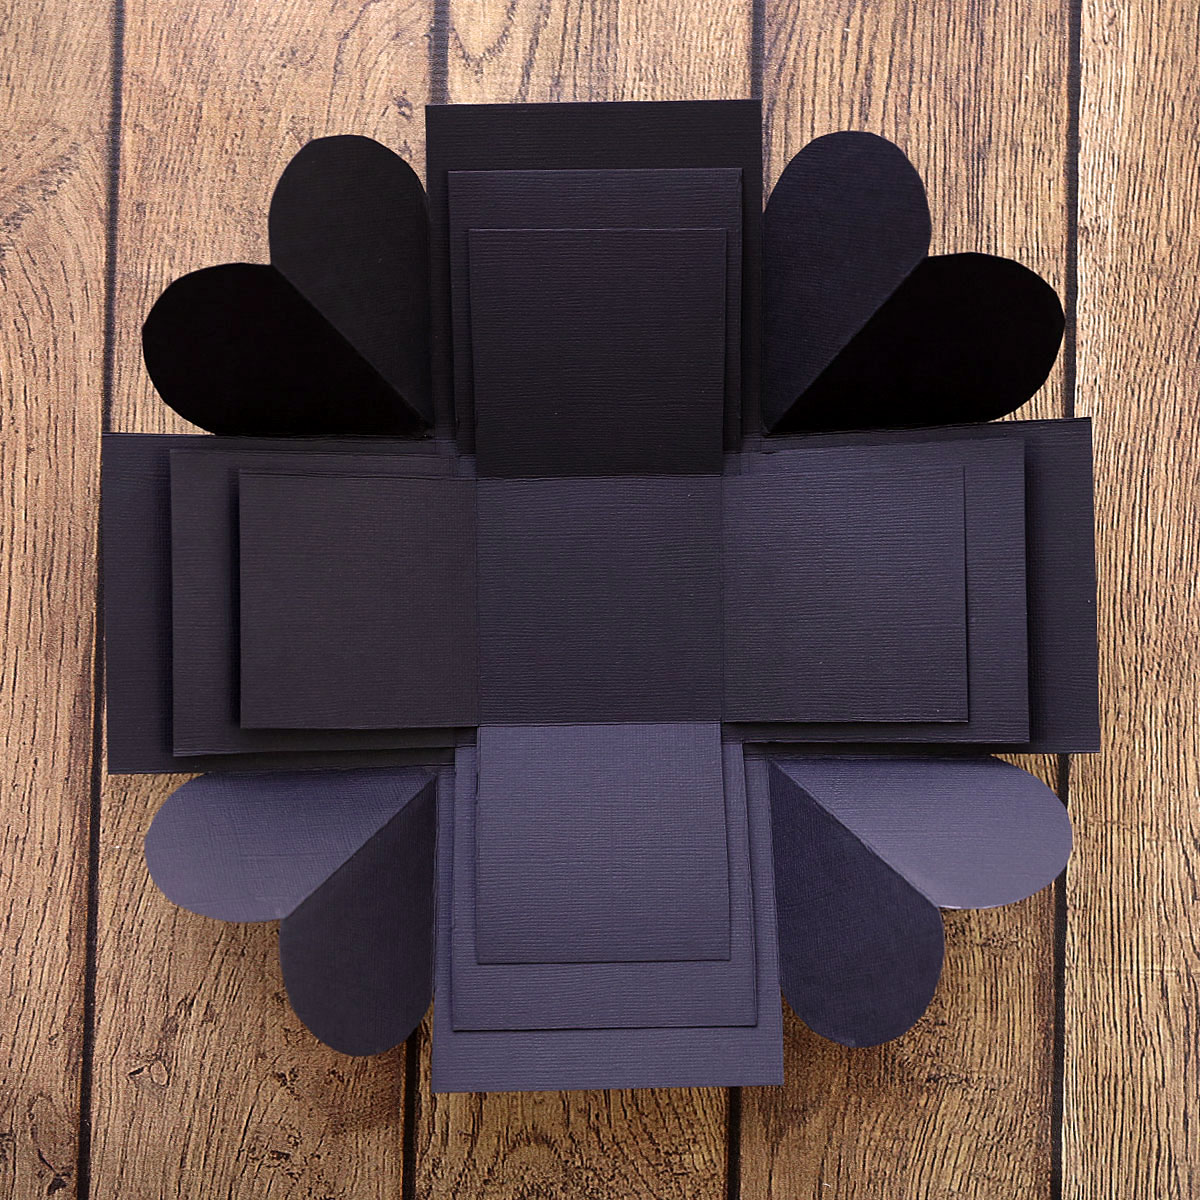
The Cutting Guide gives dimensions for up to 7 layers for your box. I made my box with 3 layers, using the dimensions highlighted in yellow on the guide. But you can include as many additional layers as you’d like in your box! A seven layer box would allow you to include LOTS of photos, notes and other memorabilia.
Please note that the Cutting Guide shows two numbers for each layer: the first number tells you how big the sheet of cardstock should be (square). The second number tells you how far from each edge you will measure in and score. It also includes cutting dimensions for the lid in case you don’t want to use the printable template.
Explosion Box Instructions
Below you’ll find a printable how-to card that contains all the instructions you need for making your own photo explode box. At the bottom of the card is an eight minute instructional video that demonstrates every step!
Explosion Box
Supplies
- 12×12 inch Solid Colored Card Stock 1 per layer you'd like to include
- 1 sheet Printed Card Stock
- Adhesive
- Paper Trimmer with Scoring Blade see note
- Photos
- Embellishments
Want more project ideas? Sign up to get my favorite easy crafts and recipes straight to your inbox!
Instructions
- Print the cutting decide and decide how many layers you would like to make your box. My box has three layers and uses the dimensions that are highlighted in light yellow. Cut your solid card stock to the dimensions listed on the cutting guide.

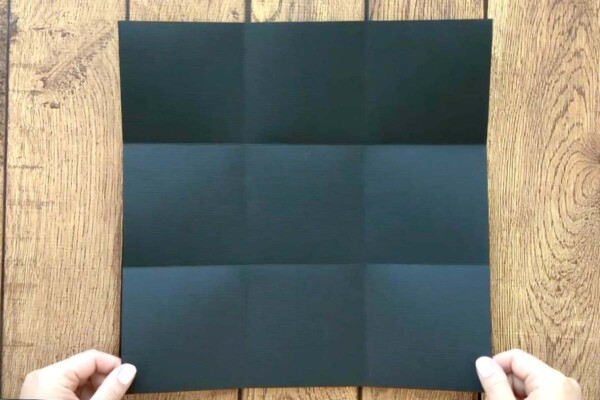
- Find the scoring measurement for the largest piece of cardstock. Measure in from one edge of the cardstock and score (for example, 4 inches in on a 12 inch piece of card stock). Rotate the paper 90 degrees and repeat. Repeat twice more until the card stock has been scored 4 times. This will divide the sheet of paper into 9 equal size boxes. Repeat with the other layers of cardstock.
- Fold in the card stock along all scored lines. Again, you should see 9 equal size boxes on each sheet of card stock.
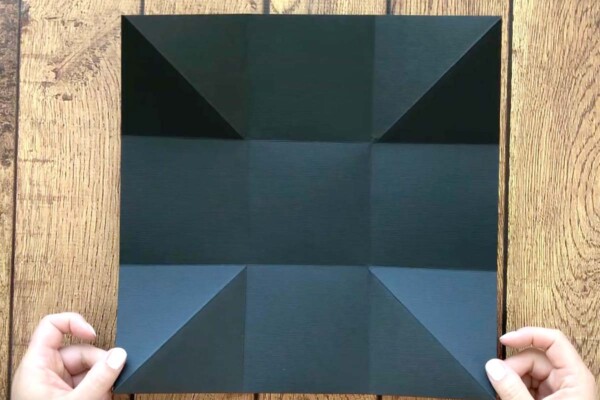
- On the largest piece of card stock, make a diagonal fold through each of the corner boxes. The diagonal fold should fold "down" while the other folds fold "up". Watch the video for a good explanation of this step.
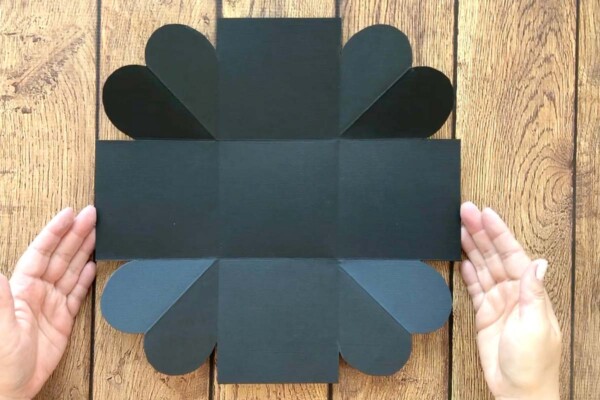
- On the largest piece of cardstock, trace the heart from the cutting guide and cut it out as shown.
- One the other pieces of card stock, cut away the corner boxes. Layer the largest piece of cardstock on the bottom, then center the next piece over it and adhere on the center box only. Repeat with any other layers.
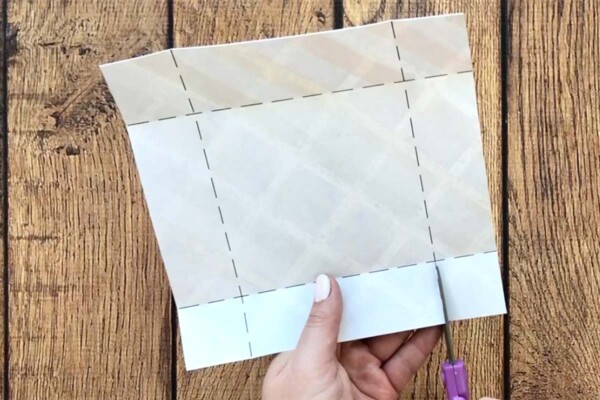
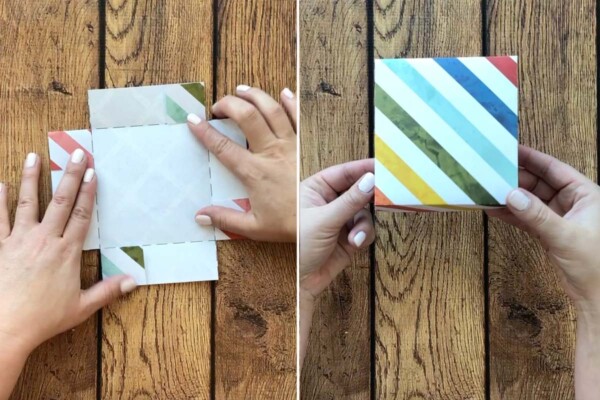
- Print the lid template on the back of the printed card stock (trim it to fit in your printer if needed). Cut along the solid lines, then score and fold along the dashed lines. At each corner, cut up to where the dotted lines meet from one side only. You are not removing the corners; you are making a flap so you can glue the lid together.
- Fold over the flat at each corner and add adhesive, then press to adhere the flap to the side next to it, creating a box lid.
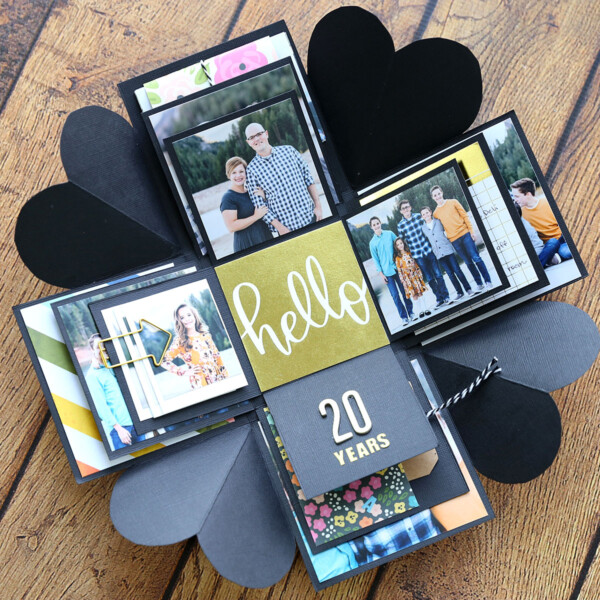
- Decorate the box as desired, adding pictures, notes, embellishments, etc. When finished, gather up the sides of the box, folding the hearts in toward the center, and place the lid on top.


Tips
Video Tutorial
Decorating your Explosion Box
Once you have the box put together, this is what it will look like:
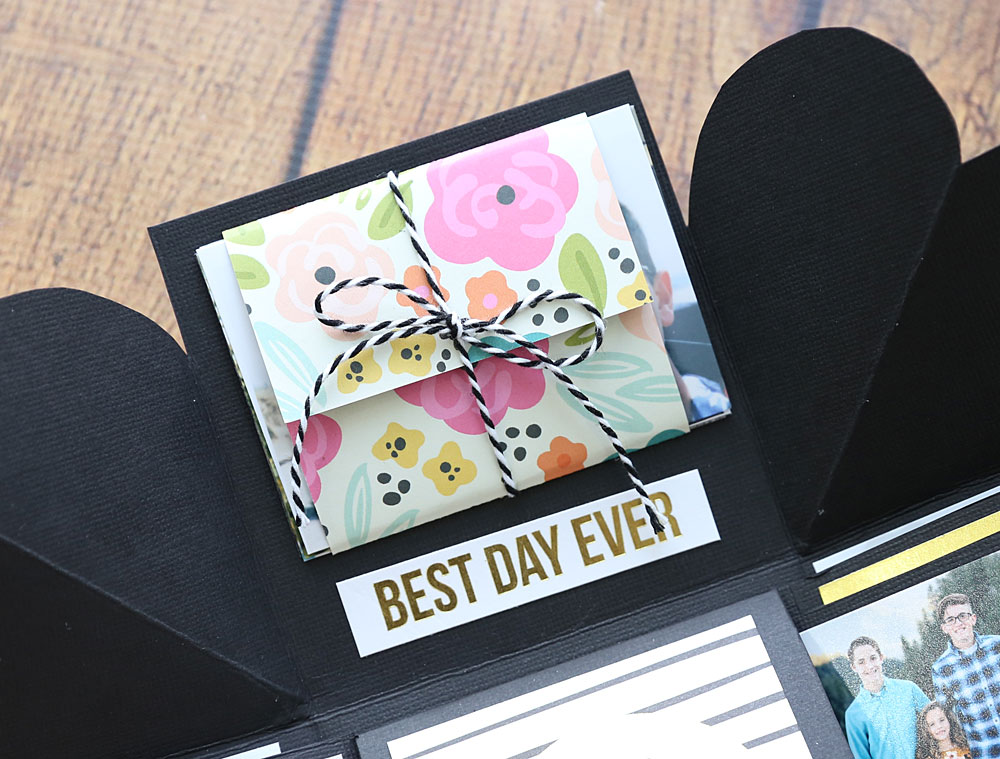
Decorating it is the really fun part! With an outside layer and two inner layers there are lots of areas to decorate. I chose to keep my box fairly simple, just adding photos, notes, and a couple of premade notecards from scrapbook section of the craft store. Inside of the box you can decorate both sides of the flaps so the recipient will find notes and photos everywhere they look.
For my photos, I cut them 1/4 inch smaller than the “score” measurement for each layer. That means the photos on the bottom layer are 3.75 inches square, the ones on the middle layer are 3.25 inches square, and the ones on the top layer are 2.75 inches square.
I added a couple of “interactive” elements in my box as well. I folded a strip of cardstock accordion style. It can be opened up to reveal small photos of each of our kids.
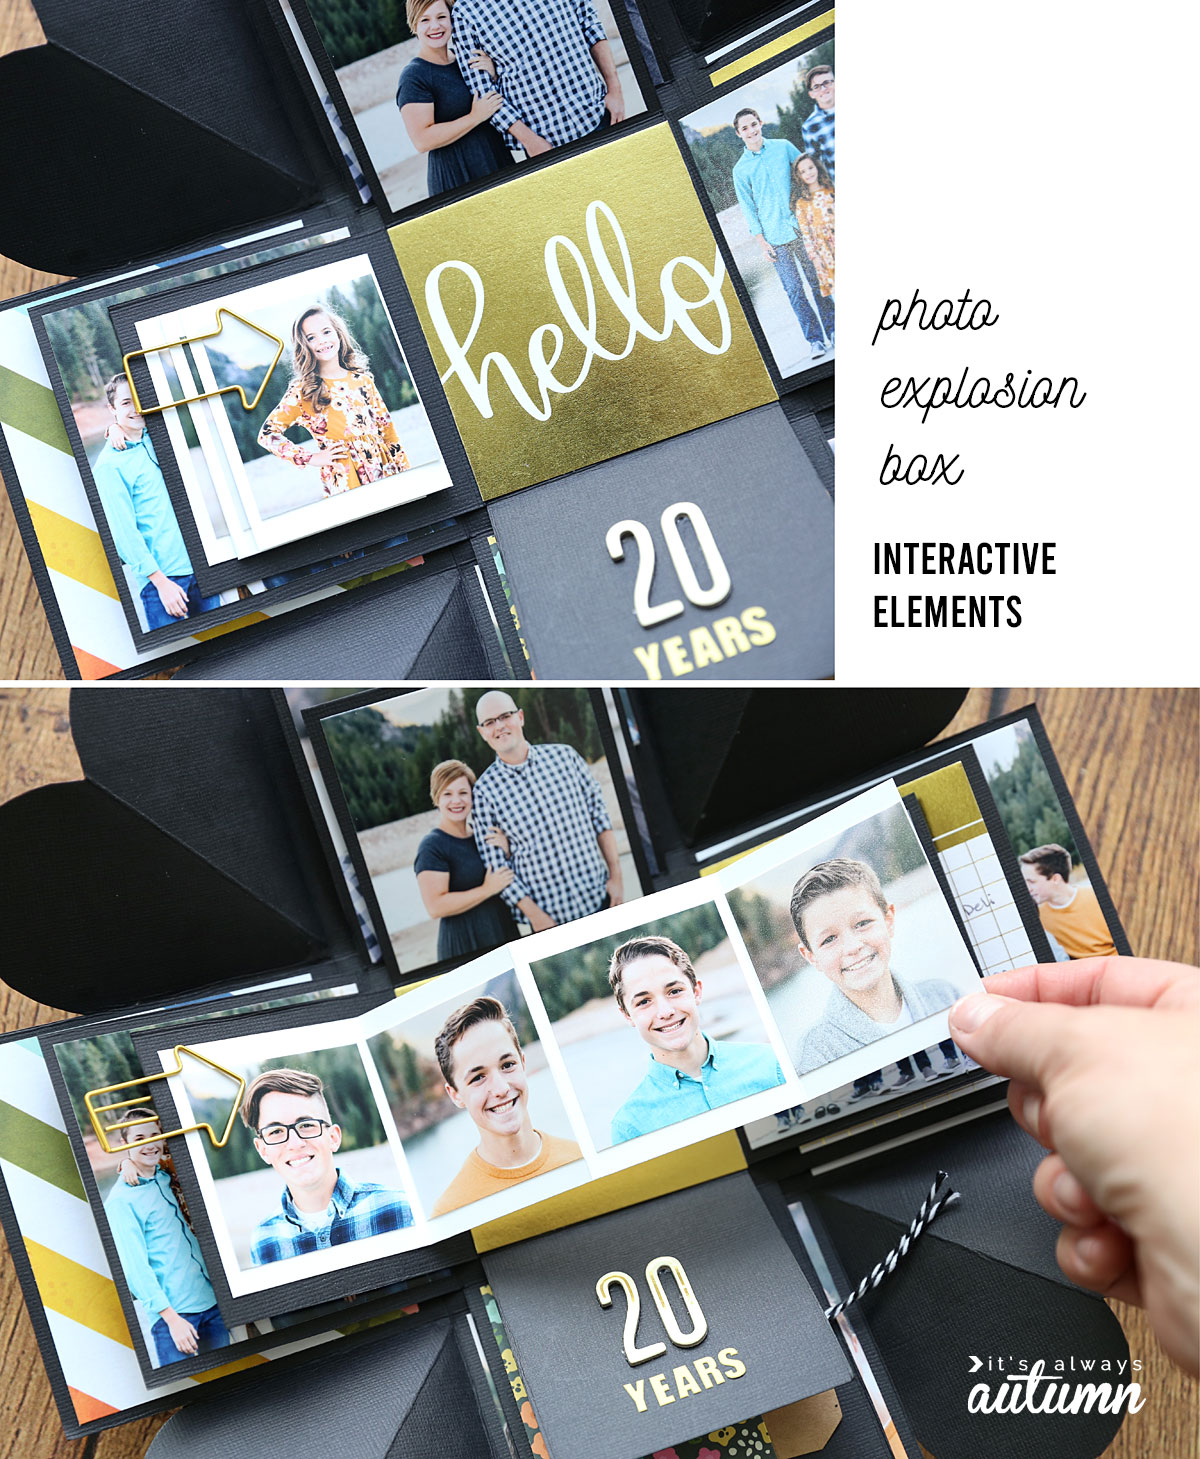
I also cut another strip of printed cardstock and folded it around some old photos of me and my husband that I printed out at wallet size. I tied it with twine and glued the whole thing onto the base layer of the box.
You can add as many (or as few) interactive elements as you’d like. You can find lots of videos and tutorials online that will give you ideas. This tutorial shows lots of different boxes, pockets, and other interactive elements along with cutting and folding dimensions. This video doesn’t include a tutorial, but gives LOTS of fun ideas.
For more handmade gift ideas, visit these posts:
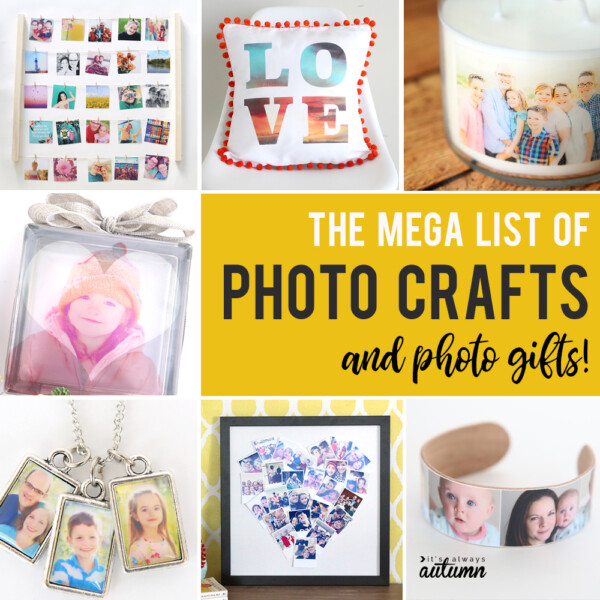
The biggest list of Photo Gifts

Erika Nelson says
What size pictures did you do for each layer? I would really like to do this for my boyfriend for our 1 year
Stephanie says
Great tutorial. Just a note that the template for the lid is a little off. I couldn’t understand why mine would not line up correctly so I measured it. The fold lines closest to the bottom of the page are further in than the other lines. Once adjusted it worked great.
Thanks
Bev says
I just love this!!! I missed out on the scrapbooking craze because I had children who would not stay out of my craft supplies after school, before I got home. So I gave up all crafts 15+ years ago and have to start acquiring supplies again now that they are all grow and and on their own.
What I would like to know, what is that tool that you are using to both score and cut? What is it called, who makes it, etc? As I have no idea as to what to even search for and it seems like it would fulfill several purposes, and keep me from buying some unnecessary duplicates.
Thanks for the great tutorial!
Amy J says
I was happy to find this tutorial, too! I am pulling out things I’ve had tucked away for a looong time now that my kids are mostly grown. I’m getting back into crafting, myself. Did you ever find a tool, Bev? I once had a Fiskars cutting tool for which blades could be changed from cutting to scoring blades. It just popped in/out. I hope you have enjoyed crafting again, Bev!
Lori G says
That is awesome! Thanks for sharing all your wonderful ideas. Love your patterns too.
Lynette says
Oh, Autumn, I am so glad you made the Explosion Box doable! My husband and I will celebrate our 49th (!!!) anniversary this summer, and I think this will be a perfect gift for him. Not only that, but because of the timing of your post, I have a few months to gather items to include in the box. I am a scrapbooker, so supplies are no problem! Thanks so much for this tutorial…and I don’t mind watching the ad so that you can include this valuable instruction for free.
As far as Costa Rica goes, I have no experience to guide you! I’ve only been to Canada, Mexico and a few countries in Europe, so I’m not very well traveled. The only “advice” I would give is that you not stress about the preparations and packing; relaxing and enjoying yourselves is the most important part of the trip! Have fun!
autumn says
Thanks Lynette! And congratulations on 49 years!