It's Always Autumn

creative tutorials for everyday life

  • Holidays
    • back to school
    • birthdays
    • Christmas
    • Easter
    • Halloween
    • July 4th
    • Mother’s Day/Father’s Day
    • teacher appreciation
    • Valentine’s
  • Crafts
    • crafts + DIY
    • handmade gifts
    • photo crafts
    • kid crafts + activities
  • Recipes
    • bread
    • dessert
    • main dish
    • side dish
  • Sewing
    • free sewing patterns
    • sewing for women
    • sewing for kids
    • how to sew
    • gifts
  • Photography
    • beginning photography tips
    • posing tips
    • photo editing tips
  • Tips
    • parenting tips
    • travel tips
    • books I love
  • FAQ

photo editing tips photography

how to smooth out a wrinkled background {photography tips}


easy technique for smoothing out a wrinkled background in a photo in 60 seconds! Easy Photoshop Elements tutorial.

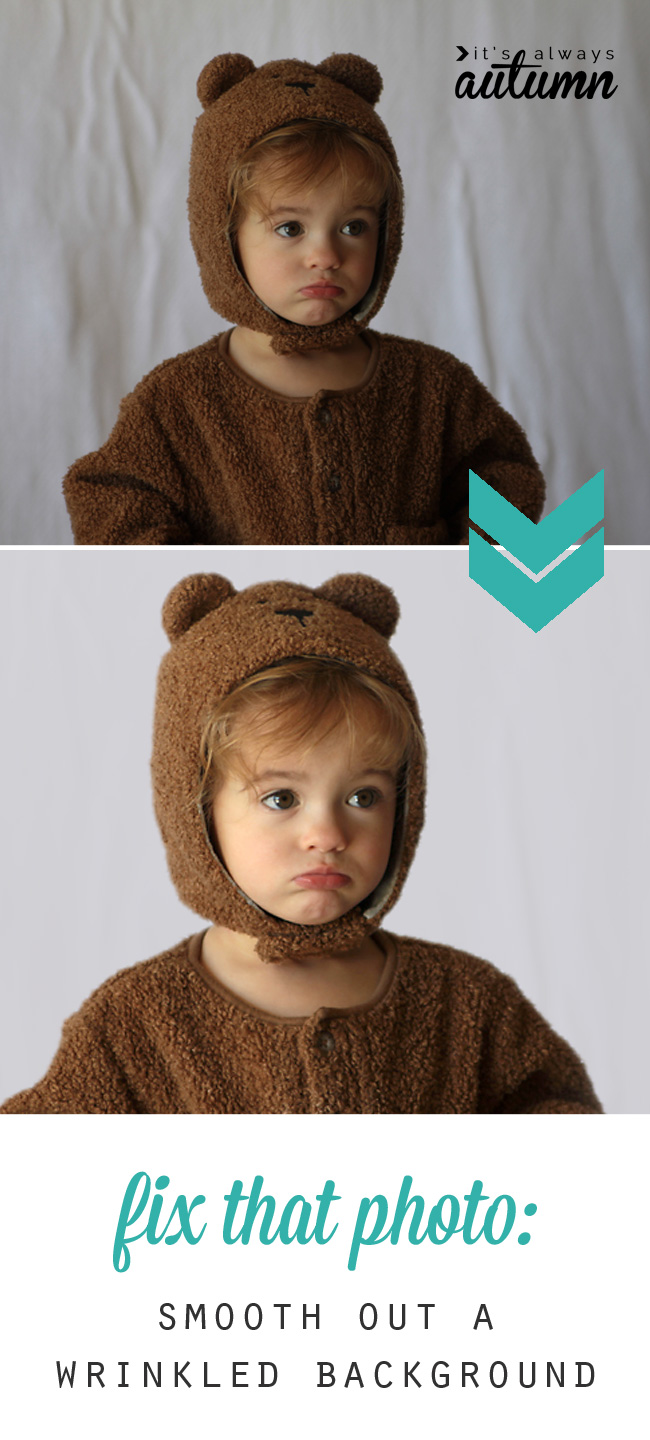
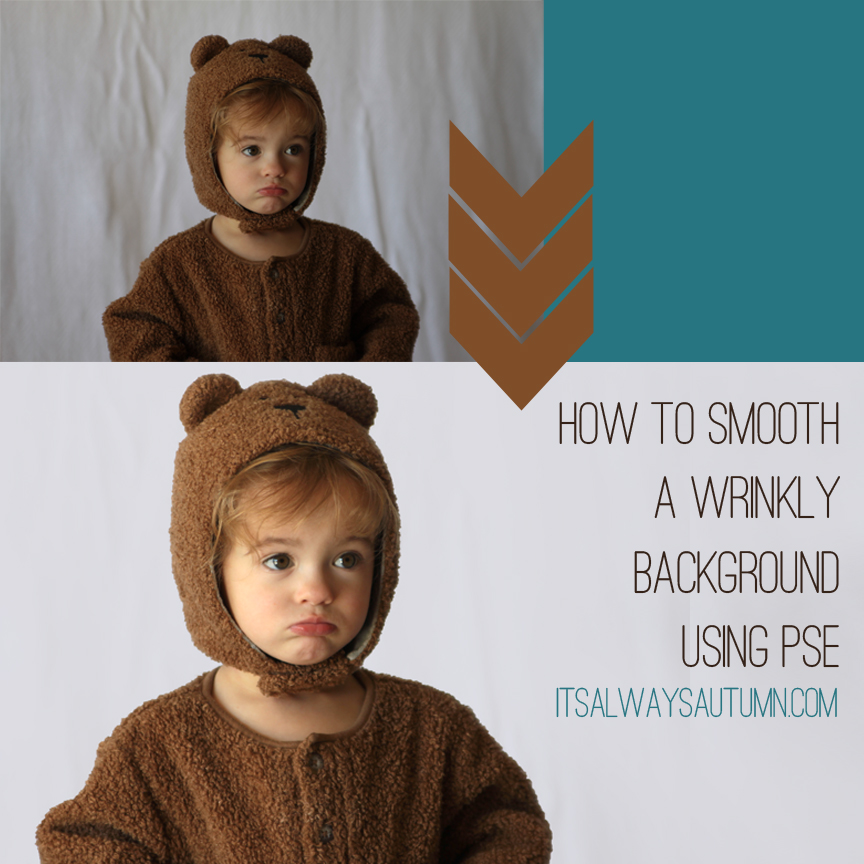
A few weeks ago I showed you how to set up a DIY photography studio in your garage to take advantage of natural light, and I recommended you use black stretch velvet for an easy and fairly inexpensive backdrop. But what if you don’t want a black backdrop? One option for small children is my DIY photography backdrop board, which you can see in action in this post. Another option is to simply grab a sheet or blanket in any solid color and use it for a backdrop – simple and super versatile. However, unless you iron the heck out of it beforehand, a portrait taken with a sheet/blanket background is going to end up with lots of wrinkles in the background:

There are a few things you can do to combat this on the front end – the first is to stretch the blanket/sheet out and clamp it tightly (assuming there is something you can clamp it to) to minimize wrinkles. Another is to grab an iron/steamer and steam it once it’s hanging in place. The third is to decide you’ll take care of the wrinkles after the fact using Photoshop Elements. Here’s how:

Quick note: This process works with smooth backdrops, like sheets or fleece blankets, and results in a very smooth background. Blankets with lots of texture require a different editing process and what I’m suggesting here will not work. Also, this process is much simpler if the backdrop is a different color than your subject – so a white backdrop works well with this brown bear suit, but a brown backdrop would make things much more difficult.

It’s a good idea to start any photo editing with a quick levels adjustment to brighten the photo if needed. Hit ctrl-L to get the levels screen you see below, and move the triangles below the histogram around to brighten and add contrast as needed (for a full explanation of how to do this, read this post).

(FYI – remember to turn down the brightness of your monitor when editing images. If it’s turned all the way up, which it probably is, your photos will appear much brighter on your screen then they’ll look when they get printed, leaving you will dark prints.)

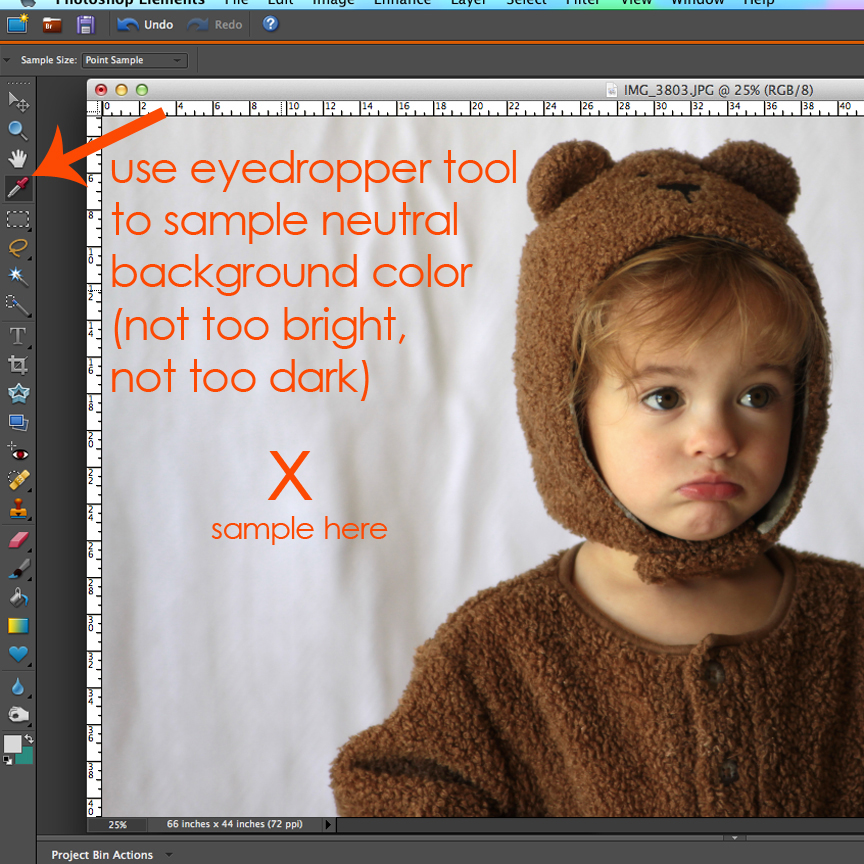
Our next step is to sample a neutral color from your background. We’re going to use this color to brush over the wrinkles, so we want it to be the main color in the background (not a dark area where a wrinkle is or a very bright area). Click on the foreground color square at the bottom left of your screen, then click on your background to sample the color.

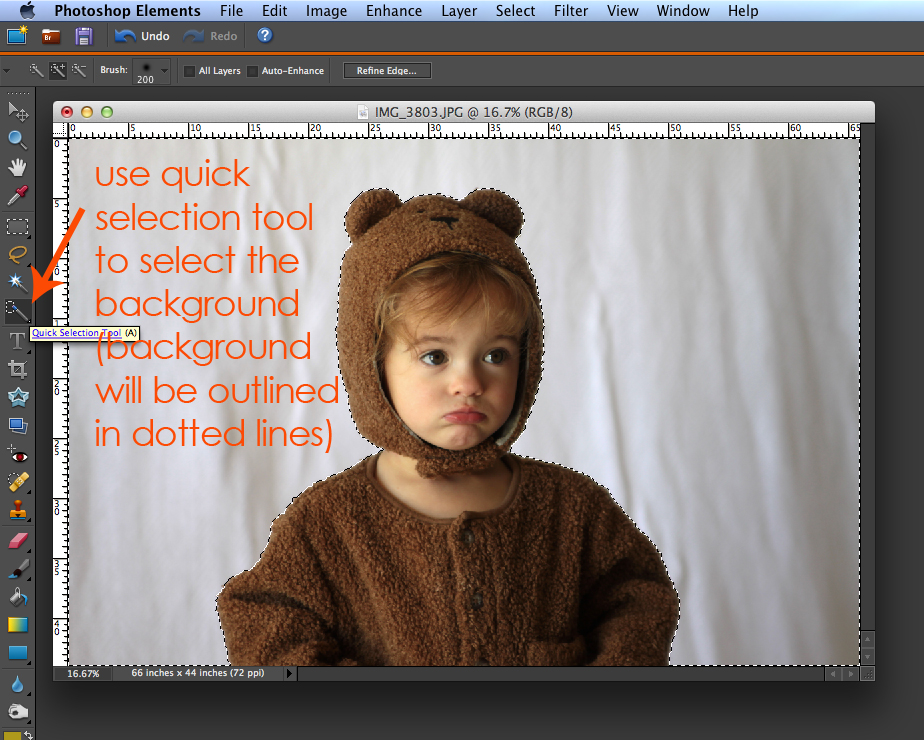
Next, select the background using the quick selection tool. If your backdrop is a different color than your subject, as in the photo below, PSE will be able to do this very easily without much work at all on your part.

Next, click the button at the top of the screen that says “refine edge” (you can see it in the photo above). Increase the smooth value to 3, the feather value to about 7, and the contract/expand value at -5.

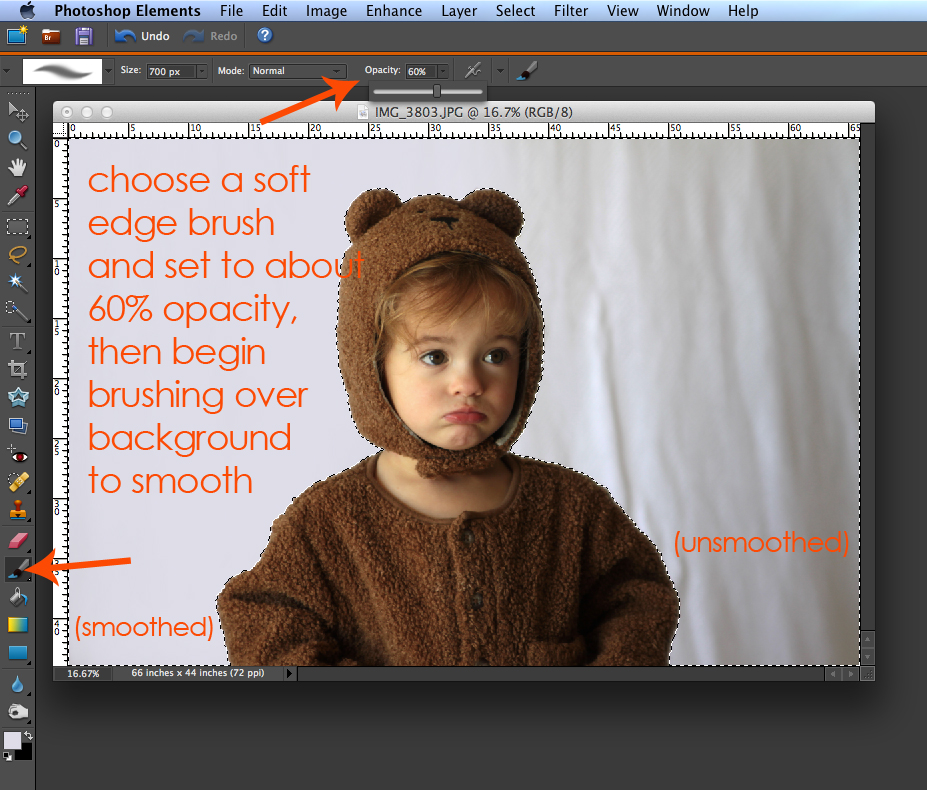
Now we have the background selected and can start brushing over it to smooth out the wrinkles. Hit B for the brush tool and use the drop down menu at top left to choose a soft edge brush, and set the opacity at about 60%. Begin brushing over the background (you’re really painting on a slightly see-though layer of color that matches the background) to smooth out the wrinkles. The nice thing here is that since we’ve selected the background, you can brush right over your subject and it won’t be affected. And the edge refinements we made above make sure you’ll still have a nice, realistic edge on the subject even if you brush right over it.

Depending on how wrinkly the background is, you may have to brush over it more than once, but after less than a minute you should have a nice smooth background.

It’s a quick process that makes a huge difference in the look of your photo.

Linking to some of these parties:

Monday: Skip to My Lou | Brassy Apple | Craft-o-Maniac

Tuesday: Tip Junkie | Ladybug Blessings | Sugar Bee Crafts | The Blackberry Vine | Hope Studios | Funky Polkadot Giraffe | Not JUST a Housewife | Homework Today’s Assignment: Be Inspired | Shwin and Shwin

Wednesday: Handy Man, Crafty Woman | Southern Lovely | Sew Much Ado | SNAP | Someday Crafts | The NY Melrose Family | Printabelle | Simply Kierste

Thursday: Somewhat Simple | House of Hepworths | Momnivore’s Dilemma | The Shabby Creek Cottage | Yesterday on Tuesday | Fireflies and Jellybeans | The Taylor House

Friday: Chic on a Shoestring Decorating | The Shabby Nest | Stuff and Nonsense | Naptime Crafters | It’s a Hodgepodge Life | At The Picket Fence | 504 Main | Blissful Bucket List | Whipperberry

Weekend: Tatertots and Jello

Share this:

  • Tweet
  • Print


33 Comments

free email series

4 FOOLPROOF HOLIDAY PROJECTS

Easy craft & recipe ideas to help you enjoy the season

« swedish apple pie
DIY felt baby Jesus ornament + wood manger ornament »

Comments

  1. Printabelle says

    November 30, 2012 at 12:11 am

    Really good tips, I’ve definitely had this issue before!

    Reply
  2. Theresa says

    November 30, 2012 at 12:11 am

    Your photo tips are amazing! I think I have every one of them pinned to my photography tips board. Well, this one is on its way. Thank you for sharing your knowledge!

    Reply
  3. Angelina says

    December 4, 2012 at 12:12 am

    Oh my goodness!!! I LOVE this tip.. Thank you so much for sharing it 🙂
    Angelina

    Reply
  4. Jennifer says

    January 26, 2013 at 12:01 am

    Thank you so much for this! I love this method.

    Reply
  5. Sam says

    June 11, 2013 at 12:06 am

    Hi,
    I found this tip while searching on internet, I did a purchase in http://www.backdropsource.co.au for white backdrop. However its a muslin backdrop, i couldn’t remove the wrinkles there. This tip solved the issue, I have forwarded this tip to many of the photographers in AU. Thank you for the tips
    Regards
    Sam

    Reply
  6. Bevybun says

    July 7, 2013 at 12:07 am

    Thank you so very much for these awesome tips! I truly cant thank u enough!!!!

    Reply
  7. i.ikeda says

    August 17, 2013 at 12:08 am

    Thank you for this. I have my daughter’s 1st birthday coming up and had never taken a photo in a studio set up (usually I take pictures in outdoor settings). I had no idea how wrinkly muslin can get! Definitely buying some paper next time. This tip is going to save her birthday pictures for sure. Thank you so much.

    Reply
  8. Uruguay says

    November 23, 2013 at 10:42 am

    Hey there are using WordPress for your blog platform?

    I’m new to the blog world but I’m trying to get started and create my own.
    Do you need any coding knowledge to make your own blog?
    Any help would be greatly appreciated!

    Reply
  9. Kaye Kantz says

    January 14, 2014 at 6:43 am

    awesome pics tammy….

    Reply
  10. Anastasia says

    March 8, 2014 at 9:50 am

    WOW! This was unbelievable easy to follow, and understand. Thank you so much!

    Reply
  11. Leah says

    March 16, 2014 at 3:42 pm

    This is so great, thank you so much! So easy to follow…normally I get so overwhelmed in Elements and this made me feel like I could really improve a photo and quickly! Thanks again.

    Reply
    • autumn says

      March 17, 2014 at 1:21 pm

      Thanks so much for letting me know – I really appreciate your comment!

      Reply
  12. Julie says

    March 18, 2014 at 12:39 pm

    Thanks for the great tips. We have photoshop as my daughter is studying photography but when she’s away at Uni I have VERY limited skills and I can’t keep ringing her for help! I also find getting a great background is an issue so will definitely be trying this out.

    Reply
  13. Kerrie says

    April 7, 2014 at 7:50 am

    Hi! For this particular editing technique, how would you do it in a different program than Photoshop? I have some great shots but wrinkles and folds in my background are ruining my picture!

    Thanks, Kerrie

    Reply
    • autumn says

      April 8, 2014 at 6:30 am

      Kerrie, I’m not really familiar with how to do things like this in other photo editing programs – good luck getting it figured out!

      Reply
  14. Valerie says

    May 3, 2014 at 10:21 am

    OMG THANK YOU SOOOOOO MUCH!!!

    Reply
  15. Dee Rittenhouse says

    May 9, 2014 at 7:11 pm

    I have to say that I use this tutorial all the time. The PTA president always asks me to take pics at functions such as Muffins for Mom and they use rolled type wrinkled construction paper as the background. This helps smooth it out and wah la mom’s pics look great. Thanks so much!

    Reply
    • autumn says

      May 10, 2014 at 10:02 am

      Awesome! I’m so glad it’s been helpful – thanks so much for letting me know!

      Reply
  16. Victoria says

    June 28, 2014 at 7:13 pm

    Thank you so much for posting this! It has been so helpful. I want to go back and re-edit so many of my photos! 🙂

    Reply
  17. Jessica says

    November 10, 2014 at 7:37 pm

    I love you. Thank you. You have changed my life!!!!:D

    Reply
  18. Brittany says

    January 13, 2016 at 5:59 pm

    Ahhh thank you for this tip!! It was exactly what I’ve been searching for! 🙂

    Reply
  19. Mallory says

    March 25, 2016 at 6:55 pm

    This is my first comment ever on a blog, but I felt the need to. This is a game changer. Thank you SO much!

    Reply
  20. Kristie says

    July 21, 2016 at 10:36 am

    Awesome tutorial!!! Wish I had seen this sooner!!!

    Reply
  21. HArley says

    December 14, 2016 at 5:47 am

    This solved so many issues for me thank you so much!!!

    Reply
  22. Dani says

    November 13, 2018 at 1:55 pm

    This was very, very helpful today for a photo I was working on! Thanks!!

    Reply
  23. Yousuf says

    January 28, 2019 at 3:24 am

    I love this article. As a professional photographer for many years I have seen an increasing dependency on over editing vs learning the craft of photography to start with a beautiful base to build from. Thank you for this article!

    Reply
  24. Yousuf says

    January 28, 2019 at 3:26 am

    I am very happy to found your article. I was seeking to know which the best professional photography. I can say is that you deserve this and much more! Thank you for sharing.

    Reply
  25. Maria Ekatarina says

    April 7, 2019 at 4:10 am

    Its a very Informative article for who are interested to learn photo editing, Moreover if you write on about Photo Manipulation It will be more help for people and specially for me..! Thanks

    Reply

Trackbacks

  1. non surgical vaginal rejuvenation says:
    July 31, 2014 at 9:23 am

    non surgical vaginal rejuvenation

    how to smooth out a wrinkled background photography tips – It’s Always Autumn

    Reply
  2. Smoothing Out a Background in Photoshop | Catherine Chen Photography says:
    May 31, 2015 at 11:41 pm

    […] https://www.itsalwaysautumn.com/2012/11/21/how-to-smooth-out-a-wrinkled-background-photography-tips.h… […]

    Reply
  3. 31 SIMPLE TIPS ON HOW TO USE PHOTOSHOP LIKE A PRO - AvantPhoto says:
    April 3, 2016 at 9:02 pm

    […] 11. Smooth out wrinkly backdrops using Photoshop Elements (works with Photoshop too!). See full tutorial here. […]

    Reply
  4. buying computer hardware says:
    June 16, 2016 at 4:14 pm

    buying computer hardware

    how to smooth out a wrinkled background photography tips – It's Always Autumn

    Reply
  5. Editing Processes – Productions Blog says:
    April 26, 2019 at 10:20 am

    […] these lines. As I had never dealt with this problem before I had to look this method up and found this helpful tutorial […]

    Reply

Leave a Reply Cancel reply

Your email address will not be published. Required fields are marked *

Hey, glad you’re here!

I'm Autumn, a mom of five who loves ice cream, Masterpiece Theatre, and clothes that hide the fact that I eat so much ice cream. When I was 18 I got a job at a craft store and told everyone (regularly) how much I hated crafts. Well, things change! Read More…

Find me here

  • Facebook
  • Instagram
  • Pinterest
  • Twitter

free email series

4 FOOLPROOF HOLIDAY PROJECTS

Easy craft + recipe ideas to help you enjoy the season

Popular Posts

How to make GORGEOUS paper flowers

How to make mini donuts! {baked cake mix donuts recipe}

Tissue transfer art is not only gorgeous, it's totally easy enough for kids to make! Fun kid's art project - perfect indoor activity for rainy days.

Easy + gorgeous tissue paper art {perfect for kids!}

This artisan bread recipe is so easy to make and turns out amazing! It only takes 4 ingredients and 5 minutes of hands on time for crusty, delicious bread! How to make bread.

Crazy easy homemade artisan bread {only 4 ingredients!}

girl’s flutter sleeve dress or top sewing tutorial & free pattern in 4T

Blog policy

All posts and pictures are copyrighted by Autumn Baldwin and blog content may not be reposted elsewhere. However, linking back to my content is just fine. You may use one photo as long as you link directly back to the specific post. Thank you!

Please view our Privacy Policy here.

Also, please note that this blog is a participant in the Amazon Services LLC Associates Program, an affiliate advertising program designed to provide a means for sites to earn advertising fees by advertising and linking to Amazon.com.

Copyright © 2019 · Divine theme by Restored 316192.168.1.1 router login