It's Always Autumn

creative tutorials for everyday life

  • Holidays
  • Holidays
    • back to school
    • birthdays
    • Christmas
    • Easter
    • Halloween
    • July 4th
    • Mother’s Day/Father’s Day
    • teacher appreciation
    • Thanksgiving
    • Valentine’s
  • Crafts
  • Crafts
    • crafts + DIY
    • handmade gifts
    • photo crafts
    • kid crafts + activities
  • Recipes
  • Recipes
    • bread
    • dessert
    • main dish
    • side dish
  • Sewing
  • Sewing
    • free sewing patterns
    • sewing for women
    • sewing for kids
    • how to sew
    • gifts
  • Photography
  • Photography
    • beginning photography tips
    • posing tips
    • photo editing tips
  • Tips
  • Tips
    • parenting tips
    • travel tips
    • books I love
  • FAQ

beginning photography tips photography
April 19, 2013

8 steps to better photos on AUTO {step 7: blur the background}

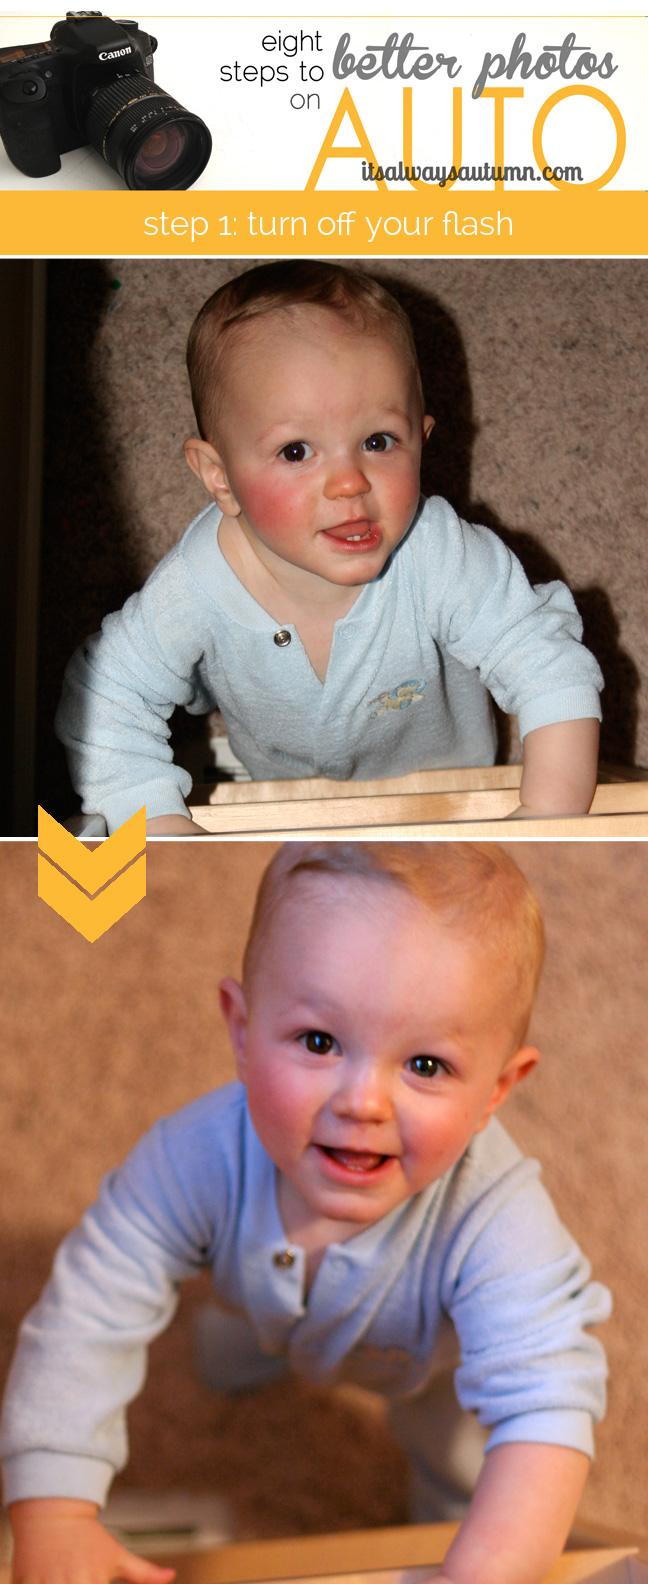
This is the seventh installment of Eight Steps to Better Photos on AUTO. Most people think the only way to really improve their photos is to learn to shoot on manual mode, and it’s true that using manual gives you the most control over the finished photo. But what if you don’t have the time or energy to invest in learning about exposure and aperture and all the other details of manual? That’s where this series comes in. There are plenty of things you can do to greatly improve your photos even when shooting on auto, and every Friday for the next eight weeks I’ll share one of them with you. Step one | Step two | Step three | Step four | Step five | Step six | Step seven | Step eight

A close up of a boy with grass and dirt in focus in the background; close up of same boy with background blurred out


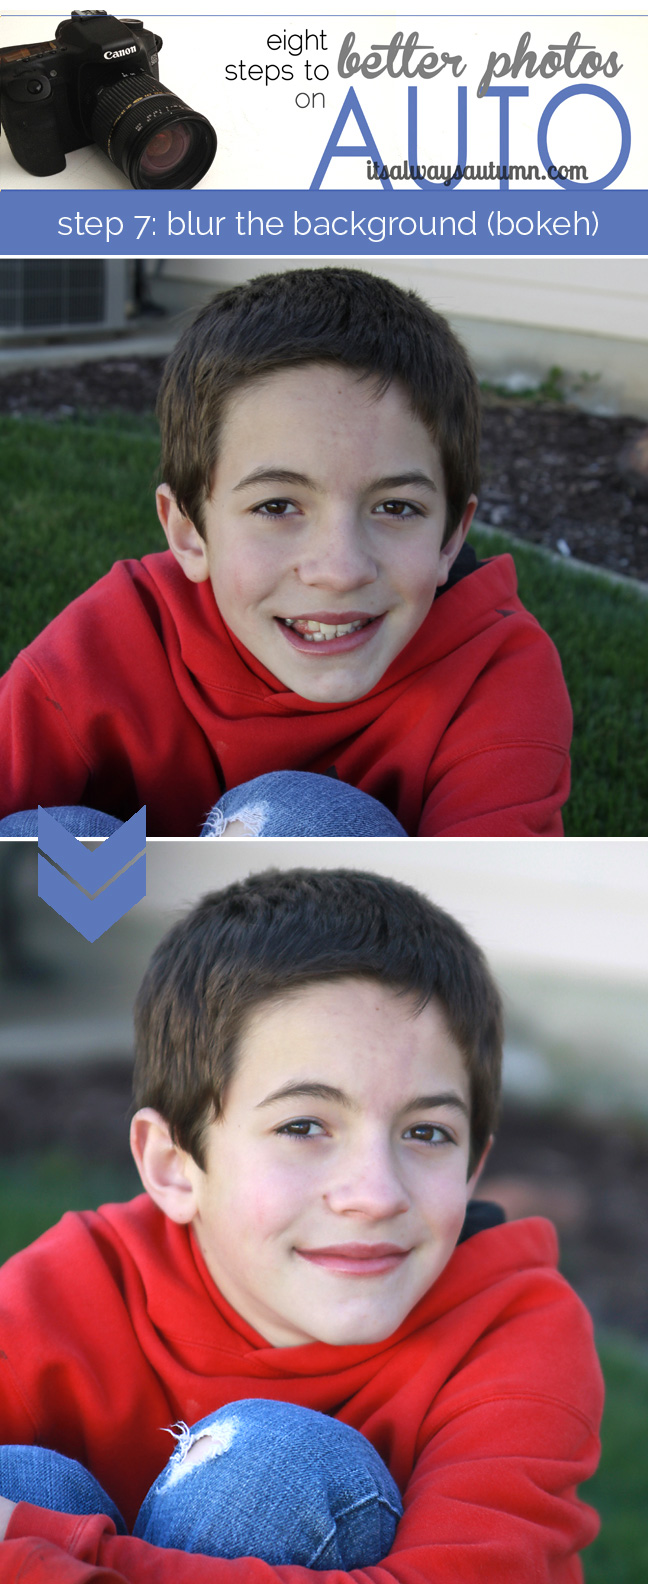
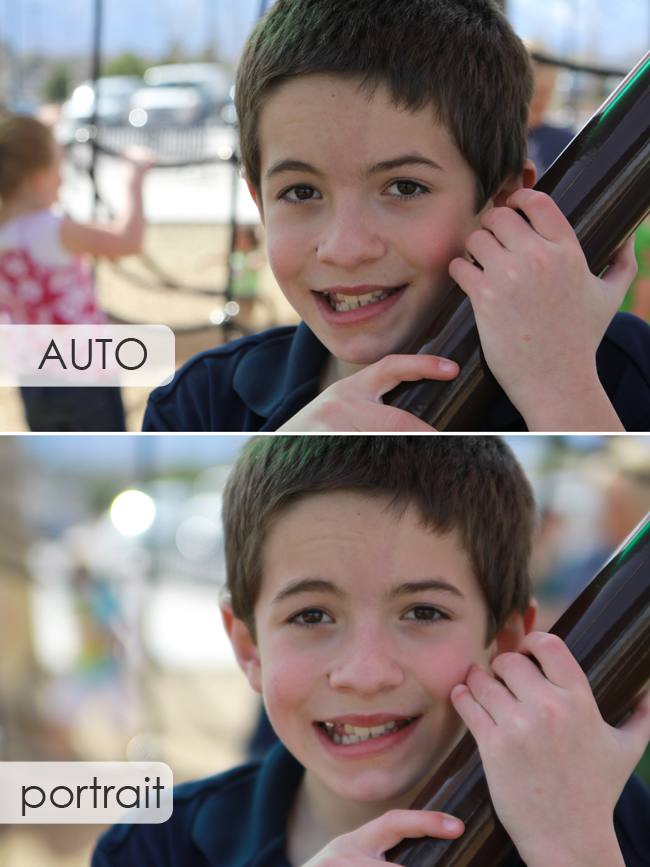
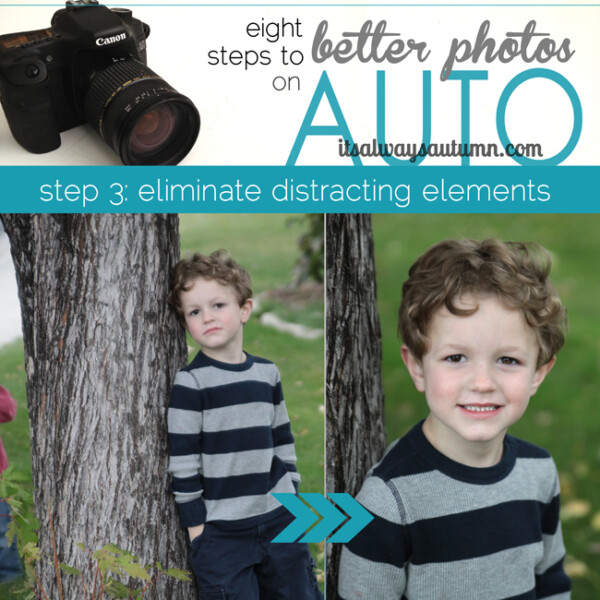
Blurring the background is one of the best ways to turn a snapshot into a great photo. When the background of the photo is blurred, the subject becomes the obvious focus and almost seems to jump out of the photo. A blurred background adds softness to the photo and makes it look more professional. In addition, blurring the background allows you to get a great photo wherever you are without having to worry about distracting background elements. The standard method for blurring the background requires knowing how to manipulate your camera’s aperture. However, there are a few simple tricks you can use to get similar results on auto, without messing with any of your camera’s settings. Let’s look at some example photos:

photo of a boy at a park with toys in the background taken on auto; same photo taken on portrait with blurry background

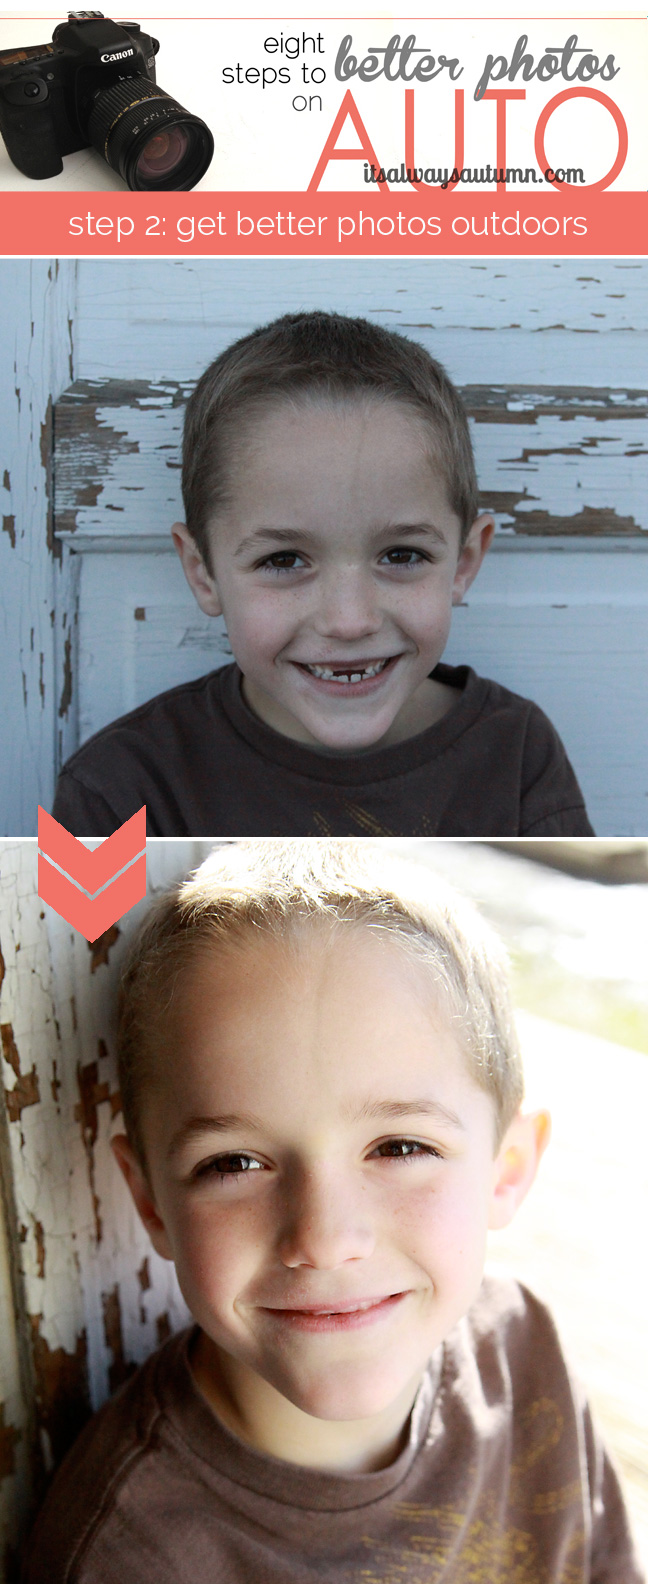
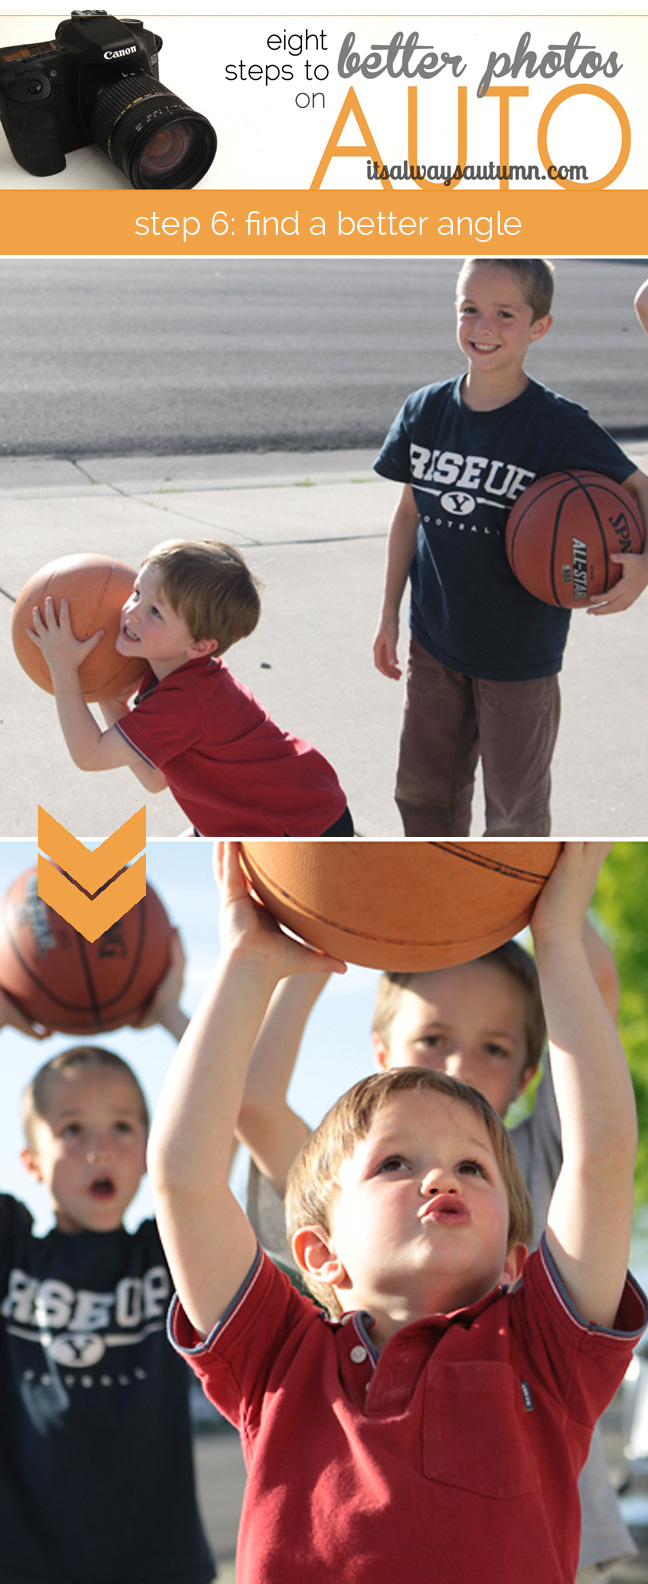
In the top photo the boy looks flat against the busy background because all parts of the photo are in focus. In the bottom photo the boy is much more prominent because he appears closer to the viewer than the blurred background. The photos were taken a few seconds apart, both on AUTO. The only difference is that the second photo takes advantage of the portrait setting – one of six auto settings that are available on nearly all cameras and are extremely easy to use.

photo of a boys at a park with toys in the background taken on auto; same photo taken on portrait with blurry background

Auto settings are generally found on a dial on a dSLR or on a menu on most other digital cameras.

diagram showing settings on a camera
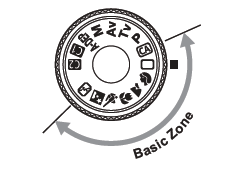
The icons you see in the basic zone of this dial represent the auto settings. The open rectangle represent full auto, while the lady’s face just below represents the auto portrait setting. (Other auto settings incude macro, sports, landscape, etc.) When you use one of these auto settings you’re telling your camera to choose aperture and shutter speed based on the type of photo you’re taking. The camera does all the hard work and you get a better photo. When you choose portrait setting you’re telling the camera you want your subject in focus and the background blurred. It can make a huge difference in the look of your photos when used correctly.

photo of a boy and girl at a drinking fountain the; same photo with blurry background

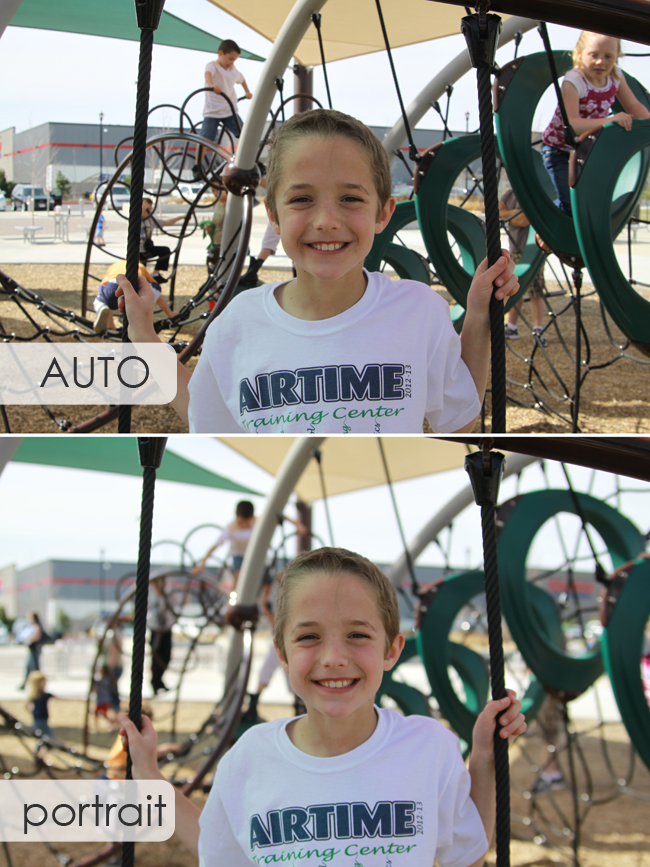
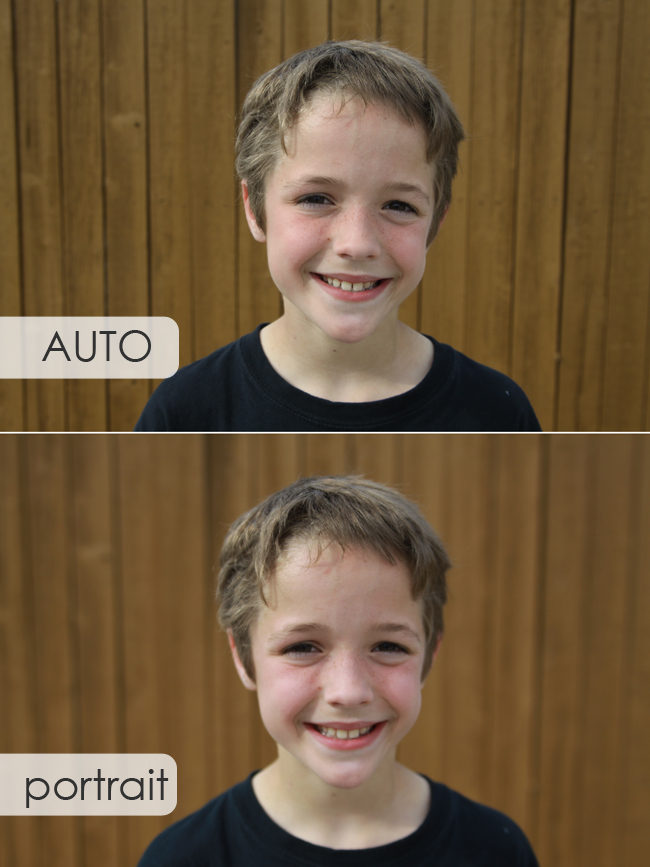
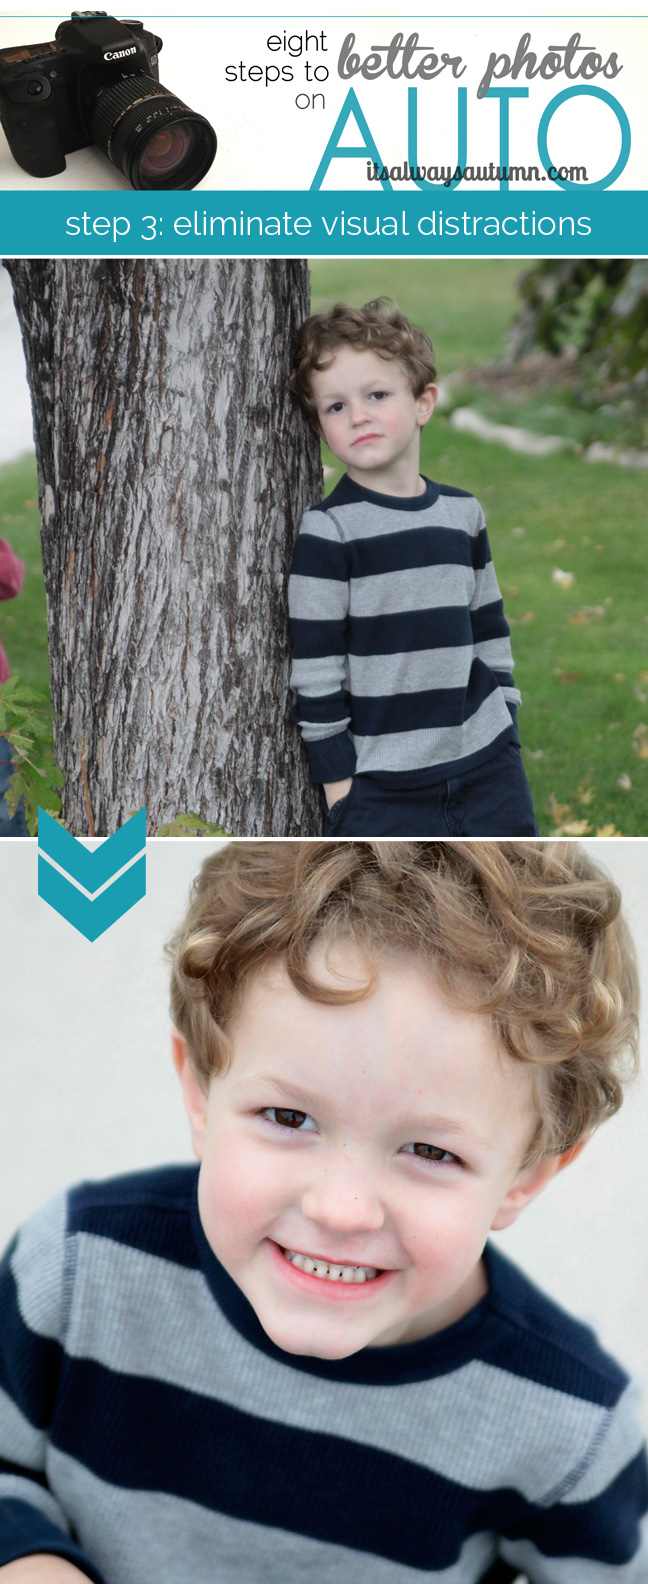
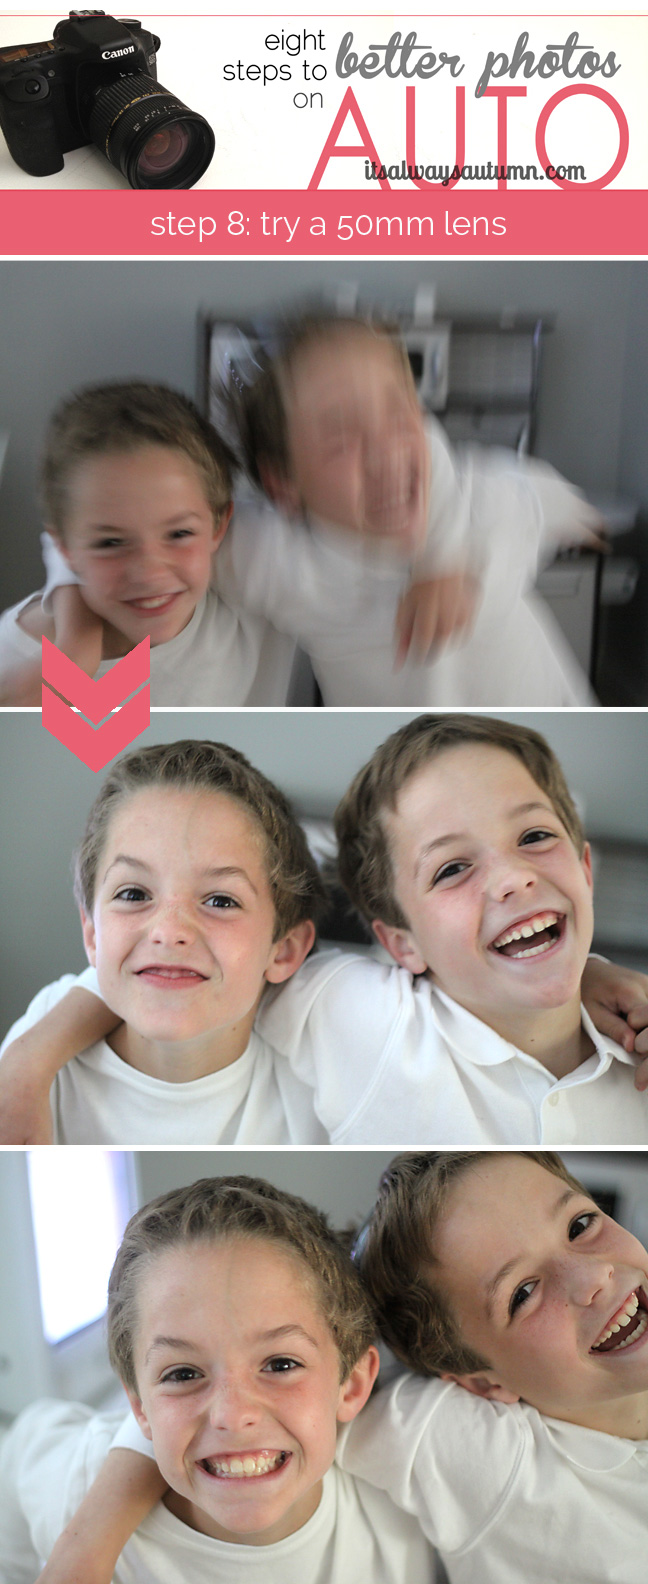
See how the other children in the background of the photo below become completely indistinct in the version taken on portrait setting?

photo of a boy at a park with toys in the background taken on auto; same photo taken on portrait mode with blurry background

The amount of blur you’ll get in the background of your photo when using the portrait setting depends on three factors: your lens capabilities, how far your subject is from the background, and how far you have zoomed in. The lens I used to shoot the photos in this post has a bit better aperture capabilities than most kit lenses (the lens that came with your camera), so when you shoot on portrait mode the blurring may not be as pronounced. But don’t worry – even with a kit lens you can manipulate the two other factors to get some blur.

A young boy standing right in front of a fence; looks the same taken on auto or portrait mode

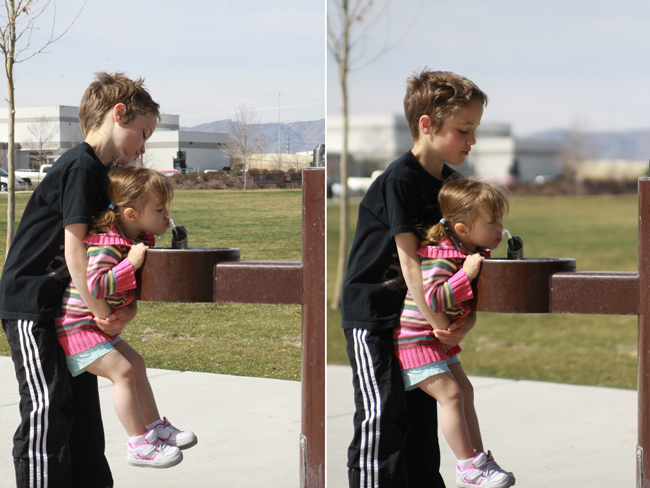
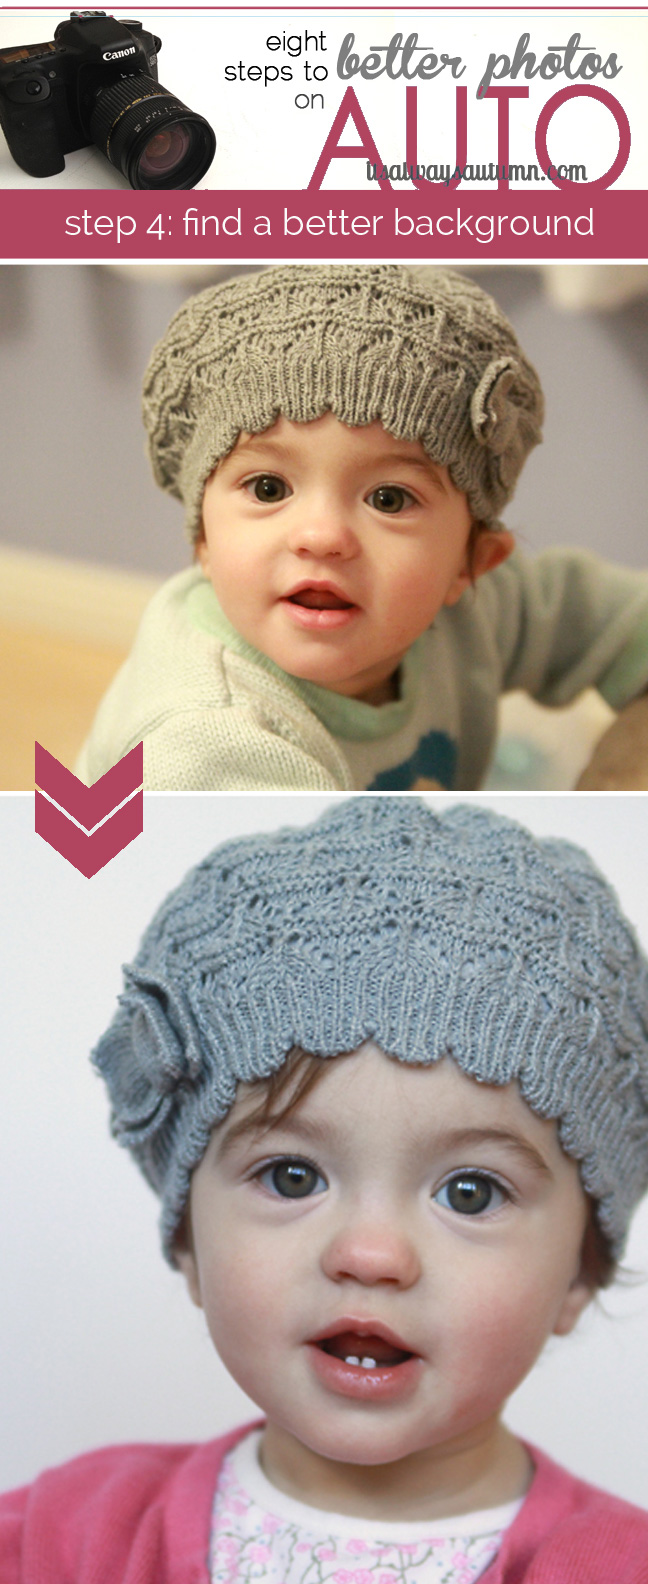
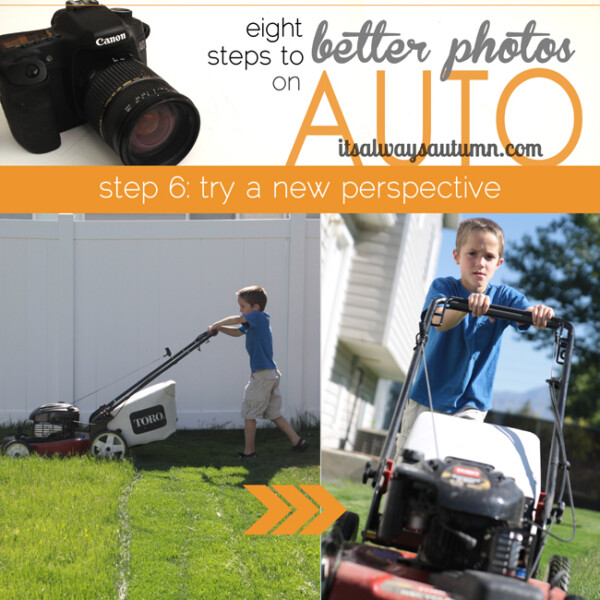
In the photos above you’ll see that there’s not much difference between the auto photo and the portrait photo. This is because the boy is standing right in front of the fence, or background, in the photo. The more space you can put between your subject and what’s behind him acting as the background the better. If you want more blur, ask your subject to walk toward you, further away from the background. See what happens when the boy walks just five feet away from the fence:

A young boy who is a few feet in front of a fence; background is more blurred on portrait mode than auto

The difference between the auto and the portrait photo is suddenly much more pronounced. Our instinct when taking photos is to find a pretty bush or cool fence and have the subject stand right in front of it – but if you want any background blur you need to have your subject walk 5-10 feet away from the background (the further away, the more pronounced the blur).

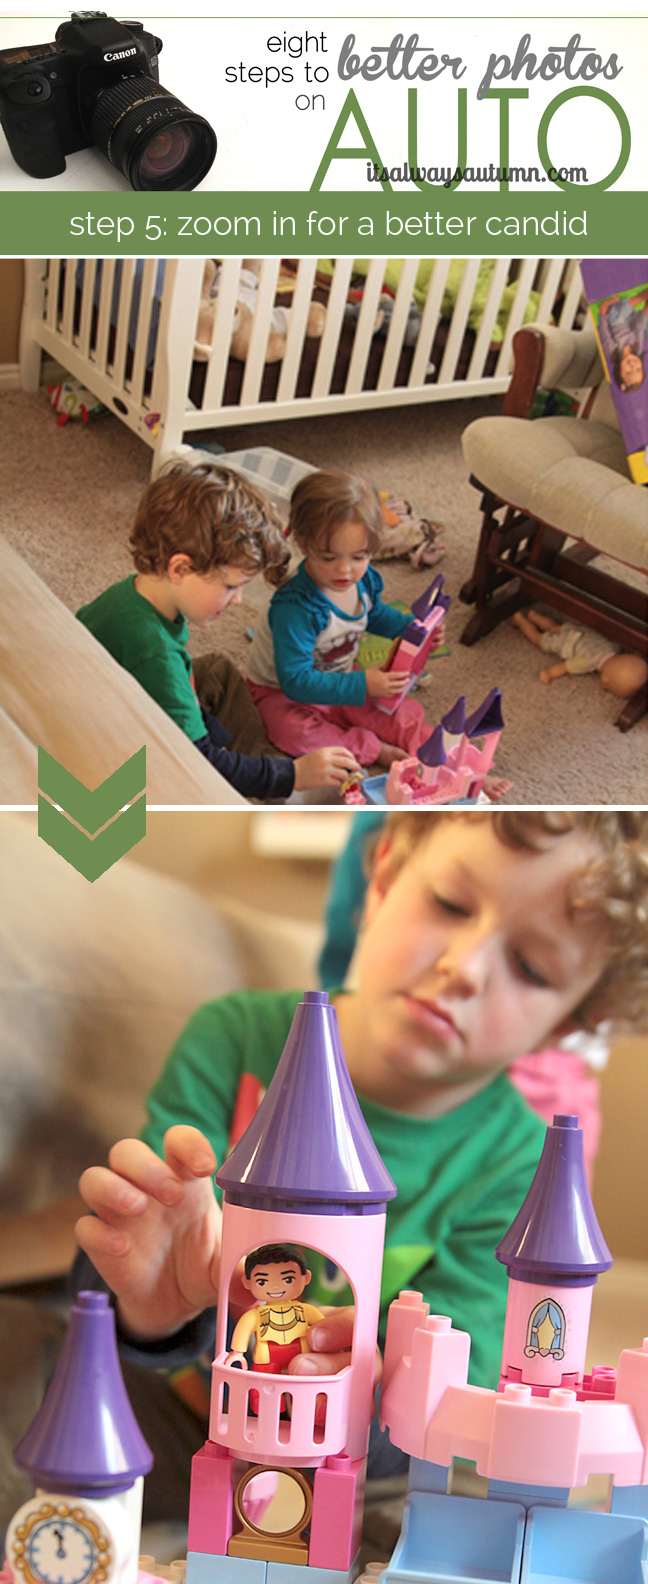
The other thing that will help blur the background is to zoom in with your camera (this post has lots of example photos and explanations). Look at these photos:

boy standing far in front of a fence; background is in focus when taken on auto, more blurry when taken on portrait; very blurry when zoomed in on portrait mode

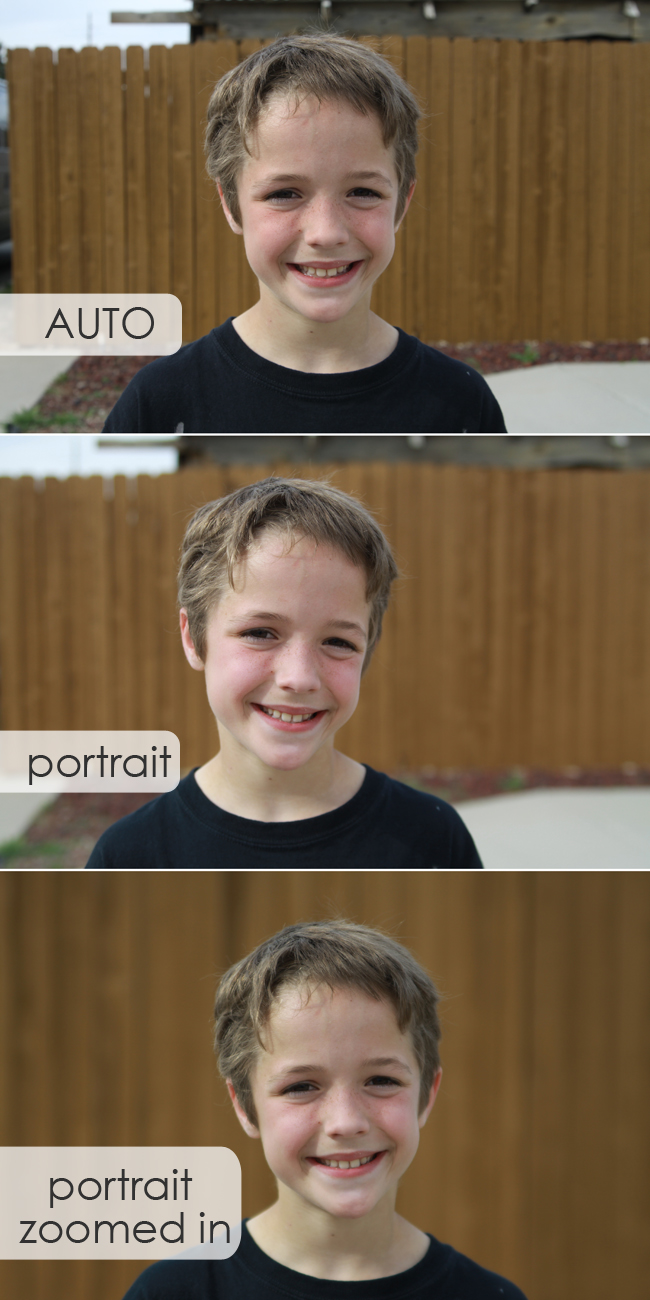
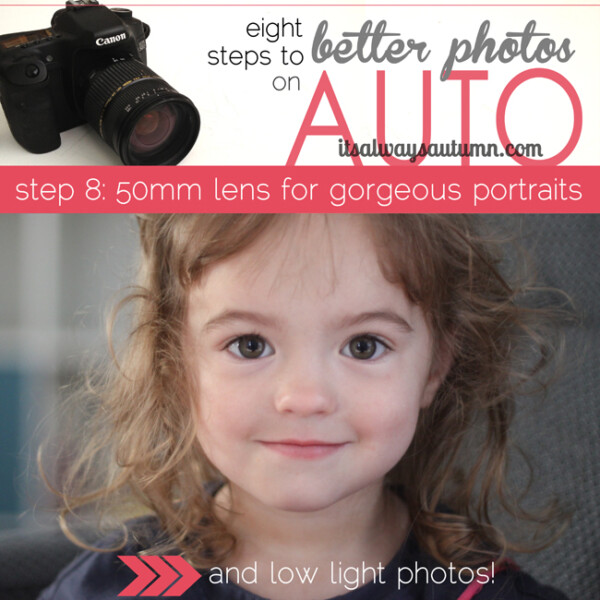
Now the boy is standing a little further away from the fence (about 15 ft away). In the first photo on auto, the background is still pretty well in focus. When I switch to portrait setting for the second photo, the background starts to get blurry. For the third photo, I combined portrait setting with zoom (I backed up so I could zoom in as far as my lens allowed) and I ended up with almost complete blur in the background (called bokeh). I didn’t even have a zoom lens on for this photo – use a zoom for even better blur and more flattering photos (more info in this post). Extreme background blur can help you take some really lovely photos:

A person in glasses looking at the camera, with very blurry blue background bokeh

Just remember: turn to portrait setting, position your subject as far in front of the background as possible, then back up and zoom in. Have fun!


The rest of the series (click each photo to go to the post):

A photo of a baby boy with harsh shadows, then a well lit photo of same baby boy  A photo of a young boy taken outside with flat blue light, then a photo of same boy with pleasant golden side lighting  a photo of a little boy with grass, trees, cars in the background; a closeup of little boy with plain background  A photo of a little girl in a hat with various colors in the background, then photo of same little girl with plain white background

Photo of girl and boy playing with toy with furniture in the background; then closeup photo of little boy playing with toys  photo of boys shooting basketball taken from side and far away; closer up photo of boys taken from straight ahead  A close up of a boy with grass and dirt in focus in the background; close up of same boy with background blurred out  blurry photo of boys laughing; in focus photos of boys laughing

Share this:

  • Tweet
  • Print

Home » photography » beginning photography tips » 8 steps to better photos on AUTO {step 7: blur the background}


19 Comments

free email series

NO FAIL CRAFTS + RECIPES

Get my favorite EASY craft and recipe ideas straight to your inbox!

« the very best banana bread recipe
devilishly tasty chocolate oat krispie bars {homemade granola bars} »

Comments

  1. Alexandra says

    April 21, 2013 at 12:04 am

    I just had to say Thank you for your articles. Few years ago we bought a nicer camera, but between moving to another country, settling down, getting pregnant and having a child, i just have not been able to even study the manual, much less practice what i did read. Some of the things you talk about i figured intuitively, but there is still so much useful information here! Thank you so much for all the time you put into writing it and taking pictures to illustrate it. Thank you!

    Reply
  2. Tia says

    April 30, 2013 at 12:04 am

    This is so great! I’ve needed this for thousands of photos! Thanks for sharing!

    Reply
  3. Traci says

    May 1, 2013 at 12:05 am

    Thank you for the tips! I’m not a fancy photo taker and have been trying to figure out how everyone gets those pretty blurred background photos when all I know how to use is the auto setting. Thank you, thank you!!!

    Reply
  4. autumn says

    May 1, 2013 at 12:05 am

    Alexandra, Tia, and Tracy: thanks so much for your comments! It makes my day to know someone is enjoying these posts 🙂

    Reply
  5. emily says

    May 5, 2013 at 12:05 am

    wow, I have not tried portrait mode… going to have to try this out on my boys!!! I came over from Six Sisters… Hope your weekend has been great! Emily @ Nap-Time Creations

    Reply
  6. Jane says

    March 9, 2014 at 2:19 pm

    THANK YOU SO MUCH!!!!! That was such a simple explanation-just what I needed!!!!

    Reply
    • autumn says

      March 10, 2014 at 3:28 pm

      You’re welcome! Thanks for your comment – I love hearing that these posts help people out 🙂

      Reply
  7. Kim says

    April 2, 2014 at 7:29 pm

    The simplest yet most informative instructions I have found in MANY months! Thanks for a great blog 🙂

    Reply
  8. Frances says

    May 4, 2014 at 10:17 am

    I agree wholeheartedly with all the above comments ! I can’t wait to try this out tomorrow, thank you so much for sharing !

    Reply
  9. Krisitne says

    May 20, 2014 at 2:59 am

    Thank you, thank you, thank you!! I have read about using portrait mode on my Nikon, I have read about changing your aperture and still not getting the desired effect. Found your website and brilliant!!! Move the subject away from the background piece, bingo, blurred background, perfect portraits!!! Thank you!!!!

    Reply
    • autumn says

      May 22, 2014 at 3:52 pm

      You’re welcome! It’s a handy little trick, especially if you don’t have a lens with a very low aperture number. I’m glad it helped!

      Reply
  10. Rebecca says

    March 17, 2015 at 4:24 pm

    Thank you so much for a clear & concise post! I must have researched and played with my camera the way the other articles were suggesting (with no luck!) for about half an hour before I came to this post. I turned on my camera, did a few practice shots using your tips and viola! success. Thank you! I do have one question: I take my own outfit photos with a self timer & tripod. Will these tips still apply? Do you have any suggestions about how to blur our background in this kind of set up? Thanks again!

    Reply
  11. Perry James says

    November 18, 2015 at 9:43 am

    I I recently took a college course called The Fundamentsls of Digital Photogrsphy so Icould make better photos. It seemed as if we spent most
    Of our time editing photos using Photoshop rather than learning the basics of photography. Your videos were more instrucural than my college
    Course and I thank you very much

    PLJ

    b

    P

    Reply
  12. Nitin Gandhi says

    December 20, 2015 at 7:48 pm

    Within 30 mins your Eight steps guidance converted me in to little bit of professional photographer. On serious note very impressed with your blog,this can’t be more easy for amateur photographer like me.
    thanks

    Reply
  13. Gladis says

    February 27, 2016 at 1:42 pm

    hey top blog I’m a massive bingo fan from Holland

    Reply
  14. BestGiantLadder says

    April 11, 2017 at 5:35 pm

    After I originally commented I appear to have clicked the
    -Notify me when new comments are added- checkbox and from
    now on whenever a comment is added I get 4 emails with the exact same comment.
    There has to be a way you can remove me from that service?
    Cheers!

    Reply
  15. Niki says

    March 12, 2018 at 8:06 pm

    I love this Auto Series, it is saving me so much time and anxiety trying to learn Manual since I just bought a new Mirrorless Camera, I am able to remove the lens and I have the kit lens + 50mm 1.8 so this is absolutely perfect! Going to be reading your blog all night. lol

    Reply

Trackbacks

  1. Slices of Life #3 | Slices of Sarah Pie says:
    June 9, 2014 at 11:14 am

    […] tutorial from It’s Always Autumn was great for helping me work towards better pictures with my trusty old point and shoot […]

    Reply
  2. Products Blog says:
    July 29, 2017 at 4:32 pm

    Ten Steps To Better Dslr Photography

    […] ou for your articles. Few years ago we bought a nicer camera, but between moving […]

    Reply

Leave a Reply Cancel reply

Your email address will not be published. Required fields are marked *

Recipe Rating


Hey, glad you’re here!

I'm Autumn, a mom of five who loves ice cream, Masterpiece Theatre, and clothes that hide the fact that I eat so much ice cream. When I was 18 I got a job at a craft store and told everyone (regularly) how much I hated crafts. Well, things change! Read More…

Find me here

  • Facebook
  • Instagram
  • Pinterest
  • Twitter

free email series

NO FAIL CRAFTS + RECIPES

Get my favorite craft + recipe ideas straight to your inbox!

Popular Posts

101 fun activities that kids can do at home list on a colorful striped background

101 Fun + Easy Activities kids can do AT HOME

50 easy crafts and activities kids can do indoors! Perfect for cold or rainy days.

50 best indoor activities for kids: easy crafts + games

Gorgeous art projects for kids! Easy art that turns out amazing.

20 easy art projects for kids that turn out AMAZING!

Collage of different paper flowers tutorials

How to make GORGEOUS paper flowers

Various flavors of baked mini donuts made from cake mixes

How to make mini donuts! {baked cake mix donuts recipe}

Blog policy

All posts and pictures are copyrighted by Autumn Baldwin and blog content may not be reposted elsewhere. However, linking back to my content is just fine. You may use one photo as long as you link directly back to the specific post. Thank you!

Please view our Privacy Policy here.

Also, please note that this blog is a participant in the Amazon Services LLC Associates Program, an affiliate advertising program designed to provide a means for sites to earn advertising fees by advertising and linking to Amazon.com.

Copyright © 2021 · Divine theme by Restored 316192.168.1.1 router login

Copyright © 2021 · Divine Theme on Genesis Framework · WordPress · Log in

free email series

NO-FAIL CRAFTS + RECIPES

Get my favorite EASY craft + recipe ideas straight to your inbox!

x