
Hi all! Today starts a new photography series I’ve been working on which will teach you how to take better photos on AUTO. Most people think the only way to really improve their photos is to learn to shoot on manual mode, and it’s true that using manual gives you the most control over the finished photo. But what if you don’t have the time or energy to invest in learning about exposure and aperture and all the other details of manual? That’s where this series comes in. There are plenty of things you can do to greatly improve your photos even when shooting on auto, and every Friday for the next eight weeks I’ll share one of them with you. Step one | Step two | Step three | Step four | Step five | Step six | Step seven | Step eight
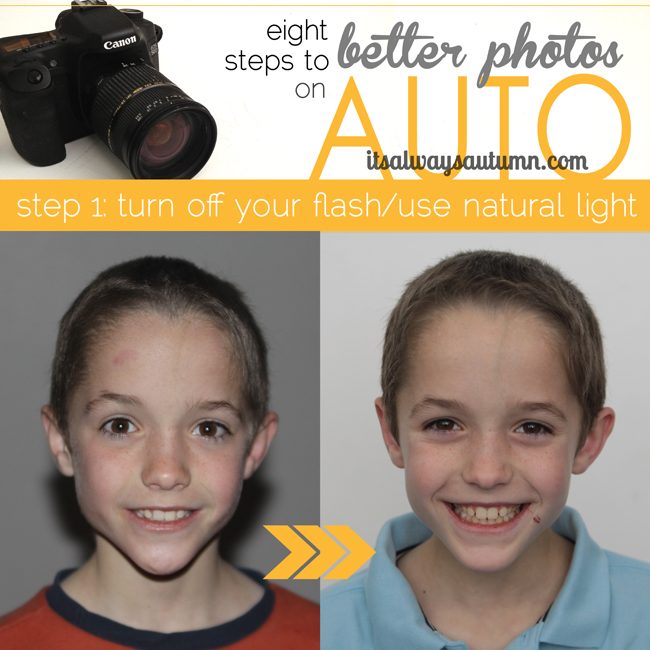
Step 1: TURN OFF YOUR FLASH & USE NATURAL LIGHT
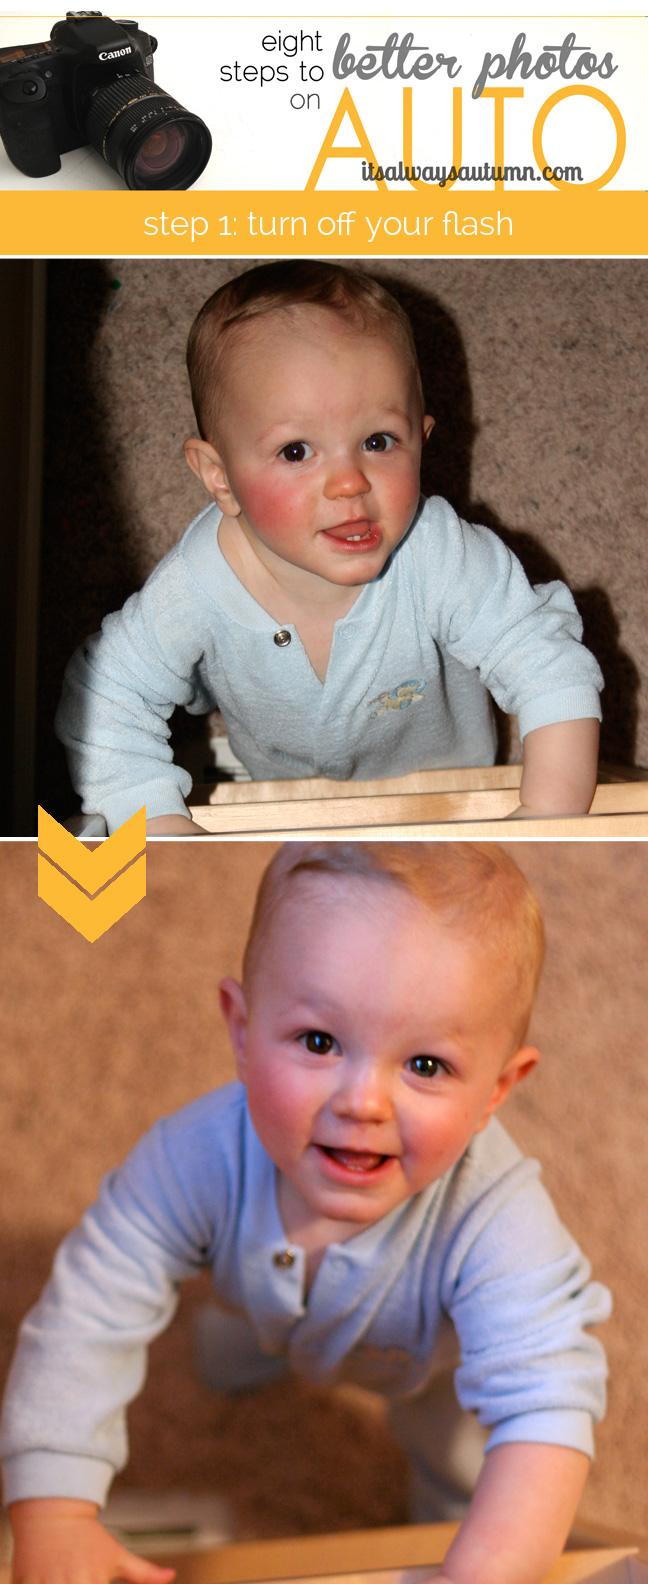
The pop-up flash on your camera almost always makes your photos look worse, especially when you’re taking photos of people. You end up with washed out skin tones, red eyes (or black eyes with an alien-like dot in the middle) and harsh shadows all around the person’s head. Look at the difference between these two photos:

Both photos were taken indoors, but the one on the left has all the problems caused by a flash while the one on the right has all the advantages of natural light (meaning light from the sun or sky) – nice skin tones, soft, natural looking shadows that define the features, and bright eyes. Turning off your flash is one of the easiest ways to dramatically improve your photos. (When I say “flash” in this post I am referring to your camera’s pop-up flash, not an external flash that can be bounced of the walls/ceiling.)
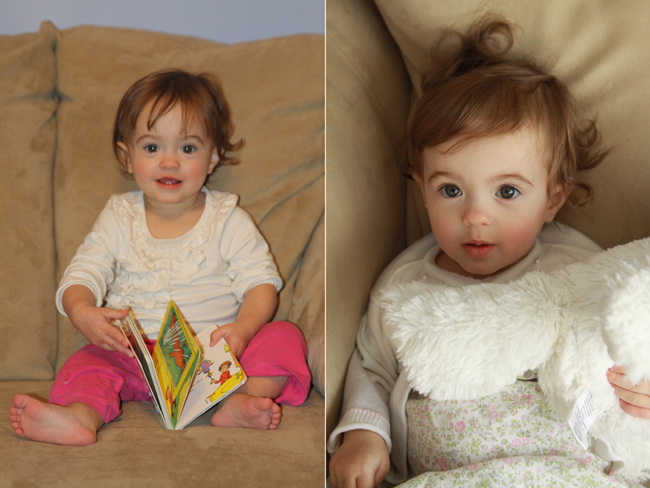
If possible, it’s best to turn off your overhead lights as well. The left photo below was taken when the overhead lights were on in the room, while the right photo was taken when there was plenty of light coming in the window so the overhead lights were off. The difference isn’t as dramatic as with the pair above, but you can see how much more natural the girl’s eyes look in the natural light photo. Her skin also has a beautiful glow in the second photo that’s missing in the first.
You’ll get the best indoor photos by positioning your subject near a large window and turning off your flash and all other lights. (See this post for more info on using window light.) But what if it’s dark outside? What if it’s Christmas morning and you really want a photo of your kids in their new robes?

Well, go ahead and snap a photo using your flash, like I did in the first photo above. Sometimes you just want to take pictures when it’s dark out, and you’ll be forced to use overhead lights and your flash in order to get your camera to focus. That’s ok, and I’ll give you a few tips for that further on in the post. But when you have the option to wait a few hours and take a quick photo outside, do that as well. Sometimes the most important part of getting a great picture isn’t how you take it, but when and where you take it.
If you want good photos, you may have to be willing to plan ahead for good lighting conditions. Is your child’s first birthday party scheduled for the evening? Hold a cake smash photo shoot in advance, during the day, so you can get great photos when the light is right. Is it a rainy day and just too dark inside to get a great shot of your child’s Halloween costume? Head out to the garage and open the garage door to let in as much light as possible and take photos in front of an impromptu blanket backdrop.
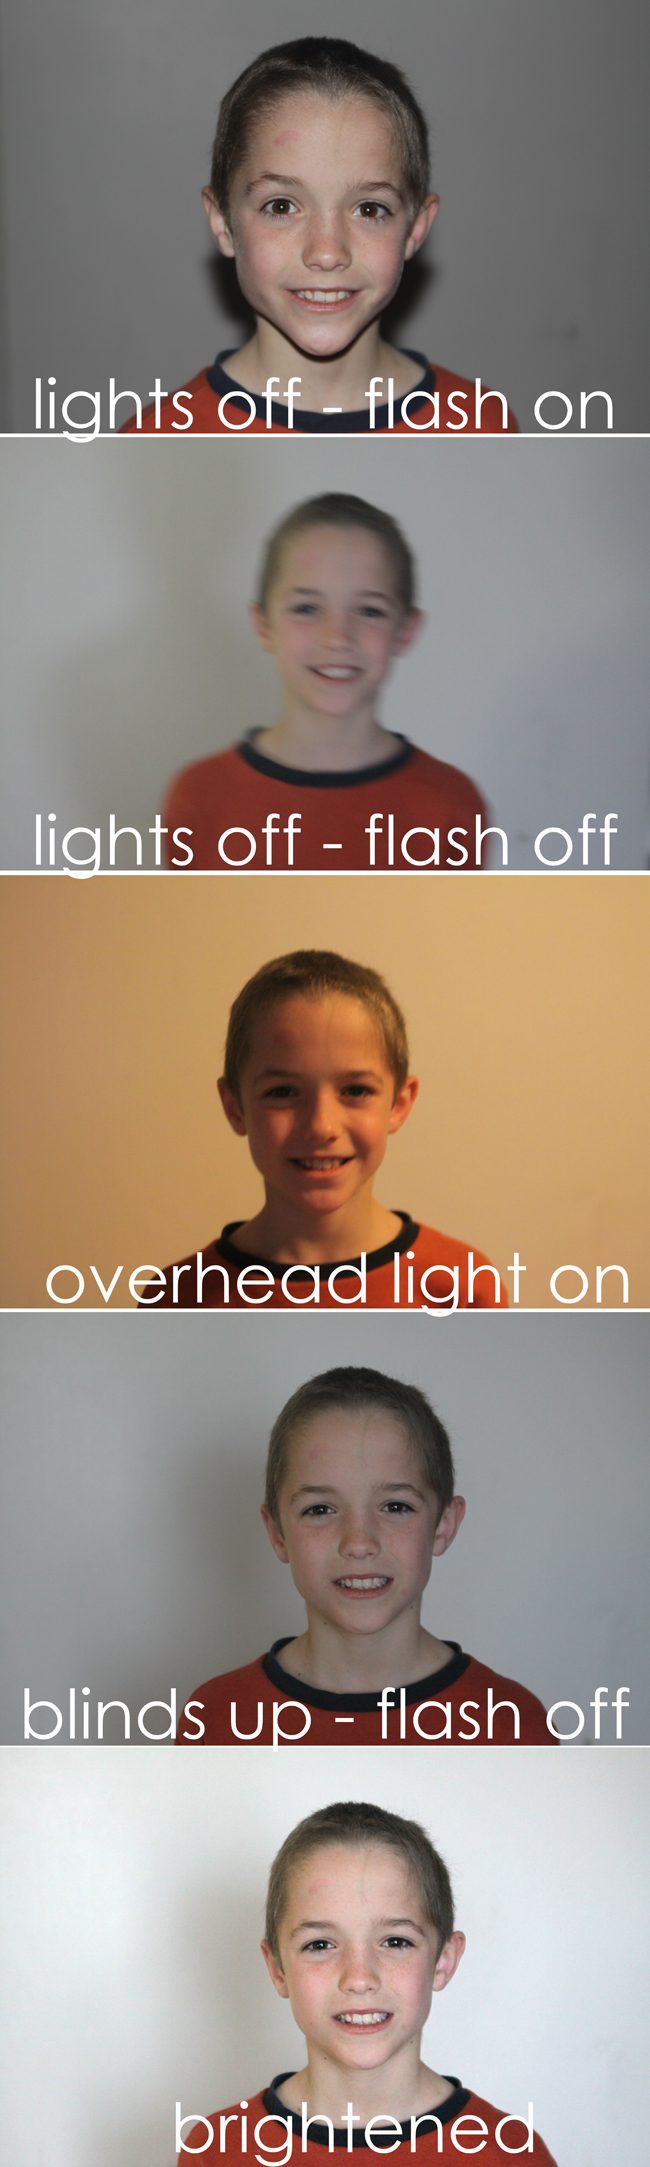 Let’s look at another set of example photos here. It was early morning and pretty dark in my downstairs family room, so when I turned on the camera and went to take a photo, the flash automatically popped up, causing a really weird shadow around his ears and cheeks.
So I turned my flash off (look for a setting that shows a lightning bolt with a line across it or check your manual to figure out how to turn off your flash). With the flash off the camera had a hard time focusing, and once it did I ended up with a very out of focus photo. That’s because it was so dark in the room that the shutter had to stay open a long time in order to get a photo.
For my third photo I left my flash off and turned the overhead lights on. This photo is even worse – it’s way too yellow and since all the light is coming from one light fixture half of his face is dark while bits of it are light. No good.
For the fourth photo I turned the overhead light back off and opening all the blinds in the room – something I don’t normally do early in the morning. Suddenly I have a much nicer photo. If you’re trying to take an indoor picture and your flash pops up, look around and see if there’s any way you can get more light in the room – open the blinds or even open the front door to get more light in.
With a little brightening (see this post) my fourth photo gets even better. Compare the top photo to the bottom one – all I had to do was open the blinds and turn off my flash to get a much improved picture.
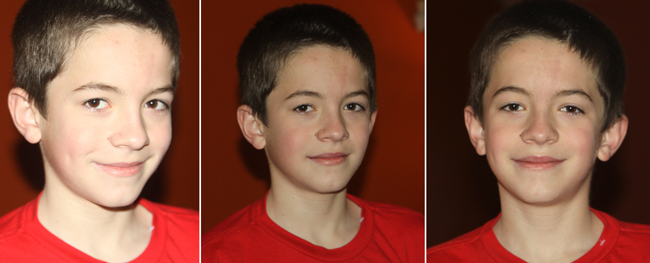
Here’s another example of the same process – the first photo was the first one I took when I walked into the room. Remember – if it’s during the day and your flash comes up, find a way to get more light in the room. For the third photo in this series I opened the blinds AND turned on the overhead light – the addition of natural light helped combat the problems you’d normally get with overhead lights alone.
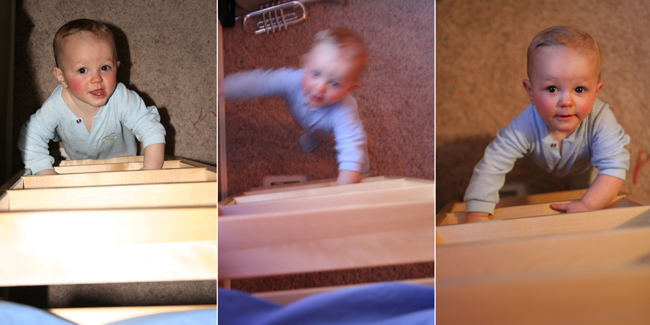
Now, if you really want to take a photo when there’s no natural light to be had, there are a few things you can do to improve your photo even if you are using a flash. First, don’t stand too close to your subject or the flash will completely wash out his face, as you can see in the first photo below. Take a few steps back and his skin tone will look a little better (photo #2 below). If you can move your subject so he’s not right in front of a wall the shadows behind his head will be less obvious because they’ll just blend into the general darkness in the room (photo #3 below).
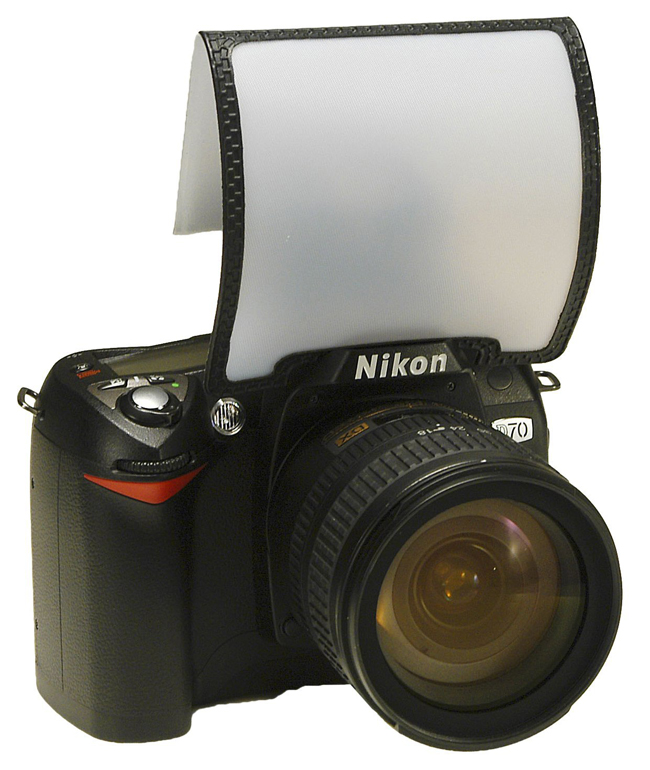
For even better results, you can diffuse your flash. You can purchase inexpensive pop-up flash diffusers for your dSLR, like this one available on amazon for under $10:
These diffusers help send the flash in more than one direction, softening both the washed out skin and harsh shadows. An even cheaper option is to hold a sheet of white paper in front of your flash while you’re taking the photo. I like the effect you can get with that if you can do some post processing. Look at these examples:
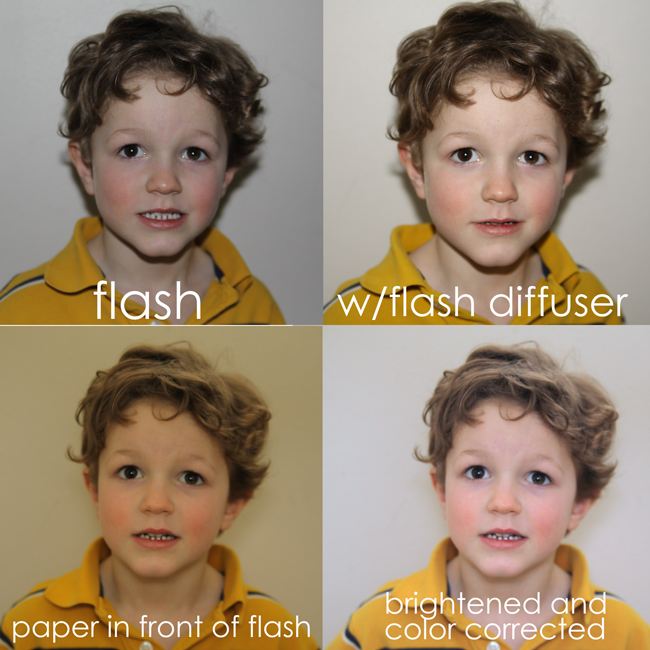
The two photos on top show the difference a flash diffuser can make – it’s not huge, but it’s still an improvement. The photos on the bottom were taken in the same conditions with the flash firing, but I held a plain sheet of white printer paper in front of the flash – it almost completely eliminated any shadows behind my subject’s head and gave his skin a much more natural look, but the photo required both brightening and color correction (both of which are extremely easy to do in just about any photo processing application). When you really want a great photo and it has to be taken with a flash, this is the way I’d go.
So that’s the end of Step 1: TURN OFF YOUR FLASH AND USE NATURAL LIGHT. I’ll be back next week with more info in lighting, then we’ll move onto other fun stuff like backgrounds, posing, etc. If you liked this post, be sure to follow It’s Always Autumn so you don’t miss the rest of the series. Thanks!
The rest of the series (click each photo to be taken to the post):


Linda says
Great lesson, I will definitely try these tips on my grandson next week,
For our photo shoot, we will be outside though.
Tiffany says
When I bought one of my lenses it came with a translucent white cap on the one end of it. I actually use that over my pop up flash as a diffuser and it works beautifully!
autumn says
nice tip – thanks!
Alison says
I discovered you posts on Pinterest and have been soaking up everything you have to say. One thing that I wondered if you knew how to do was to turn off the flash and also shoot in portrait mode. I use a Canon Digital Rebel XTI and it looks like I can only do one or the other. Thanks for any help.
Amanda Binello says
Ias there geberal setting you can keep on your camara. I have an old Canon EOS4D
dana j says
Great article ! Diy diffuser: section of a milk carton cut out. Fiund it it works great!