
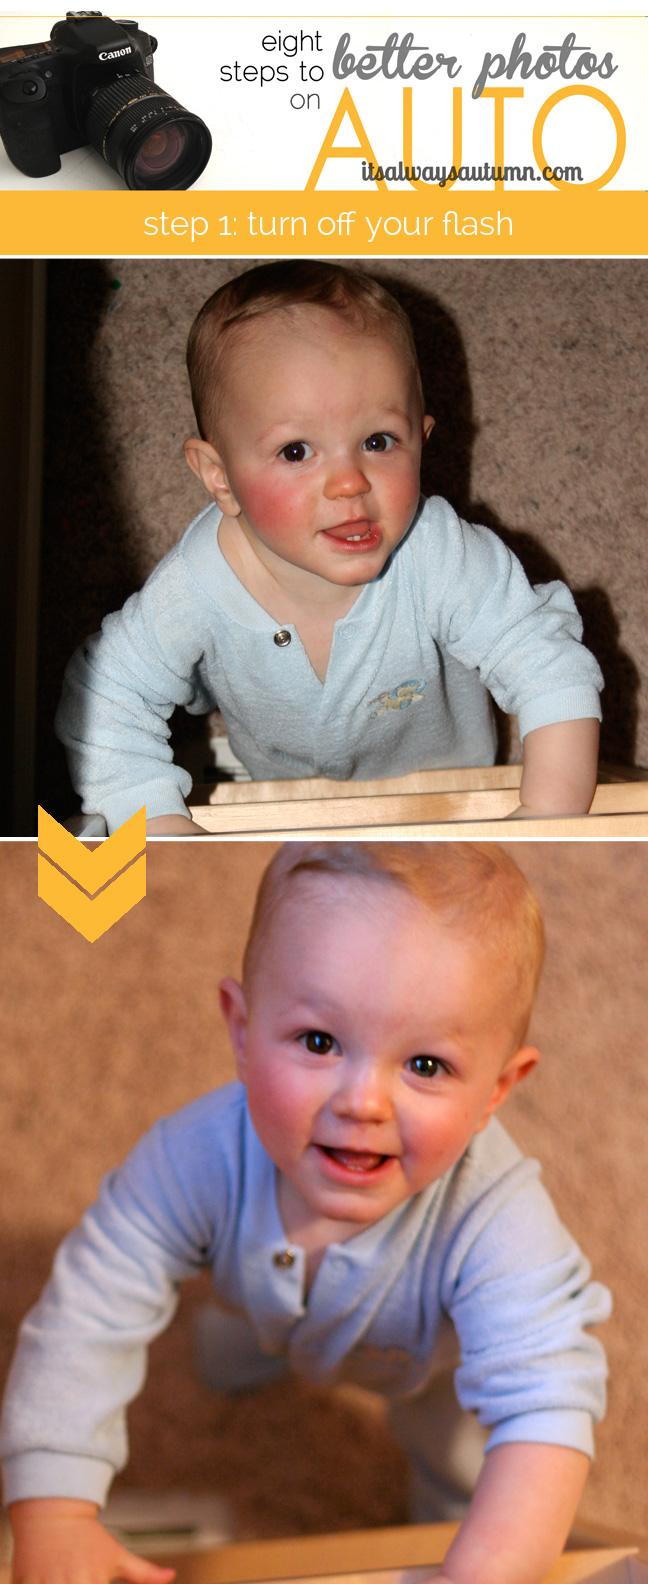
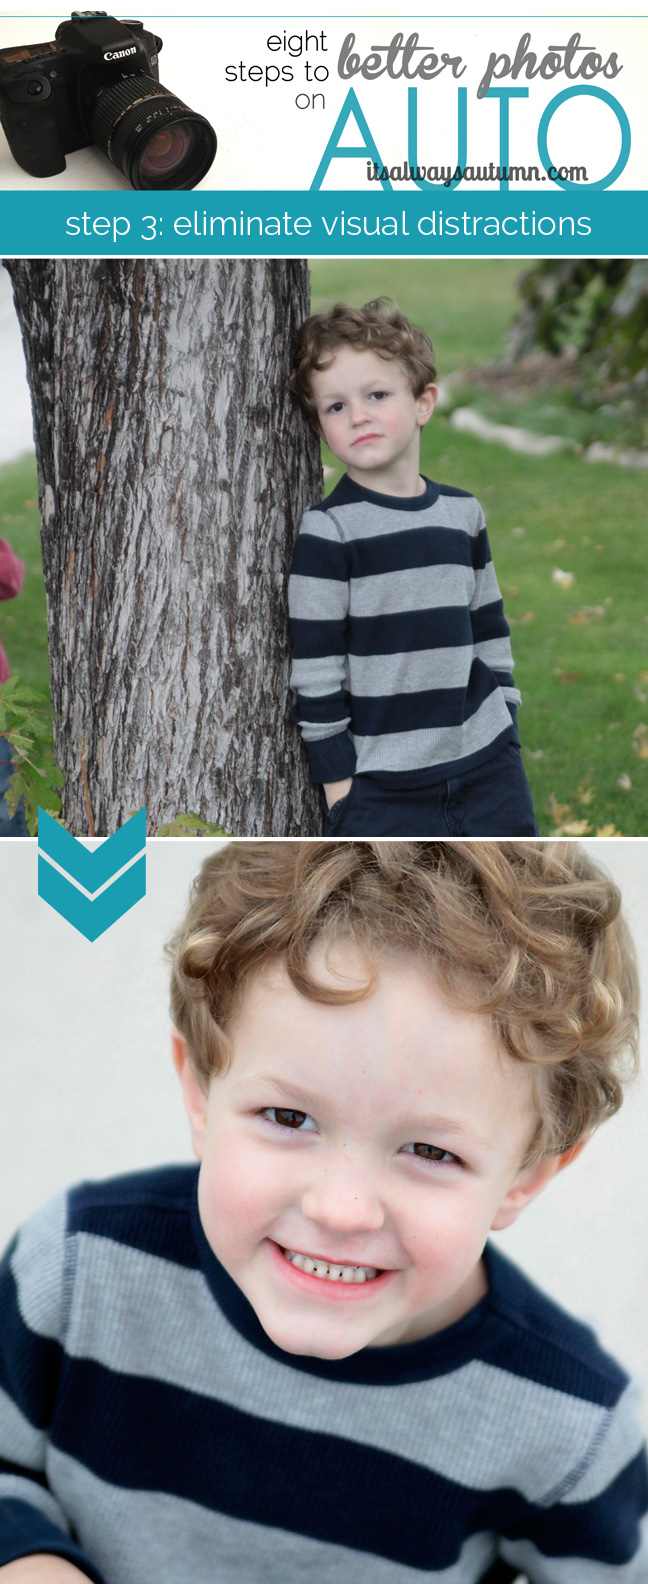
This is the final installment of Eight Steps to Better Photos on AUTO. Most people think the only way to really improve their photos is to learn to shoot on manual mode, and it’s true that using manual gives you the most control over the finished photo. But what if you don’t have the time or energy to invest in learning about exposure and aperture and all the other details of manual? That’s where this series comes in. There are plenty of things you can do to greatly improve your photos even when shooting on auto, and every Friday for the next eight weeks I’ll share one of them with you. Step one | Step two | Step three | Step four | Step five | Step six | Step seven | Step eight
People want to take better photos, which often leads to buying a better camera and other equipment. Generally, I think improving your understanding of things like lighting and learning to use whatever camera you have will go further toward getting good pictures than any amount of expensive equipment. However, there are a few exceptions, and if you have a dSLR, a 50mm 1.8 lens is one of them. It’s a pretty neat little lens, and it’s not super expensive. Even on auto, it will make a difference in your photos, especially if you want to take portraits with extreme background blur (bokeh) or you want to be able to take photos inside without using your flash (and if you’ve read step 1 you know you never want to use your flash). To see how much difference using a 50mm lens as opposed to your kit lens (the one that came with your camera) I took photos in a number of different lighting conditions with both lenses so we could all compare. Keep reading for more explanation of what makes the 50mm lens a worthwhile investment and comparison photos.
First off, here are some links (affiliate) so you know what lens I’m talking about: if your dSLR is a Canon, you’d want the Canon 50mm 1.8 lens![]() and if you shoot Nikon, the Nikon 50mm 1.8 lens
and if you shoot Nikon, the Nikon 50mm 1.8 lens![]() . They range between $100-$125, sometimes getting cheaper around the holidays.
. They range between $100-$125, sometimes getting cheaper around the holidays.
Ok, so what does 50mm 1.8 mean? Well, 50mm is the focal length. Your kit lens is probably in the 18-75 range, which just means it can zoom in and zoom out a normal amount. The 50mm lens doesn’t zoom at all – if you want your photo to be closer or further away you have to move your feet, which can help you pay a little more attention to your perspective. The more important number is the 1.8. That means that the aperture, or hole in your lens that lets light in, can open very wide. This is important for two reason: 1) a wide aperture creates extreme background blur, and 2) a wide aperture allows you to take photos in low light conditions. Look at these example photos:
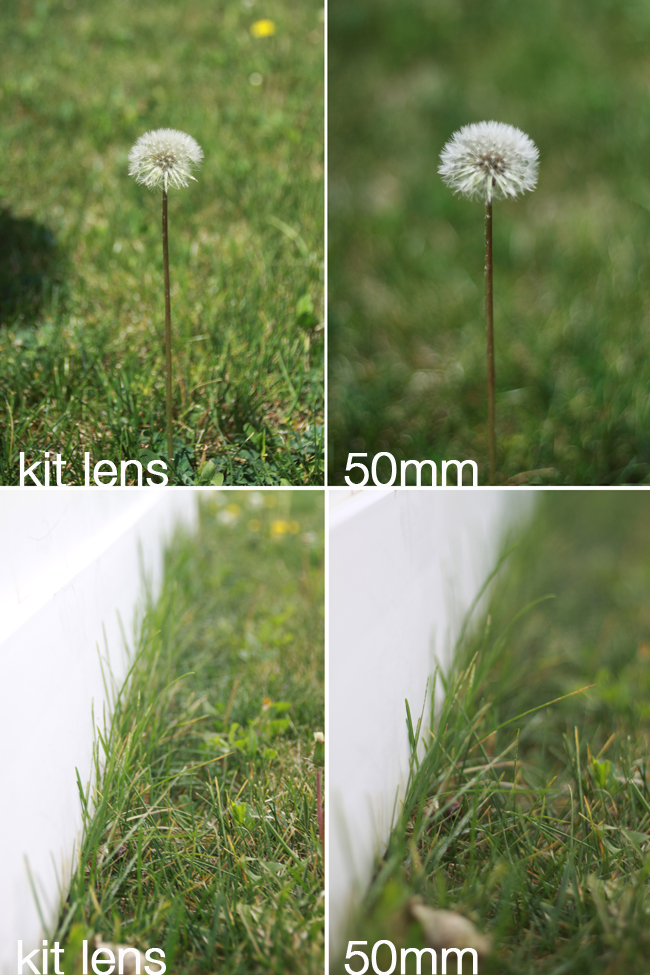
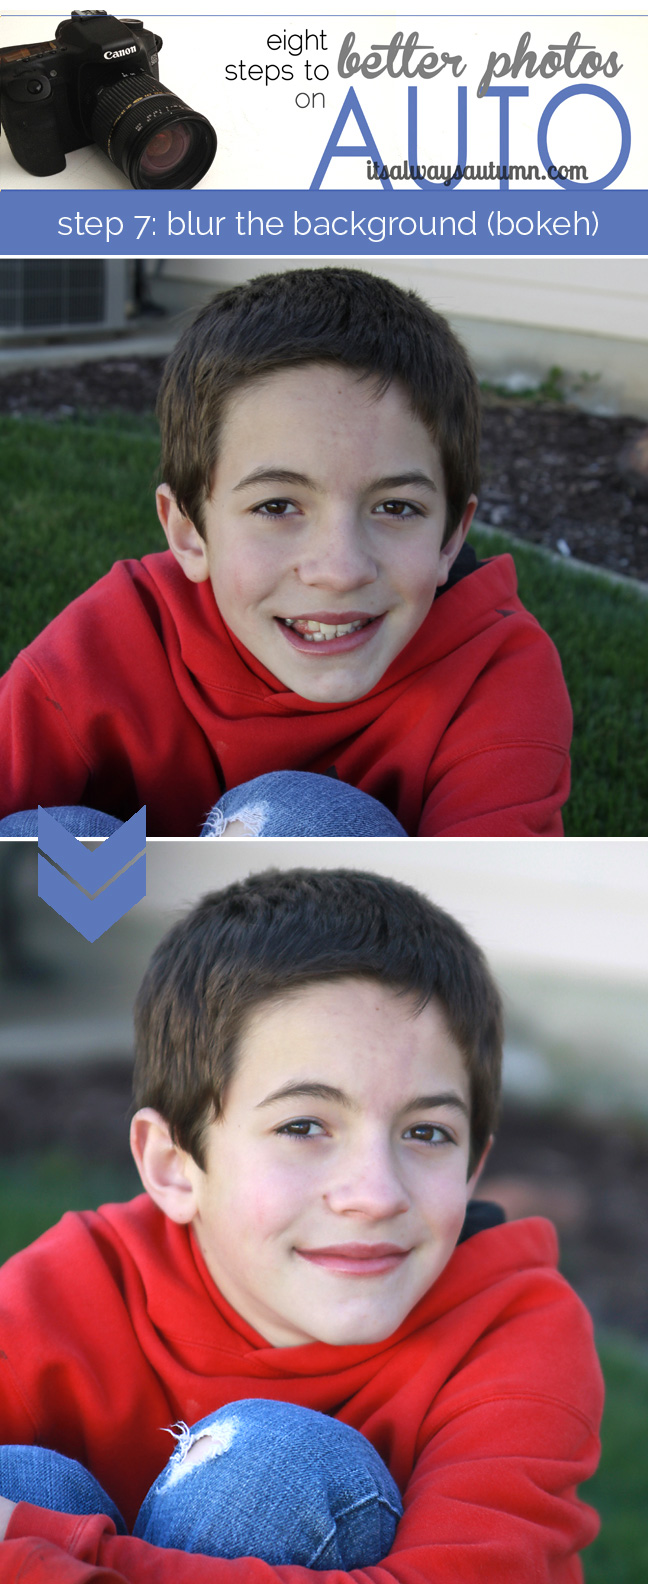
Background blur, or bokeh, is just plain cool. It helps the subject of your photo stand out, and I shared tips for getting that look on auto in step 7. You can do it with your kit lens – the first photo of the dandelion has a blurred background – but you’ll get much more extreme blur with a 50mm 1.8 lens (second dandelion photo). You can even get blur in the both the foreground and the background, as you can see on the photo of the grass. It’s a really nice effect and it will help your photos look more professional. The nice thing about this lens is that (as camera equipment goes) it’s very affordable. Find the canon version on Amazon here for $89-$120 and the Nikon version here for around $95. (There’s also a 50mm 1.4 lens that is about 3 times the price – unless you’re a pro it’s not worth the extra money IMO.)
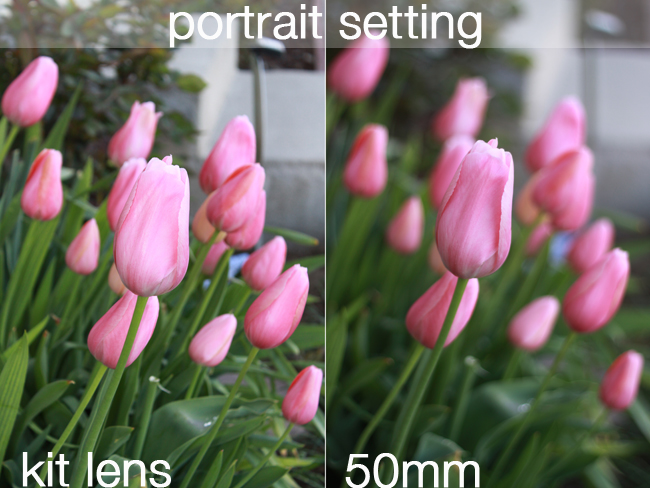
The other main advantage of a 50mm lens is that it handles lower light situations beautifully. You may notice that your flash likes to pop up ALL THE TIME when using your kit lens. If you’re inside the flash comes up. If you’re outside but in the shade, the flash comes up. I recommended using portrait setting in step 7 to get some background blur, but when I tried to do so for the following photos of tulips taken in the shade with the kit lens, the flash popped up, washing out the photo. Not so with the 50mm lens – that picture turned out much nicer:
Here’s another set I took in my kitchen. With the kit lens on the flash came up (1st photo) but I knew there was plenty of light in the room so I turned off the flash (2nd photo). Then I took one more picture with the 50mm (3rd photo). All the photos are nice, but my daughter’s skin looks so soft and creamy in the third photo – the difference is subtle, but it’s definitely there.

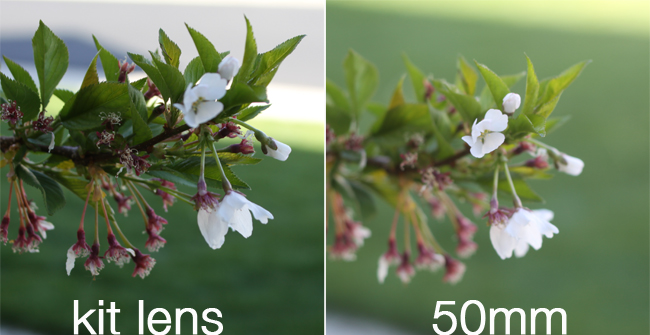
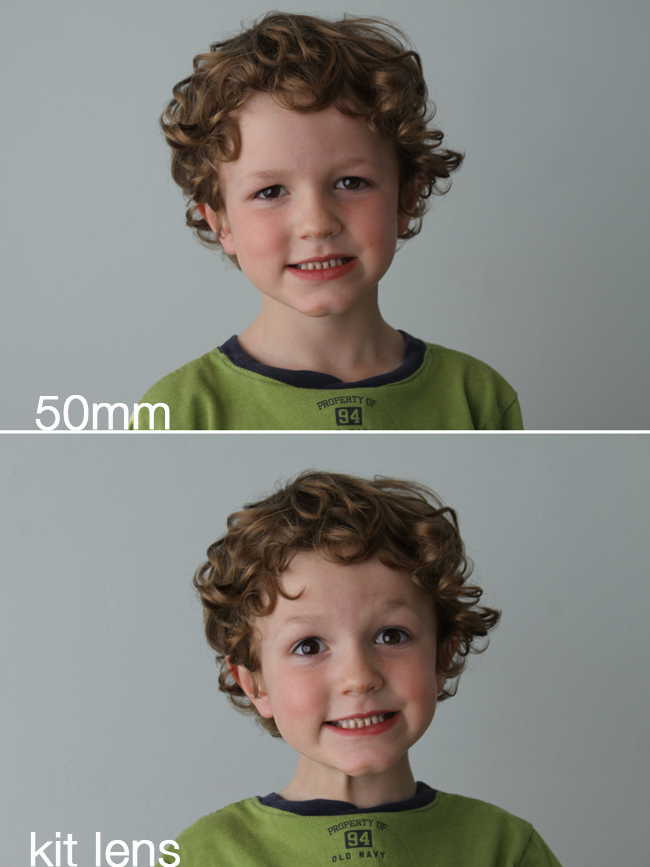
I found that often the photos I took with the 50mm lens were better exposed – the colors looked brighter and more natural than the ones taken with the kit lens:
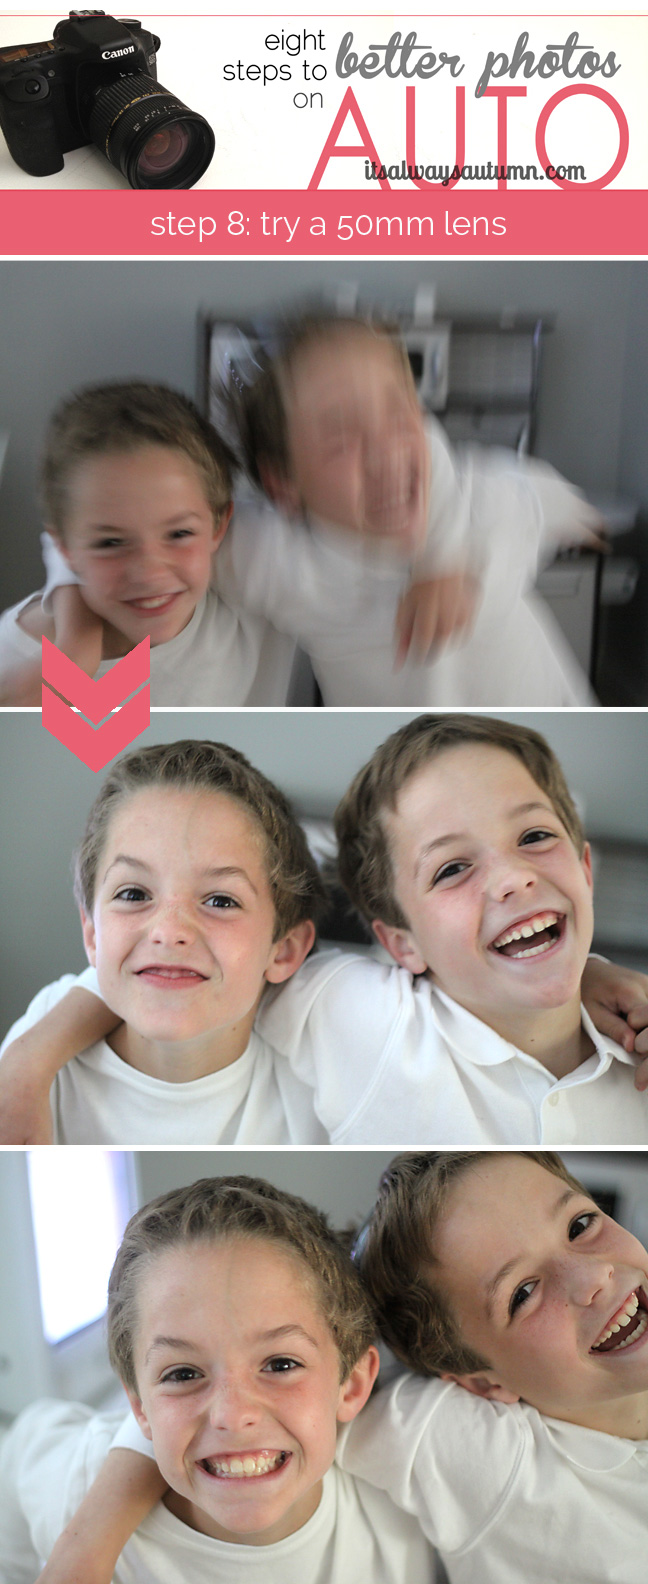
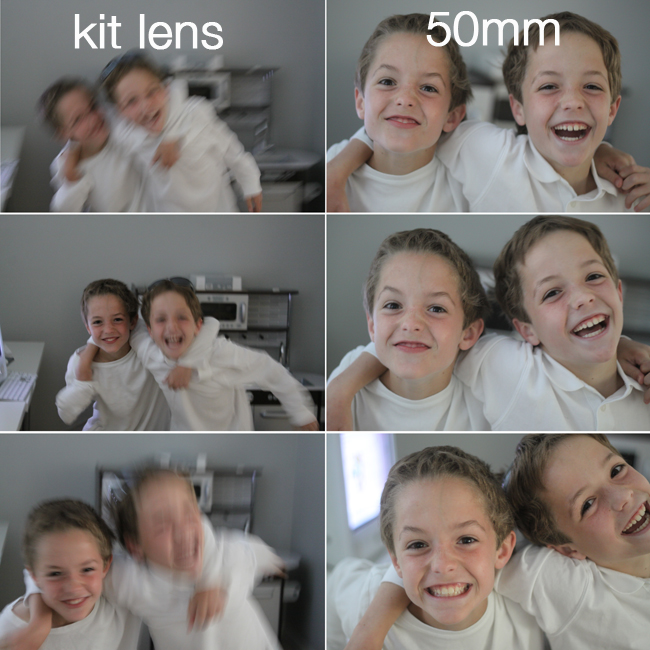
But the time the 50mm lens really shown was when I wanted to take pictures of my kids goofing off downstairs. The kit lens can’t handle low-light situations very well – you either have to use the flash (bad!) OR if you turn off the flash the shutter speed gets so slow that the photo ends up completely blurry (worse!). I had my boys walk toward me while goofing off with each other and you can see that the kit lens photos are completely blurred. I asked them to do the exact same thing again and I used the 50mm lens – the photos are so much clearer it’s really amazing.
Now, it’s obvious I like this lens. However, you should know there are some drawbacks to it:
1. It’s hard to use in small rooms since it doesn’t zoom out.
2. When you’re using it in low light, the aperture will be open very wide, which means the item you’re focused on will be in sharp focus while everything closer to you or further away from you will be blurred. That’s great when you are photographing one person, but when you are photographing groups you may end up with one person more in focus than the others:

See how the boy on the right is slightly blurry? If you know how to shoot on manual you can fix that, but when you’re shooting on AUTO you just have to take what you get. My suggestion: shoot a lot of photos.
3. Focusing can be a little tricky. For the same reason I just explained, you may take a photo with this lens thinking you’ll be focused on a person and the lens accidentally focuses on a tree branch right in front of the person’s face instead. Again, be willing to take a lot of photos and get used to the lens for the best results.
4. In a nicely lit room when you aren’t worried about background blur, your kit lens may actually be able to get just as good of results as a 50mm:
Both photos are in sharp focus with nice exposure – I don’t think I could have picked which one came from which lens if I hadn’t been keeping track. So you won’t ALWAYS see a huge improvement with the 50mm lens, especially when the lighting is just right.
Even with these drawbacks, I think the 50mm 1.8 is definitely worth the investment if you’re looking to improve your photography. It’s a FANTASTIC lens for learning to shoot on manual as well, so if you think that’s in your future you might want to get one.
That brings out Better Photos on Auto series to a close. Thank you to anyone who has followed along with all the steps – I know some of the things I’ve discussed seem basic, but they all make a huge difference in how your photos turn out.
The rest of the series (click each photo to go to the post):


Montani says
I use a Nikon 50mm 1.4 lens to take basketball photos from behind the basket. Zoom with your feet and get great shots in the low light of the gym, even with fast movement.
yasoda says
Oh my this is so great…nicely mentioned the tips…with examples. Thank you so much!
Royce Halford says
Sounds like a good idea. I have the kit lens. I will need to buy the 50mm.
jay moha says
Very helpful
Heather says
Wow Autumn, thank you so much for this post! I’m an avid Pinterest pinner who pins it for later and forgets it. In other words, it’s very hard to keep my attention! Your post did just that though. So much that I actually read all of your 8 posts on this in one sitting (minus a couple minutes here and there). Very easy to understand and very helpful! Hope to see more 🙂